OneFocus CRM
Overview
OneFocus™ is a powerful Customer Relationship Management (CRM) solution exclusive to Lead Liaison. We built it from the ground up with our partners in mind, focusing on efficiency and integration. Best of all, we made OneFocus™ available to every Lead Management Automation (LMA)™ subscriber at no additional charge.
Getting Started
To get started with OneFocus™, tell your representative that you would like to use the CRM. As long as you are subscribed to LMA™, our support team will activate it on your account with no other action needed on your part.
To verify your installation, log into the Lead Liaison app and navigate to the Home Screen. An extended Sales menu should be located directly beneath the Dashboard option. You should also see an orange asterisk symbol in the lower right of your screen – this is the CRM Sales Shortcuts. If this is not correct, please inform you representative so we can verify your activation.
Security Profiles
You can use Security Profiles to decide who can access what parts of your CRM. For example, you may work with a contractor that you'd like to give access to your prospects, but you would not like them to see your current active contracts or pending deals. To access security profiles,
- Click the Settings gear on the top right of the screen
- Navigate to Users
- Click Security Profiles
Edit existing security profiles by clicking the Edit button to the far right of the profile. Add a new profile by clicking the green New Profile button in the top left. All OneFocus™ options are listed under CRM.
Settings
To change OneFocus™ settings,
- Click the Settings gear on the top right of the screen
- Navigate to App Setup
- Click CRM
Use the switches to toggle the settings on or off. The table below explains each setting and its function.
| Setting | Function |
|---|---|
| Add reason for lost deals | Prompts user to enter a reason for a lost Deal |
| Require reason for lost deals | Requires user to enter a reason for a lost Deal |
| Apply Organization Lifecycle Stage to all Prospects currently in the Organization | Prospects currently in Organizations will inherit the Organization's Lifecycle Stage |
| Apply Organization Lifecycle Stage to future Prospects added to the Organization | Prospects added to an Organization will inherit the Organization's Lifecycle Stage |
| Update Prospect Company field with Organization name when adding a Prospect to an Organization | Company field on Prospect Profile is updated to match the name of the Organization when a Prospect is added to an Organization |
| Update Prospect Company field for all Prospects in the Organization when the Organization name is updated | Company fields on Prospect Profiles are updated to match the new name for an Organization when the Organization's name changes. |
| Add linked Prospect to "Opportunity" Lifecycle Stage when assigned to a Deal | When a Deal is added to an Organization, all linked Prospects will move to the "Opportunity" Lifecycle Stage |
| Add linked Organization to "Opportunity" Lifecycle Stage when assigned to a Deal | When a Deal is added to a Prospect, the linked Organization will move to the "Opportunity" Lifecycle Stage |
| Add linked Prospect to "Customer" Lifecycle Stage when Deals are Closed Won | When a Deal is won for an Organization, all linked Prospects will move to the "Customer" Lifecycle Stage |
| Add linked Organization to "Customer" Lifecycle Stage when Deals are Closed Won | When a Deal is won for a Prospect, the linked Organization will move to the "Customer" Lifecycle Stage |
| Add linked Prospect to this Lifecycle Stage when Deals are Closed Lost | When a Deal is lost for an Organization, all linked Prospects will move to the selected Lifecycle Stage |
| Add linked Organization to this Lifecycle Stage when Deals are Closed Lost | When a Deal is lost for a Prospect, the linked Organization will move to the selected Lifecycle Stage |
| Add linked Organization to this Org Type when a Deal is Closed Won | Move the Organization to the selected Org Type when Deal is won |
| Add linked Organization to this Org Type when a Deal is Closed Lost | Move the Organization to the selected Org Type when Deal is lost |
| Update Org Type to _____ when Lifecycle Stage is _____ | Updates the Prospect's Org Type for Visitor Tracking when their Lifecycle Stage is moved to the selected |
Pipelines
Pipelines represent the stages of the Deals in your funnel. By creating your own pipeline, you can define sales stages that are specific to your organization and sales program. You can also create multiple pipelines for different Teams. For example, you may want a general pipeline and a pipeline for public accounts or nonprofits. To manage pipelines,
- Click the Settings gear on the top right of the screen
- Navigate to App Setup
- Click CRM
- Navigate to the Pipelines tab
Here you will see all of your pipelines. You can view pipelines by name, number of stages, creator, and creation date. To create a new Pipeline,
- Click the green New button
Enter a Name and Description
Click Save to use Lead Liaison's default stages
OR
- Click Save & Create Stages to define your own stages
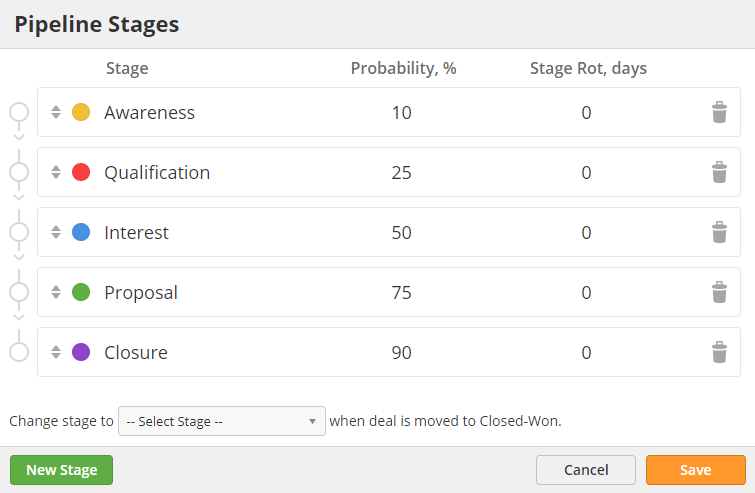
By default, we use five stages: awareness, qualification, interest, proposal, and closure. You can customize your own pipeline stages to match your organization's preferred process. You can have as few or as many stages as you need.
- Stage – change the name or color code of a stage
- Probability – the probability Deals in that stage will close
- Stage Rot – set the number of days a deal can be in a stage before it rots. Sometimes called "stalled" or "dead".
- Trash – delete stage
- New Stage – add a new stage to the pipeline
- Change Stage to – automatically move a Deal to a specific stage when Closed-Won
Probability will affect the total value of Deals in the Pipeline. For example, a $1000 Deal with 10% probability will report $100 in value. See the Pipelines page for more details.
When setting Stage Rot, be sure to take into account your longest sales cycle. A Deal should only be flagged with Stage Rot when it has passed the point that most Deals fall through.
Now that you have created Pipelines, you can edit and delete them from the Pipelines menu. Simply mouse over the the far right of the Pipeline you wish to edit or delete, and an Edit and Trash icon will appear. You can also use the drop down menu to set a pipeline as the default.
Learn more about Pipelines here.
Object Layouts
Object Layouts control what information is displayed on an Object's detail page. Objects include Prospects, Organizations, and Deals. To create an Object Layout,
- Navigate to an Object Profile
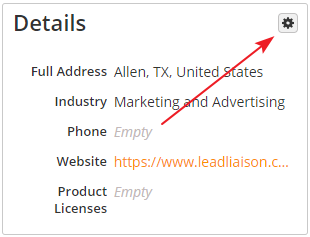
- Locate the Details Card on the left of the screen
- Click the gear in the top-right corner of the Details Card
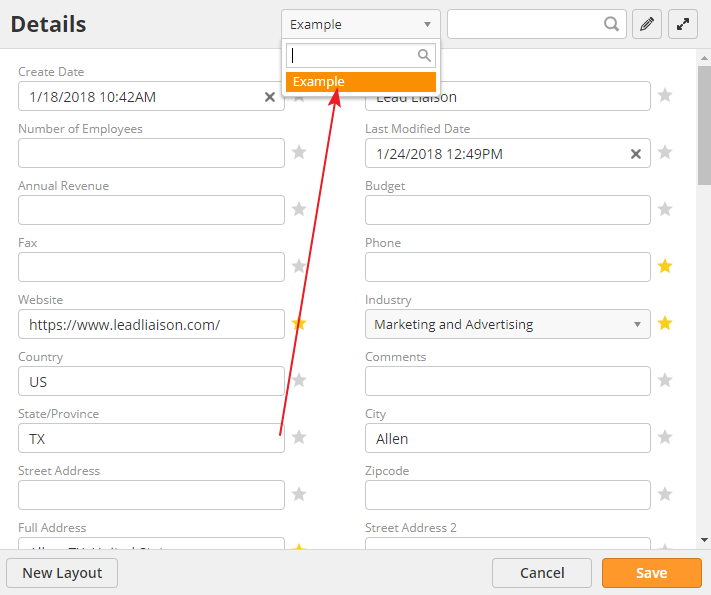
- Click New Layout
- Give the layout a name in the Layout Name field
- Click and drag to rearrange fields
Once you have created the layout, you can switch between them using the drop-down menu in the top-left corner of the Details page.
Default view
Administrators have the option of switching back to the Lead Liaison default view, but other users do not. Once they are assigned a layout, they will only see that layout and other layouts assigned to them. You can use layouts like this to hide important system from users who do not need to access them.
.
To edit a layout, you can click on the pencil icon in the top-right corner of the Details page.
Sections
You can create sections to organize your fields. For example, the default layout includes sections for Personal Information, Privacy, and Other. To create a new section
- Open the Details page
- Click New Layout
OR - Click the edit icon
- Click on the (+) icon in the top-right corner of the layout editor
Assigning Layouts
When you create a layout, the layout is set to private by default. This means it will only be available to your user account. You can set the layout to Public to grant access to all users, or click Share to assign the layout to particular users.
Remember, once you share a layout with non-admin users, they will not be able to access the default layout. This includes if they create the layout themselves.
Layout Permissions
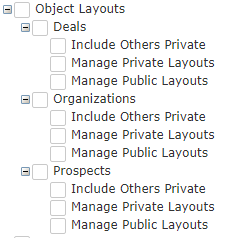
You might wish to restrict who has permission to edit or create layouts. To do so, navigate to Settings > Users > Security Profiles. Select the appropriate profile and click Edit. Locate and expand the Object Layouts section.
- Include Other's Private – view all layouts, even if marked as private (usually for admins/managers only)
- Manage Private Layouts – allow users to create and edit their own personal layouts
- Manage Public Layouts – allow users to create, edit, and share layouts
Manage Layouts
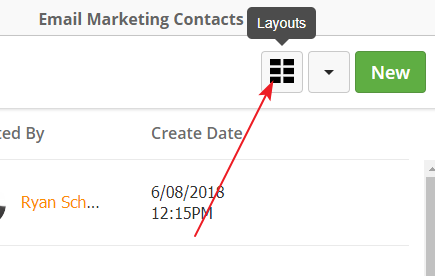
You can view all existing layouts by navigating to Settings > App Setup > Manage Fields and clicking on the tab for the appropriate object. Then, click the Layouts icon in the top-right corner of the screen. From here you can see all layouts and delete any that are no longer necessary.
Navigating
Once you have activated OneFocus™, you can access it using the Main Navigation Menu on the left and selecting Sales.
The Sales menu includes the following options:
Contracts - view all contracts currently in the systems as well as start and end dates.
Deals - view and add deals by pipeline step in real time. Sometimes known as "opportunities."
Organizations - view and add new organizations.
Prospects - view and add new prospects. Sometimes known as "leads" or "contacts."
Sales Emails - view record of sales emails sent over a specified time period.
Import - Import Prosects, Organizations, and Deals.
Note: if you only see the Sales Emails option, the CRM is not running. Make sure you have an LMA™ subscriptions and request your Client Success Manager to activate OneFocus™ on your account. If you still don't see the additional options, please visit support.leadliaison.com, or contact your representative.
Using the Sales Shortcuts
We've created Sales Shortcuts that are accessible from every screen. To access the Sales Shortcuts, mouse over the orange asterisk symbol in the bottom-right corner of the screen.
We organized the Sales Shortcuts with the most-used options near the mouse-over menu (bottom). From bottom to top, the options are
New Note – add a Note in the system for a Prospect, Organization, and/or Deal
New Task – schedule or add a Task for a Prospect, Organization, and/or Deal
New Prospect – manually add a new Prospect that you can tie to an Organization
New Organization – add a new Organization
New Deal – add a new deal to the Pipeline
New Contract – add a new contract for a Prospect, Organization, and/or Deal
New Email – create a new email (Sales Enablement only)
To learn more about adding new objects and detailed instructions for doing so, visit the individual pages linked in the section below.
Using OneFocus™
Prospects
OneFocus™ CRM changes the way Lead Liaison™ displays Prospect Profiles. From the CRM-version of the Prospect Profiles screen, you can view any Organizations, Attachments, Activities, Deals, and Contracts associated with the Prospect. You can also still see contact information, automatons, and lists shown in the non-CRM version.
Main Article: Prospects in OneFocus™
Organizations
OneFocus™ adds an Organization Profile to the Lead Liaison platform. You can view any Prospects, Attachments, Activities, Deals, and Contracts associated with the Organization. You can also add Notes, Tasks, and new Attachments.
Main Article: Organizations in OneFocus™
Deals
Deals are the sales opportunities within a Pipeline. Users can create a deal as soon as they can enter a value for the sale. You can associate deals with Prospects and Organizations, and keep up to date on tasks from the Manage Deals page.
Main Article: Deals in OneFocus™
Contracts
The Contracts page shows all of the Contracts you've put into the system. From this page, you can add a new Contract, edit and existing Contract, or delete a Contract.
Main Article: Contracts in OneFocus™
Notes
Notes are an excellent way to keep track of your interaction with Prospects. For example, you may wish to note that a Prospect prefers a certain kind of food, or that an Organization's decision-making process follows a particular flow.
You can associate notes with Prospects, Organizations, and Deals. Add new notes by using the New Note button in the Sales Shortcuts, or by using the Task Panel on a profile page.
The three drop-down menus at the top of the New Note form allow you to search for the Prospect, Organization, or Deal you want to associate the note with. Use the text editor to format your Note. The Note will appear in the Timeline on their profile page.
Tasks
Tasks represent the activities you perform while working with a Prospect, Organization, or Deal. Your organization may track the number and type of tasks you complete per week, so make sure you review with your sales manager.
Like Notes, you can associate a Task with Prospects, Organizations, and Deals. Add new Tasks by using the New Tasks button in the Quick Menu, or by using the Task Panel on a profile page.
The three drop-down menus at the top of the New Note form allow you to search for the Prospect, Organization, or Deal you want to associate the note with. Use the Task menu to select what type of Task you would like to add. You can use the text editor to provide more details for the task.
You can schedule the Task for the future and press the Save button. If you're adding a Task you already completed, you can use the Complete button instead. The Task will appear in the Prospect, Organization, or Deal's Timeline.
To complete or edit a scheduled Task, navigate to the Prospect, Organization, or Deal's profile page and click on the Task in the Timeline. The Task editor will reappear, and you adjust any fields and click Save or Complete.
Related content
© 2021 Lead Liaison, LLC. All rights reserved.
13101 Preston Road Ste 110 – 159 Dallas, TX 75240 | T 888.895.3237 | F 630.566.8107 www.leadliaison.com | Privacy Policy
