Webhooks
What are Webhooks?
The concept of a Webhook is simple. A Webhook is an HTTP callback: an HTTP POST that occurs when something happens; a simple event-notification via HTTP POST. A web application implementing Webhooks will POST a message to a URL when certain things happen. When a web application enables users to register their own URLs, the users can then extend, customize, and integrate that application with their own custom extensions or even with other applications around the web. For the user, Webhooks are a way to receive valuable information when it happens, rather than continually polling for that data and receiving nothing valuable most of the time. Webhook have enormous potential and are limited only by your imagination!
At the moment, Lead Liaison can call a Webhook from a 3rd party. This capability is tightly integrated into our automation and a dedicated "Call Webhook" action is available for use. This action is explained here in more detail.
Use Cases for Webhooks
Even though the concept of Webhooks are simple, it's often times hard to figure out how they can be used to benefit your business and complement Lead Liaison. Here are a few ideas we've gathered for you.
- Create a Webhook that sends a text message to a Prospect or Customer's mobile phone.
- Create a Webhook that sends a direct mail piece (postcard) to a Prospect or Customer's address.
- Create a Webhook that sends promotional marketing material to a Prospect or Customer (following an event, as a thank you, around the Holidays).
- Create a Webhook that sends an alert to yourself.
- Create a Webhook that creates a support ticket in your support console (create a case in Zendesk or in Salesforce.com).
Many 3rd party services support Webhooks. Here are a few we're fans of:
Creating a Webhook
To create a Webhook go to Settings > App Setup > Webhooks > New
A popup will appear. Enter the required information for the Webhook. Each field is explained below:
- Webhook Name = The name of the Webhook.
- Description = Description of the Webhook.
- URL = URL of the Webhook that Lead Liaison will call. Usually provided by the 3rd party.
- Insert Field Area = Used to insert any standard/custom Lead Liaison field into the Webhook URL. Place your cursor in the area in which you'd like to insert the variable and click the "Insert Field" button.
- Request Type = The format type of the Webhook sent from Lead Liaison to the receiving service in FORM/URL, JSON or XML format.
- Template:
- POST request type:
- use request encoding type as FORM/URL and make sure the template is written in this format: param_1=val_1¶m_2=val_2
- use request encoding type as JSON and make sure the template is written in JSON format. Note, the JSON post data must be valid. To validate it before creating the template use this free tool.
- GET request type:
- append your parameters in the URL field as a query string like this: http://www.service-example.com/service?param_1=val_1¶m_2=val_2,
- alternatively, write the URL of the service in the URL field and the parameters in the template field "param_1=val_1¶m_2=val_2". Lead Liaison will append the template to the service URL.
- POST request type:
- Request Token Encoding = Encoding format when the Request Type equals Post. Can be FORM/URL or JSON.
- Response Type = The response type from the Webhook back to Lead Liaison (FORM/URL, JSON or XML).
Response Mapping
If the Webhook sends a response back to Lead Liaison don't forget to setup the Response Mapping. A Response Mapping will map the Webhook data object to a Lead Liaison field. Do get to the Response Mapping page, click the gear under the Actions column on the Manage Webhooks page and select Response Mapping.
Managing Webhooks
Incoming Webhooks
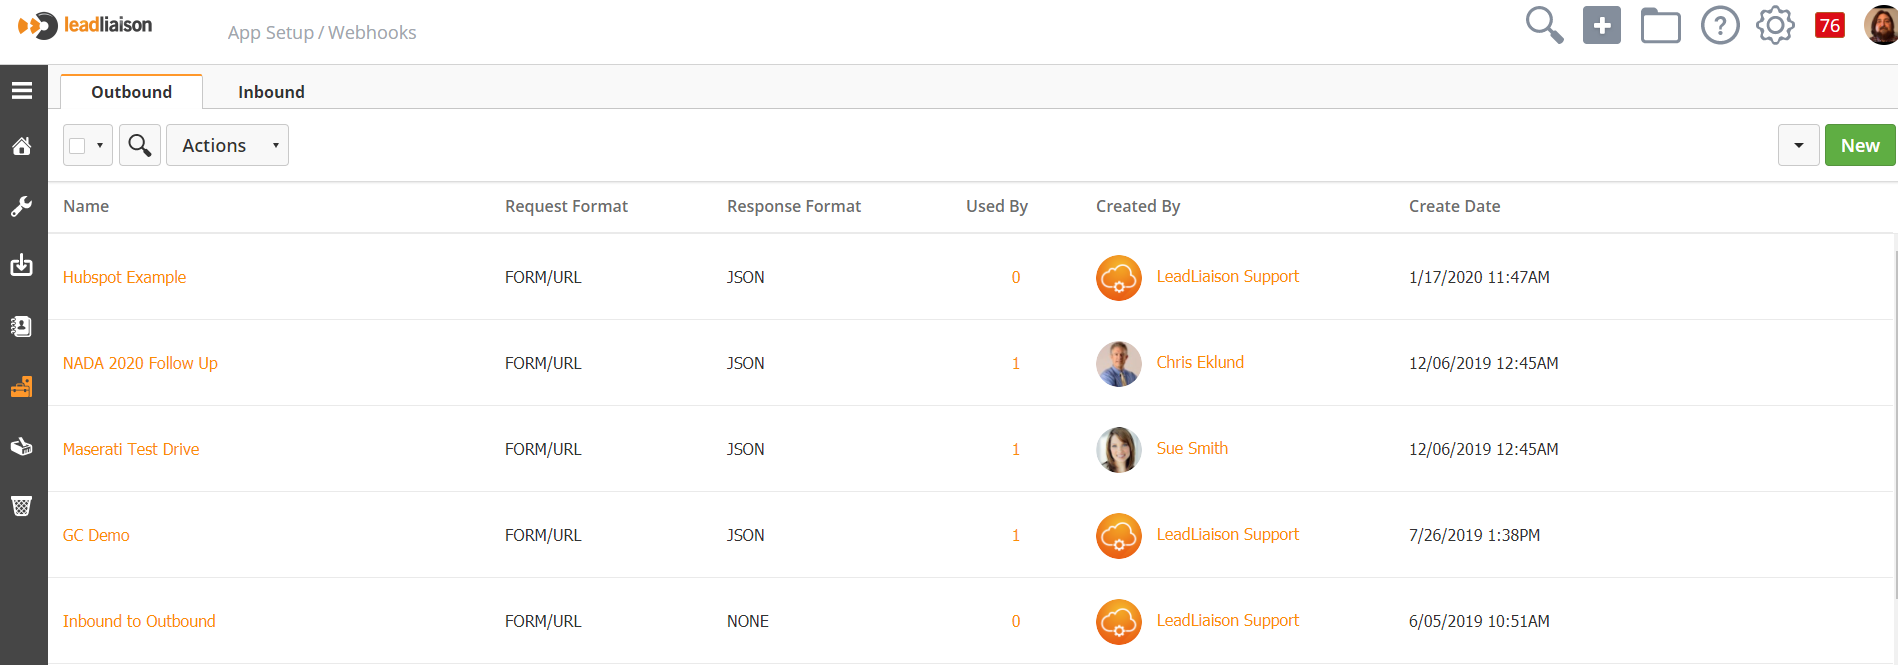
To manage your Incoming Webhooks go to Settings > App Setup > Webhooks. A table similar to the one below will appear.
Table columns are explained in detail below:
- Name = The name of the Webhook as entered by the creator.
- Request Format = The format type of the Webhook sent from Lead Liaison to the receiving service in Form/URL, JSON or XML format.
- Response Format = The response type from the Webhook back to Lead Liaison (Form/URL, JSON or XML).
- Used By = The number of automated processes that are using the "Call Webhook" action. Clicking this number takes the user to the manage page which lists all the automations.
- Created By = The first and last name of the Lead Liaison user who originally created the Webhook.
- Create Date = The day and time when the Webhook was created.
- Actions
- Edit/View = When clicked a popup appears to edit the Webhook.
- Response Mapping = When clicked it brings up a page to manage the Webhook response mapping.
- Delete = Deletes the Webhook. Prompts the user to confirm deletion.
Deleting Webhooks
A Webhook cannot be deleted if the Used By count is > 0. The user must remove the Webhook from the hosting process first before it can be deleted.
Cloning Webhooks
To clone your Webhook do the following:
- Go under the Actions column next to the Webhook you'd like to clone.
- Select the Clone Webhook action.
- The new Webhook will be created with the same name and a "- Clone" at the end of it. All other Webhooks settings will remain the same.
Testing Webhooks
See our section on Testing Webhooks for a few options.
© 2021 Lead Liaison, LLC. All rights reserved.
13101 Preston Road Ste 110 – 159 Dallas, TX 75240 | T 888.895.3237 | F 630.566.8107 www.leadliaison.com | Privacy Policy

