Send and Track for Google Chrome
Overview
Lead Liaison Send & Track™ for Google Chrome enables salespeople to be ultra-efficient with email communication and follow up. Easily send one-to-one trackable emails, insert templates and trackable marketing content, add people to automated Workflows, and much more. While salespeople drive engagement using Send & Track™, marketing helps sales by converting more visitors, building rich profiles with valuable sales intelligence, and creating trackable assets for to simplify a salesperson's job.
Installing Send & Track™ for Google Chrome
See instructions here for installing the plugin. Please note that Send & Track for Google Chrome handles personal and sensitive data. Please reference our Privacy Policy for more information.
Learning Your Way Around
There are a number of cool features in Send & Track for Google Chrome.
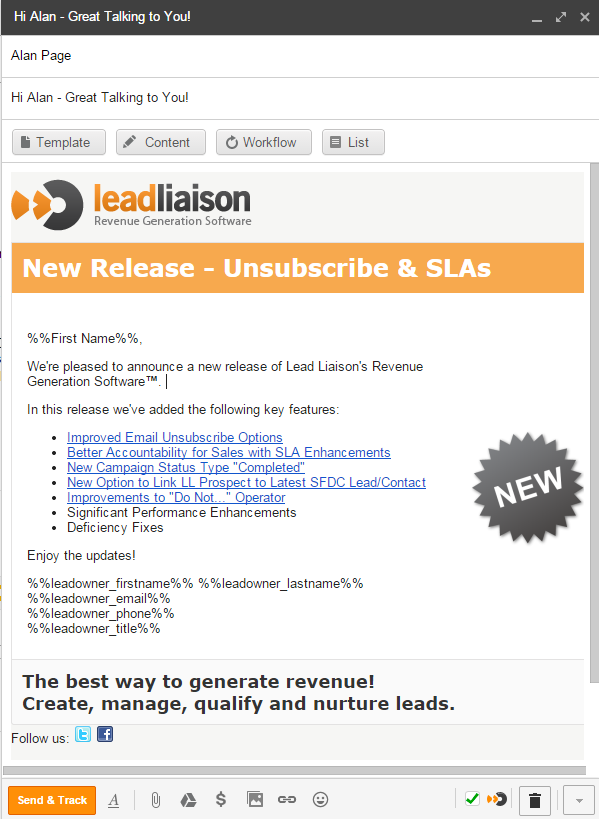
- Open a new compose message and you'll see a screen similar to the one below.
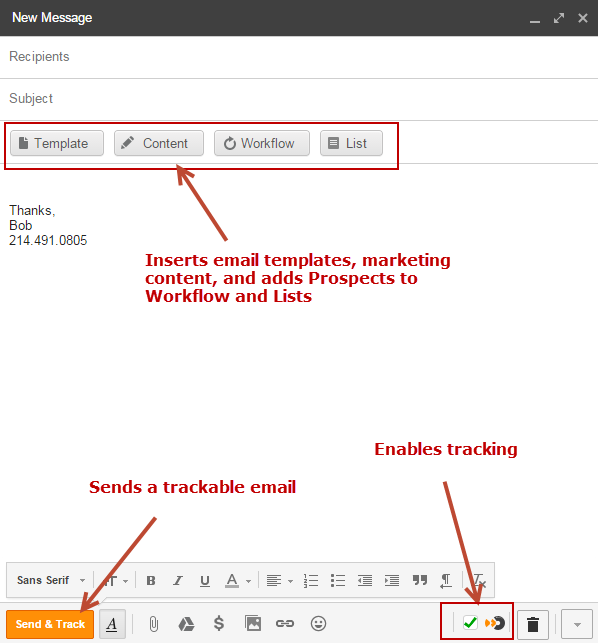
- Notice the button ribbon, with Template and Content underneath the Subject line. These buttons allow you to insert email templates or sales and marketing content, regardless if your email is tracked or not.
- Check the box next to the Lead Liaison logo on the bottom right corner of the compose window.
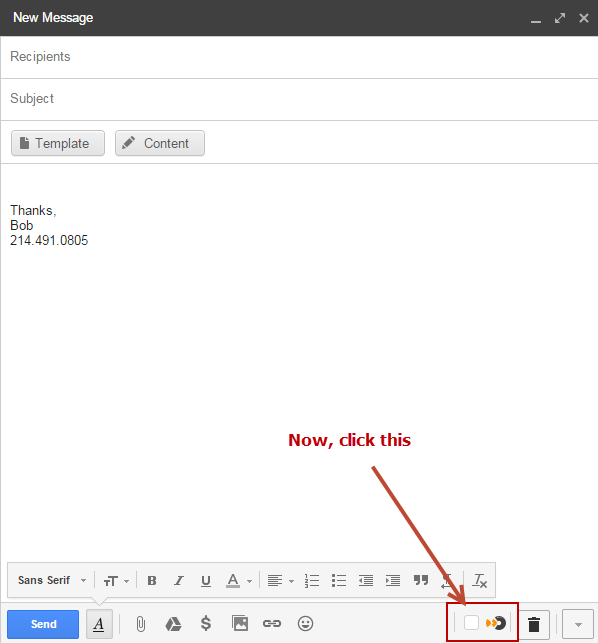
- You'll notice two more buttons appear after checking the box on the bottom right.
- These two buttons allow you to add a Prospect into one or more Workflow or Lists.
- The traditional blue Send button also turns to an orange button that says "Send & Track".
Feature Summary
In this section we'll provide an overview of each feature of Send & Track™ for Google Chrome.
Sending Trackable Email
This feature is useful for sales and marketers that want to connect email to web. Most emails that are sent go into a black hole. Sales never has any insight into what happens after an email is delivered. With Send & Track™, sales people will know when a Prospect opens an email, clicks a link in an email, and more importantly, what they do after your email drives the Prospect to your website. In the example below, we send a trackable email to Susan Smith, see her website activity, and learn more about her from her profile.
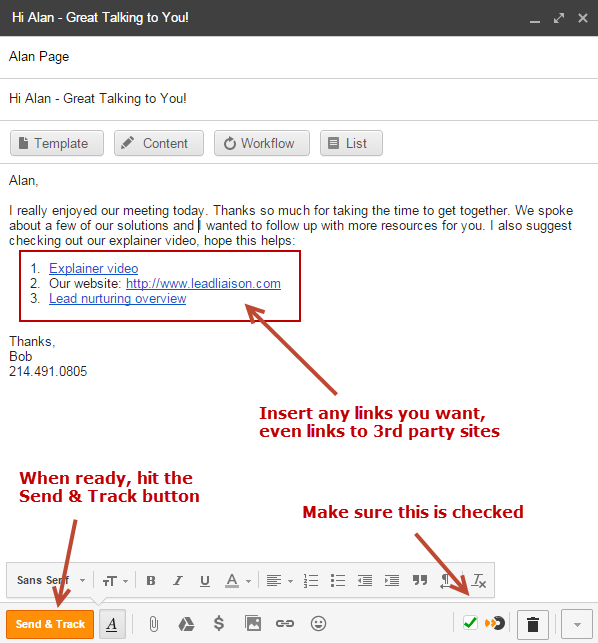
- Compose your email and insert links into your message
Make Sure your Links are Hyperlinked
Make sure your links are hyperlinked. Inserting plain text, like "www.leadliaison.com" or "http://www.leadliaison.com" will not encode the links. Links should look like "www.leadliaison.com" or "http://www.leadliaison.com" (with blue link text).
- Check the checkbox is checked on the bottom right of the compose window.
- Click the orange Send & Track button.
Sending as Normal
Even with the Send & Track checkbox checked you can still send an untracked email using the normal send process. To circumvent link encoding and send with the normal send, use the keyboard shortcuts for Google Mail. On a PC the default shortcuts are Ctrl+Enter and on a Mac they are ?+Enter.
What Happens Next?
- A new Prospect is created in Lead Liaison
- When the recipient clicks a link in your message that sends them to your website they'll show up on visitor tracking and in the daily lead report.
- This is helpful as sales can now see when the recipient takes action and what they're doing while on your company's website.
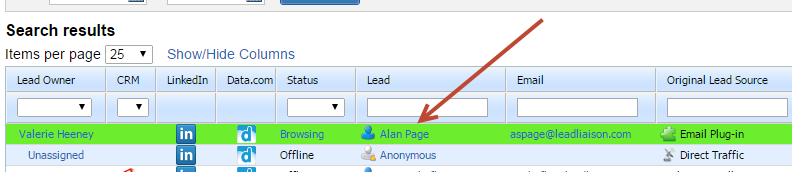
- On the Prospect Profile page(and in your CRM) you'll see an Activity tab, with lots of great information about the Prospect's activity as they engage with your message and your company's content. Here's what's tracked:
- When an email was sent (Sales Email Sent)
- Whenever the Prospect opens your email (Sales Email Open)
- Whenever the Prospect clicks a link in your email (Clicked a Link in Sales Email)
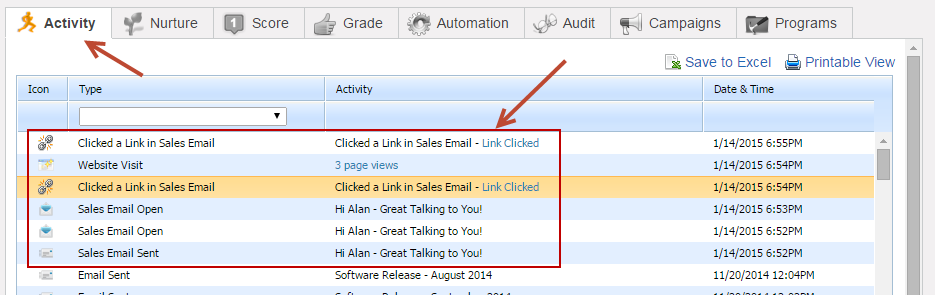
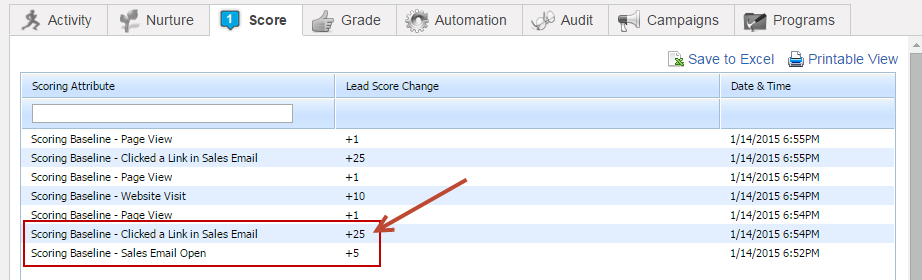
- As the Prospect engages with your Send & Track™ email their activity is scored, including opening the email and clicking links inside the email.
Sending to Groups
It's important to keep in mind that Send & Track for Google Chrome is meant to be a 1:1 tool. When sending to groups (more than one person at a time) all links in the email will be encoded using information for the first person entered into the To: field. That means any group recipient that clicks a link in the email will be identified and subsequently tracked as the first person listed in the To: field. Opens by any group recipient will be recorded as an open by the first person in the To: field. If there is nobody in the To: field the person in the Cc: field will be used. Similarly, if there is nobody in the Cc: field then the first person in the Bcc: field will be used.
Here's an example to help illustrate how this works:
- If an email is sent to Person A and Person B then links in both emails will get encoded as Person A
- If Person B clicks one of the links they will be identified and tracked as Person A.
- In the senders send sent box the email will contain links encoded as Person A.
When sending to a group you'll see the following browser prompt:
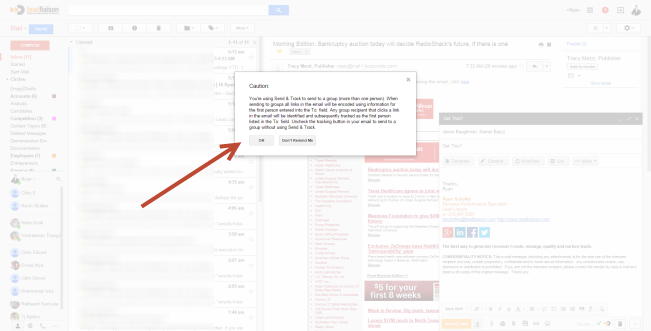
- Clicking "OK" confirms your understanding of how Send & Track for Google Chrome works with groups. The prompt will appear again next time.
- Clicking "Don't Remind Me" prevents the prompt from showing when sending to groups in the future.
- Clicking the "x" to close the prompt aborts the send.
CRM Integration
Lead Liaison's Send and Track for Google Chrome integrates with most CRMs (Salesforce.com, Pipedrive, Zoho CRM, Base CRM, Insightly, etc.) in two ways:
- Optionally saves a copy of the email to your CRM using the CRM's email to Bcc address with the Log in CRM setting.
- Optionally creates a new lead in your CRM (if it doesn't already exist) when the Log in CRM setting is enabled.

Log in CRM
Creates a new lead in your CRM account when the Log in CRM setting is enabled. Note, if the prospect already exists in Lead Liaison but not in your CRM the record will not be created.
To add email to Bcc addresses for use with the Log in CRM setting, navigate to Admin > App Setup > Email > Send & Track > Custom Bcc Email Addresses section.

Creating New Prospects
When an email is sent a new Prospect is automatically created in Lead Liaison using the contact's name and email address.
Inserting Email Templates
This feature allows sales and marketers to take advantage of pre-created email templates and choose the best performing templates to accelerate sales.
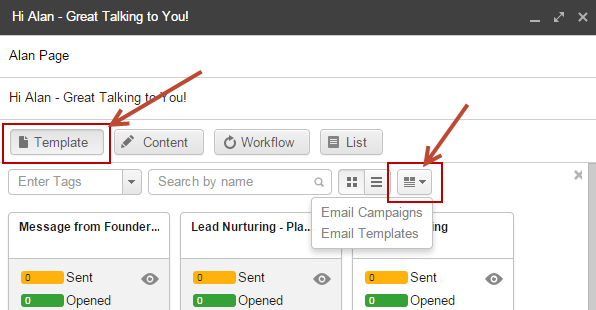
- Click the Template button to select Email Campaigns or Email Templates to insert into the compose window.
- Switch between Email Campaigns and Email Templates using the button to the right.
- Content is inserted into the compose window.
- Replace your mail merge fields with relevant information.
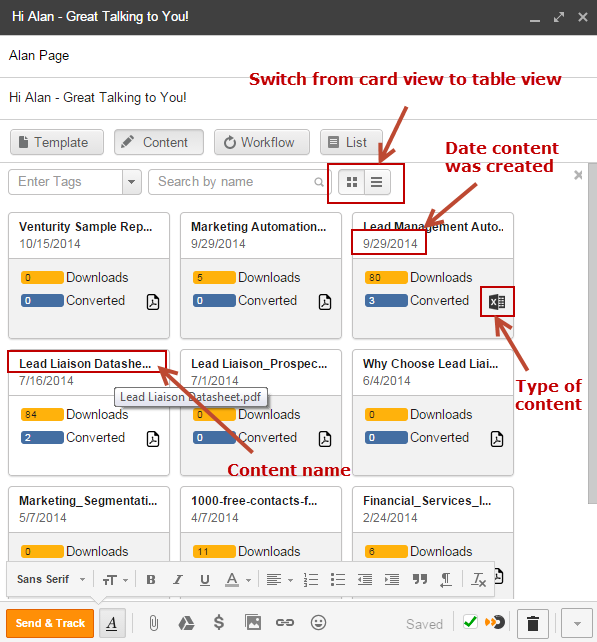
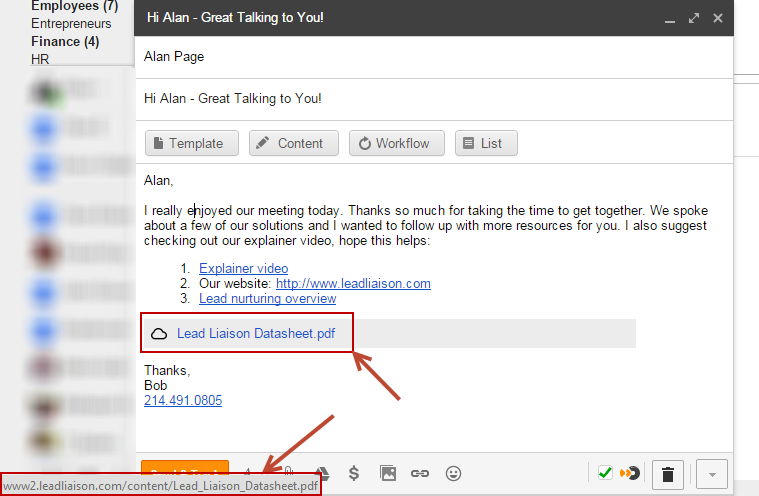
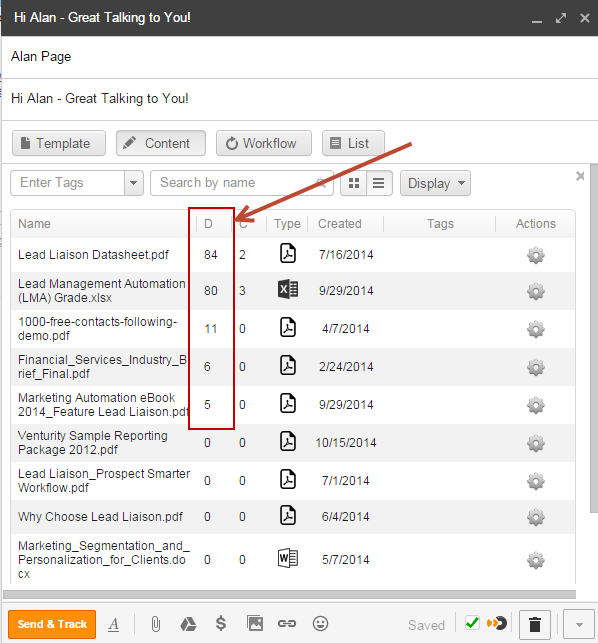
Inserting Content
Easily insert sales and marketing content into your email messages. Find content by the most popular content (downloads) or content that converts the most number of Prospects (conversions).
Adding Content
Add more content to be pulled into your Send & Track emails by uploading it into Lead Liaison. Follow these instructions to add content.
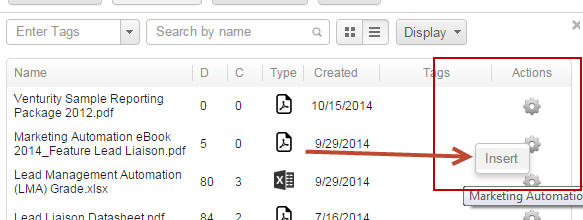
- Click the Content button to access your sales and marketing content.
- In table view, click the gear, then insert.
- In card view, click the header of the card to insert the content.
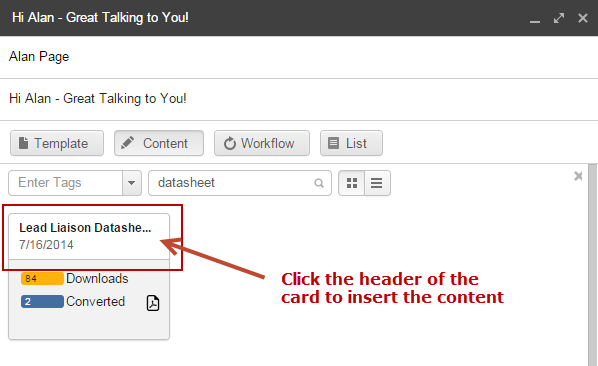
- Content is inserted as a link in your email.
Vanity URL
As long as you've configured a domain name for your account the link for your content, as well as any other trackable link inside your email, will use your vanity URL as shown in the screenshot below. It's important to note that you'll need to authenticate the plugin after your Vanity URL is setup in Lead Liaison. If your Vanity URL was setup after you installed the plugin make sure to re-authenticate.
- To remove content from your message click the X:

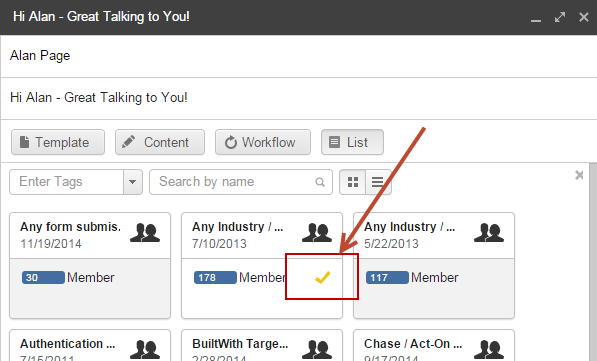
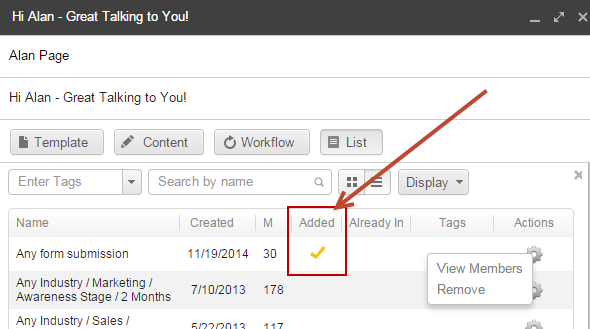
Adding Prospects to Lists
To add a Prospect to a List do the following:
- Click the List button.
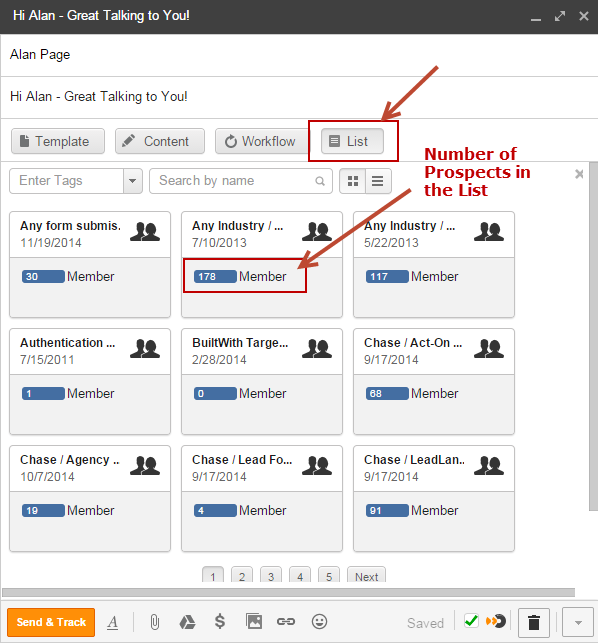
- Click the card header or gear/insert in table view to add the Prospect to a List.
- When the Prospect is added to the List, a checkmark will appear, like this:
- In table view, it looks like this:
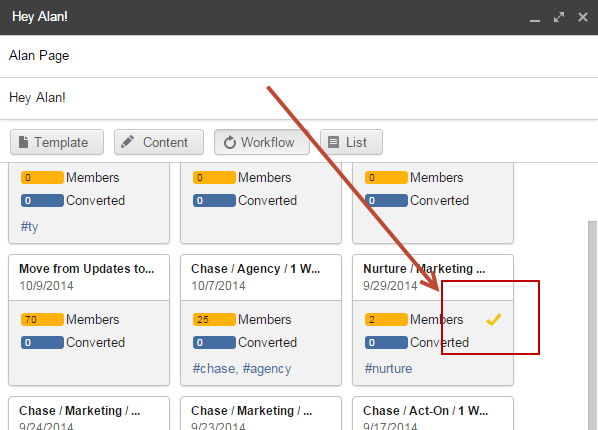
Adding Prospects to Workflow
Easily add Prospects to nurturing or educational Workflow by doing the following:
- Click the Workflow button
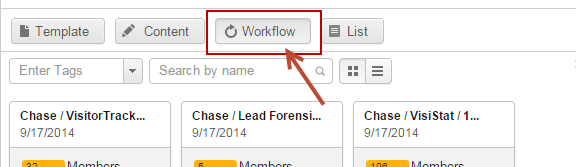
- Click the card header or gear/insert from table view to add the Prospect to one or more Workflow.
- When a Prospect is added to a Workflow a yellow check mark will appear, like this:
Statistics
Navigate to your Dashboard and add the Sales Emails widget from the library to see a high-level view of your top performing sales people and sales emails:

Sales Email Report
Navigate to Sales > Sales Emails to see stats and a log of all your sales emails.
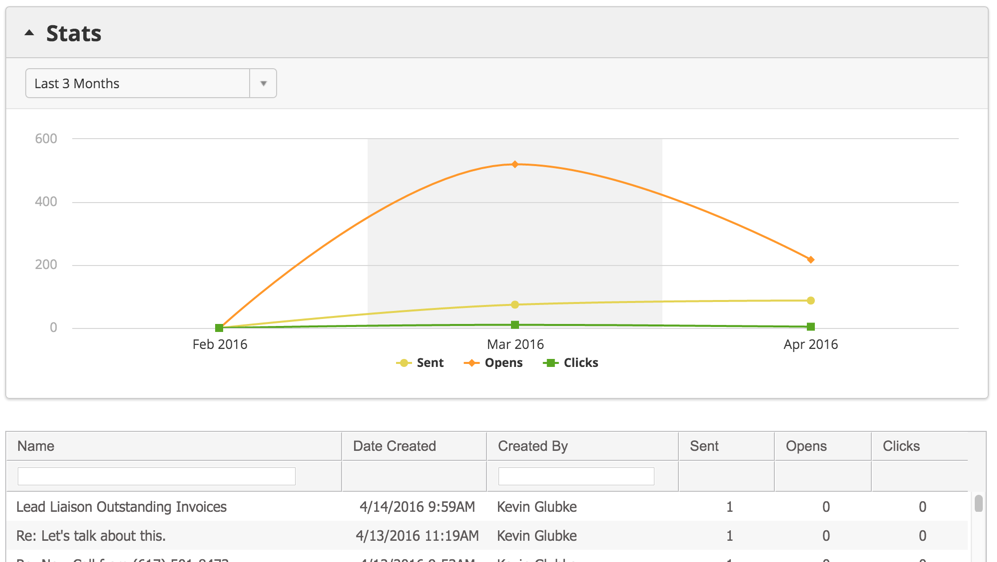
- Name – the subject line of the email
- Date Created – the first time this email was sent
- Created by – the user that sent the email
- Sent – the number of times this email has been sent to Prospects
- Opens – the numebr of times this email has been opened across all sends
- Clicks – the number of times this email has had links clicked across all sends
When two sales emails have the same subject line, they are merged into the same record on this page. To view the performance of a sales email to a specific Prospect, check in the Timeline on the Prospect's Profile.
Navigation Tips
- In table view, click any column header to sort by that column.
- In table view, use the Display option to hide/show columns.

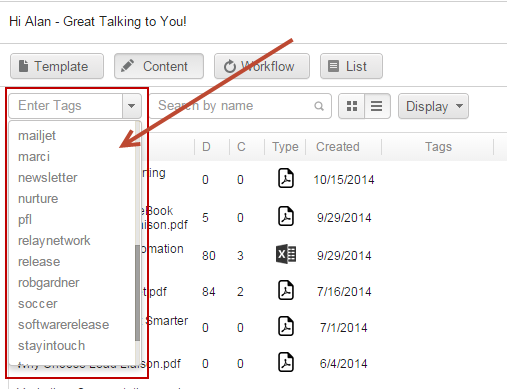
- Use the Tags search box to find Templates, Content, Workflow, and Lists by Tag.
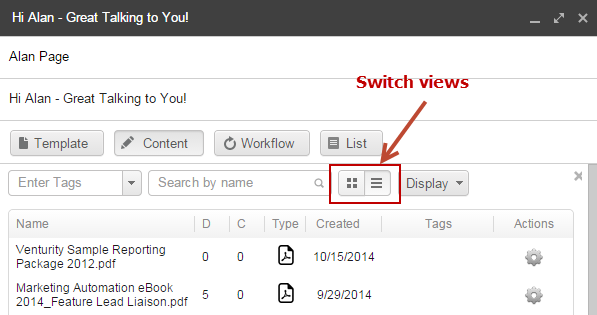
- Switch between card view and table view.
- Use the search box to easily find content.

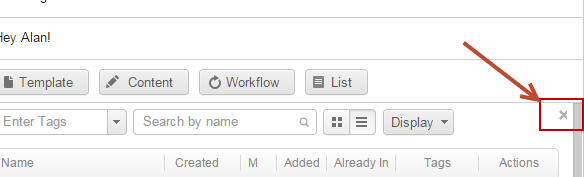
- Click the X to close the view.
- If a Prospect is already added to a Workflow, List, etc. a green checkmark will appear. When adding a Prospect to a Workflow or List while creating your email a yellow checkmark will appear.

Settings
Send & Track™ for Google Chrome has user-level settings and global account settings. Both settings are described in more detail below.
User Settings
Each user can control their own settings for Send & Track™ for Google Chrome. To get to the settings login to Lead Liaison via the web and do the following:
- Click Home > Setup profile
- Click the Send & Track tab
Settings are as follows:
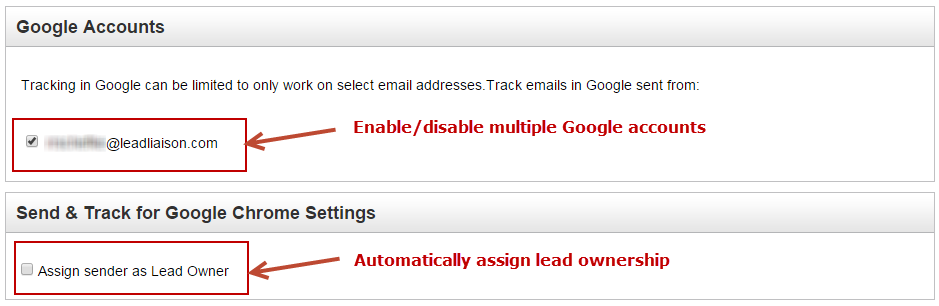
- Google Accounts:
- Enable/disable multiple Google accounts for use with Send & Track.
- Accounts appear once an email is sent with Send & Track from a new account.
- Enable/disable multiple Google accounts for use with Send & Track.
- Send & Track for Google Chrome Settings:
- Assign sender as Lead Owner:
- Automatically assigns the lead owner of recipient as the sender.
- A lead owner will be assigned only if no leader owner exists.
- This setting is enabled by default.
- Track first open only: Tracks and logs only the first time the recipient open's the email and not subsequent opens.
- Enable PC: Ctrl + Enter and Mac: ? + Enter to track emails: Enable this feature to send trackable email using these keyboard shortcuts. If not enabled, using these shortcuts will bypass tracking and send the email using normal methods.
- Enable real-time notification sounds: Unchecking will mute all notification sounds from the real-time browser alert feature.
- Assign sender as Lead Owner:
Global Account Settings
The settings below apply to all users and settings in your Lead Liaison account. To access these settings go to Settings > App Setup > Email > Send & Track
- Open/Click Tracking Settings:
- Disable tracking Opens/Clicks on all browsers when the opener is a Lead Liaison user = Disables all link clicks and opens on all browsers when the person opening or clicking the email is a Lead Liaison user.

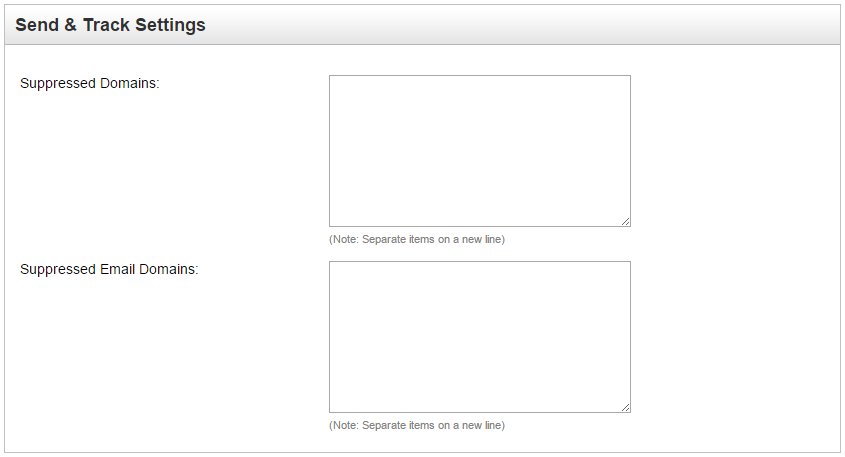
- Suppressed Link Domains = Suppressed link domains will not encode links within the email body that contain these domains. Enter domain names in the box, each separated by a new line, in this format: domain.com.
- Suppressed Email Address Domains = Suppressed email address domains will not create a Prospect, record link clicks, record opens, score the Prospect when the recipient's email address contains one of these domains. Enter domain names in the box, each separated by a new line, in this format: domain.com.
Updating
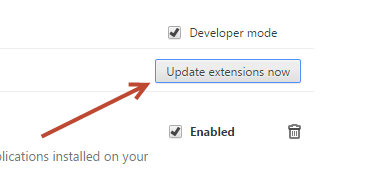
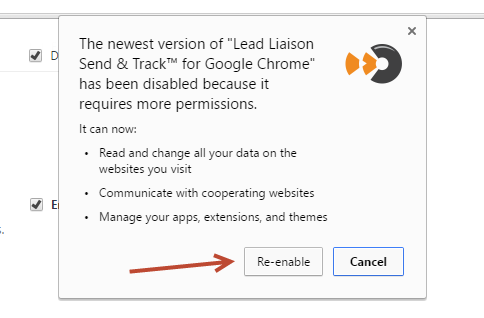
Send & Track™ for Google Chrome will automatically update in your browser for minor releases. For major releases, a manual update may be required. Follow the steps below to manually update the plugin:
- Go to the area to manage your Google Chrome Extensions
- Click the "Update extensions now" button
- You'll find the "Enable" checkbox unchecked. Check it.

- Click the "Re-enable" button:
Notes
- Emails sent from Google are classified as "Sales Emails" in Lead Liaison.
- Templates:
- Sent = When the template is sent. A send will still be recorded even if the template is altered after inserting it into the compose window.
- Opened = When the template has been opened. An open will still be recorded even if the template is altered after inserting it into the compose window.
- Converted = A conversion happens when a Prospect clicks a link in an email template and no previous conversion occurred. A conversion could happen from a web form submission, email link click, etc., anything that tracks a Known Prospect. For example, if the Prospect visited your company's website anonymously, then clicked the Send & Track link, the link click will count as a conversion.
- Workflows:
- Members = Number of Prospects added to the Workflow.
- Converted = A conversion happens when a Prospect clicks a link in an email send from your Workflow and no previous conversion occurred. A conversion could happen from a web form submission, email link click, etc., anything that tracks a Known Prospect. For example, if the Prospect visited your company's website anonymously, then clicked a link from your Workflow email, the link click will count as a conversion.
- Content:
- Downloads = Number of times the content has been downloaded.
- Converted = A conversion is when the content initiates the conversion from anonymous/unknown to Known. More specifically, a conversion is recorded when a Prospect provides their email address in the content conversion window and no previous conversion occurred. A conversion could happen from a web form submission, email link click, etc., anything that tracks a Known Prospect. For example, if the Prospect visited your company's website anonymously, then provided their email in the content gate, this will count as a conversion. To learn more about using content to convert Prospects see these instructions.
- Lists:
- Members = Number of Prospects in the List.
- Every tracked Prospect sent with Send & Track will be added as a new Prospect in your Lead Liaison instance.
- Multiple Google Accounts are supported. Enable/disable your Google Accounts from within your preference center in Lead Liaison.
![]()
© 2021 Lead Liaison, LLC. All rights reserved.
13101 Preston Road Ste 110 – 159 Dallas, TX 75240 | T 888.895.3237 | F 630.566.8107 www.leadliaison.com | Privacy Policy