Importing Prospects
- Ryan Schefke
- Sam Mahboob
- Christopher Kipgen (Unlicensed)
File Format
Import Template
Use this CSV file as a template for your import if you needed.
Importing Prospects
To import a list from a CSV, XLS or .XLSX file do the following:
- Prepare your file for import. For a contact to be imported, the contact must have at least an email address or full name. If an email address is not provided then we check for a Full Name (or First Name and Last Name). If a Prospect is found with the same name then the import record is matched with the first contact the system finds. If no match is found then a new Prospect record will get created.
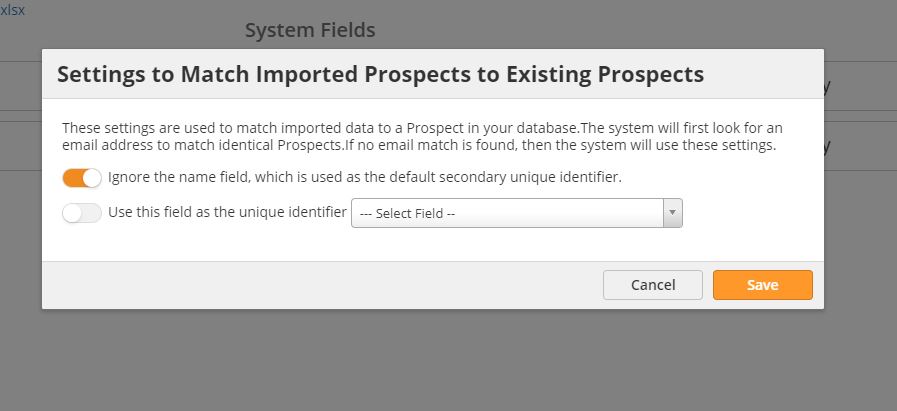
- There is also an "Ignore the name field" option available. If this option is turned ON, then we will not use the prospect name as a second identifier to match Prospects. So by default it will attempt to create a new prospect (incase the other settings are configured to accept new records).
- There is also an "Ignore the name field" option available. If this option is turned ON, then we will not use the prospect name as a second identifier to match Prospects. So by default it will attempt to create a new prospect (incase the other settings are configured to accept new records).
- Optionally create a List. Note, it's not mandatory to import contacts into a list. They can be directly imported into the system.
- Click Prospects > Import
OR - Click Sales > Import and select Prospects if you are using OneFocus™ CRM
- Drag & Drop the file into the dashed border box or select your file using the Upload button

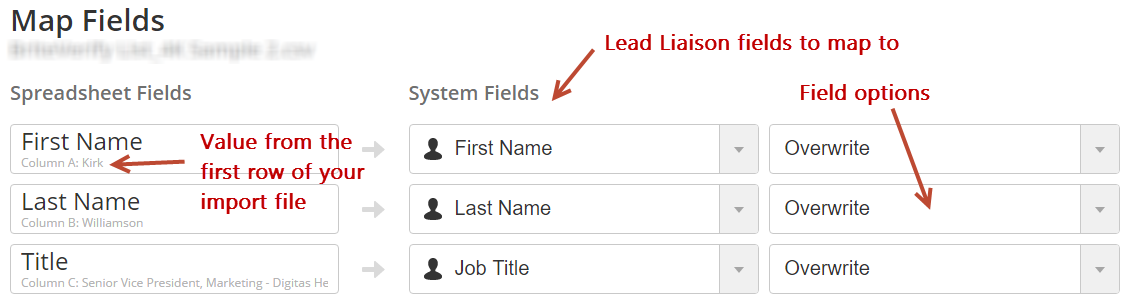
Map fields
Most fields are automatically mapped; however, check all your fields to ensure the data is mapped to a Lead Liaison field.
- Import options per field:
- For Multi-Picklist Values:
- Ignore: Ignores the imported field data.
- Overwrite: Overwrites the data in the list and Prospect data if the imported data is not empty.
- Merge: Applies only to multi-picklist fields. Imported data will be used to update a Prospect's info without deleting existing information. For example, if the field is "Favorite Colors" and the Prospect's field has "Red, Blue and Green" and the imported data is "Brown, Green", then the resulting field data will be "Red, Blue, Green and Brown". Use a semicolon (; to separate multiple fields on your imported data.
- For Everything Else:
- Ignore: Ignores the imported field data.
- Overwrite: Overwrites the data in the list and Prospect data if the imported data is not empty.
- Update if empty: Overwrites the data in the list and Prospect data if the imported data is not empty and the Prospect's existing field data is empty.
- For Multi-Picklist Values:
Unique Identifier
This is where you can select a unique identifier for matching imported Prospects to existing database. The system will first look for an email address to match identical Prospects. If no matching email is found, then the system will use the settings defined here:

Please note that in this case, system will NOT use Full Name (or First Name and Last Name) if the email address is not provided. Instead, it will use the unique identifier specified here to match Prospects.
You can add a Prospect into an Organization during the import process by mapping a field to the Organization field. The system will add the Prospect to an existing Organization if the Organization Name or Domain match. If there is no match, the system will create a new Organization.
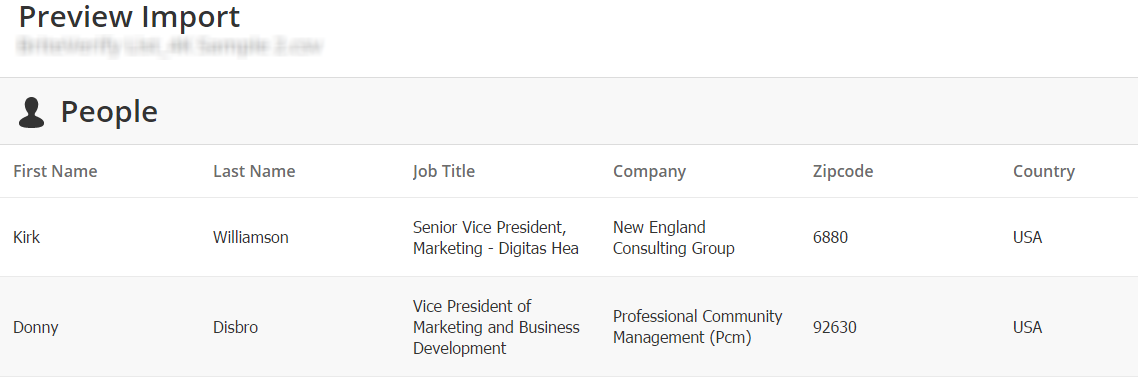
Preview results
The first ten rows of data will be shown in the preview.
Options
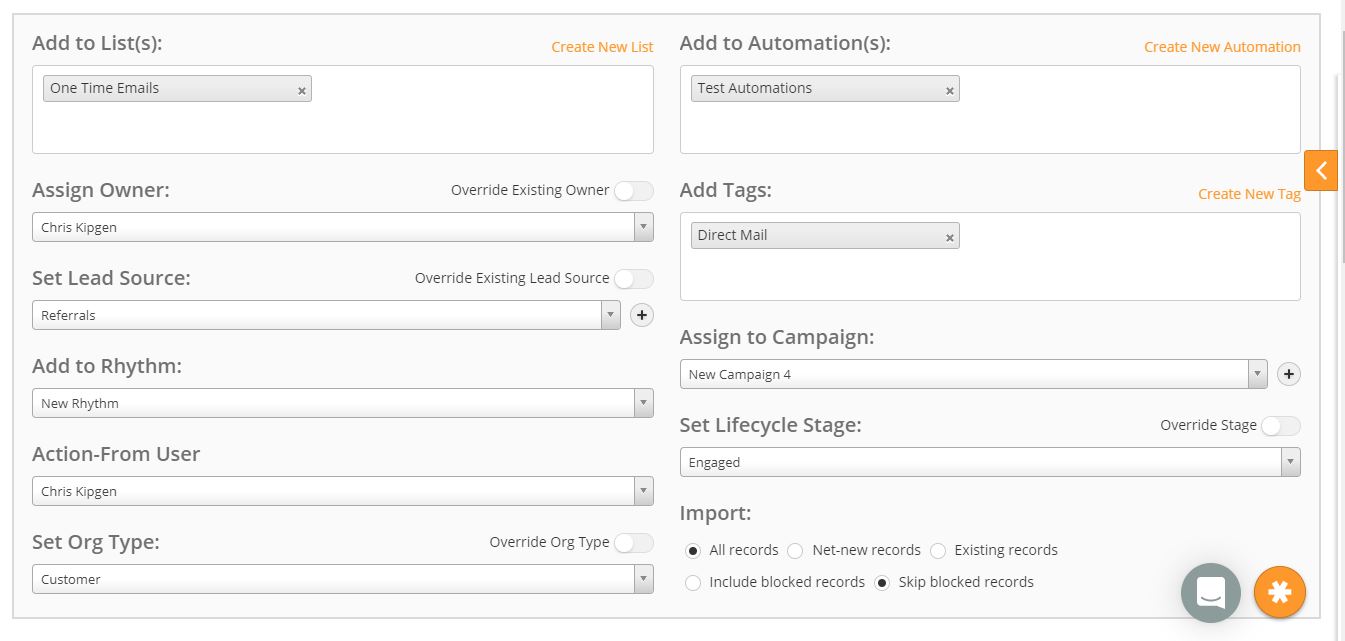
Lead Liaison provides several options to add Prospects to a list, tag them, assign ownership, assign to a Campaign, set a Lead Source, and more. The options you see will vary depending on your product license. Each option is explained below:
- Add to Lists(s). Select which list(s) to import contacts into. Click the Create New List link to create a new list on the fly.
- Add to Automation. Select workflows to add Prospects into.
- Add Tags. Assign one or more tags to your imported Prospects. Click the Create New Tag link to create a new tag on the fly. To learn more about Tags read this.
- Assign Owner. Select which Owner to be assigned to all imported contacts. If your file includes Prospects from multiple owners See Setting Lead Owner section below.
- Set Lead Source. Attribute the same Lead Source to all Prospects. Use the toggle to override the current lead source for existing Prospects. If your file has Prospects from multiple lead sources, map a field in your file to the Original Lead Source field instead.
- Assign to Campaign. Assigns imported Prospects to a Lead Liaison Campaign. To learn more about Campaigns click here. To create a new Campaign click the plus icon to the right of the drop down.
- Add to Rhythm. Adds all Prospects to selected Rhythm.
- Action-From User. If adding Prospects to a Rhythm, select the Action-From User. If you don't select anything, the system will use the Rhythm's default Action-From User.
- Set Lead Source. Assigns a value to the Original Lead Source field. If the Prospect already exists you can override the Original Lead Source value by enabling the Override Existing Lead Source toggle switch. To create a new Lead Source, click the plus icon to the right of the drop down.
- Set Lifecycle Stage. Sets all Prospect's Lifecycle stage to the selected Stage. Use the toggle to allow existing Prospects to revert stages (for example, from Marketing Qualified to Engaged). If your file has Prospects with different Lifecycle Stages, create a corresponding field in your file and map it to Lifecycle Stage instead.
- Set Org Type. For visitor tracking, select the Prospects Organization Type. For accounts with OneFocus™ CRM, we recommend using the Org Type on the Organization object.
- Import.
- All records – Import all records, creating new Prospects and updating existing Prospects with matching rules.
- Net-new records – only create new Prospects, ignoring existing records.
- Existing records – only update existing Prospects, ignoring new records.
- Include blocked records – Import Prospects who have previously been marked as Blocked (i.e. they are on global blocked list).
- Skip blocked records – Do not import Prospects who are already on global blocked list.
- Click Next.
- Click Run.
Import Happens in the Background
The import process gets queued in the system and happens in the background. While the import occurs, you can access other areas of the application so your work is uninterrupted. Check back on your import by navigating to Prospects > Import.

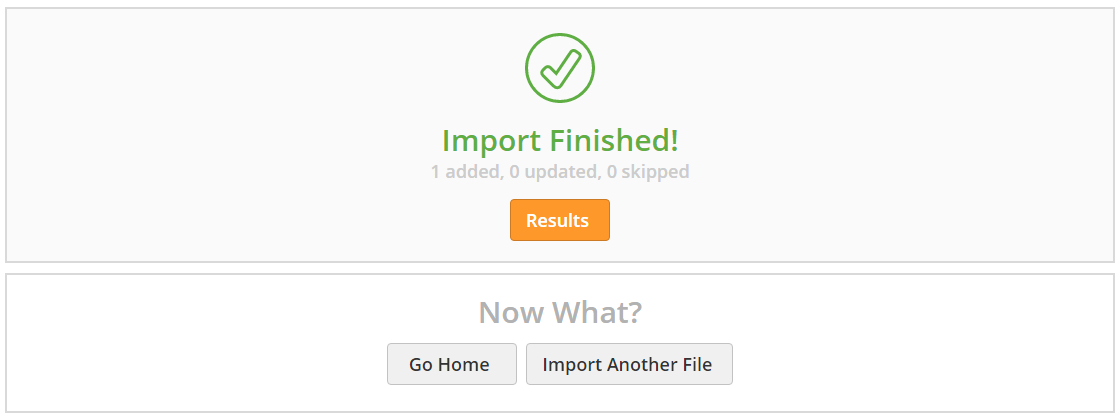
- View Results, Go Home, or import another file.
Import over the limit
Our system has the ability to auto-detect if the list of contacts in your uploaded spreadsheet puts you over the allowed Prospects limit for your account. If you proceed with the import, our system will fail additional records that exceed the limit. You can however, view and download a list of any such failed/skipped imports from the import area later on:

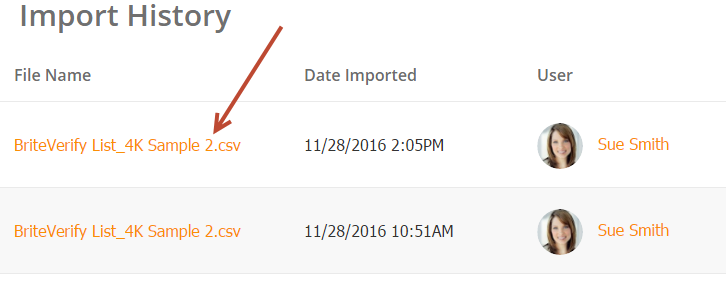
Import History
You can view complete history of all of your imports (Prospects, Org, Deal, Custom Objects etc.) on the History page by going to Settings > Import > History:
Download Past Import Files
To download files that have been previously imported do the following:
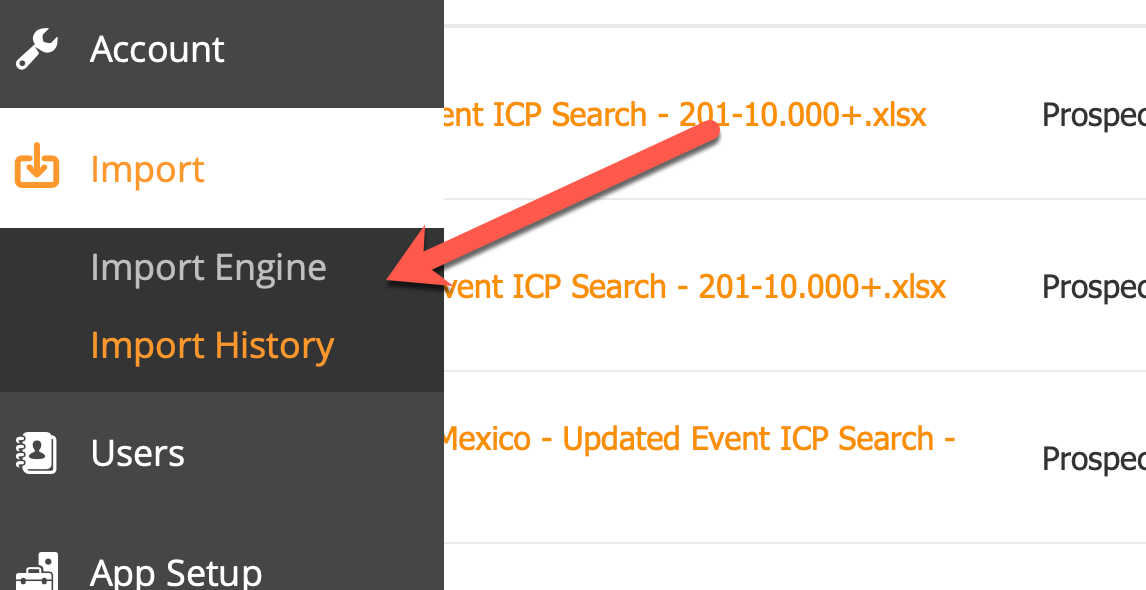
- Navigate to Prospects > Import
- Click the name of the file under the File Name column as shown below
Viewing Imported Prospects
To view prospects from previous imports do the following:
- Navigate to Prospects > Import
- Select Results under the actions column as shown below

Filtering Imported Prospects
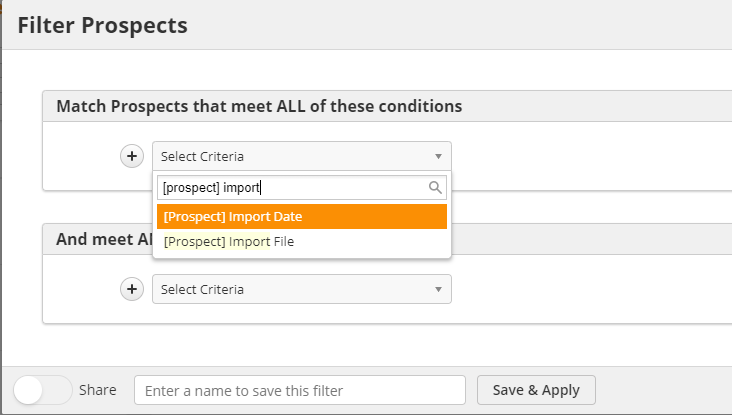
You can filter Prospects based on their Import date and the name of the Import File they were included on. These filters can be used for Prospects Filters, Segementations, and Automations.
Viewing Skipped Prospects
Occasionally the system may not be able to import a Prospect. For example, if the Prospect has no name, email, or other unique identifier, the system will not be able to import the record. If the system skips records during your import, you can download them after the import finishes.
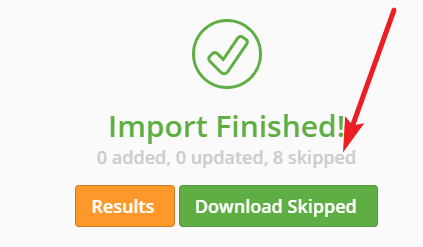
On the exported CSV, we include the reason the system skipped the Prospect. Here are some of the most common skip reasons:
- Cannot accept net-new records. Check import settings.
- Cannot accept existing records. Check import settings.
- Invalid name and/or email address.
- Cannot identify record.
If you have any questions as to why the system skipped a record, please contact Lead Liaison Support.
Overage Alert
If you attempt to import a file that will put your account over your Prospect limit, the system will notify you.
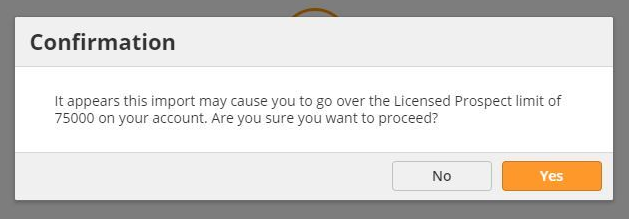
If you choose to proceed and the import puts you over limit, the system will skip any net new Prospects. It will still update existing Prospects once you hit the limit.
The system considers every Prospect on your spreadsheet when showing this alert. It does not check the spreadsheet for duplicate or existing Prospects first. For example, let's say your account limit is 75,000 Prospects and you currently have 60,000. If you upload a sheet of 30,000 Prospects but 29,000 are duplicates or already exist, you will still see this warning. Only net new Prospects count against your license, and only Prospects that exceed your license are skipped.
Notes
Validating Email Format on Import
Lead Liaison does validate email address format on import and "skips" records that have an invalid email (missing "@" symbol, missing top-level domain like .org or .com, etc.). In this video we show results of importing two valid Prospect records and two invalid Prospect records:
Setting Lead Owner
Add a "Lead Owner" field to your import CSV file to automatically set (or overwrite) the existing lead owner value in Lead Liaison.
Use Lead Liaison Username
Please note the value of the Lead Owner could be any of the following:
- Lead Liaison username
- User's email address as used in their profile
- User's full name
The Lead Liaison username is the username used when logging into Lead Liaison. To see your teams usernames look under the "User Name" column on the Managing Users page.
Importing Names
When importing names the First Name and Last Name must be separated into two distinct columns. Here are simple instructions on how to split names using Microsoft Excel.
Importing Boolean Fields
When importing a boolean field (1 or 0, true or false, yes or no) the following values are accepted:
- "true" or "false" (not case sensitive)
- "yes" or "no" (not case sensitive)
- "0" or "1"
Using 0
When using "0", the imported value will be empty. If you want the imported value to show up as "No" use "false" or "no".
These Lead Liaison Standard Fields are examples of fields that accept boolean values:
- Do Not Email
- Do Not Call
- Bounced
Importing Picklist Values
When importing a picklist value Lead Liaison offers three options:
- Ignore: Ignores the imported field data.
- Overwrite: Overwrites the data in the list and Prospect data if the imported data is not empty.
- Merge: Applies only to multi-picklist fields. Imported data will be used to update a Prospect's info without deleting existing information. For example, if the field is "Favorite Colors" and the Prospect's field has "Red, Blue and Green" and the imported data is "Brown, Green", then the resulting field data will be "Red, Blue, Green and Brown". Use a semicolon (; to separate multiple fields on your imported data.
Related content
![]()
© 2021 Lead Liaison, LLC. All rights reserved.
13101 Preston Road Ste 110 – 159 Dallas, TX 75240 | T 888.895.3237 | F 630.566.8107 www.leadliaison.com | Privacy Policy