Google Analytics Tracking Integration
Overview
The Google Analytics Tracking Integration allows customers to map audience data from Google Analytics to Lead Liaison and Lead Liaison data to Google Analytics custom dimensions. The integration enriches Google Analytics reports with company information, scores and other data collected by Lead Liaison that Google Analytics users wouldn't natively see in Google's platform. Similarly, Lead Liaison users can pull in gender, age, continent, metro, region, latitude, longitude and more from Google Analytics to enrich Prospect records and use relevant criteria in segments.
Setup
Set up the integration by doing the following steps:
- Add your Google Analytics account by navigating to Setup > Integrations > Connectors.
- Click the Add Account button.
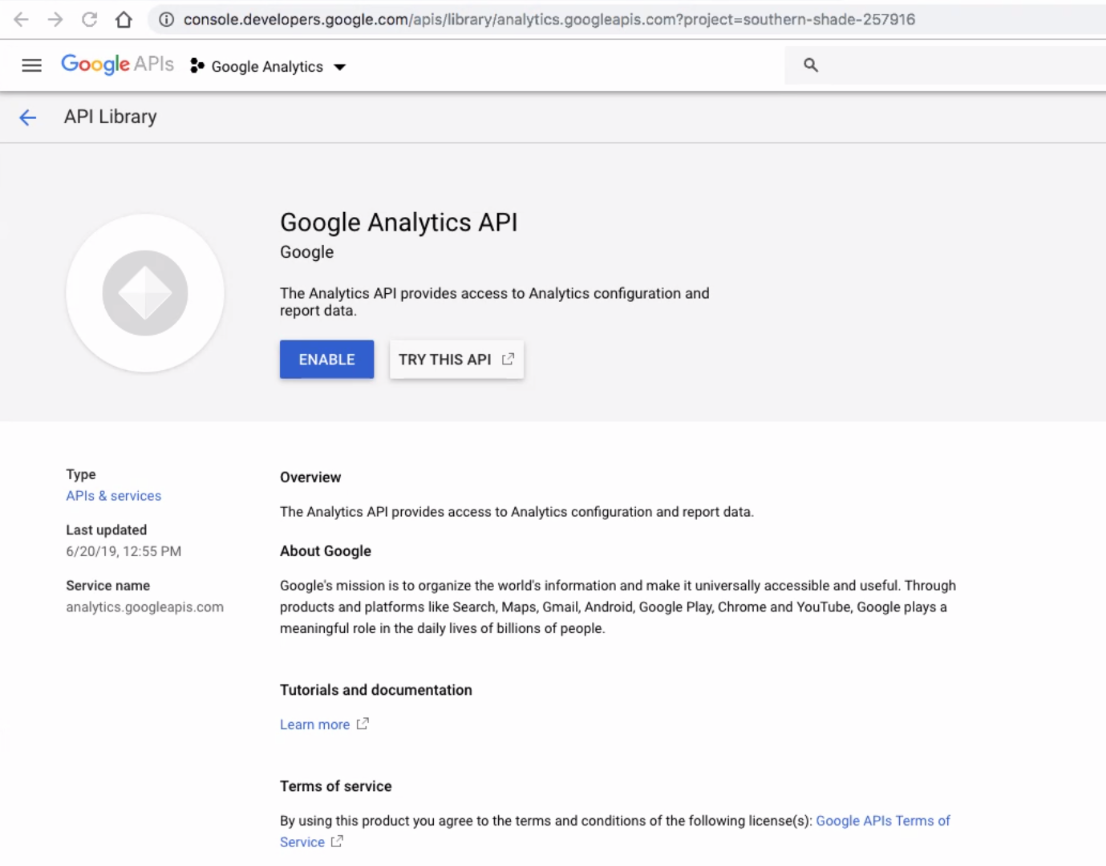
- You'll need to enable access in your Google Analytics account to the Google Analytics API. The API can be found in Google's API library located here. Search for the Google Analytics API and click Enable to continue.
- Once your account is connected the buttons should change and appear similar to the ones below.
- After connection, an initial sync is run. The sync loads the list of Google Analytics accounts, properties and views. If a new account, property, or view is added you can run the manual sync using the Sync button to pull in new data. There is no automated syncing of accounts, properties, and views. Use this button for any new items you need to pull in.
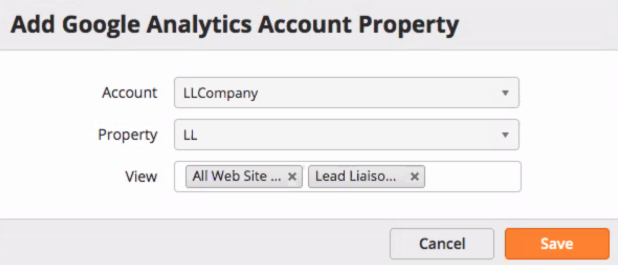
- Use the Add Property button to add a new Google Analytics Property.
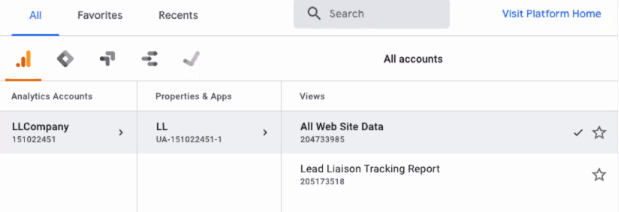
The screenshot below shows different Accounts, Properties, and Views in a Google Analytics account:
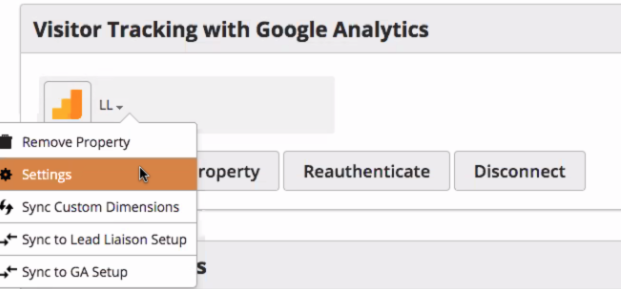
- Left-click on the Connector to see additional option as explained below:
- Remove Property: Removes a Property in the system.
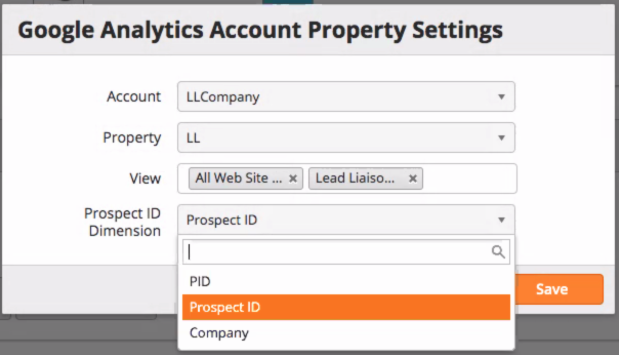
- Settings: The integration uses a Lead Liaison Prospect ID to link records in Lead Liaison with Google Analytics and vice versa. Click on the Connector and choose Settings to see or change the Custom Dimension where the Prospect ID is stored.
- Sync Custom Dimensions: If you create a new Custom Dimension in Google Analytics, use this option to have it appear in Lead Liaison.
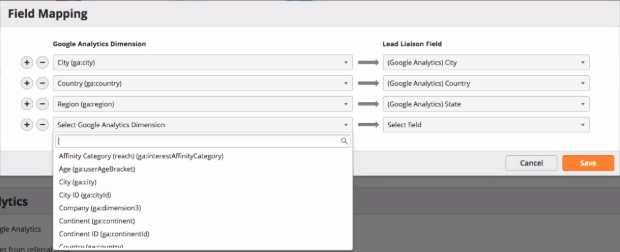
- Sync to Lead Liaison Setup: Defines data set that flows from Google Analytics into Lead Liaison.
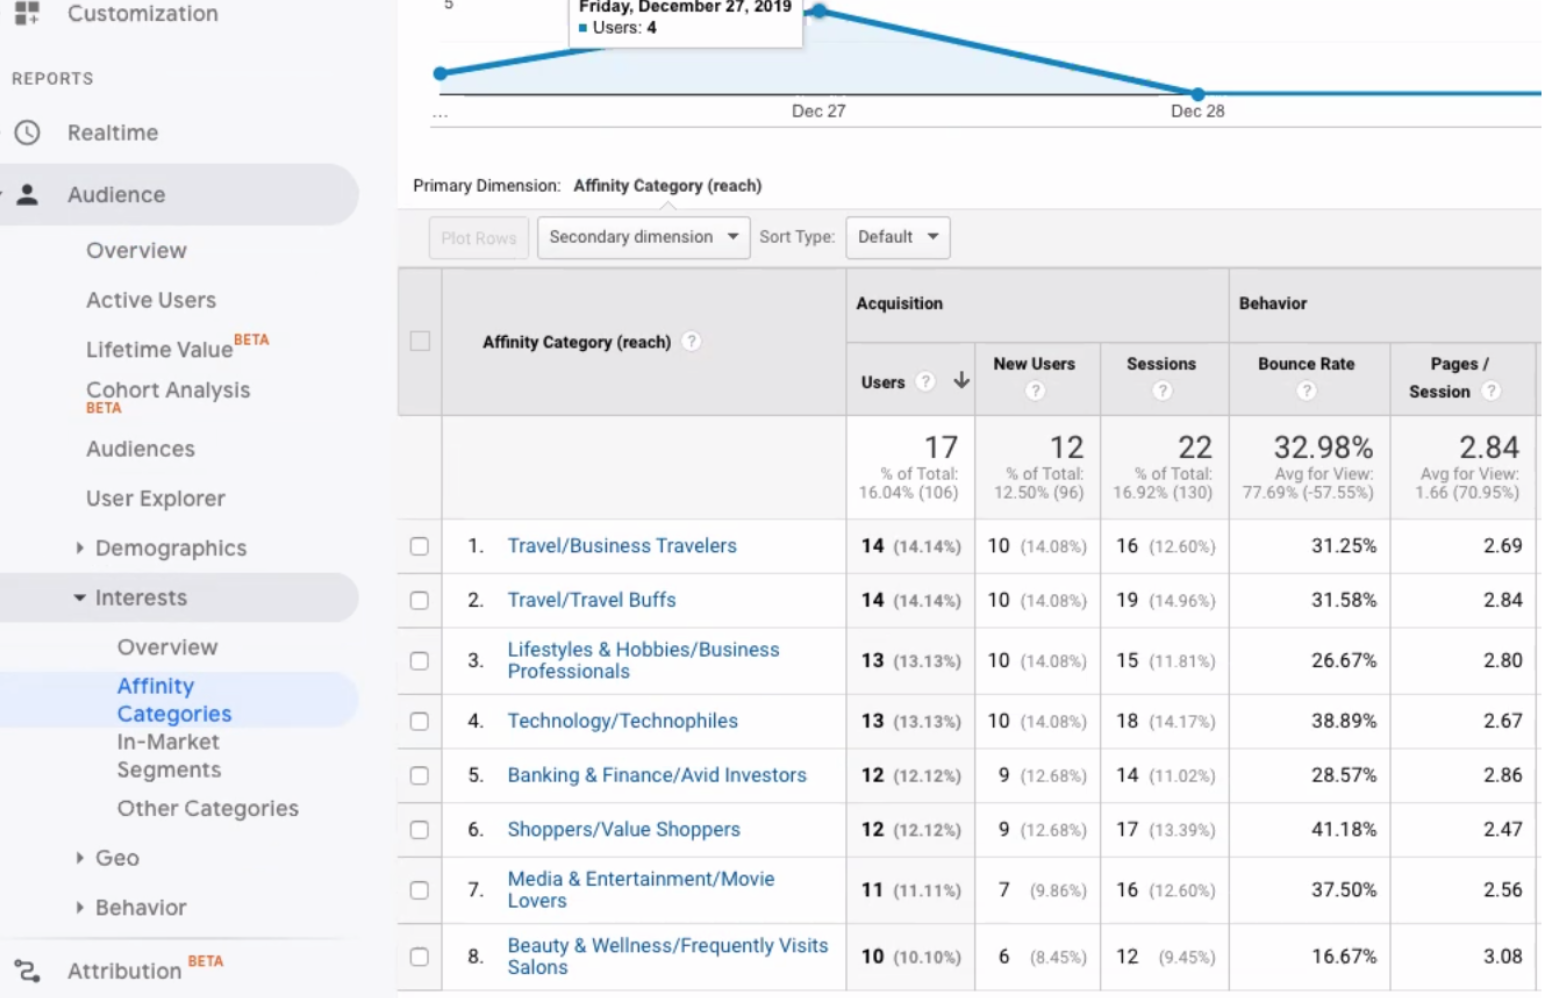
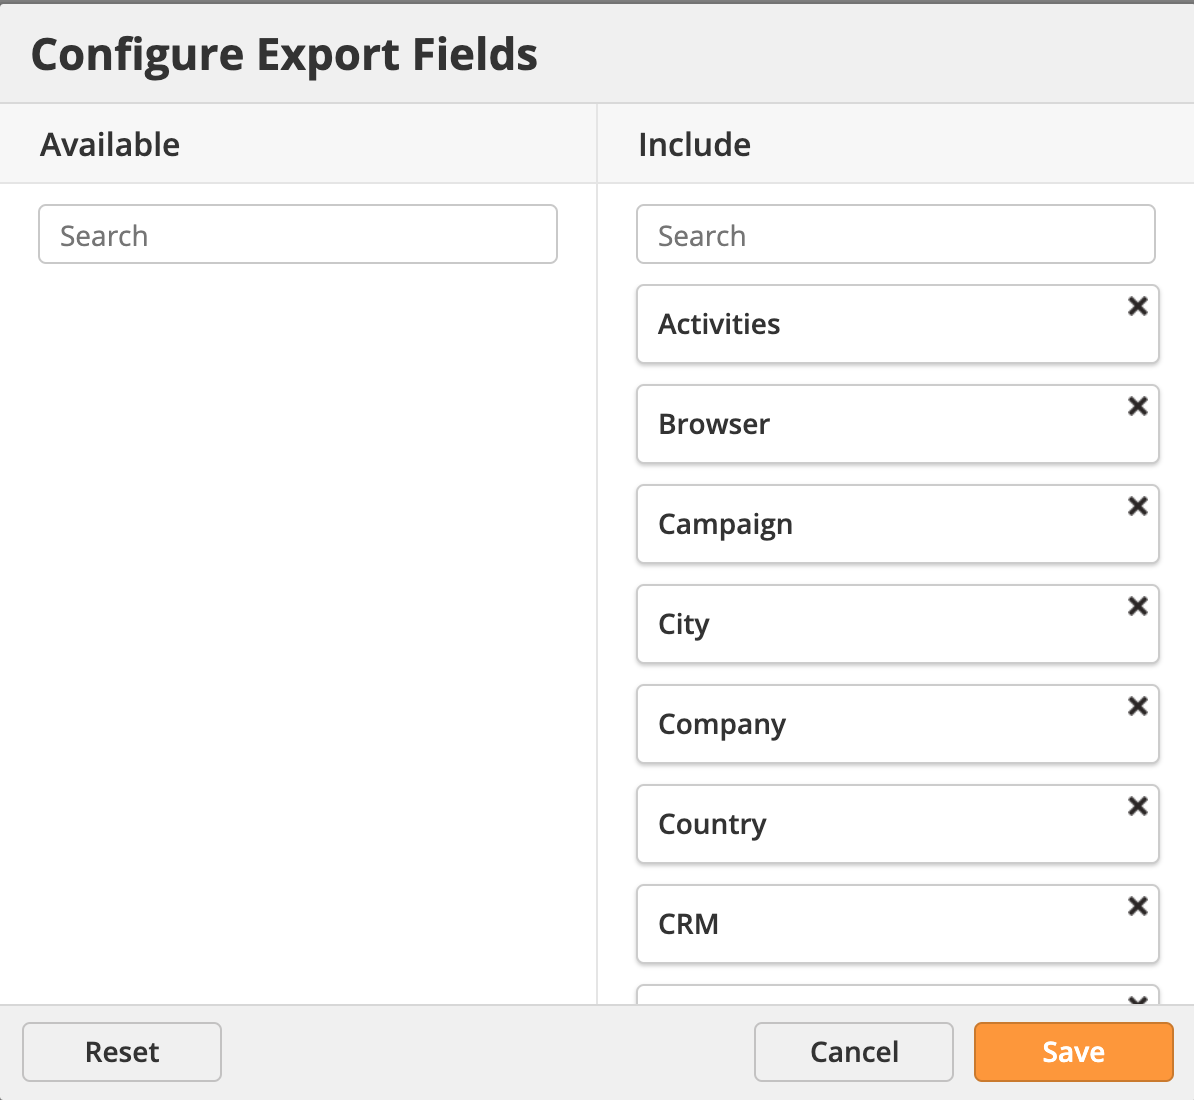
- Attributes like Affinity Category might be helpful. This data will appear in a Lead Liaison Prospect Profile. It will not appear in visitor tracking reports unless the data is mapped to one of the available visitor tracking fields (in the Configure Export Fields popup as shown below).
- Sync to GA Setup: Defines data set that flows from Lead Liaison into Google Analytics.
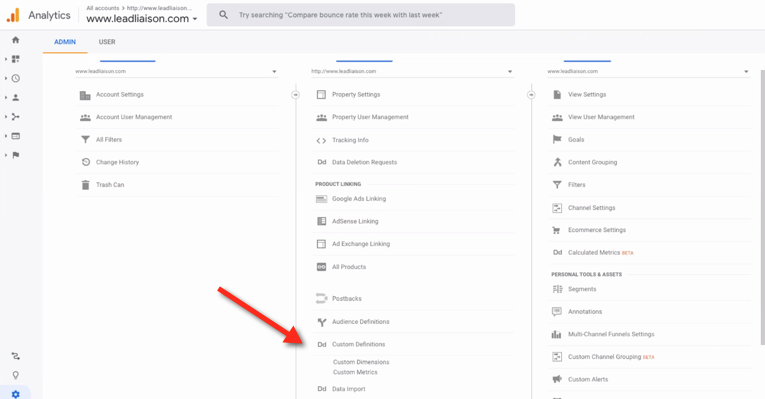
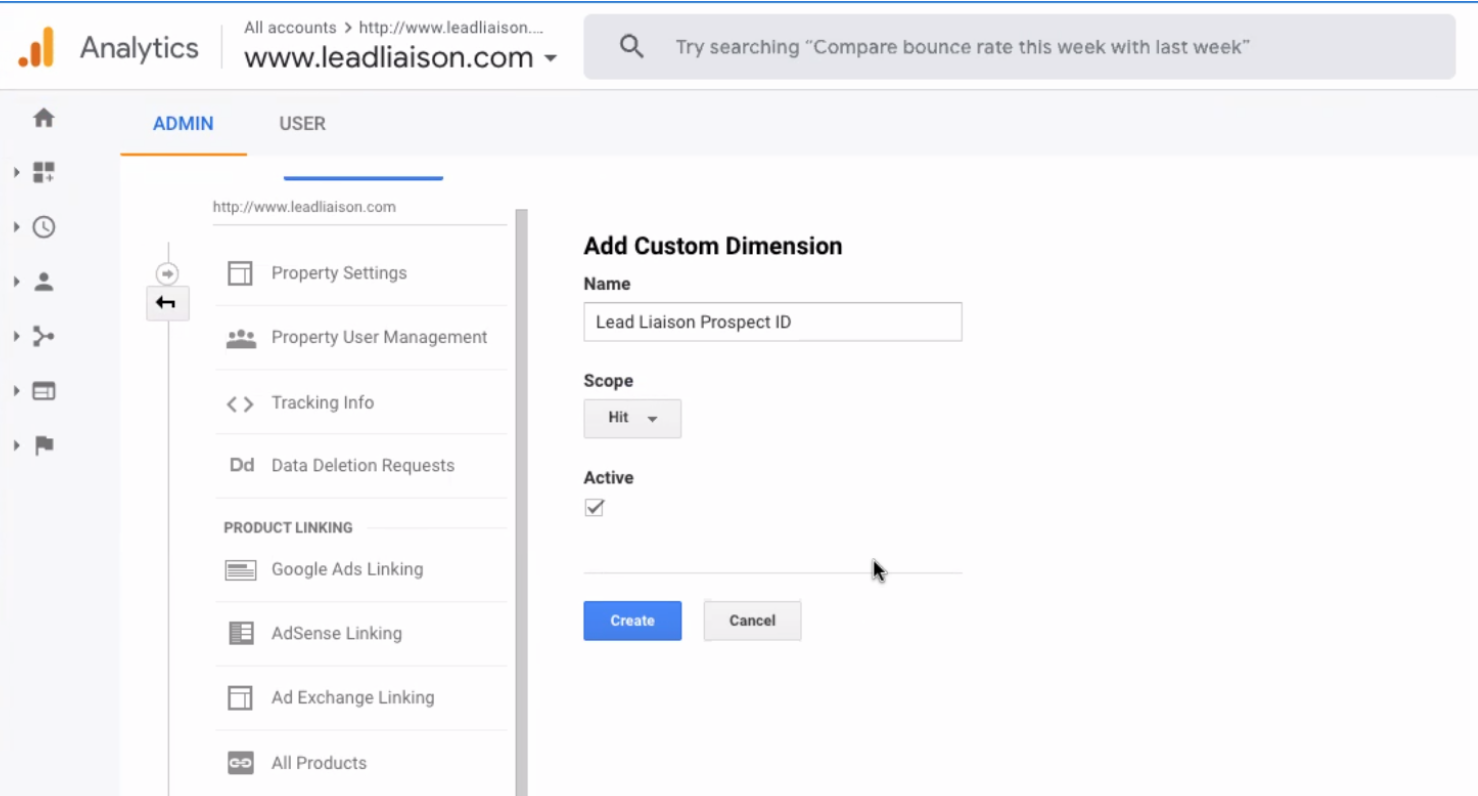
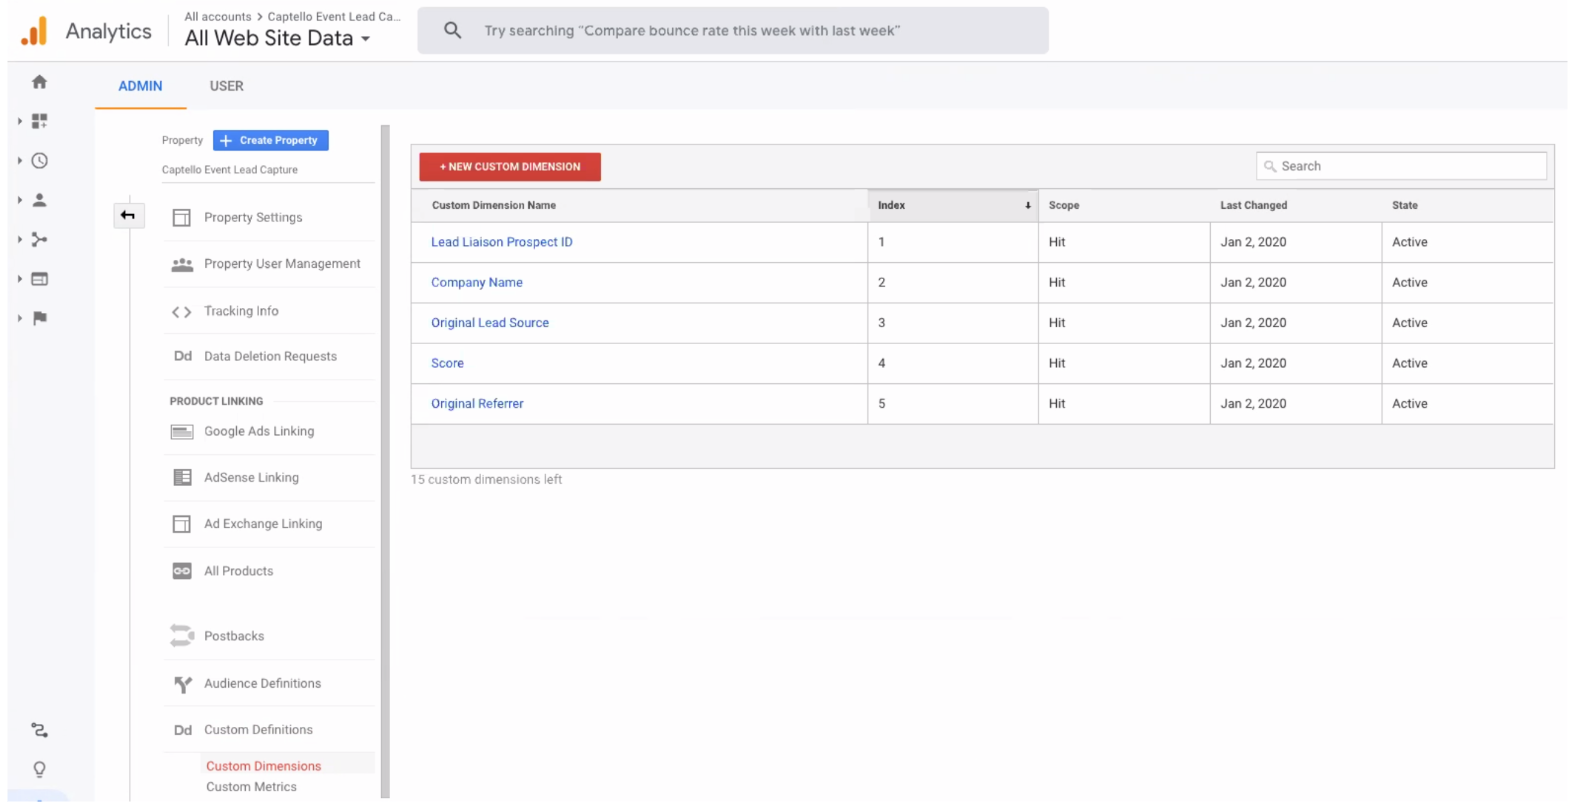
- Add new Custom Dimensions in your Google Analytics account:
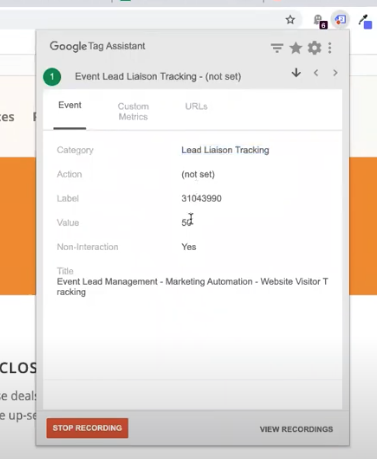
Lead Liaison passes the Event information below to Google Analytics in addition to your Custom Dimensions. The screenshot below shows Google Tag Assistant with Event data passed from Lead Liaison to Google Analytics:
- Category = Lead Liaison Tracking
- Action = Company name or (not set) if there is no identified company
- Label = Prospect ID
- Value = Lead Score
- Non-Interaction = Yes, to ensure erroneous Bounces are not reported in Google Analytics.
Results of Integration
Audience Report in Google Analytics
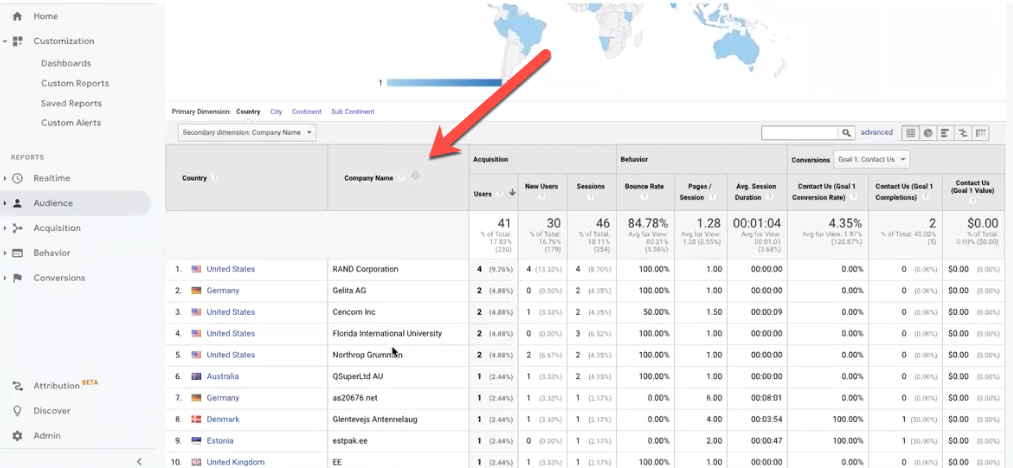
Once the integration is complete you'll be able to see Lead Liaison data inside Google Analytics. For example, in the screenshot below the Company name is added into a Google Analytics tracking result.
Custom Report in Google Analytics
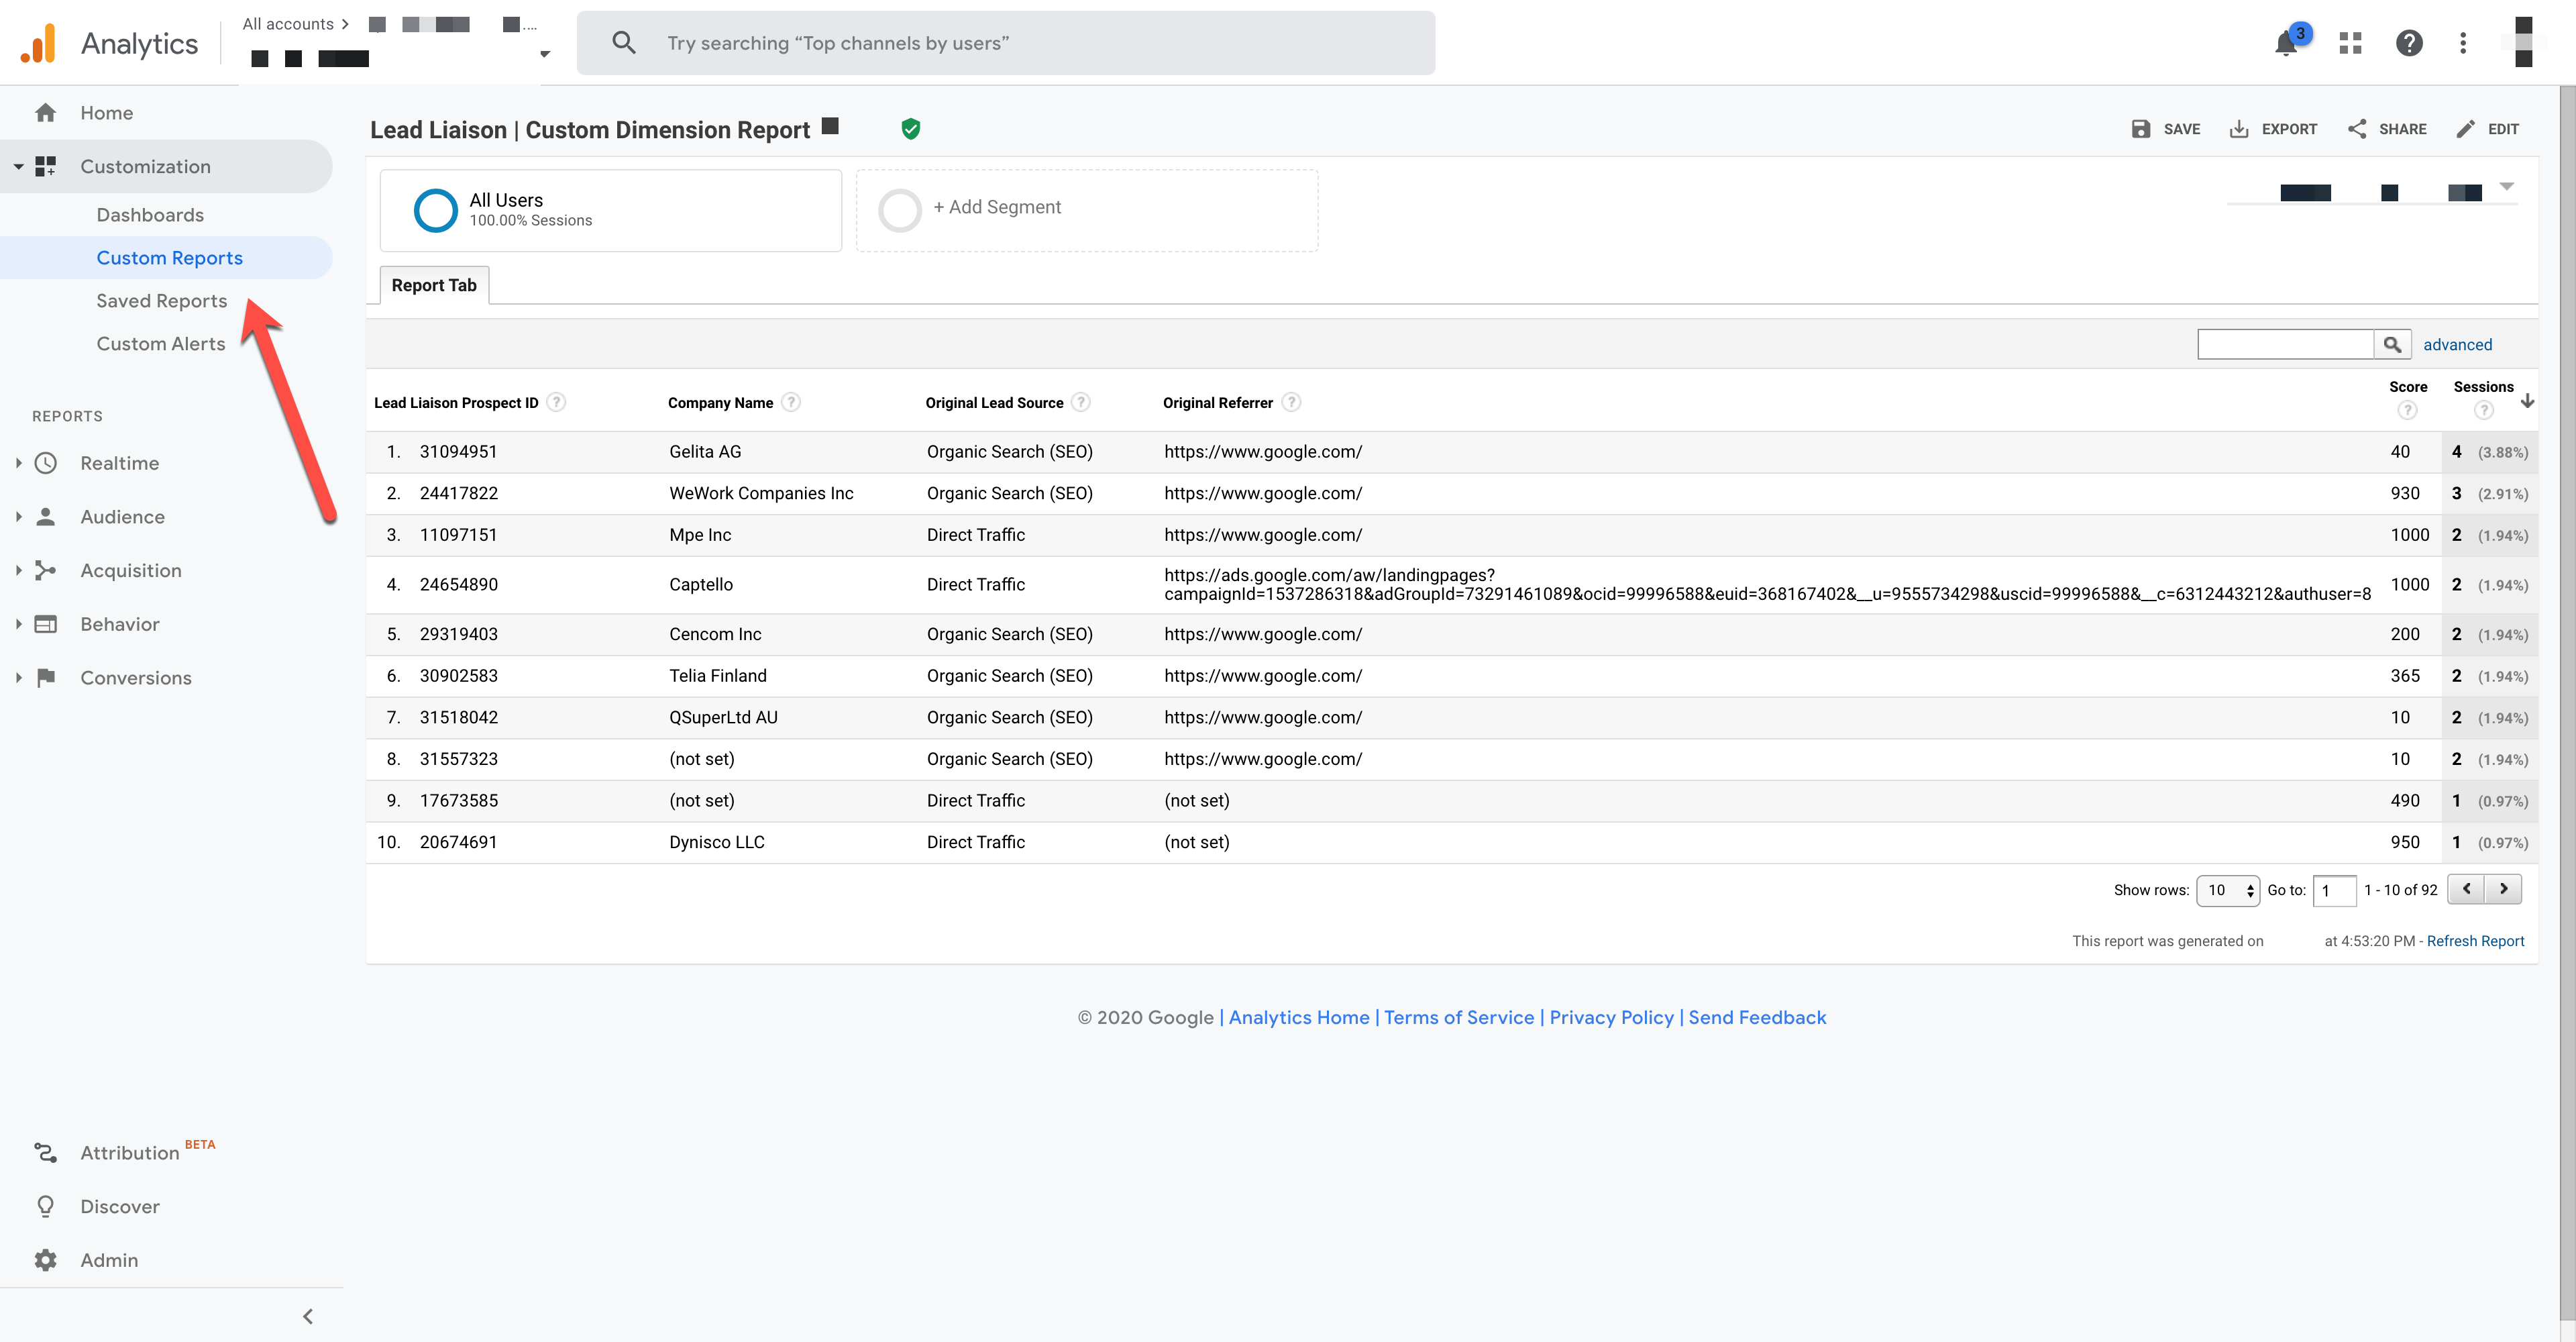
Here's a Custom Report template that you can use in your own Google Analytics account. Click this link to add the report to your preferred Google Analytics View and share it with others.
Report Tutorials
Geo Report by Company Name
Lead Scores by Company Name
Custom Dimensions to Create Segments
Channel Reports by Company Name
Visitor Tracking in Google Data Studio
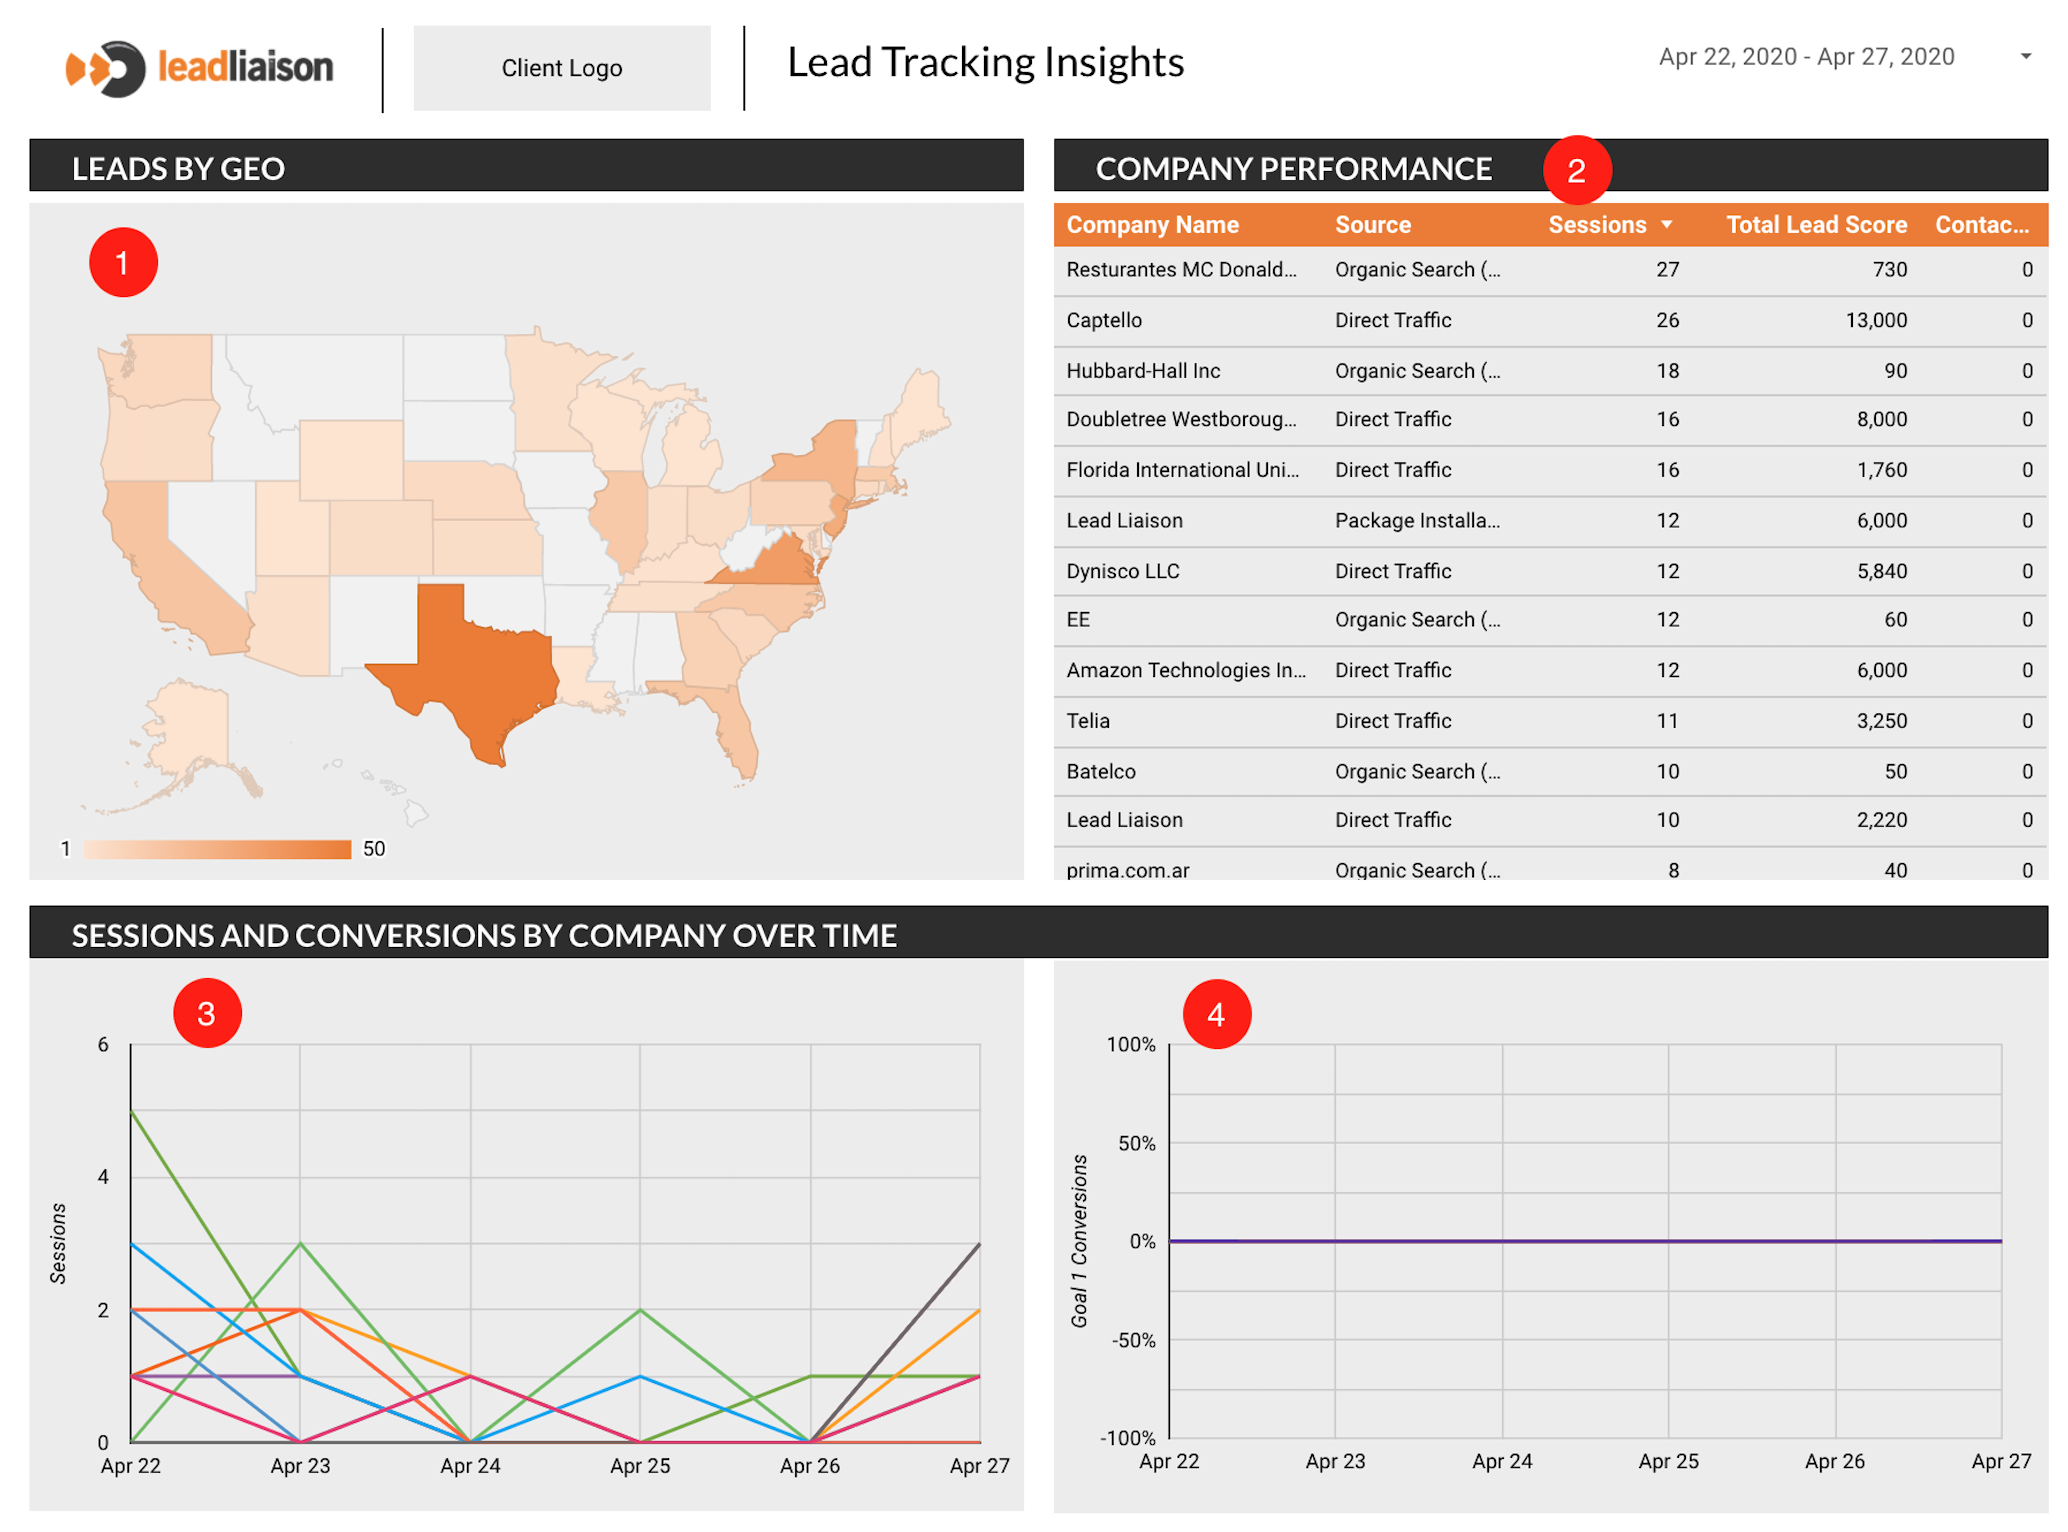
Build visitor tracking reports in Google's Data Studio. To do so, download the report template here and add your data using the video tutorial below. Here's how the template looks along with some quick pointers:
Summary of Data Studio sections:
- Leads of Geo: See where each lead is coming from. Customizable geo level (ie state, country, city).
- Company Performance: See aggregated information by company name.
- Company name: excludes (not set companies)
- Lead Source: The channel from which the visitors arrived
- Sessions: The number of site visits from each company
- Total Lead Score: The sum of the individual lead scores by company
- Goal 1: A customizable conversion metric relevant to you (ie contact form submissions, purchases, etc)
- Sessions by Company Name over Time: See how many sessions each company is generating over time. Drill up or down to see the sessions by year, month, or date. Time breakdowns are customizable.
- Goal 1 Conversions Over Time: See how many conversions each company is generating over time. Drill up or down to see the sessions by year, month, or date. Time breakdowns are customizable.
Google Analytics Data in Lead Liaison Profiles
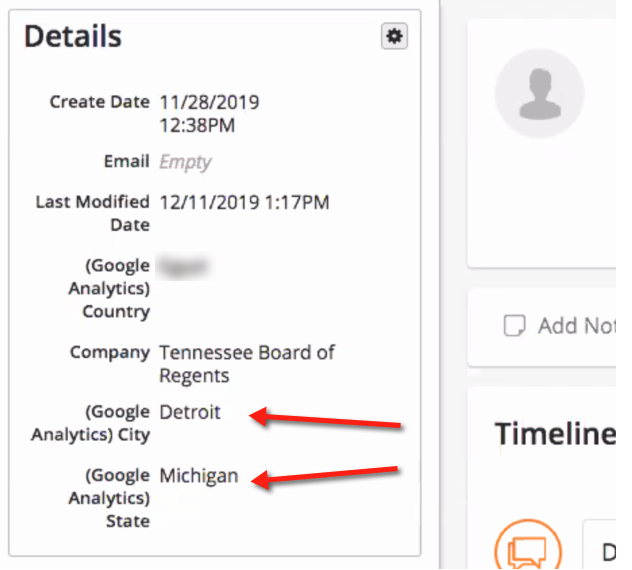
Similarly, records in Lead Liaison can be updated with data from Google Analytics.
Notes
- Data is updated and synced between the two systems every two hours.
- Data can be mapped to Lead Liaison standard fields. For example, if you want to overwrite the City, State, and/or Country collected by Lead Liaison with data collected from Google Analytics you could do that. Can map to standard fields.
Granting Support Access
Google Analytics allows you to grant access to other users so you can share your data with them, or give them more permissions to do things like manage users, edit settings, etc. Our support team may ask to be granted access to your Google Analytics account in order to help you troubleshoot any issues. Granting access is the most secure way to share your site’s data without having to share your login details.
Step 1. Open Your Settings in Google Analytics
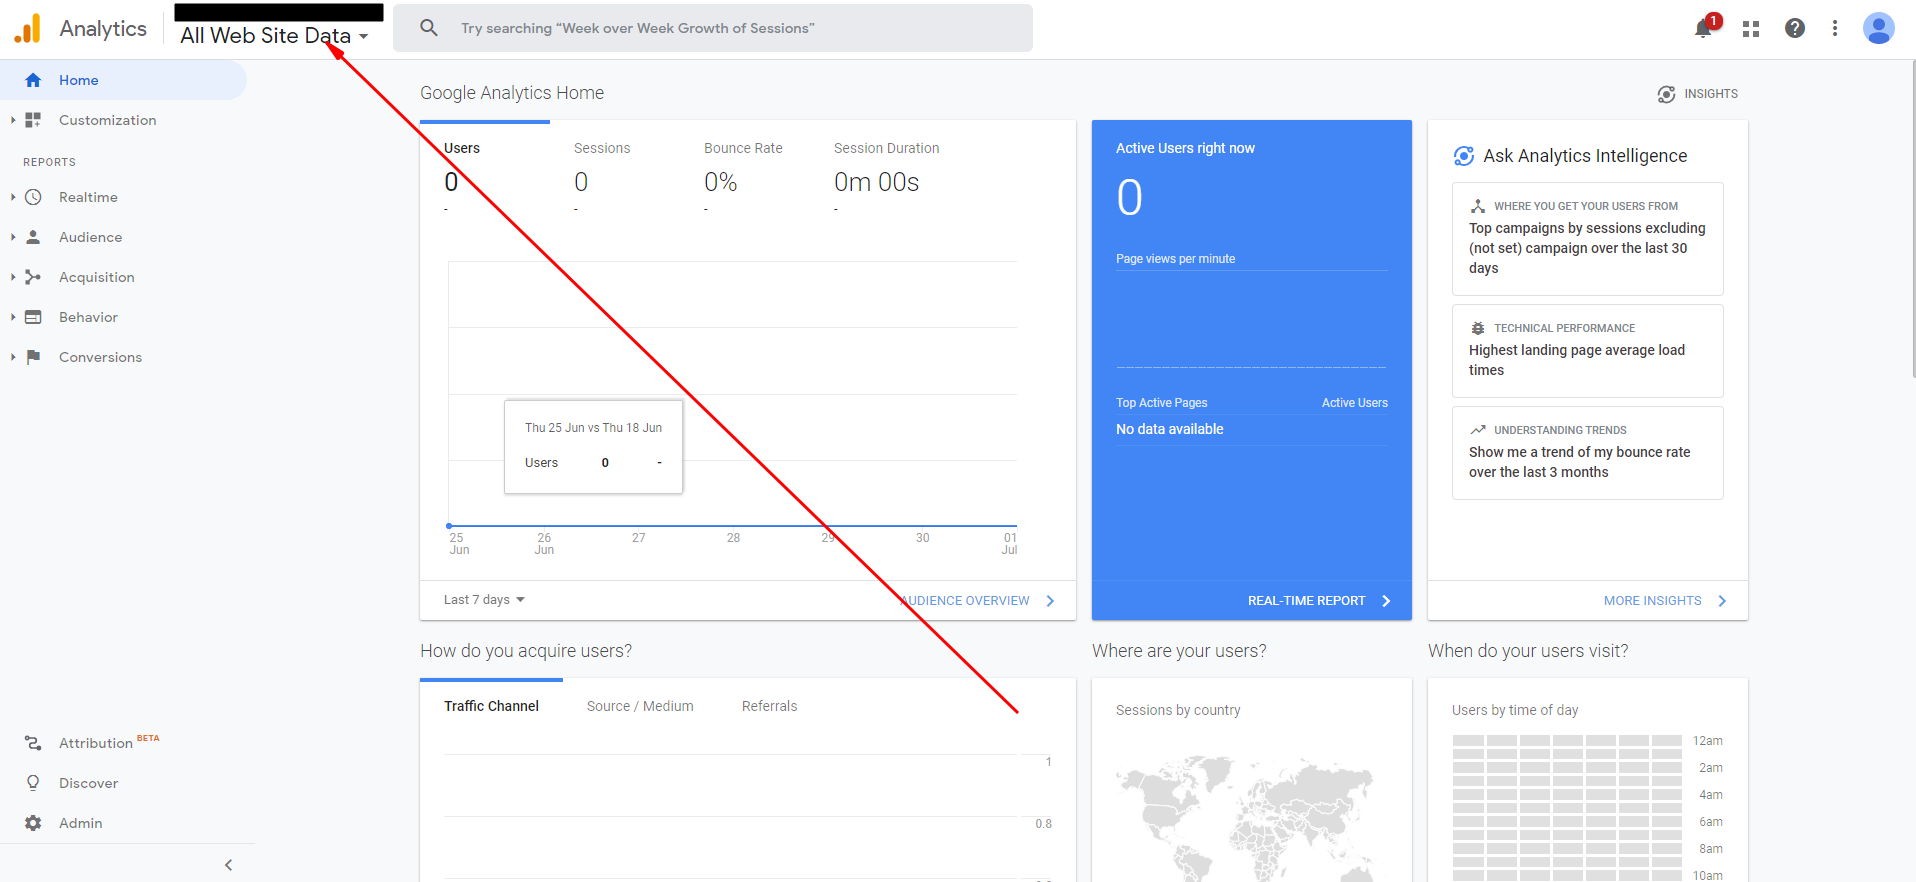
The first thing you need to do is to sign in to your Google Analytics account and choose the site for which you’d like to grant access.
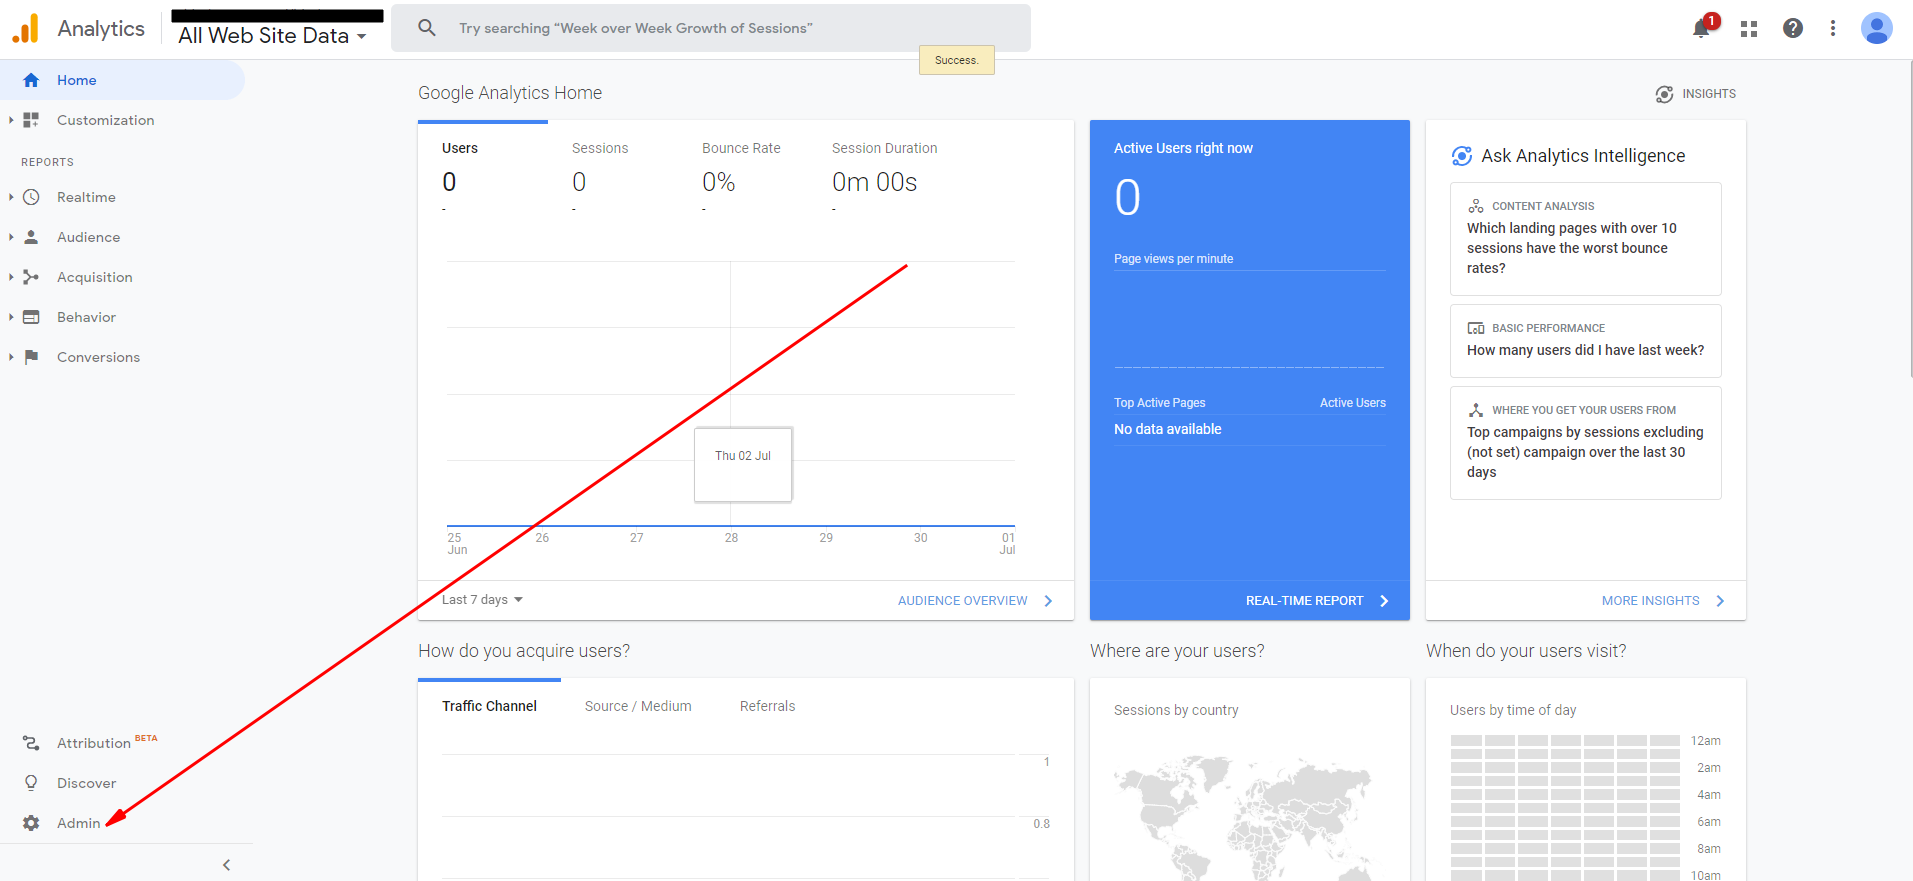
Then, click the Admin option.
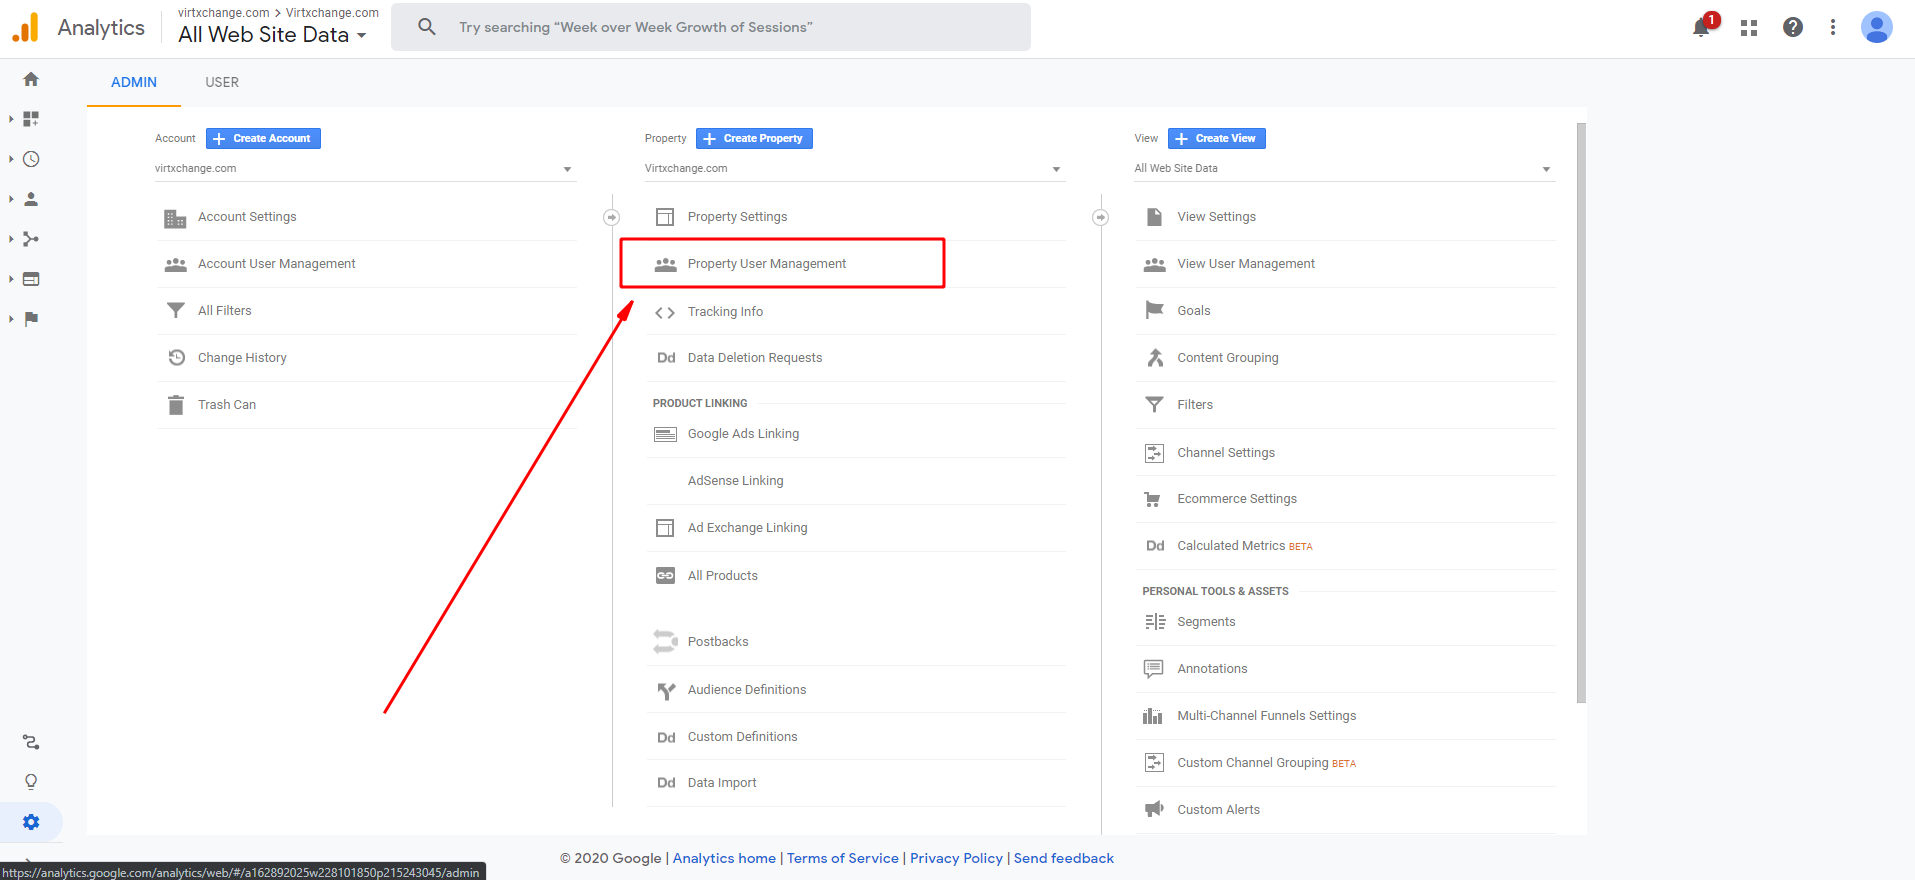
Now you’ll notice there’s a User Management link under every column. That’s because there are 3 levels of access: Account, Property and View:
- Account: Allow users to add other users, add additional websites, and link AdWords and AdSense data.
- Property: Allow users to access the tracking code, adjust the retargeting code and adjust settings on a particular website.
- View: Allow users to view reports, add goals and content groupings.
Click the User Management link in the middle, under the Property column.
Step 2. Add permissions to a user
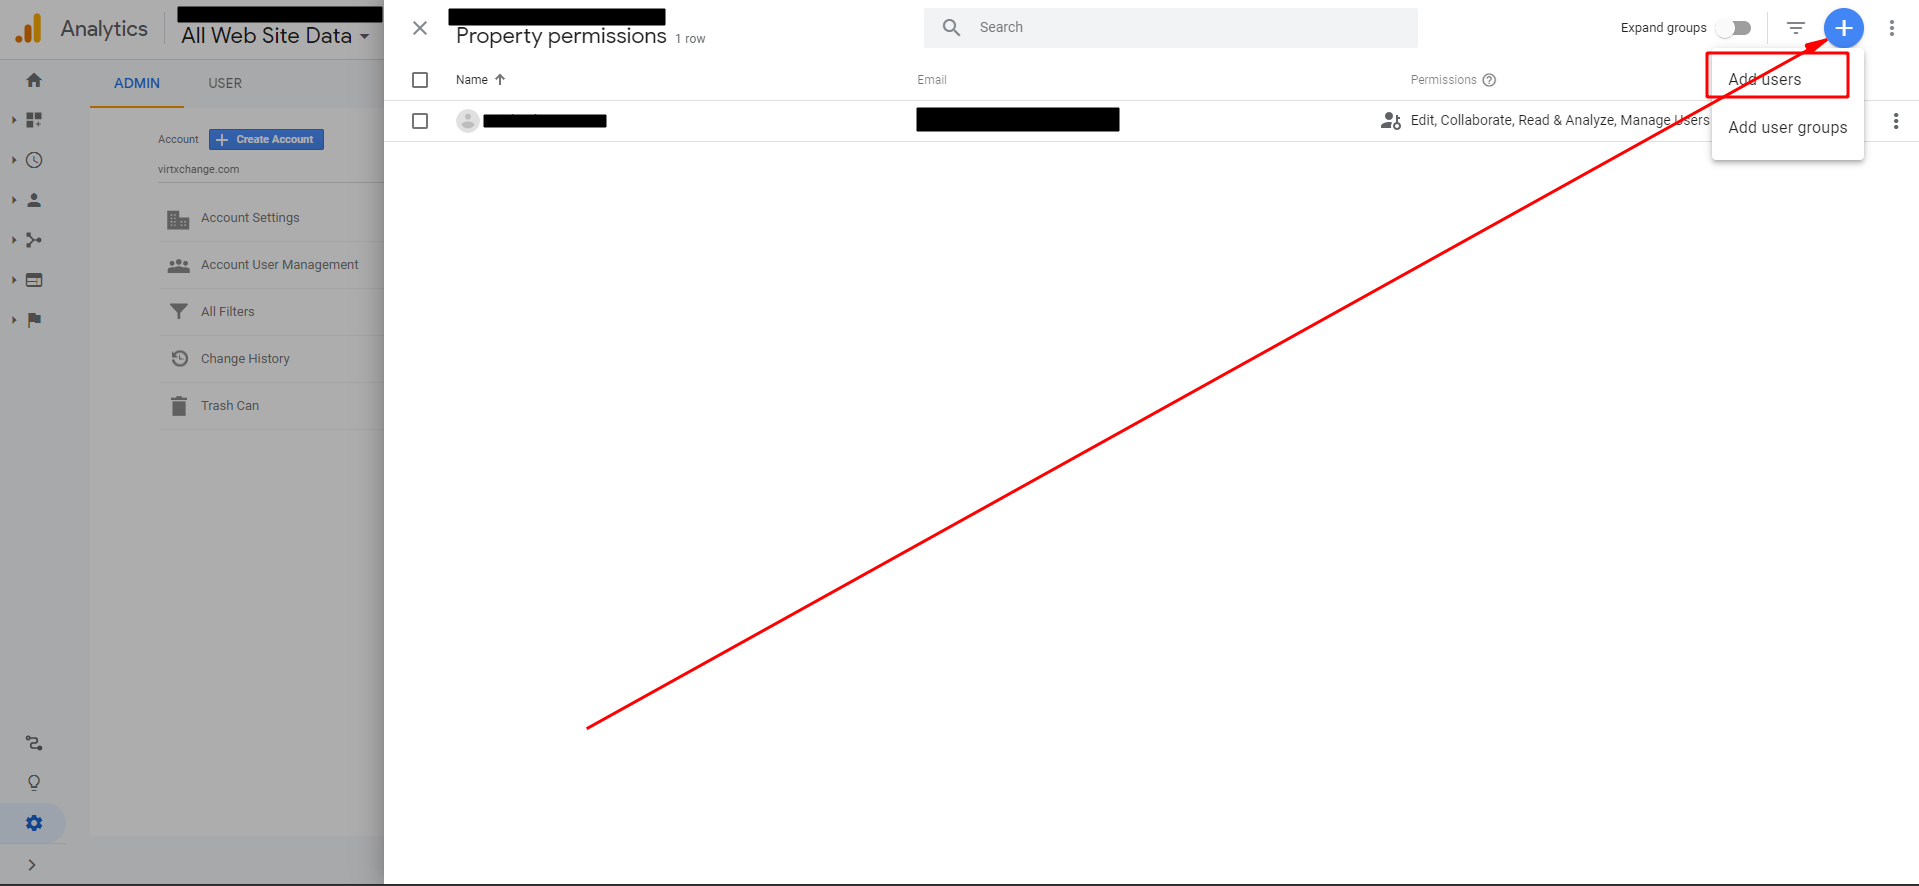
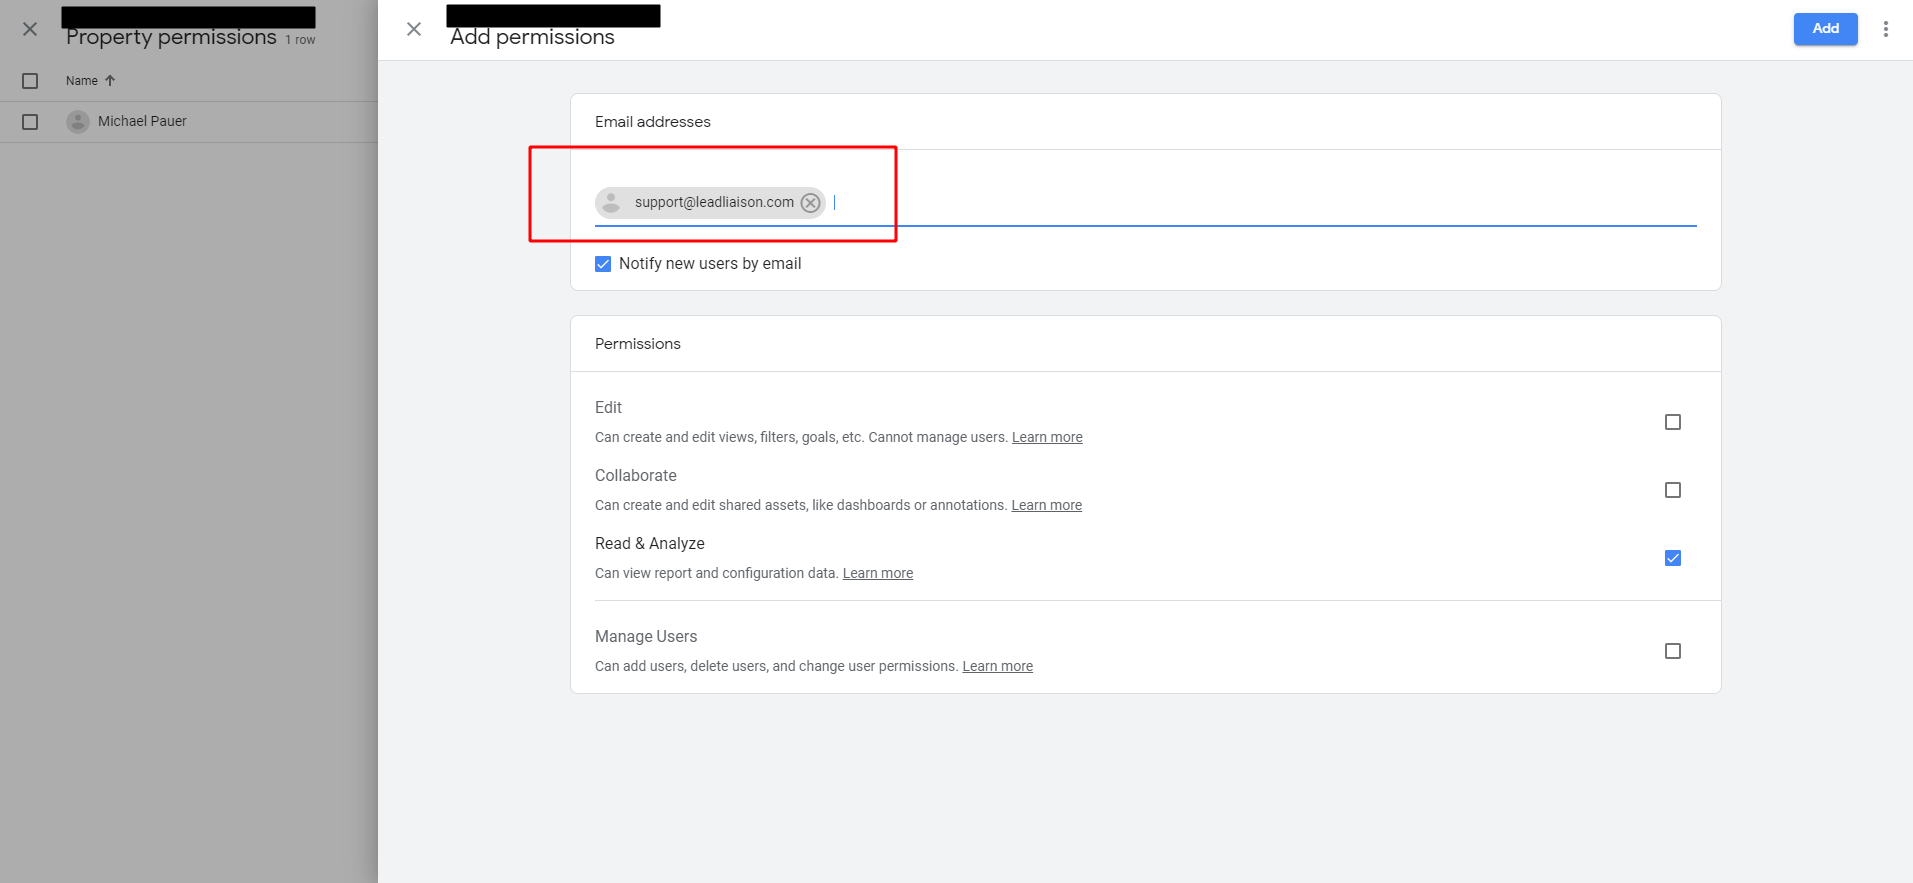
you’ll be asked to enter the email of the user to whom you’d like to give access. You can give permissions to manage users, collaborate, edit or read and analyze. Usually, support will need Edit access, but that is entirely up to you and what your comfortable with.
After clicking the '+' and selecting Add User, input support@leadliaison.com as the user to grant access to.
© 2021 Lead Liaison, LLC. All rights reserved.
13101 Preston Road Ste 110 – 159 Dallas, TX 75240 | T 888.895.3237 | F 630.566.8107 www.leadliaison.com | Privacy Policy

