External Web Forms
Overview
While using Lead Liaison, you can track forms that were not
Mapping an Existing Web Form
There are two options to use when mapping an existing web form. You can use a custom mapping or have your form scanned.
Scanned forms are easier to manage as Lead Liaison will automatically scan the form remotely and identify form fields for you. Scanned forms are ideal if you don't expect the form fields to change that frequently and/or you don't have the ability to look at the code for your web form.
For easier form management, Lead Liaison offers a second option, custom mapping.
Each option is discussed in detail below.
Using Scanning
Follow these five steps to scan and map an existing form that's already on your website:
Fields Must Have Name Attribute
Lead Liaison will only scan form fields if the Name attribute is associated with each field. If the form is not scanning, make sure to add the Name attribute. The Name attribute is discussed in more detail on the w3schools.com website here. See the "The Name Attribute" section.
Step 1: Configure Form
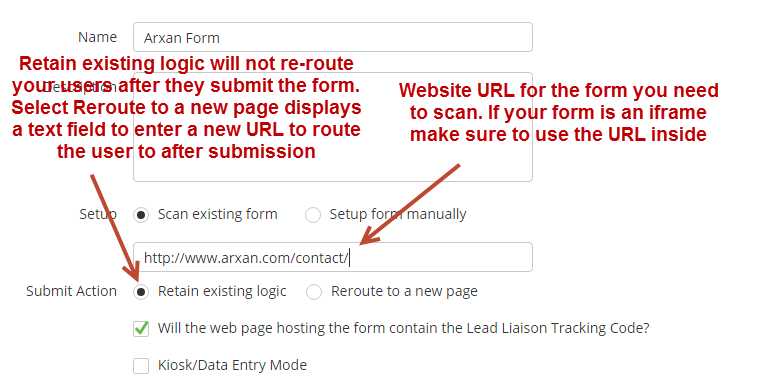
If you will be using a tracking pixel to track the form as listed in post-processing step 3b below, turn off the toggle for "Will the web page hosting the form contain the Lead Liaison Tracking Code?"
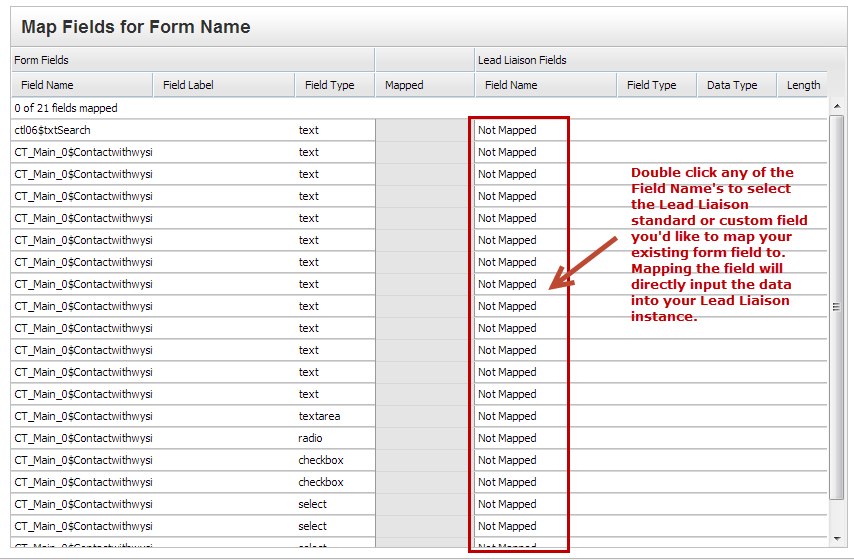
Step 2: Map Form Fields
Step 3: Add Alert
See Web Form Alerts section below.
Step 4: Take Action
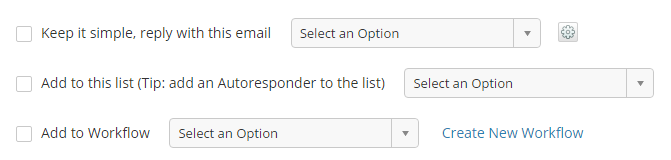
In this step you can take action to follow up. There are three options, all of which may be individually enabled/disabled:
- Reply with an email = Select the email marketing campaign you want to use as a reply to the web form submission. Click the gear to the right of the drop down box to change From/Reply email address options. Note, if there is no Lead/Contact Owner then the system will use the default address information.
- Add to a contact list = Adds the prospect to a contact list.
- Add to a process = Adds the prospect to an automation or nurturing process. Note, the values shown in the drop down are Automations and Lead Nurturing (with Type = "Just for Sales" and "Marketing Nurture Track" only). This is a great opportunity to add a prospect to a workflow that relates to the web form.
Reply with Email vs. Add to Process
Note, when replying with an email an email will be sent every time the same prospect submits the form; however, since prospects can only be added to an automation one time, if they are added to any automation in the "Add to Process" section they will only enter the workflow one time - even if the prospect submits the same web form multiple times.
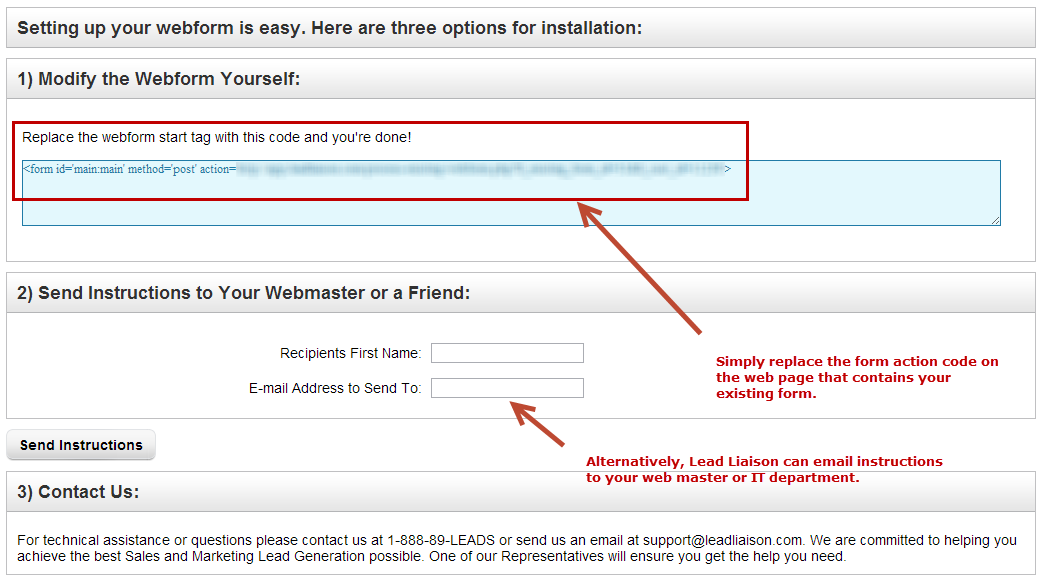
Step 5: Publish Form
Form Submission Under SSL
If the form will be embedded into a web page under SSL (https) then change the http to https in the webform start tag.
Keeping Your Existing Form Action Code
If you want to keep the existing form action to send the form submission to your backend first, then you'll need to submit the form to Lead Liaison's backend after you submit it to your backend. There are a few steps to take, which are discussed below in the Post Processing Before Submitting to Lead Liaison section. Please read this section carefully and make the appropriate changes.
Using a Custom Mapping
The steps to setup a custom mapping are very similar to those described above for scanned forms. The differences are highlighted below.
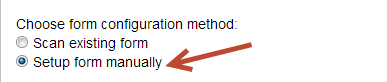
- In Step 1, choose "Setup form manually" for the form configuration method.
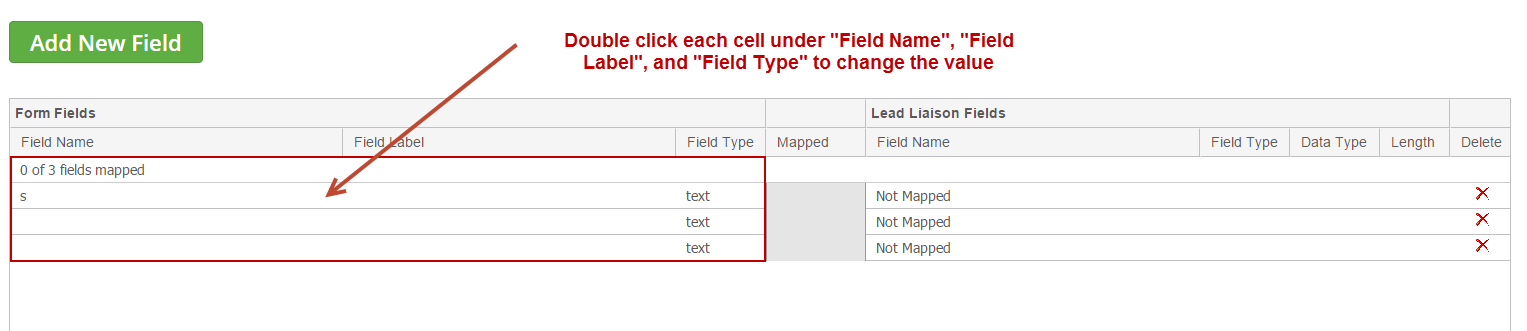
- In Step 2, add new fields to map
- Field Name is from your form code
- Field Label can be anything you want. It's used as a way to help you identify which field it is.
Field Name
"Field Name" is the name attribute of the input field. For example, consider this line in your form: <input type="text" name="fname">. In this case, the "Field Name" is fname.
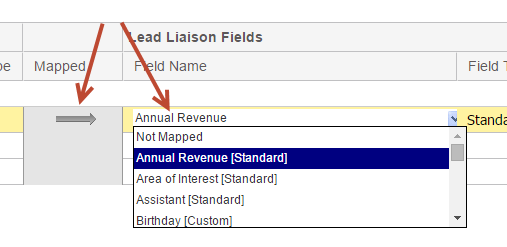
- In Step 3, setup your mapping and add the Lead Liaison Standard or Custom field to map the data to.
- Delete unnecessary fields by clicking the icon under the "Delete" column.
- Select the mapping direction (none or one-way) and select the field to map to
Managing Fields on a Custom Mapping
At any point in time new form fields may be added or existing fields may be deleted from the form. Follow these instructions to edit your form fields:
- Go to Content > Web Forms
- Click Edit under the Actions column next to the form you wish to edit
- Proceed to the appropriate step
Integrating Modal Forms
If your website has forms that are displayed as a modal (popup on the same page) then follow these steps to avoid registering a page view every time the page containing the modal-based form is loaded:
- In the web form settings, uncheck the checkbox for "Will the web page hosting the form contain the Lead Liaison Tracking Code?" This will force the page render to not trigger a form view.
- At the "Publish Form" page, find the "img" tag which triggers the form view. Add this image tag to the page HTML when the popup is opened.
- It's likely you'll keep your form tag as is.
In summary, set the form as if it was within a page that does not contain the Lead Liaison tracking code. As a result, the tracking code will not trigger the form view. When the popup is opened add the image tag to the page which will trigger the form view.
Post Processing Before Submitting to Lead Liaison
It may be necessary to post-process a web form. Post-processing usually occurs when data needs to be validated or conditioned. For example, you may have an External form that was built with your content management system (CMS), such as WordPress or Joomla!, that sends emails/alerts, etc. when a form is submitted. Lead Liaison doesn't force you to change your process if you want to keep your existing setup.
Overview
When post-processing is used on External web forms submissions are sent to the customer's backend, processed, then resubmitted to Lead Liaison. For Lead Liaison to support this process, we append a Lead Liaison Prospect identifier to the form. The Prospect identifier is collected from a JSONP request sent from the tracked web page hosting the form to Lead Liaison's backend. The request grabs the Prospect identifier and appends it to the web form as a hidden field.
Here are the steps to take to keep your form action open tag code unchanged and integrate your external form with Lead Liaison:
Step 1: Map your Existing Web Form Using the Instructions Above
Step 2: Turn Feature On
This feature is disabled by default for all web forms. To turn this feature on, append the line of JavaScript code shown below within the block of Lead Liaison tracking code. It's necessary to only add this new line of tracking code on the page where the web form is located.
var ll_append_identifier_to_form = true;
Step 3: Disable Auto-Form Tracking and Enable Form Views
If you want to submit the form data directly to Lead Liaison and bypass submitting the form to your backend then do Step 3a below. However, if you want to submit the form data to your backend as well as to Lead Liaison, thereby augmenting the submission process, then do not edit your form open tag (<form>) and follow Step 3b.
Step 3a: Add Form ID Parameter to Form Open Tag
This step is required for two reasons:
- register form Views inside Lead Liaison
- disable automatic web form tracking
To add the parameter to your form open tag do the following:
- Go to Step 5 in the publish process.
- Copy ll_existing_form_id=FORMID. In the example below you'll see ll_existing_form_id='485'. Your value will be different as each form is given a unique ID.
<form ll_existing_form_id='485' id='main:main' method='post' action='http://app.leadliaison.com/process-existing-webform.php?ll_existing_form_id=485&ll_cust_id=24589'>
Step 3b: Add Form View Pixel and Disable Auto Tracking
To enable form views add the line below anywhere inside the body tag (<body>) of the page that contains your external form. Note your tracked domain, customer ID, and form ID will differ. To find your form ID do the following go to Step 5 in the publish process of your External Form.
<img style='visible: none;' src='https://YOURTRACKEDDOMAIN/tracking_engine/update-ll_existing-webform_total_views.php?ll_existing_form_id=YOURFORMID&ll_cust_id=YOURCUSTOMERID' />
Next, disable automatic web form tracking by following these instructions.
Remember to turn off the toggle for "Will the web page hosting the form contain the Lead Liaison Tracking Code?" when setting up your form. If you do not, the tracking pixel will not work.
Step 4: Forwarding Form Submissions to Lead Liaison
Posting Back to Lead Liaison?
You do not need to do this step if you have chosen Step 3a above. However, if you've done Step 3b, you will need to follow this step.
Once you have completed the above steps, make a call back to Lead Liaison to send the form submission. You should forward the submission data to http://t1.llanalytics.com/process-existing-webform.php?ll_existing_form_id=xxx&ll_cust_id=xxxxx. You can find the exact URL on the Publish Form page of the External Form Wizard. The correct URL is shown in the image below.
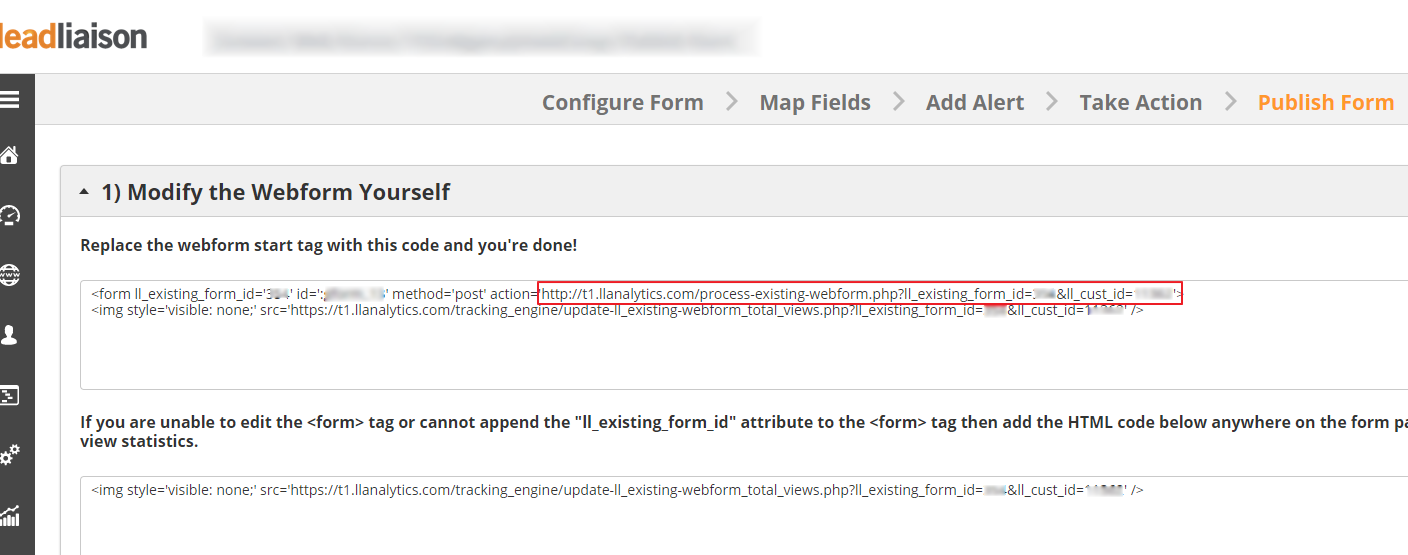
If your website runs with SSL (HTTPS), change the "HTTP" in the URL to "HTTPS".
The way the information is submitted back to Lead Liaison depends on your backend infrastructure. Your web developer can help you understand how your system works and the best way to forward data to us. Below we have provided an example of how you might forward data back to our system using a PHP CURL.
Including Unique Visitor Parameter
If you are not going to submit all the data in the $_POST array or you are going to process the submitted data before forwarding to Lead Liaison, then make sure to include the "ll_unique_visitor_id" parameter with the submitted data. This parameter will be used to assign the submission to the tracked visitor. The "ll_unique_visitor_id" parameter is automatically appended to a form submission by Lead Liaison. If you are using PHP, you'll see it as $_POST['ll_unique_visitor_id']. In the curl below we use the $_POST array and submit all information to Lead Liaison. As a result, the "ll_unique_visitor_id" will be part of the submitted data.
In the example below, we provide a code snippet for a PHP application:
<?php //Define the CURL post URL, replace the patterns %%THE_FORM_ID%% and %%THEIR_CUSTOMER_ID%% by the form ID and customerID, these values are at the publish step of the existing webform wizard. $url = 'http://t1.llanalytics.com/process-existing-webform.php?ll_existing_form_id=%%THE_FORM_ID%%&ll_cust_id=%%THEIR_CUSTOMER_ID%%'; $fields = $_POST; //url-ify the data for the POST foreach($fields as $key=>$value) { $fields_string .= urlencode($key) . '=' . urlencode($value) . '&' ; } rtrim($fields_string, '&'); //open connection $ch = curl_init(); //set the url, number of POST vars, POST data curl_setopt($ch,CURLOPT_URL, $url); curl_setopt($ch,CURLOPT_POST, count($fields)); curl_setopt($ch,CURLOPT_POSTFIELDS, $fields_string); //execute post $result = curl_exec($ch); //close connection curl_close($ch); ?>
Reference: http://davidwalsh.name/curl-post
![]()
© 2021 Lead Liaison, LLC. All rights reserved.
13101 Preston Road Ste 110 – 159 Dallas, TX 75240 | T 888.895.3237 | F 630.566.8107 www.leadliaison.com | Privacy Policy