Automatic Web Form Tracking
Overview
Enables customers to automatically track website visitors who submit a form by their name, company and email. Additionally, leads are automatically created and optionally injected into supported CRM systems which reduces data entry time. All of this is done without adding anything else to your website except for 2-3 lines of tracking code.
This feature is called Automatic Web Form Tracking.
Supported Browsers
Browser | Version | Non-Ajax Forms | Ajax Forms |
|---|---|---|---|
Internet Explorer | IE8+ | Yes | Yes |
Firefox | 5+ | Yes | Yes |
Chrome | 13.0.782.112+ | Yes | Yes |
Opera | 11.5+ | Yes | Yes |
Safari | 5.1+ | No | Yes |
Functionality
Highlights
- Automatic Web Form Tracking works "out of the box" with your existing 2-3 lines of tracking code.
- Captures the following four (4) parameters from a web form submission when available:
- company
- name
- title of page
- If name is available then the website visitor's name is shown instead of "Anonymous". If name is not available then the website visitor's email address is displayed instead of "Anonymous". If name or email is not available then the form submission is not tracked as a known lead nor is an Activity History event recorded for a "Web Form Submission".
- Automatic Web Form Tracking does not interfere with Lead Liaison's advanced web form integration technology (hosted or existing). If advanced web form tracking technology was integrated into an existing web form then data captured from integration of advanced web form technology will override Automatic Web Form Tracking.
- An Activity History Type named "Web Form Submission" is recorded under the "Type" column on the prospect's Profile page. The title of the web form page is shown under the "Activity" column.
- All form submissions are tracked in the Activity History section and the name/email on the Visitors page even if the visitor viewed several pages before submitting a web form.
- For example, if visitor viewed 3 pages before submitting a web form these 3 pages would be tracked and the web form submission would give us the name, email, etc. information to convert the visitor into a known lead - the user would see the name of the visitor on the Visitors page
- If during the same visit the visitor submits 2 additional web forms (totaling 3 web form submissions) all 3 of these web form submissions will be recorded in the Activity History section.
- CRM integration
- Form submissions are also recorded and synced with supported CRM systems.
- Administration
- When used in conjunction with a CRM system, Lead Liaison can automatically add a new lead to supported CRMs when a web form is submitted. A check-box option exists on the general-settings.php page that says "Auto-create CRM lead from Automatic Web Form Tracking:". This option is only shown when if your account has CRM connectivity enabled. To access this option go to Settings > Account > Settings > Salesforce.com
- Tracked web form fields are automatically mapped to Lead Liaison's standard fields. For example, all of the name fields map to our name fields, email to our email field, etc.
Organizing Stats for Automatically Tracked Web Forms
Lead Liaison automatically creates a "Tracked Form Object" for each webform with the same identifier. The identifier may be any of the following options, ordered by priority:
- "ll_form_identifier" attribute, example: <form ll_form_identifier="Contact Us">
- "name" attribute, example: <form name="my_form_name">
- "id" attribute, example: <form id="my_form_id">
- "No Name", if all the above conditions were not met.
To see a list of automatically tracked webforms organized by Object do the following:
- Go to Content > Web Forms
- Filter by form type "Auto"
Tracked Web Form Fields
Lead Liaison automatically tracks email, name and company form fields. Web form fields with the following field names are automatically identified by Lead Liaison. The "name=" or "id=" parameter must be in one of the supported formats below. Lead Liaison will first check the name= parameter. If there's no match, then the id= parameter is used.
Field names are not case sensitive. For example, Email, email, eMAIL and EMAIL will all work.
Email:
email, mail, mailaddress, emailaddress, mail_address, email_address, lead_email, leademail, contact_email, contactemail, lead_mail, leadmail, contact_mail, contactmail, your-email, contact.email, useremail, fields_email
Name:
name, fullname, full_name, leadname, lead_name, contactname, contact_name, your-name,
First Name:
firstname, first_name, fname, f_name, leadfname, lead_fname, contactfname, contact_fname, contact.firstname, first-name, userfirstname, fields_fname
Last Name:
lastname, last_name, lname, l_name, leadlname, lead_lname, contactlname, contact_lname, contact.lastname, contact.familyname, last-name, userlastname, fields_lname
Company:
company, companyname, company_name, organization, organizationname, organization_name, your-company, fields_business
Implementation Specifics
- Form validation - Automatic web form tracking does not interfere with your web form validation. Validation refers to required fields or validating inputs such as making sure an email address is in the right format. If a web form submission fails your validation the lead will not be identified/tracked in Lead Liaison.
- Form holding - Lead Liaison holds web form submissions for a short period of time, a "holding period" of 750 milliseconds, to capture form data. It's possible a website visitor with a slow internet connection (dial-up for example) would not be tracked as their form submission might be delayed due to internet connection speed. If the visitor's form submission time is longer than the holding period the lead will not be identified nor will a Web Form Submission Activity History event be recorded. For example, if the time starting from clicking the "Submit" button until Lead Liaison's servers receive the form data is more than the holding period then data will not be reported to Lead Liaison. Important: If this happens, your web form functionality will not be affected and your form will still be processed. If your web forms use Ajax technology to submit the form then the holding period does not impact data capture. Note, this occurrence is rare as most people have fast internet connections and even dial-up connections should submit data within the holding period.
- Handling alternate emails - Additional leads may be created if website visitors submit forms using different email addresses. For example, if a website visitor submits a web form using email address #1 then submits another web form using email address #2 a second lead will be created under email address #2 showing one hit and the lead under email address #2 will show a Lead Status of "offline". Additionally, the second web form submission will record a Web Form Submission Activity History event under the lead using email address #2. The lead under email address #1 will show Lead Status as "online" and page views will be tracked under this lead. If your web forms use Ajax technology to submit the form then the lead under email address #2 will show a Lead Status of "online" while the lead under email address #1 shows "offline". Note, this occurrence is rare as most people will use the same email address on form submissions.
- Tracking forms submitted from ISPs - If ISP tracking is off automatic web form submissions will still be tracked. Automatic Web Form Tracking identifies a website visitor from an ISP only when they submit a form. However, if your form does not contain a company name field the visitor will not be identified.
- Server side validation - If your web form only has server side validation and no client side validation and a visitor submits a form that fails your validation then the form data will still be submitted to Lead Liaison and tracked.
Turning Off Automatic Web Form Tracking
Default Value
Note, the default value for the ll_use_automatic_form_tracking JavaScript variable is true. In other words, removing this line var ll_use_automatic_form_tracking = true; or var ll_use_automatic_form_tracking = false; does not mean automatic web form tracking is disabled. When it's missing, it's still true. Follow the instructions below to set this variable to false.
To turn off automatic web form tracking flip a flag in your tracking code. Change "true" to "false" in this line of your tracking code:
var ll_use_automatic_form_tracking = false;
After changing the flag your tracking code should look similar to this:
<script type='text/javascript' language='javascript'>
    var llcustid = 123456789;
    var ll_use_automatic_form_tracking = false;
    (function() {
        var llt = document.createElement('script'); llt.type = 'text/javascript'; llt.async = true;
        llt.src = 'https://t1.llanalytics.com/tracking_engine/lltc.min.php';
        var s = document.getElementsByTagName('script')[0]; s.parentNode.insertBefore(llt, s);
    })();
</script>
Disabling Select Pages When Tracking Code is Globally Embedded in the Footer
The standard method for installing Lead Liaison's tracking code is to insert the JavaScript snippet into the footer of your website. However, when doing this it's impossible to manipulate the JavaScript snippet on the individual page, since it's included on the page from the global instantiation. To disable automatic tracking in this scenario, set the flag to false immediately after the standard JavaScript snippet. It's okay if the ll_use_automatic_form_tracking variable is still set to true or missing in the footer instantiation. Either of the code blocks below will work:
<script type='text/javascript' language='javascript'>
    var llcustid = 123456789;
    var ll_use_automatic_form_tracking = true;
    (function() {
        var llt = document.createElement('script'); llt.type = 'text/javascript'; llt.async = true;
        llt.src = 'https://t1.llanalytics.com/tracking_engine/lltc.min.php';
        var s = document.getElementsByTagName('script')[0]; s.parentNode.insertBefore(llt, s);
    })();
</script>
<script var ll_use_automatic_form_tracking = false;></script>
OR
<script type='text/javascript' language='javascript'>
    var llcustid = 123456789;
    (function() {
        var llt = document.createElement('script'); llt.type = 'text/javascript'; llt.async = true;
        llt.src = 'https://t1.llanalytics.com/tracking_engine/lltc.min.php';
        var s = document.getElementsByTagName('script')[0]; s.parentNode.insertBefore(llt, s);
    })();
</script>
<script var ll_use_automatic_form_tracking = false;></script>
Setting the Flag Before the Standard JavaScript Snippet
If it's not possible to set the flag to false immediately after the standard JavaScript snippet then make sure to remove this variable from the standard snippet. Do not leave it in the code snippet as var ll_use_automatic_form_tracking = true;. Remove that line all together.
Identifying the Origin of Automatically Tracked Web Forms
Identify where an automatically tracked web form was first found in one of two ways:
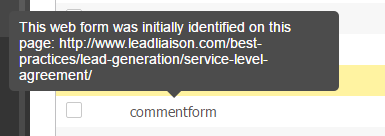
- Hover over the name in the Name column to show a tooltip, as shown below:
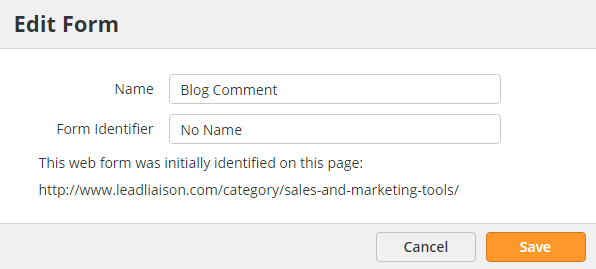
- Click Edit
Changing the Name of Automatically Tracked Web Forms
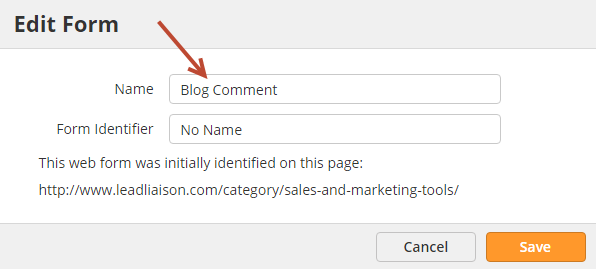
- Click Edit
- Change the name in the Name field
- The Form Identifier is the value of the Lead Liaison identifier attribute, name attribute or id attribute in this order.
Tracking Web Forms With Custom Names/Identifiers
In the event a web form is not using one of Lead Liaison's auto-tracked web form fields you can still enable automatic web form tracking using one of three options:
- Identify form fields by name attribute
- Identify form fields by ID attribute
- Identify form fields by label through the "for" attribute
Identify form fields by name attribute:
If the form fields are something like:
Email <input type="text" name="field_1" />
Full Name <input type="text" name="field_2" />
Company <input type="text" name="field_3" />
Then use this custom JavaScript code with your tracking code:
var ll_fields_map_settings_by_field_name_identifier = {
	email: 'field_1',
	fullname: 'field_2',
	firstname: '',
	lastname: '',
	company: 'field_3'
};
Your tracking code would be something like:
<script type='text/javascript' language='javascript'>
    var llcustid = 123456789;
    var ll_use_automatic_form_tracking = true;
	var ll_fields_map_settings_by_field_name_identifier = {
		email: 'field_1',
		fullname: 'field_2',
		firstname: '',
		lastname: '',
		company: 'field_3'
	};

    (function() {
        var llt = document.createElement('script'); llt.type = 'text/javascript'; llt.async = true;
        llt.src = 'https://t1.llanalytics.com/tracking_engine/lltc.min.php';
        var s = document.getElementsByTagName('script')[0]; s.parentNode.insertBefore(llt, s);
    })();
</script>
Identify form fields by id attribute:
If the form fields are something like:
Email <input type="text" id="field_id_1" />
First Name <input type="text" id="field_id_2" />
Last Name <input type="text" id="field_id_3" />
Company <input type="text" id="field_id_4" />
Then use this custom JavaScript code with your tracking code:
var ll_fields_map_settings_by_field_id_identifier = {
	email: 'field_id_1',
	fullname: '',
	firstname: 'field_id_2',
	lastname: 'field_id_3',
	company: 'field_id_4'
};
Your tracking code would be something like:
<script type='text/javascript' language='javascript'>
    var llcustid = 123456789;
    var ll_use_automatic_form_tracking = true;
	var ll_fields_map_settings_by_field_id_identifier = {
		email: 'field_id_1',
		fullname: '',
		firstname: 'field_id_2',
		lastname: 'field_id_3',
		company: 'field_id_4'
	};

    (function() {
        var llt = document.createElement('script'); llt.type = 'text/javascript'; llt.async = true;
        llt.src = 'https://t1.llanalytics.com/tracking_engine/lltc.min.php';
        var s = document.getElementsByTagName('script')[0]; s.parentNode.insertBefore(llt, s);
    })();
</script>
Identify form fields by label through the "for" attribute:
If the form fields are something like:
<div>
	<label for="field_id_1">
		<span>
			Email
		</span>
	</label>
	<div>
		<input id="field_id_1" type="text" />
	</div>
</div>
<div
	<label for="field_id_2">
		<span>
			Company
		</span>
	</label>
	<div>
		<input id="field_id_2" type="text" />
	</div>
</div>
<div>
	<label for="field_id_3">
		<span>
			Full Name
		</span>
	</label>
	<div>
		<input id="field_id_3" type="text" />
	</div>
</div>
Then use this custom JavaScript code with your tracking code:
var ll_fields_map_settings_by_field_label_for_identifier = {
	email: 'Email',
	fullname: 'Full Name',
	firstname: '',
	lastname: '',
	company: 'Company'
};
Your tracking code would be something like:
<script type='text/javascript' language='javascript'>
    var llcustid = 123456789;
    var ll_use_automatic_form_tracking = true;
	var ll_fields_map_settings_by_field_label_for_identifier = {
		email: 'Email',
		fullname: 'Full Name',
		firstname: '',
		lastname: '',
		company: 'Company'
	};

    (function() {
        var llt = document.createElement('script'); llt.type = 'text/javascript'; llt.async = true;
        llt.src = 'https://t1.llanalytics.com/tracking_engine/lltc.min.php';
        var s = document.getElementsByTagName('script')[0]; s.parentNode.insertBefore(llt, s);
    })();
</script>
Tracking Multiple Forms with Custom Names/Identifiers
If you have multiple forms with different names/identifiers across your website, then all form fields can be tracked using a single code snippet. Notice in the snippet below that all form field values are added, separated by commas.
var ll_fields_map_settings_by_field_name_identifier = {
    email: 'field_1,field_2,field_3',
    fullname: 'field_4,field_5,field_6',
    firstname: '',
    lastname: '',
    company: 'field_7,field_8'
};
Depending on your selected method, your tracking code would be something like:
<script type='text/javascript' language='javascript'>
    var llcustid = 123456789;
    var ll_use_automatic_form_tracking = true;
	var ll_fields_map_settings_by_field_name_identifier = {
		email: 'field_1,field_2,field_3',
		fullname: 'field_4,field_5,field_6',
		firstname: '',
		lastname: '',
		company: 'field_7,field_8'
	};

    (function() {
        var llt = document.createElement('script'); llt.type = 'text/javascript'; llt.async = true;
        llt.src = 'https://t1.llanalytics.com/tracking_engine/lltc.min.php';
        var s = document.getElementsByTagName('script')[0]; s.parentNode.insertBefore(llt, s);
    })();
</script>
Notes
Working with Form Submissions via the Onsubmit Event Attribute
If your form has an "onsubmit" event attribute then we'll monitor the response of this function when the prospect clicks the "submit" button. If the returning result of this event equals "false" we cancel handling the submission and do not send the data back to Lead Liaison.
In some cases, you may still want to have the "onsubmit" event to return false. For example, if the form is submitting data via Ajax. To accomodate this, you can override the option provided by Lead Liaison and Lead Liaison will still submit the data to our backend even if the original onsubmit event returns "false".
To enable this feature there are two options:
Option 1: Add an attribute to the form open tag as follows: ll_ignore_original_onsubmit_result="1"
Option 2: Add this flag to your tracking code: var ll_ignore_original_onsubmit_result = true;
Working with Form Submissions via Ajax
If your form is submitted with Ajax and does not use the direct form submit action for submissions then follow these instructions.
Call the function below to trigger submitting the form after processing the submitted form on your backend. Lead Liaison will not be able to detect when the form is submitted until this function is called. Place the code below where your form submission is triggered.
If you built the form yourself you'll likely have an “onclick” event on the “submit” button at the bottom of the page.
If you are using a 3rd party form builder then the builder should give you an option to add JavaScript code to be called after the form submission.
// Use one of the two methods in Step 1 below. If neither of these options work for you then you can use any option that works for you to identify the form, such as with a name attribute or by a CSS class.
// Step 1) Identify the form:
// If the form has an "id" attribute:
var my_form = document.getElementById('form_id')

// If the form can not be defined by an "id", then use this method, knowing that the "0" below is the index of the form within all forms on the page. If the form has only one form then the code below will suffice.
var my_form = document.getElementsByTagName('form')[0]

// Step 2) Trigger Lead Liaison tracking code to track the form "my_form" submission:
_ll_track_form_submission.submit_form(my_form, function (){
	// Insert any JavaScript code here that you want to apply after Lead Liaison completes processing the form submission.
})
Selective Insertion
If you have select web forms and prefer to have this additional tracking code only the pages where the web forms reside then place only the additional code snippet (similar to the example below) on the web page.
<script type='text/javascript' language='javascript'>
var ll_fields_map_settings_by_field_label_for_identifier = {
    email: 'Email',
    fullname: 'Full Name',
    firstname: '',
    lastname: '',
    company: 'Company'
};
</script>
Understanding Form Behavior
Consider this use case, there is a web form with the following elements:
Email <input type="text" name="email" />
Full Name <input type="text" name="full_name" />
Company <input type="text" name="field_3" />
It's important to note the "Email" and "Full Name" fields will be automatically tracked without using any custom code since the field names are in a supported format by our Automatic Web Form Tracking technology. If this is the case, only add the code that pertains to the fields that are not automatically tracked such as in the example below:
var ll_fields_map_settings_by_field_name_identifier = {
    company: 'field_3'
};
Using Custom Tracking Code in a Global Header
Make sure you're mindful of the behavior of this custom tracking code. For example, if you use it in a global header with something like:
var ll_fields_map_settings_by_field_name_identifier = {
    email: 'field_1',
    fullname: 'field_2',
    firstname: '',
    lastname: '',
    company: 'field_3'
};
Then any web form within your website with these identifiers will be automatically tracked.
Order of custom code
The custom code described in the section above may be added in any order within the block of Lead Liaison's JavaScript code.
Merging Automatically Tracked Forms
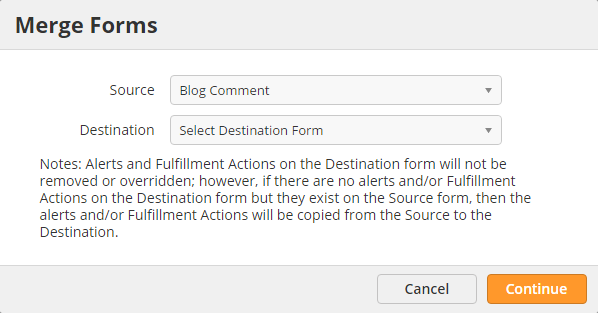
It might be necessary to merge one or more automatically tracked forms into a single auto-tracked form. Follow these steps to do that:
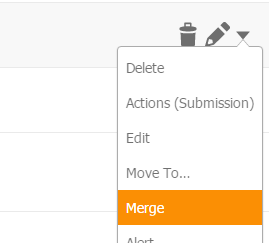
- Navigate to Content > Web Forms and find the form you want to merge into another form. This will be the source form, that gets added into another form (destination form).
- Select Merge from the tab menu options:
The merge will do the following:
- Sum the total # of views and submissions
- Sum the stat logs (used for reporting)
- If the source form has alerts configured:
- and the destination form has an alert, then the source form alert will be removed
- and if the destination form does not have an alert, then the source form alert will get assigned as the destination form alert
- If the source form has Fulfillment Actions configured:
- and the destination form has Fulfillment Actions, then the source form Fulfillment Actions will be removed
- and if the destination form does not have Fulfillment Actions, then the source form Fulfillment Actions will get assigned to the destination form Fulfillment Actions
Essentially, alerts and Fulfillment Actions on the destination form will not be removed or overridden; however, if there are no alerts and/or Fulfillment Actions on the destination form but they exist on the source form, then the alerts and/or Fulfillment Actions will be copied from the source to the destination.
Supporting Multi-Step Forms
If your web form is submitted in steps then you'll need to add an additional parameter to your tracking code where the multi-step form exists. In these cases, you might have a multi-step form wizard from a provider like Gravity Forms or your webform is custom built that uses JavaScript to override the "On Submit" event.
The parameter, called "ll_frequent_try_auto_track_forms", should be added only to your tracking code where the multi-step web form is located. Note: This method of tracking runs every 2 seconds. If the person submits the page where this parameter exists in less than 2 seconds the form will not be automatically tracked.
var ll_frequent_try_auto_track_forms = true;
Automatically Pre-Filling Forms
Used for Automatically Tracked Webforms Only
Please note this feature only works for automatically tracked webforms. It will not work with External Forms or Hosted Forms (including HTML embedded forms). Hosted forms have their own pre-fill capability in the web form designer. To learn more about web form types read this.
Requirements
The following fields can be pre-filled using this feature: email, company, first name, last name and full name. For pre-filling to work, the fields must be in the format described above on this wiki page.
- This is an optional feature to pre-fill an automatically tracked web form.
- Lead Liaison uses JSONP technology to pre-fill the forms. A jQuery library sends the request to Lead Liaison's backend which identifies the prospect and returns their information back in a JSON response. The response is them parsed and the information is used to pre-fill the web form with select information.
Turning On Form Pre-Fill
To turn form pre-fill on add the following line of code underneath your tracking code to each page that contains the form.
var ll_prefill_automatic_tracked_form_fields = true;
Without this line of code form pre-fill will be disabled. By default, Lead Liaison will not pre-fill forms with business intelligence information (data retrieved from our geolocation and company identification lookups, or Hoovers - if enabled). To enable form pre-fill with business intelligence data add the following line of code:
var ll_prefill_form_with_ti_data = true;
© 2021 Lead Liaison, LLC. All rights reserved.
13101 Preston Road Ste 110 – 159 Dallas, TX 75240 | T 888.895.3237 | F 630.566.8107 www.leadliaison.com | Privacy Policy
