Overview
Through fully-customizable forms and business card scanning, the live event lead mobile app makes life easier for sales, while the back office web app give marketing valuable marketing-qualified leads immediately.
Getting Started
Before your team downloads the mobile app, make sure your account is configured right for your Organization.
Minimum Operating System Versions
The Captello app requires iOS 14 or Android 10 at minimum.
Security Profiles
Security profiles let you control how much access users have to Lead Capture elements within the Lead Liaison platform. To access security profiles, navigate to Settings > Users > Security Profiles. Click the Edit button to the right of the appropriate profile.
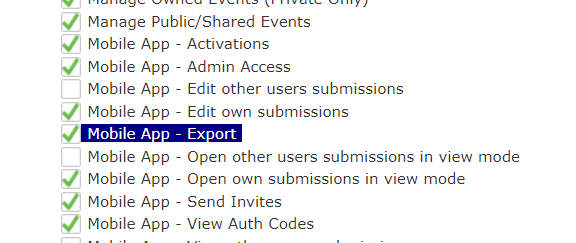
By checking the box next to Lead Capture, you can add or remove all permissions. Press the (+) to the left of the checkbox to view the following individual options:
Access Event Staff
Add Elements – add new elements to existing Lead Capture forms.
Capture Portal – access, complete, or delete incomplete business card transcriptions and barcode captures.
Change Event Visibility – change the event visibility of the events user has access to
Create Event Form – create a new form that will appear on devices.
Create Event Form from Template Only – user must select from a template to create a new event
Edit Default – edit only the default value of existing elements on an existing form.
Edit Elements – edit elements on an existing form.
Edit Events – user can edit events
Export Submissions – export all the submissions data of the event
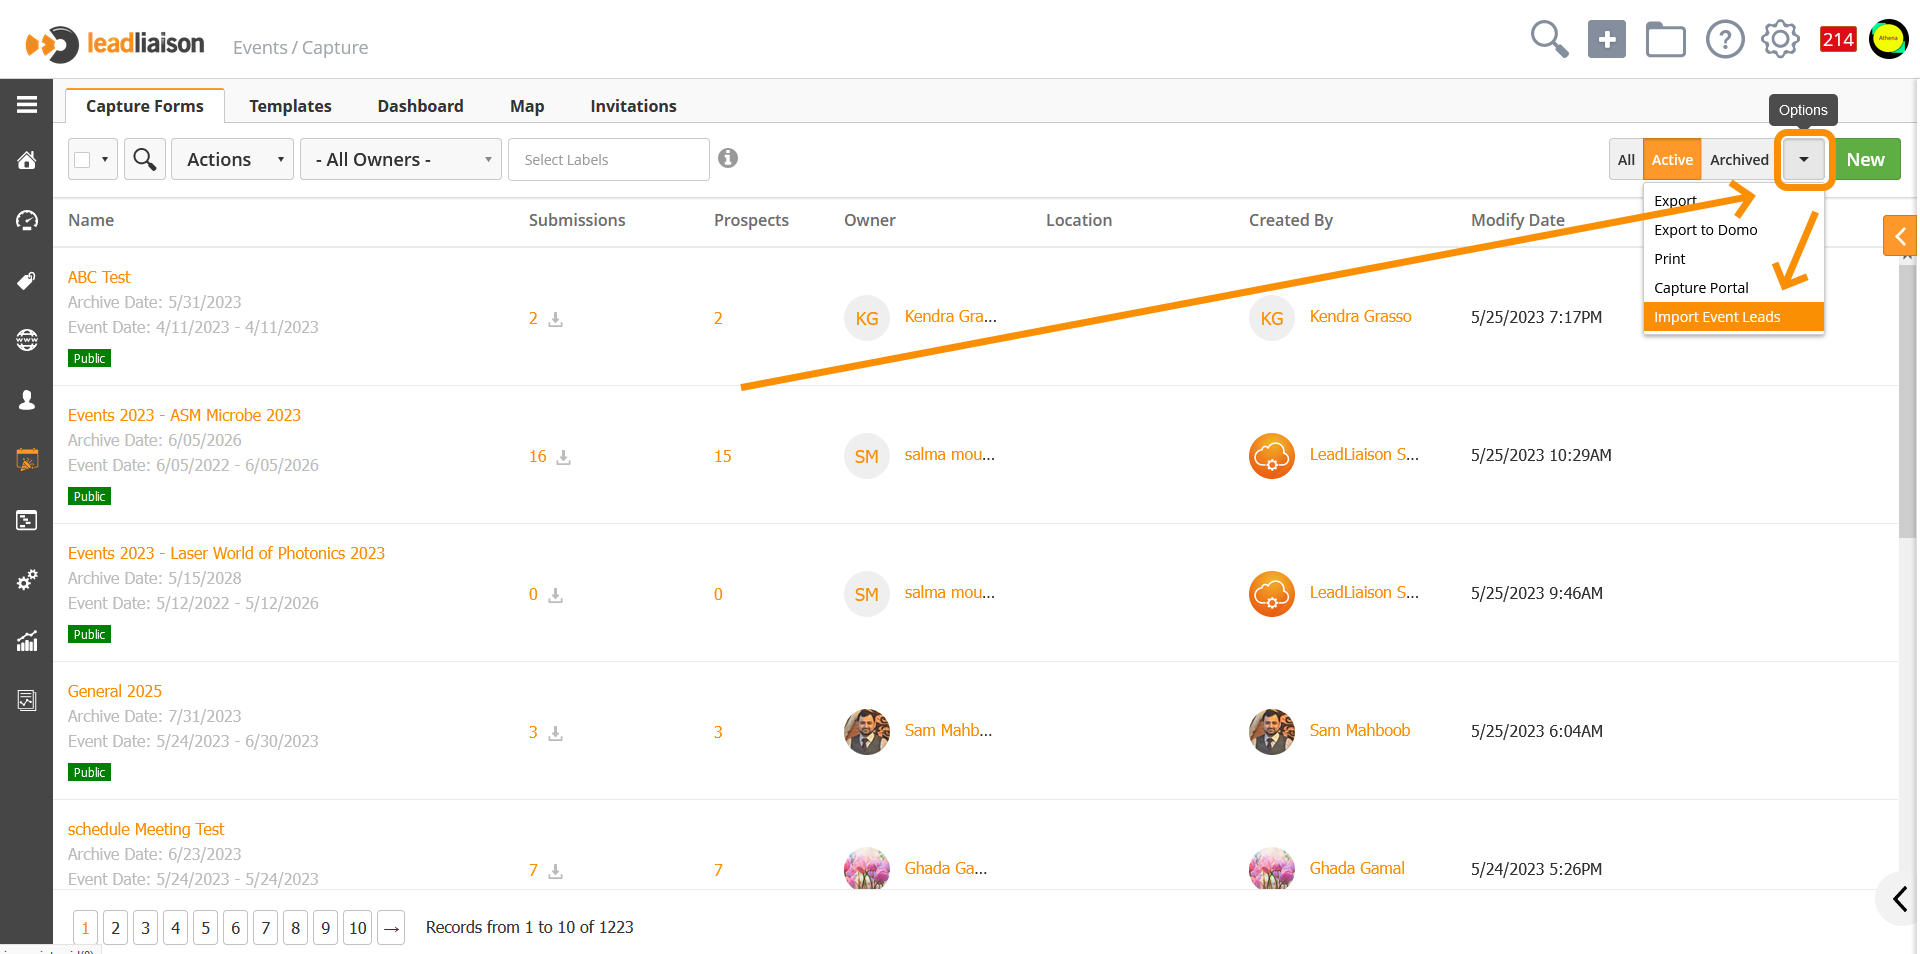
Import Event Leads – mass import new submissions into an existing event.
Manage All Events – edit or delete any event.
Manage Assigned Access Events – edit or delete only events assigned to the user.
Manage Invitation/Devices – add or remove devices from the device list.
Manage Event Templates – create, edit, or delete templates.
Manage Groups – create new device groups for form assignment.
Manage Owned Events (All) – view, edit or delete the events owned by the user
Manage Owned Events (Private Only) – view, edit or delete ONLY private events owned by the user
Manage Public/Shared Events – view, edit or delete public and shared events
Notes:
- Events with “Private” visibility can be accessed by any user that have the “Manage All Events“ permission
- Events with “Public” visibility can be access by any user who have the “Manage Public/Shared Events” permission
- Events with “Shared” visibility can be accessed by any user who have the “Manage Public/Shared Events” permission and the event is shared with the user or any assigned team to the user.Remove Elements – remove exiting elements from existing forms.
View All Submissions – when using a device, see submissions from other devices.
View Auth Codes – retrieve authorization codes for device users.
Devices
View, edit, or remove devices by navigating to Event > Capture > Invitations > Devices.
User– user associated with the device
Username– username associated with the device
Groups– number of groups the device is in; click on the number to view.
Type– type of mobile device used
Date Joined– date the device was activated
Status– device statuses; Pending (device not authenticated), Active (device authenticated and ready to use), Disabled (device authenticated but disabled in Lead Liaison)
Use the checkbox in the top-left corner to select and delete multiple devices. Use the spyglass symbol to search for devices by name.
Invitations
End users access the mobile app through an invitation. The invitation contains an authentication code the user will user to activate their device.
Individual Invitations
In most cases, you should give each of your attendees their own mobile app Authentication code. You can grant users access either when cloning the templates or after creating the event form.
To give users access when creating a new event:
Clone the appropriate template.
Scroll down to User Access.
Select users from the Users textbox by typing their names or emails.
OR
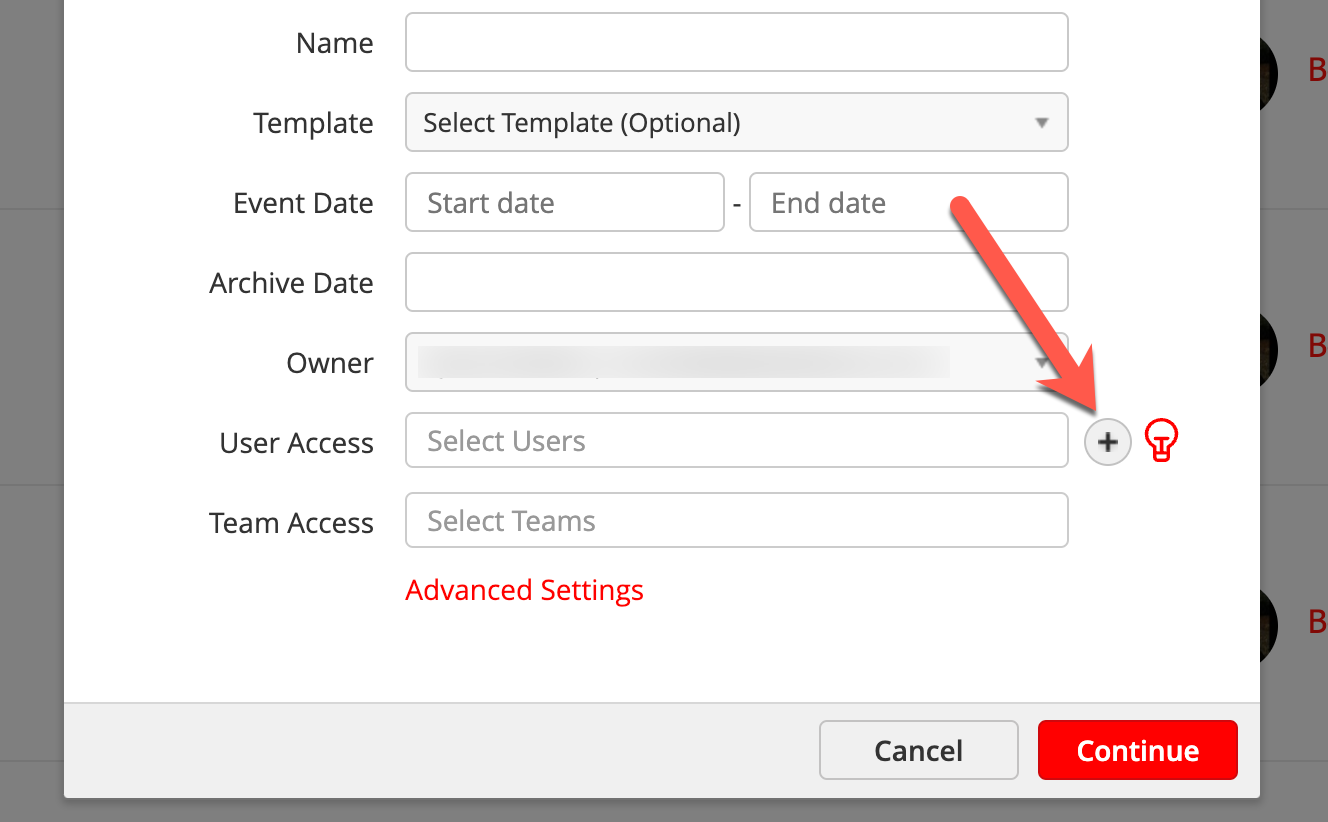
Click the (+) icon to add a new user.
To give users access to an existing event:
Click on the Event name to open the Event Designer.
Click the Properties tab.
Scroll down to User Access.
Select users from the Users textbox by typing their names or emails.
OR
Click on the dropdown menu of an event.
Click on Access.
Select users from the Users textbox by typing their names or emails.
OR
Click the (+) icon to add a new user.
Sending New Invitations
There are two types of invitations you can send, Individual and Universal.
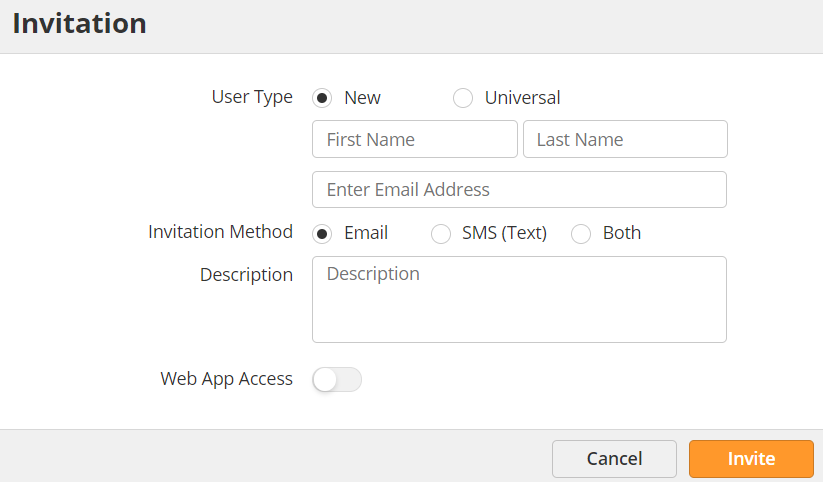
Individual Invitations – Send an authorization code for personal use. This option allows you to identify the individual who has captured the lead and should be your default option. Send Individual invitations through Email, SMS, or both.
Universal Invitations – Send an authorization code for multiple users to use. This option will not let you identify the individuals capturing leads. This option is best for people who don't normally work with you, like vendors, temp workers, or third parties assisting you at your event. When selecting
Admin level users can also send new invitations or check Auth Codes from the Captello mobile app directly. Read here for more details.
Bulk Invitations
It is possible to send invitations to multiple users in an spreadsheet. Follow the steps below to invite multiple people at once:
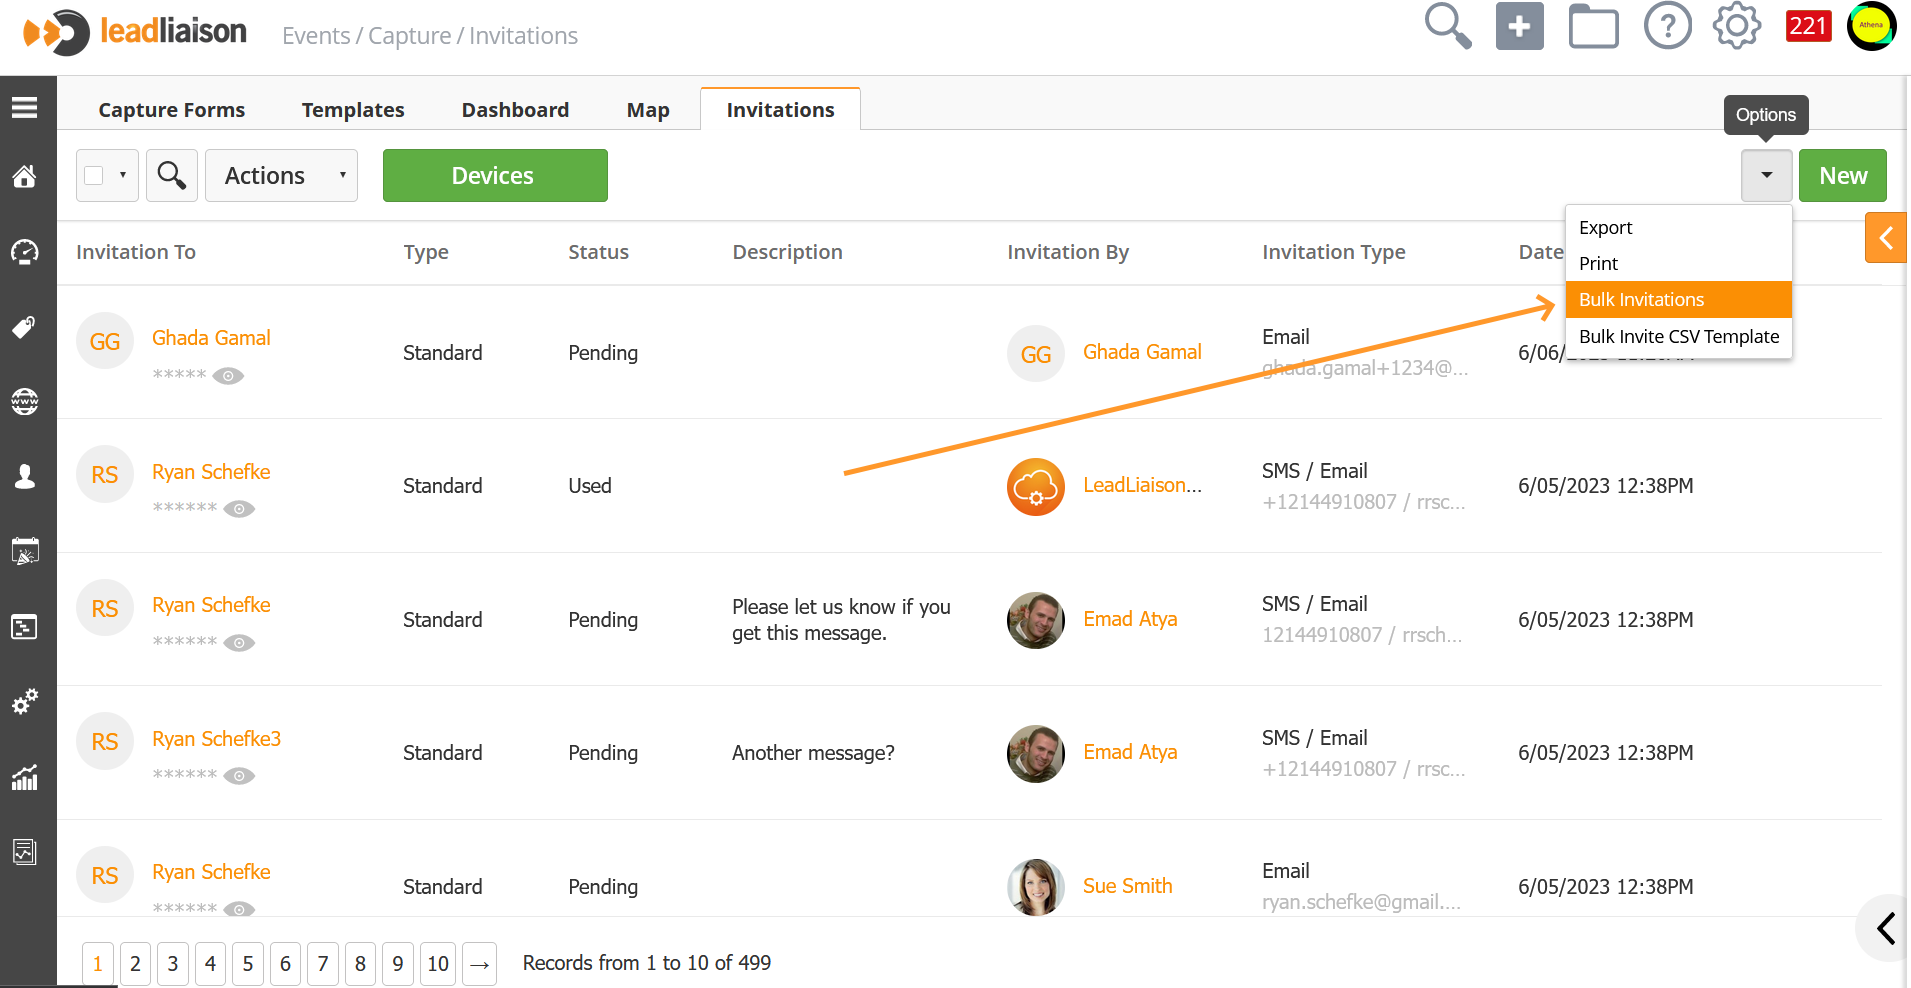
Go to Events > Capture > Invitations
Click on the Options drop-down button and click Bulk Invitations
Upload a spreadsheet that contains First Name, Last Name, Email and/or Mobile Number. A spreadsheet template is available to download if needed.
Reminders
Reminders help users activate their mobile app. If they have not logged in after a set amount of time, we will send them a reminder email with their Authentication code.
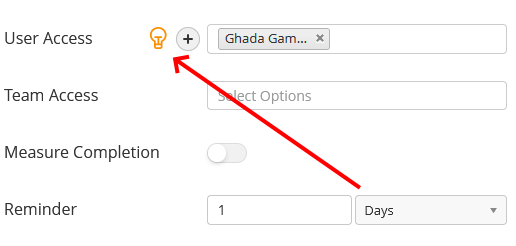
To enable reminders, click on the lightbulb icon next to User Access. Then, set the number of days prior to the Event Start Date. If the user has not activated by your set date, they will get a follow up email.
Bulk Invitations
You can send Invitations to many users at once using Bulk Invitations. To send a Bulk Invitation
Navigate to Events > Capture > Invitations
Use the drop-down menu in the top-right to download the Bulk Invite CSV Template
Open the spreadsheet and add your user info
Use the drop-down menu to select Bulk Invitations
Upload your completed spreadsheet
The Bulk Invite CSV Template includes first name, last name, email, and mobile phone. The system will send an invitation out to their email, phone, or both depending on what your provide.
All four CSV fields must be included or you will get an error. For example, you must include the mobile phone field, even if that column is blank.
While sending a bulk invitation, you can add event access to the users.
Retrieving Authentication Codes
If a user loses their authentication code, admins or other profiles with the right permission can retrieve them. To retrieve the code
Navigate to Events > Capture > Invitations
Use the Search icon to find the right user
Click on the Eye symbol below their name to reveal the code.
Edit a Device
Once a user has activated their device, you can edit their device settings using the action menu on the right in Events > Capture > Invitations > Devices.
Use the trashcan icons to delete the device from your system. Deleting a device will also prevent the user from accessing the mobile app.
Use the pencil to edit the device's name on the device list. This is a helpful option to use if you have multiple users and will be sorting them into groups for various events.
The drop-down menu contains the following options:
Deactivate/Activate – temporarily remove or add access to the mobile app
Delete – delete the device
Edit – edit the device's name
Groups – manage which groups the device is in
If the user has not activated his or her device, you can edit or resend the invitation from the Invitations tab.
Revoke Invitations and Remove Authenticated Devices
To remove an invitation click on Events > Capture > Invitations and click the delete icon as shown below.
To remove an authenticated device click on Events > Capture > Devices button then select Deactivate from the menu as shown below.
Staff Directory
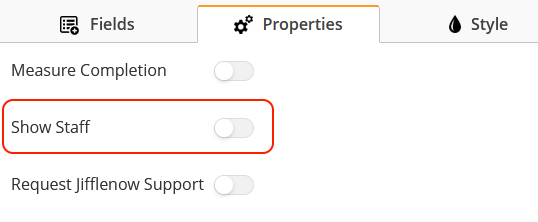
Staff Directory shows a list of your team members on Captello mobile app who have access to the specific events that you're attending. For live events, this means you can view and communicate with people from your company attending the event. To enable Staff Directory as an option, turn on the Show Staff toggle in the Properties tab of the Event Designer.
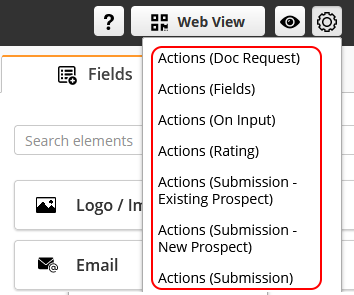
Every user that has access to the event will be included in the Staff Directory. You can view your staff directory from under the settings gear on event designer page:
You can also change the status of individual staff member to available or unavailable.
In the Captello app, a Staff Directory would display like this:
Each of the buttons beside someone's name allows a different action.
Calendar. Clicking this button lets you schedule an appointment on the persons calendar. | |
Call. Clicking this button lets you voice call the person selected using your device. | |
Message. Clicking this button lets you send a text message the person selected. |
Goals
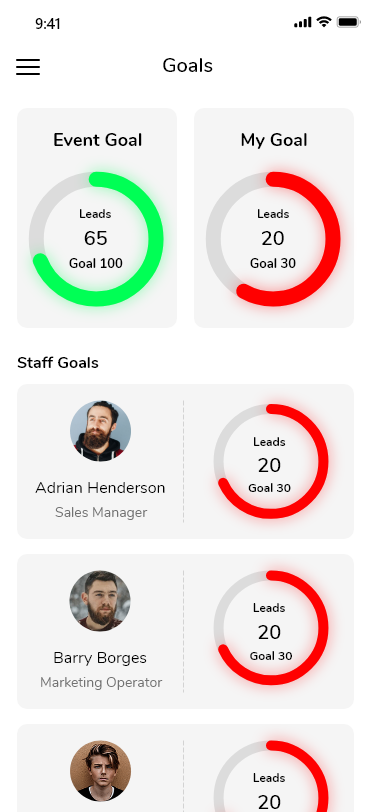
Define goals for your event (targeted # of leads captured, etc.) and keep track of the progress toward each goal. Goals can be set at an individual level and/or team level.
To add your goals, click the gear icon on top and select Goals.
Choose from these available options. Create goals based on target number of leads or number of submissions.
For Individual Goals, select whether you want the same goal for all users, or custom goals per user.
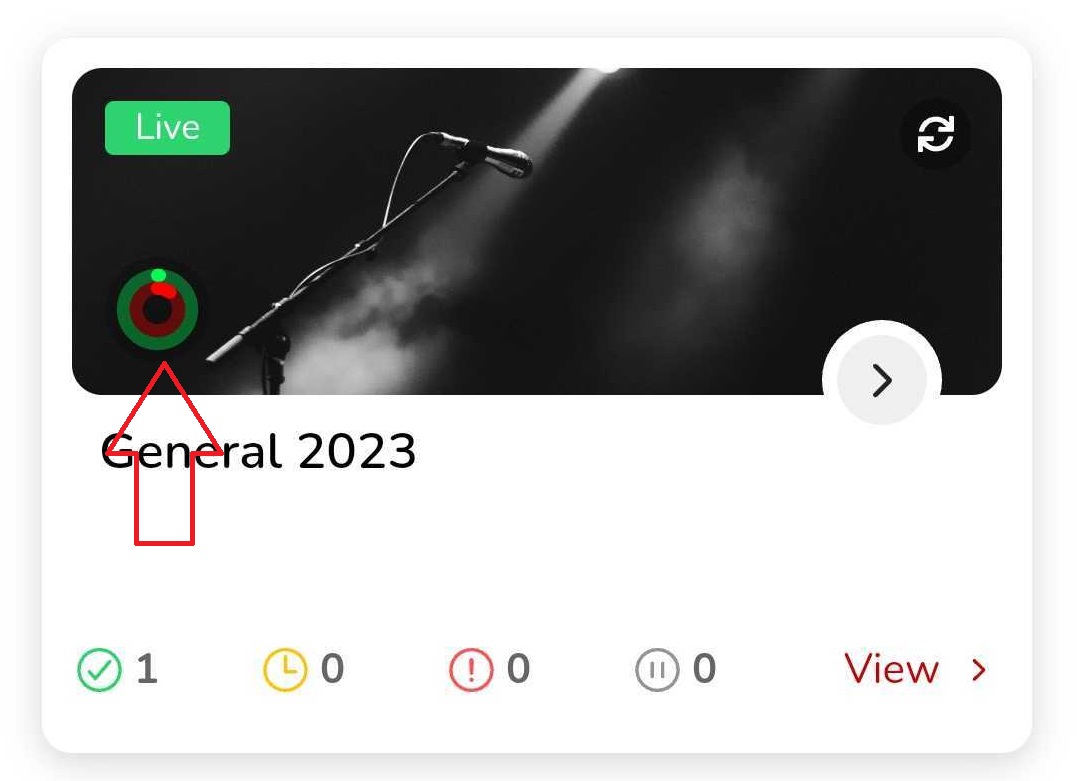
In the Captello mobile app, a circular Goals icon will appear on the event when Goals are added.
Tapping this icon will open up your Goals statistics. You can view individual progress as well as team progress towards the set goals.
Localization
You can localize the mobile app for users in non-English speaking countries. Based on their device's language settings, users will see the app in their preferred language when they first authenticate. The app will automatically translate menu options, field labels, and multi-choice options. It will not translate Event Names or Addresses.
The mobile app currently supports:
Arabic
Chinese (Simplified)
Dutch
English
French
German
Italian
Japanese
Korean
Portuguese
Spanish
If you need localization in a language you do not see, contact your Lead Liaison representative for more information on adding a language.
To enable localization for app users, navigate to Setup > Events > Capture and scroll down to Localization. Then select either Auto Translate or Custom Translate.
Auto Translate
Auto Translate uses an advanced translation program to translate English text in real time. With this option, users can easily switch between supported languages. The translations are very accurate, but if your organization uses special words and phrases, the app may not have context to translate properly. In these cases, you should use a Custom Translate template.
Custom Translate
If you want to specify how the app should translate certain internal words or phrases, you can upload a Custom Translate template. To add custom localization support:
Navigate to Setup > Events > Capture.
Scroll down to Localization.
Select Manage Custom Translate.
A new page will open showing any current custom translations you may have. Select one of the current ones or click on New for a new translation.
Set the English word or phrase you want to customize, and the language your changing using the dropdown. Finally enter the translation that is desired.
Click Save.
Creating an Event
Events are the core of Event Lead Management. They include trade shows, conferences, meetups, and any other live event where you could capture lead data. To set up a new Event, navigate to Events > Capture and click New. Select from the following form types:
Exhibitor – Used to capture leads at live events or virtual trade shows. Includes all forms of lead capture such as kiosk, badge, and business card.
General – Used for different types of use cases such as digital marketing, employee engagement, and more.
Sales – Used by sales teams to capture leads from a mobile device while on the go. Forms never expire and are always available.
Note: the options on the New Capture Form menu will change depending on your form type. Set additional options by clicking the Advanced Settings button.
Name – name of your Event
Template – create Event using a Template (see Templates below)
Save to – save event to a folder
Campaign – add event to Campaign for ROI tracking purposes
Description – internal description of event
Event Date – start and end date of event used for reporting
Archive Date – the last date end users can capture new Prospects in the mobile app
Event Owner – user in charge of managing event
Event Address – physical location of the event using Google Maps
Registration List – attach a List of attendees
Labels – custom labels for segmenting reports
Visibility – Visibility of the event form can be set as Public, Private or Shared
User Access – users and groups invited to the event
When providing Users Event access, existing users will appear in a drop down. If the User is not already in the system, you can add a new user by clicking on the (+) button to the right.
Once you click Continue, you will see the Event Designer. From here you can design your Event Form. Customize the form to capture any type of data using the same process as Hosted Forms.
Custom Attributes
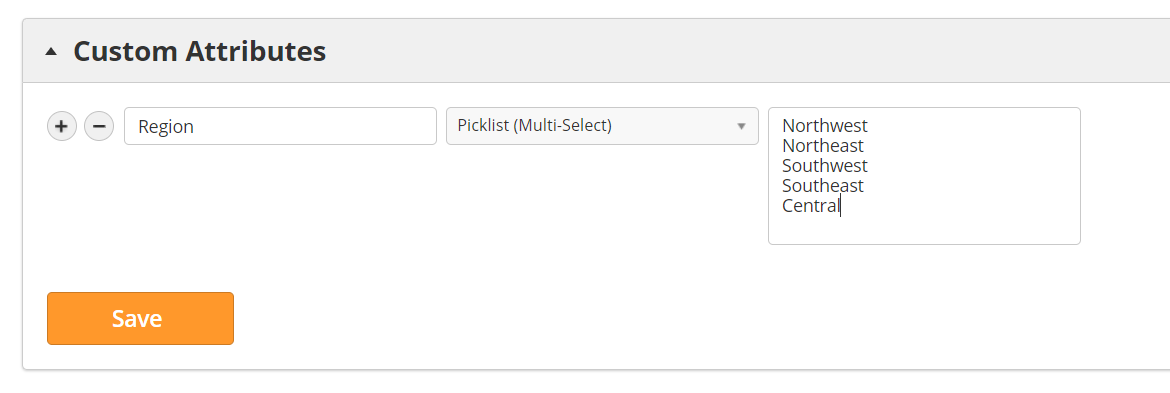
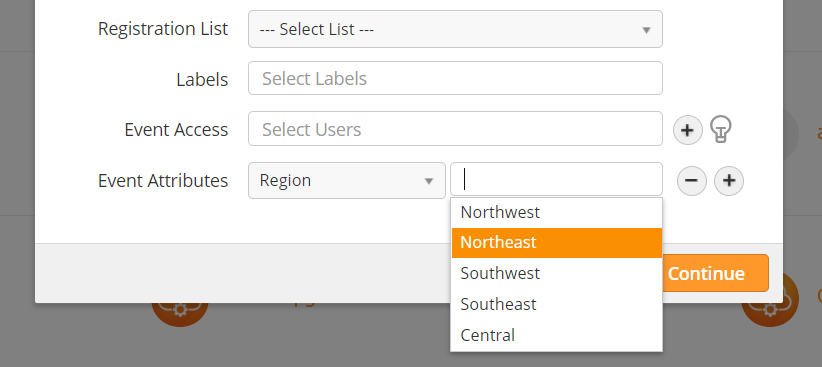
Custom attributes are event metadata fields you can add to the New Event menu. For example, you may want to add an attribute for Region which could then be exported with the other event metadata. To manage custom attributes, navigate to Settings > App Setup > Events and scroll down to Custom Attributes.
If you have Custom Attributes, users can select an Attribute to add to Event metadata when creating a new Event.
Device Objects
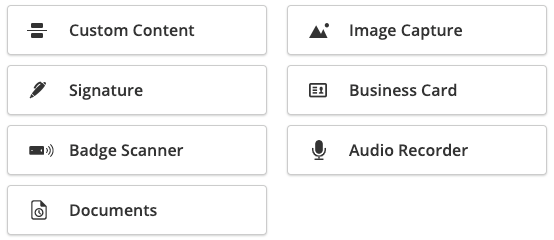
In addition to the existing web form objects, device forms have several unique objects: Custom Content, Image Capture, Signature, Business Card, Badge Scanner, Audio Recorder, and Documents.
Custom Content
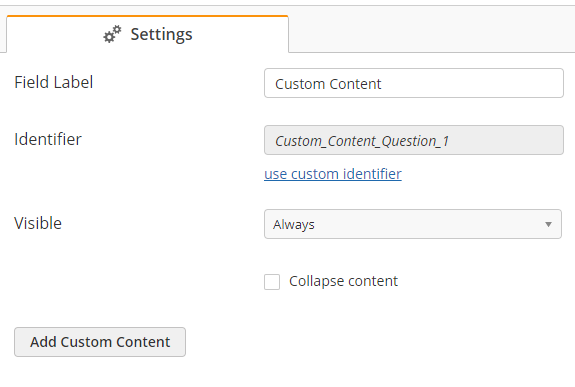
Use Custom Content to add HTML 5 content to your Event Form. You can add text, images, links, and embedded content like YouTube videos or Google Maps. To add Custom Content,
Add the Custom Content Element
Optionally re-label the field and select visibility rules
Click Add Custom Content
Use the editor to add your content
If you are using an image in the custom content, there is an option in the Style settings to control the size of the image.
This setting overrides the image width to use the full width of the screen while keeping the image’s aspect ratio.
Image Capture
With the Image Capture element, users can add up to five images to their submission. Drag the Image element to your Event form. The Image element will appear on the device in the same order as the Event Designer preview.
Business Card Capture
Captello offers the option to capture business cards which can then be transcribed to retrieve lead contact information.
Transcription Options
Captello offers two different transcription methods i.e. Human AI and Pure AI. Both are very distinct methods that have their own advantages.
Pure AI will be enabled by default. The submission will be in "Pending" status until the transcription is complete.
Pure AI - Pure AI uses a sophisticated process that combines machine learning, image analysis, data intelligence, and artificial intelligence to perform its magic. Results are returned quickly inside the mobile app. Here is a quick overview video:
Auto - This is the default option. Cards, once captured, will be transcribed automatically using Pure AI technology. (Click the orange text to change the setting)
Manual - Manual means you take a picture but then you'd need to tap a “transcribe” button in the app to process the transcription. This is for situations where maybe you already have a badge scan and just want a pic of the card. (Click the orange text to change the setting)
Human AI - Human AI uses an operations team of several hundred people. The workforce transcribes the contact information while artificial intelligence processes the data to find matching information and discard bad information. The result is a highly accurate process ideal for multiple use cases.
Workforce - Cards will be transcribed by Lead Liaison’s workforce for a small fee. Once transcribed, a event submission is complete. Transcription turnaround time is mentioned below depending on the use case. Click the orange text to change the setting.
Transcriber Proficiency:
Standard:Transcriptions are typically available within three (3) hours. Results may vary based workload and number of requests. Requests in bulk will be processed faster than single requests. Results will never take longer than 6 hours. Transcriptions that cannot be completed will be available in your internal transcription portal.
Premium: Transcriptions are typically available in 60 minutes. Results may vary based workload and number of requests. Requests in bulk will be processed faster than single requests. Results will never take longer than 2 hours. Transcriptions that cannot be completed will be available in your internal transcription portal.
NOTE
Results from non-US instances may take longer to process.
Internal - Submissions held inside the platform for you or our Operations Team to transcribe. (Click the orange text to change the setting)
The best method for your business depends on your use case. In the tables below we’ve highlighted six (6) use cases for transcribing contact information from documents, all of which Captello supports.
Localization
Select a default language for transcription. When set to English, Lead Liaison will still transcribe foreign languages, but will default to English when possible. English cards are typically available in less than an hour depending on the number of cards, time of day, and day of the week.
Two types of localization are available: Local Ops and Remote Ops. With Local Ops, business cards are sent through our normal transcription process, but only workers proficient in the selected language will transcribe the cards. A staff member reviews any submissions our workforce cannot complete. The following languages are available with Local Ops:
Japanese
Arabic
Chinese
With Remote Ops, the cards are transcribed by a professional in that language. The professional will transcribe all cards personally. The following languages are available with Remote Ops:
Russian
Korean
French
Thai
For your end users, the process is the same. Some cards may be available within a few hours with Local Ops languages, but with either option we target 1-3 business days following the close of the event.
If you need transcription in a new language not already listed, please contact our support team at least one week in advance with the following details so we can make necessary arrangements on our end for the transcription:
Number of leads you expect to capture
First calendar day and last calendar day where you’ll be collecting leads
Language you need us to support
Transcription Notes
Add special instructions for our transcribers. For example, you may ask them to use the company name as it appears on the card, not as it appears on the logo. Please note that while we will do our best to follow your special instructions, we may not be able to follow instructions that go outside of the scope of transcribing a business card. For example, our transcribers won't enter a campaign ID or default value into the Notes field. This should be done on the form.
Signature
The Signature element lets end users capture a Prospect's signature. This feature is perfect for opt in statements, non-disclosure agreements, and quotes.
Badge Scanner
Developer Kit Integration
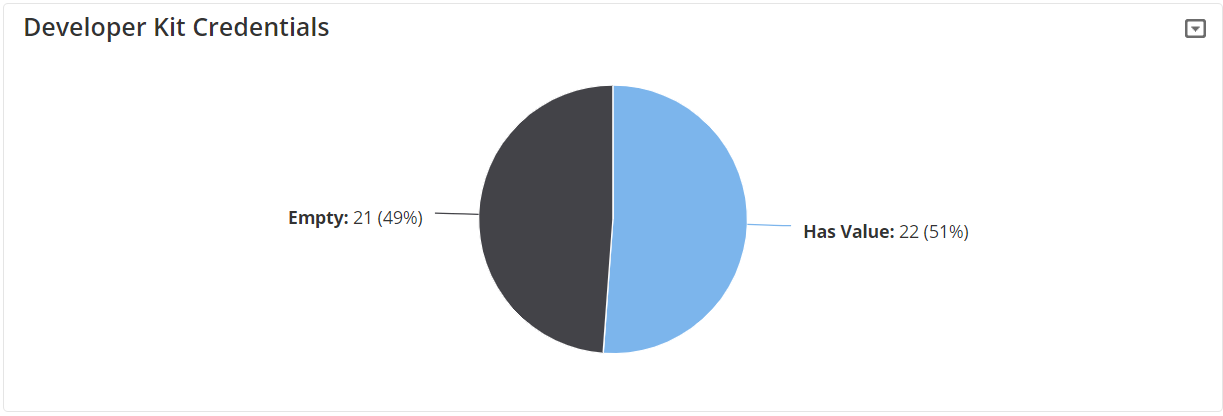
To use badge scanning at your event, you must provide Lead Liaison with the event Developer's Kit at least 14 days in advance. Additionally, if the badge provider only provides a test badge, you must also provide Lead Liaison a production badge at least 24 hours in advance.
To setup up badge scanning on your form, do the following:
Add the Badge Scanner object into your form:
Include all fields that you'd like to fill in once a badge is scanned. Typically, these fields are added to the form:
Name (First/Last)
Email
Phone
Address
Important: You must map your fields to Lead Liaison Standard fields. This tells the system to fill the data into the field. In the example below, we mapped the email field on our form to the Email field in the system. This is done in the settings of each form field under the Map Rules section as shown below:
To pull all contact information from a badge, there must be field mappings in your form for each of the following system fields:
Email [Standard]
First Name [Standard]
Last Name [Standard]
Work Phone [Standard]
Street Address [Standard]
Street Address 2 [Standard]
City [Standard]
State/Province [Standard]
Zipcode [Standard]
Country [Standard]
Job Title [Standard]
Regular Scans (API Kit)
End users can scan Prospect name badges with the Badge Scanner element. Every event is different and will usually have a specific barcode provider. We use a two-step validation process using both the barcode provider's test badge and the show's production (live) badge.
To add the Badge Scanner element,
Contact the event organizer and purchase an API kit (might also be called a Software Developer's Kit, or SDK)
Create your Event Form
Once support confirms they have added the element, test the form
If the barcode provider only provides a test badge, provide Lead Liaison a production badge at least 24 hours in advance (you will typically get your production badge by mail or during the check in process)
Once Lead Liaison confirms ready, test the form using your badge
Integrated Registrated Providers
Our system can integrate with any provider that has an API kit. Here are some of the providers we currently integrate with:
1st Sales
American TradeShow(ATS)
ATS(HIMSS HSF 2019)
Aventri - Nokia (STOVA)
Aventri (STOVA)
BadgerScan
B-Com
Bizzabo
boabee
Boomset by Hopin
Bravura Technologies
Capture technologies
Circdata
CMR Lead Retrieval
cmrus (CMR)
CompuSystems (CompuLEAD)
Conexsys
Convention Data Services (CDS)or CDS (Xpressleadspro)
Convey
Core-apps
CTI Meeting Technology
Custom Reg (Custom Registration)
Cvent
ECBadgeScan
Eleventh and Gather
eShow (netronix corporation)
Event Power
eventcore (STOVA)
Experient(Maritz Global Events)
Expo Badge/Expo badge (GCC)
Expo Logic (Community Brands)
Expo Tracker
ExpoBadge (GulfCC)
ExpoLeads/ ExpoTools - (Advanced Tradeshow Technology) - (Spargo) MCI
Fira de Barcelona
GRS
Hannover Messe/DMAG Visitor-Data/Deutsche Messe AG
High Performance Software USA, INC
ITN
ITR - uk
key4events
Leadature
LeadValu
Leni
livebuzz
LookingCube
Marvel SOAP
meetingplay (STOVA)
MGL
mosaic
One Sky It
Positive Proximity
PreTix
qConnection Inc.
Regfox Registration
Scan2Lead Adventics
Showcare (Showcare Event Solutions)
SmartSource
spargoinc
SPS Leads (Spsleads / SPS LR)
Swapcard
Swiftium Cosmic Portal
Swoogo
TASA/TASB
TPNI
Trade Show Leads (TSL)
Tradeshow Multimedia Inc.
TurnoutNOW
validar
VCARD
Please note that even if you see your show's provider on this list, you still need to follow the process above. API documentation can change from show to show, so it is important you send us everything you receive from the show organizer.
What if the event does not offer a developer kit?
You can still use any of these options:
Transcribe business cards using Human AI (processing in the background) or Pure AI (processing on the spot).
Transcribe a badge using Pure AI (transcribe on the spot) and add missing contact information such as email and phone number.
Post-process yourself by taking a picture of the badge, manually collect emails, then transcribe the submissions at your leisure using the built-in capture portal.
Hint: Use the “Send to Capture Portal” option on the Scanner element.Self-service lead capture by having attendees scan a QR code or use a kiosk inside the booth to:
Request a brochure
Sign up for a demo
Schedule a meeting
Engage by playing a game
Complete a survey
Enter a contest
Run a guided tour or exciting competition. Set up “Waypoints” (branded QR codes) and/or digital activations around your booth. Waypoints can be backed by content (videos, brochures, games, etc.) to extend learning opportunities. Encourage attendees to scan Waypoints for a chance to earn prizes and get placed on the leaderboard. This entire experience can be delivered by Captello.
Import your leads into Captello after collecting them from the event. Captello will serve as your hub for all your event leads. Assuming you’ve built business processes that initiate from the point of lead capture, all of your processes will kick in once you import into Captello from your browser.
Regular Scans (ID Card)
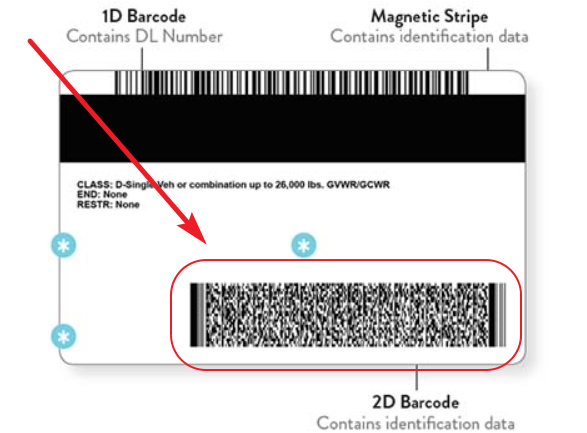
Use the ID option to scan data from North American IDs such as driver's licenses or stats IDs. After adding the Badge Scanner element, select ID as the barcode type and North America as the region.
Make sure to scan the PDF 417 barcode on the rear of the ID. No other barcodes will return data.
Regular Scans (Post-Show Reconciliation)
Some badge providers do not offer an API Developer's Kit and instead offer post-show data merge, also known as post-show reconciliation. Lead Liaison provides full support for this process. The workflow is as follows:
Scan badges to collect an ID.
The ID is stored in the Capture Portal.
IDs are exported from the Capture Portal and sent to the provider.
The provider sends back a spreadsheet with appended data.
The spreadsheet is imported into Lead Liaison to complete submissions.
Any post-submission processes (Fulfillment Actions or Automation) trigger at that point.
Some providers may provide minimal contact data (like name and company) along with the scan. In order to have the best lead capture experience, make sure you send a sample badge through our Badge Scan Request process. Our Events Team can advise what type of process to expect and can configure the form for you. If you choose to configure the badge scanner yourself, we still strongly recommend having the Event Team review it.
Regular Scans (vCards)
vCards, also known as Virtual Contact Files, are a standard file format for electronic business cards. They contain contact information like name, address, phone number, email, and more. vCards can be easily shared through email, instant messaging, and other electronic means. They're particularly useful for importing and exporting contacts between different devices or software platforms. Many times, vCards are encoded within QR codes for easy scanning and distribution, especially in events and conferences.
Our lead capture solution is not only adept at scanning event badges but can also seamlessly scan vCards. This functionality is especially useful when attending events where vCards, often embedded within QR codes, are the primary means of exchanging contact details.
Key Features and Instructions:
Dual Scanning Mode: The scanner can detect both vCards and badges simultaneously during an event.
Built-in Capability: The vCard scanning feature is inherently integrated into the scanner element, ensuring it works out of the box without any additional setup.
Barcode Type Setting: The efficiency of scanning vCards predominantly relies on the "Barcode type" setting in the builder. If set to 'Default', the scanner is equipped to detect badge barcodes, QR codes, and vCards across our supported formats.
Recommendation: Given that vCards are frequently encoded within standard QR codes, it's advisable to maintain the Barcode type as 'Default'. This setting ensures the scanner captures a broad spectrum of badges and vCards effectively.
Custom Barcode Type: While the default setting is recommended for general use, users who are certain about the barcode type and wish to scan only specific badges can specify the desired barcode type for optimized performance.
Remember, the versatility of our scanner ensures you're equipped for diverse event environments, whether it's badge-heavy, vCard predominant, or a mix of both.
Configure your form (no contact data)
To configure your lead capture form for Post-Show Reconciliation, do the following:
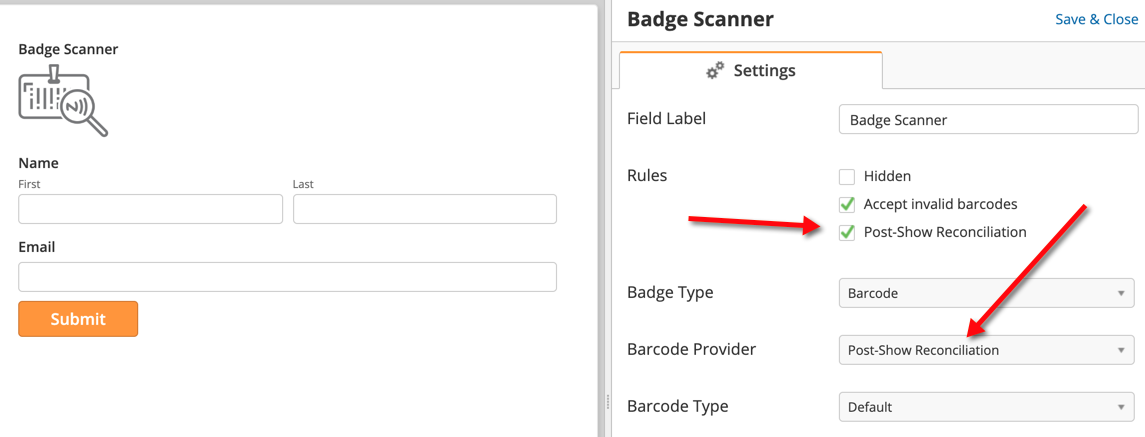
Add the Badge Scanner element to the form.
Check the Post-Show Reconciliation setting under Rules.
Select Post-Show Reconciliation under Barcode Provider.
When your users scan, the fields will grey out and display the word Scanned. Users can then submit the form without taking further action. The submissions will appear as Pending until the post-show reconciliation is complete.
Configure your form (contact data)
Some providers will also provide contact data embedded in the badge. This will usually allow you to see Name, Company, and sometimes Job Title. If the provider is also giving contact data, do the following:
Add the Badge Scanner element to the form.
Check the Send to Capture Portal setting under Rules.
Select the appropriate Provider.
When your users scan, the fields with contact data will populate. The other fields will grey out and display the word Scanned. Users can then submit the form without taking further action. The submissions will appear as Pending until the post-show reconciliation is complete.
Submitting Scans
Once your event is over, you'll need to export the IDs from the Capture Portal. Do the following:
In the Alert Center, select Capture Portal.
Export your list of IDs by:
Selecting the Barcode button
Filtering by your Event
Selecting Export from options gear
Run a test scan to ensure badges are scanning properly and the system is pulling in the ID. When your form is configured properly, you'll notice a few things:
The record will show Post-Show Reconciliation in red font.
The Barcode ID section will have an ID as the value.
Once you receive your appended spreadsheet back from the provider import them back into the system to complete the submission.
Choose Import from the options gear.
Follow these steps to configure the Importer, as shown below:
Select your Event
Select your appended spreadsheet
Map fields
Import Tips
The fields in the column on the left include standard contact information you'll receive back from your badge provider. The column on the right represents columns from your spreadsheet. The system should automatically map most fields; however, spot check the mapping to ensure accuracy. Imported fields will be saved into the Submission record. This process completes the submission. All standard contact information along with your custom form qualifiers will finalize the submission. Any Fulfillment Actions or Automation actions configured on your event form will trigger at this point.
Post-Show Reconciliation FAQ
What does post-show reconciliation mean? Post-show data reconciliation (also known as post-show data merge) is a process wherein data is appended to your leads by the lead retrieval provider once an event is over. The process starts when Lead Liaison’s mobile app scans a badge and collects an ID. These IDs are exported from Lead Liaison and provided to the lead retrieval provider. The provider returns a spreadsheet that appends contact information to the IDs. The updated spreadsheet is then imported into Lead Liaison. IDs are matched and leads are submitted at that time.
What else do I need to ask when I reach out to the event organizer to purchase post-show data merge license? In addition to purchasing the post-show data merge license, ask the provider when they will be able to get a sample badge. Also ask them if there is any data (like the Prospect's name or company) included in the scan for verification purposes, and how quickly the turnaround process will be. The turnaround time will affect your post-capture workflow.
How does this change my post-capture workflow? Post-capture workflow will not be initiated until data has been collected from the lead retrieval provider and merged into Lead Liaison. Once the data is merged into Lead Liaison, the post-capture workflow will be initiated. Keep this in mind when building your workflow. Immediate follow-up will be delayed until reconciliation has been completed.
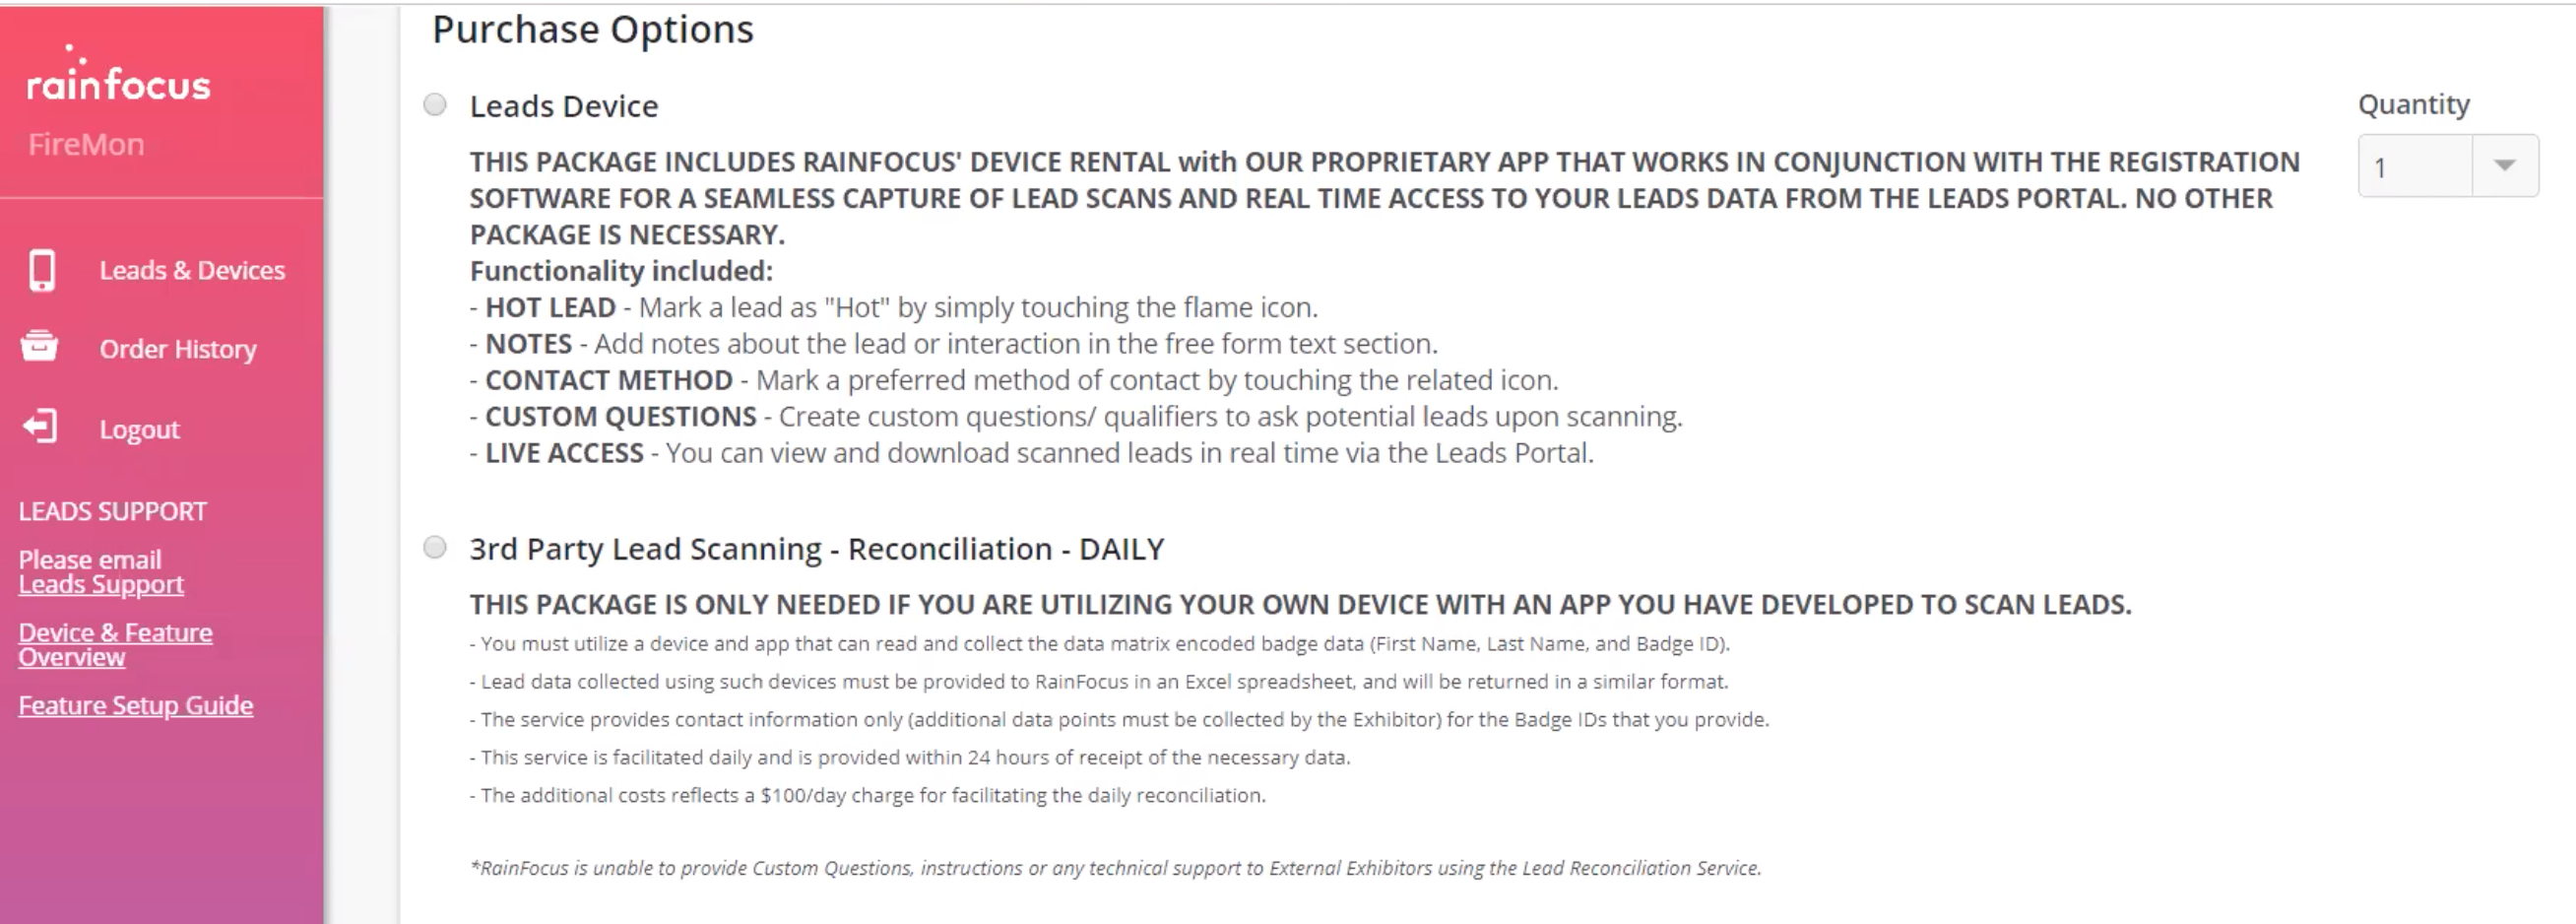
How do I purchase post-show reconciliation? Always opt to purchase the API Developer Kit when available. When it's not available, choose the reconciliation option. For example, the provider below, rainfocus, offers post-show reconciliation as an option (bottom radio button) over using the show-provided scanning app (top radio button).
IntelliScan
IntelliScan is a method of lead capture at events that do not offer an API Devkit for lead scanning.
It allows you to scan attendee badges to retrieve the scanned lead’s information and automatically fills out the form.
Enabling IntelliScan
IntelliScan requires a separate license. To enable IntelliScan, contact your Captello representative.
Once IntelliScan is enabled for your account, follow the steps below to enable it on your capture form:
Click on the Scanner field.
Switch on ‘Enable IntelliScan’
(Optional) Enabling the ‘Verify Data’ switch allows you to review retrieved data before filling the form fields.
Below is an example of preview with ‘Verify Data’ on.
Once you click ‘Accept’, the form is filled with the retrieved contact details.
Rapid Scan
In addition to regular scanning, users can save time with Rapid Scan. With Rapid Scan enabled, users can scan one badge or business card after the next without having to wait for the form to reload. To enable Rapid Scan as an option, turn on the Rapid Scan toggle in the Properties tab of the Event Designer.
Supported Devices
Rapid Scan for business cards is supported on iOS devices only. Android support is coming soon.
Group Scan
You can capture multiple leads from the same group or company with the Group Scan feature. Multiple people can be scanned in rapid succession. The first person scanned is always the primary person for the group. All data from the primary person’s submission, besides their contact information, is copied to every other person in the group. When enabled, the standard badge scan button will be split into two buttons, with the smaller group scan button off to the right.
All survey responses, notes, questions and follow up documentation settings will apply to the entire group. To enable Group Scan as an option, turn on the Enable Group Scan toggle in the Settings tab of the Scanner element.
Here is a quick video overview:
Troubleshooting by Running a Test Scan
Follow the steps below to validate badge data by running a test scan.
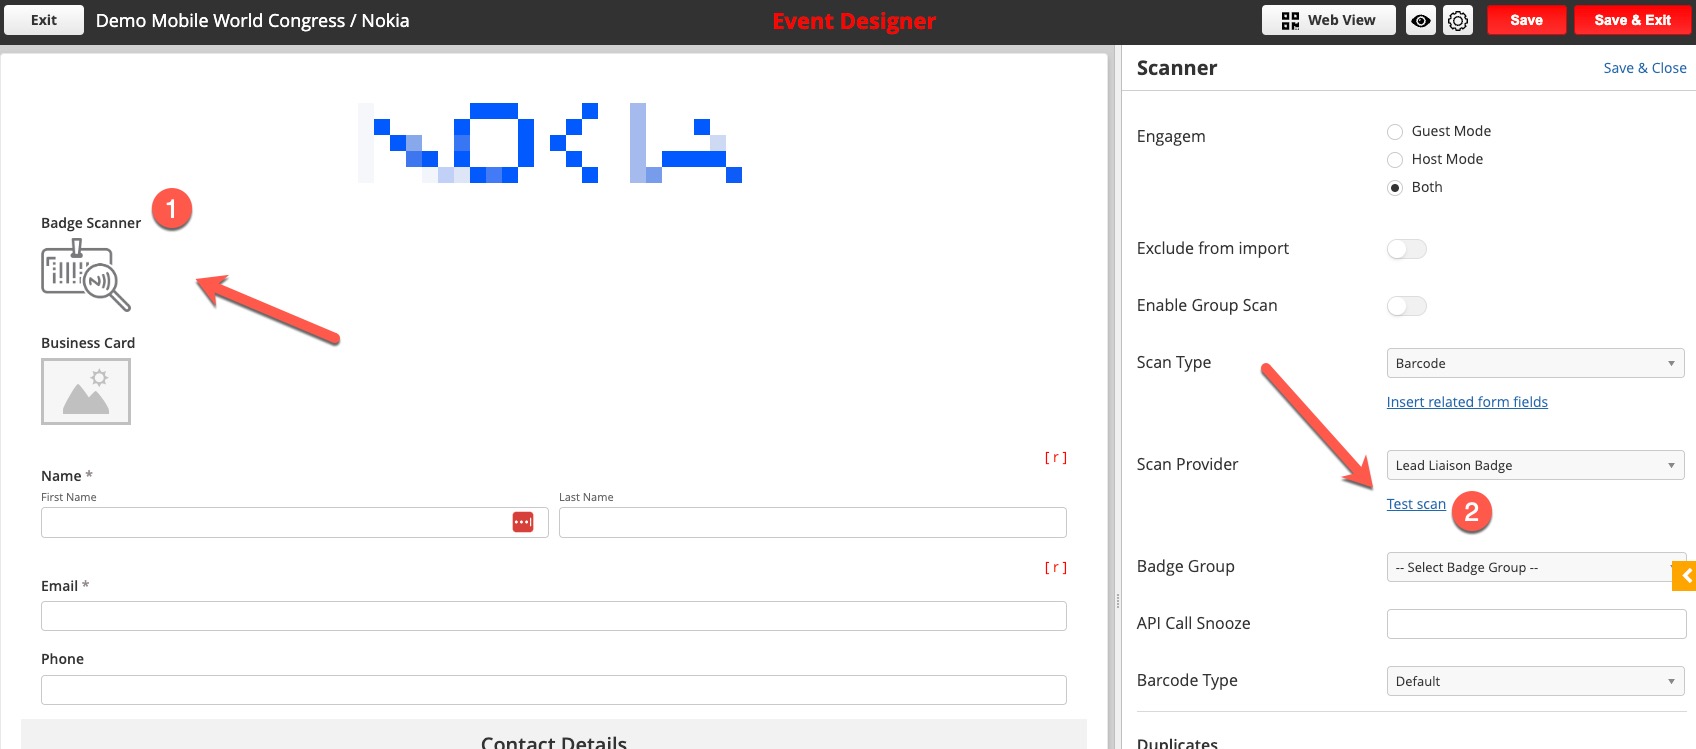
Open the capture form builder for the specific event. Navigate to Events > Capture > Click on the event name.
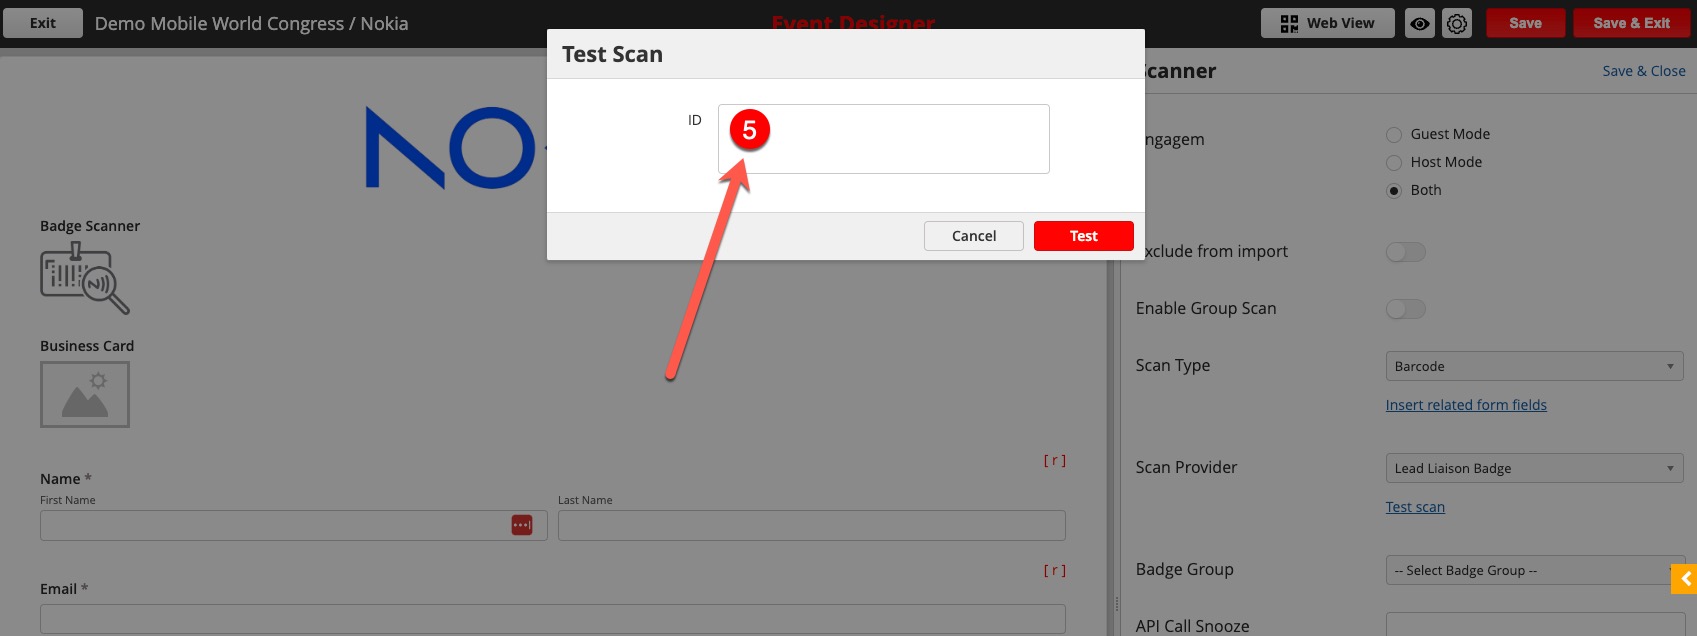
Click on the Badge Scanner element and select Test scan from the right side as shown below.
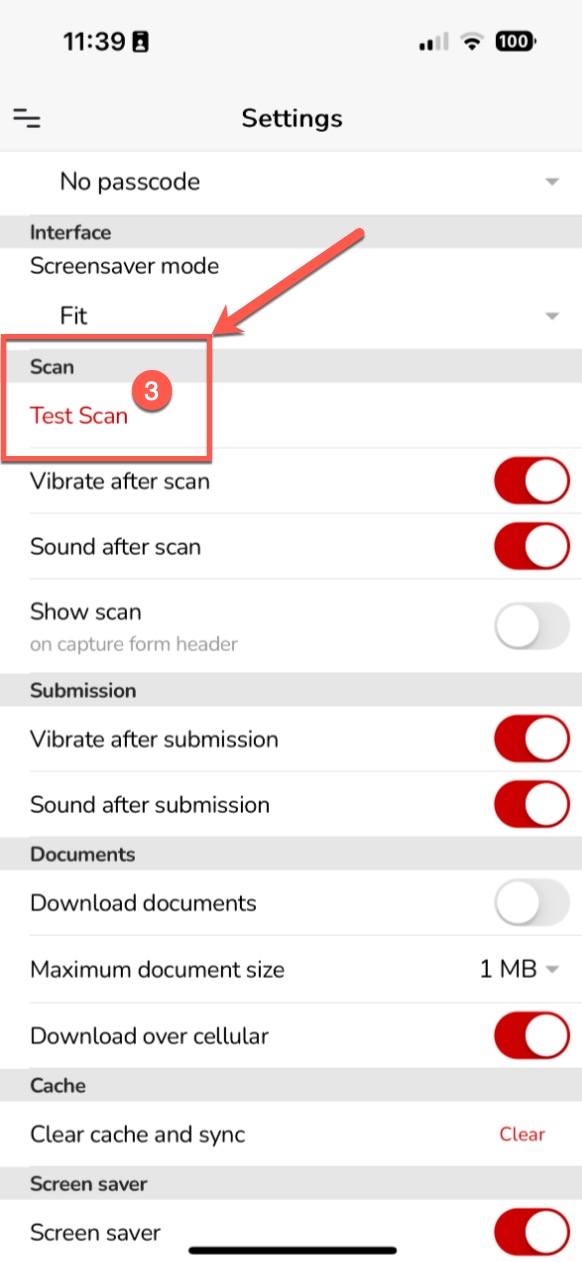
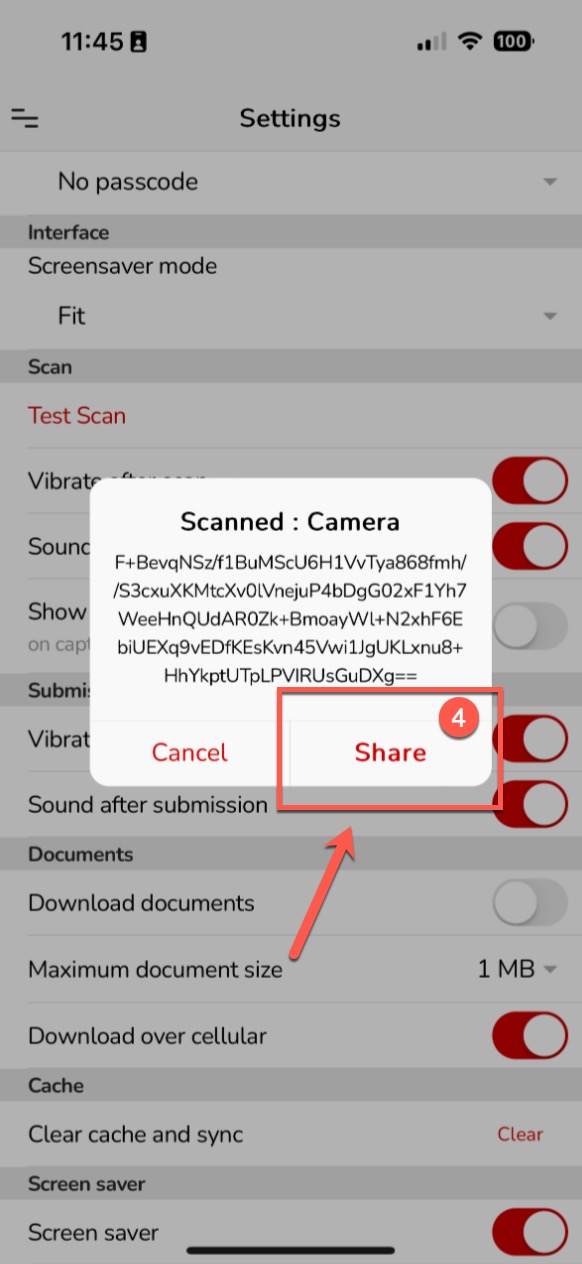
Open the mobile app and tap the hamburger icon on the top left to access the menu. Select Settings > Test Scan > Camera.
Scan the barcode on the badge then tap the Share button to share the contents with yourself. This information is the value behind the barcode.
Copy this information into the Test Scan popup in the capture form builder then click Test.
The Test Scan results will be displayed on your screen. Using the example below, in Section 2, we can see the results of this badge scan show the Street Address, City, State, and Zipcode are missing from the badge. In this case, the registration provider may not be sending the information through the API or the attendee does not have this information in their registration profile. Each section is explained below:
Section 1: Raw contents of the barcode.
Section 2: Formatted response from the registration or badge providers API.
Section 3: Unformatted (raw) response from the registration or badge providers API.
Section 4: Debug information that maybe be useful to Captello's Support Team.
Lookup
The lookup feature allows you to prefill capture form fields by searching databases that you have connected, such as NPI or yhimour Salesforce account. The search can be done using email address, or in case of NPI, using the NPI of the lead.
To set up the Lookup feature in a capture form, follow the steps below:
Add a single line text field, navigate to its properties, and enable the Lookup toggle.
Select your Lookup source, which can be ‘System’ (Your existing prospects, an always available options), Salesforce.com or NPI (if you have the licenses for them).
Note: The NPI source returns the First Name, Last Name, Country, City, State, Street Address, Zip Code, Work Phone, and Fax.
To review data before filling the form, turn on the ‘Verify Data’ toggle. It works similar to business card AI transcription.
The lookup field will have a search button on the side. Its colors can be customized.
Here is an example of how verification looks like:
Customizing The Lookup Search Button Color
In the style tab of the capture form, scroll down to tthe ‘Lookup button style’ section. To custmize the colors of the button, turn off the ‘Use theme style’ toggle, then choose your desired colors.
‘Lookup button color' changes the background color of the button, while 'Lookup icon color’ changes the color of the magnifier on the button.
Salesforce Lookup
Since Salesforce has different types of records (Leads & Contacts) and can have multiple leads using the same identifer (ie. Email), and since the Lookup field returns one record per search, there are sorting options to help you get the right result, detailed as follows:
Record type: Choose between leads only, contacts only, leads then contacts (searches leads first), or contacts then leads (searches contacts first).
Sort by: This option lets you choose the order of the search. It can be by most recently modified, least recently modified, most recently created, and least recently created.
Salesforce Lookup Field Mapping:
Custom Fields Mapping
Captello introduces generic standard fields for use when there's no direct match with Salesforce fields. For example, if Salesforce has a field named "Other City" that does not exist in Captello, it will be added to a generic standard field "Text2" in Captello.
When Salesforce records are looked up, their field information is pulled into corresponding Captello fields. The mapping for this feature is fixed as follows:
Lead Field Mapping
Salesforce Lead Field | Captello Field |
Salutation | Salutation |
FirstName | FirstName |
LastName | LastName |
Description | Description |
LeadSource | LeadSource |
MobilePhone | MobilePhone |
Phone | Phone |
Fax | Fax |
Status | Status |
Company | Company |
Title | Title |
Website | Website |
AnnualRevenue | AnnualRevenue |
NumberOfEmployees | NumberOfEmployees |
Industry | Industry |
Street | Street |
City | City |
State | State |
PostalCode | PostalCode |
Country | Country |
Id | Id |
Contact Fields Mapping:
Salesforce Contact Field | Captello Field |
Salutation | Salutation |
FirstName | FirstName |
LastName | LastName |
Title | Title |
MobilePhone | MobilePhone |
MobilePhone | MobilePhone |
HomePhone | HomePhone |
Description | Description |
LeadSource | LeadSource |
Fax | Fax |
MailingCity | City |
MailingCountry | Country |
MailingPostalCode | Zipcode |
MailingState | State |
MailingStreet | StreetAddress |
Id | Text1 |
OtherCity | Text2 |
OtherCountry | Text3 |
OtherPhone | Text4 |
OtherPostalCode | Text5 |
OtherState | Text6 |
OtherStreet | Text7 |
Account Fields Mapping:
Some of the ‘Accounts’ object fields are pulled into Captello when looking up a Salesforce contact. Below is a table showing the mapping of the ‘Accounts’ object fields.
Salesforce Account Field | Captello Field |
Name | Comapny |
AnnualRevenue | AnnualRevenue |
Industry | Industry |
NumberOfEmployees | NumberOfEmployees |
Website | Website |
Type | Type |
Id | Text10 |
Phone | Text11 |
Fax | Text12 |
BillingCity | Text13 |
BillingCountry | Text14 |
BillingPostalCode | Text15 |
BillingState | Text16 |
BillingStreet | Text17 |
ShippingCity | Text18 |
ShippingCountry | Text19 |
ShippingPostalCode | Text20 |
ShippingState | Text21 |
ShippingStreet | Text22 |
Description | LargeText1 |
NPI Lookup
The NPI lookup works with numeric fields. It uses the NPI number to look up records.
NPI Lookup Mapping
NPI records are returned according to the following mapping rules:
NPI | Captello |
first_name | FirstName |
last_name' | LastName |
address_1' | StreetAddress1 |
address_2' | StreetAddress2 |
city' | City |
state' | State |
country_name' | Country |
postal_code' | Zipcode |
telephone_number' | WorkPhone |
fax_number' | Fax |
name_prefix' | Salutation |
name_suffix' | NameSuffix |
middle_name' | MiddleName |
gender' | Gender |
credential' | Text1 |
sole proprietor' | Text2 |
enumeration_date' | Text3 |
last_updated' | Text4 |
status' | Text5 |
Audio Recorder
Use the audio recorder to take audio notes. In addition to recording audio, users can also save time from typing text notes by using Lead Liaison's audio transcription feature.
Audio recordings are saved as a part of the form submission. Users can play the recording from the form or within the submission in Lead Liaison. The system will also save a link to the audio recording saved to the Prospect Profile if the field is mapped. You can map to any paragraph field.
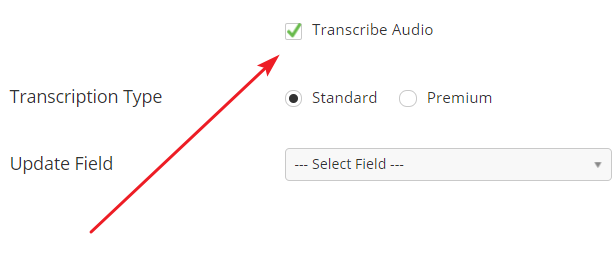
To enable audio transcription, click the Transcribe Audio checkbox on the form element.
Next, choose one of the following transcription types:
Standard – The recording is run through advanced transcription software. This software is more accurate than most speech to text programs found on mobile devices. Unlike those programs, it is not trying to transcribe in real time, and as a result is significantly better at proper grammar and punctuation. Most transcriptions will take 5-10 minutes, but may take longer depending on the length of the recording. Use this option for single-person recordings and general note taking.
Premium – The recording is transcribed by a dedicated transcription specialist. Because a human is transcribing the audio, they can ensure the transcription has completely accurate grammar and punctuation. They can also identify multiple people, so this option is great for recording full conversations in addition to longer notes. Use this option for the best accuracy, multi-person conversations, or situations with extreme background noise.
Premium transcription is a paid service billed by the minute. The longer the recording, the higher the cost. Please contact your sales representative for current rates.
The system will save the transcription as a Note in the Prospect's Timeline. You can also save the transcription to a Prospect Field by mapping it in the Update Field drop-down menu.
The playback of audio notes will depend on browser support. If the notes were taken on Android they may be saved as .m4a which Safari does not natively support.
Audit
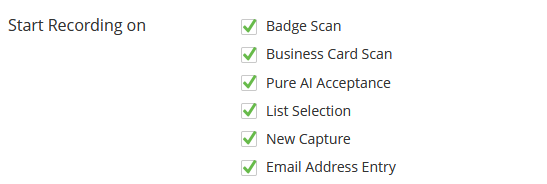
The audit field adds an audio recorder that starts automatically while capturing leads using a selected option, and ends when the lead is submitted or when the time limit is reached.
The available options are:
Badge Scan: Starts recording when the user starts scanning using a badge scanner and ends when the user clicks submit or when the time limit is reached.
Business Card Scan: Starts recording when the user starts scanning using a badge scanner and ends when the user clicks submit or when the time limit is reached.
Pure AI Acceptance:Starts recording when the user clicks accept after a card scanning and ends when the user clicks submit or when the time limit is reached.
List Selection: Starts recording when the user selects a prospect from the event's list and ends when the user clicks submit or when the time limit is reached.
New Capture: Starts recording whenever a user starts capturing a prospect
This option takes over all the other options. For example, if you scan a badge while this option is turned on, the recording still starts once the capture menu is opened, not when scanning the badge starts)
Email Address Entry: Starts recording after the user finishes typing an email address and taps on another field, and finishes when the lead is submitted or when the time limit is reached.
Schedule Meeting
With the Schedule Meeting option, you can insert a meeting scheduler to the event form for your team to book one on one meetings with the Prospects.
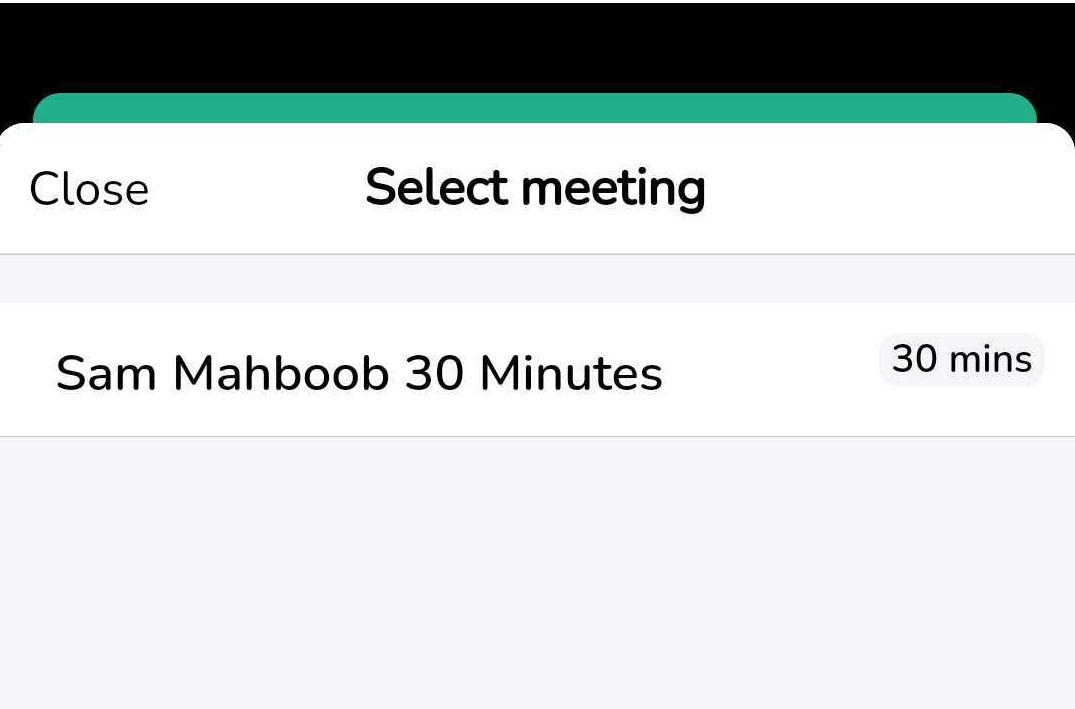
You can select from the list of available specific users and meetings.
If you select specific user, you will have the option to select from all available meeting types for that user and book a time on the calendar:
However, if you select specific meetings then only the selected meetings will be available on the form. For example, if you select a user's 30 minutes meeting type then the app will show only that option. You can also choose multiple specific meetings from the list.
Documents
Use this feature to share documents (or e-literature) during your event. Documents can be previewed and shared outside of the form or selected during form submission and added to an email for follow up. Documents are uploaded to the system and grouped into Document Groups. One or more Document Groups can be included in your event lead capture form.
Supported File Types
Almost all file types are supported. A thumbnail icon is generated for each file type. For PDF files the thumbnail is the first page of the document. For all non-PDF files a generic thumbnail is created. File types that display a thumbnail are:
.csv
.xls
.xlsx
.doc
.docx
.txt
.mp3
.mp4
.pdf
Other file types are supported but may not show a standard thumbnail.
Adding Documents to Your Form
Here's how to setup your documents for an event:
First, create a Document Group.
Navigate to Content > Trackable Content > Document Groups.
Click the New button.
Click the
icon at the top right of the popup.
A new browser tab will appear. New Documents are added to the system as Trackable Content. Upload all of your Documents. See the tutorial on Trackable Content for more info.
Return to the original tab with the Documents popup and click the reload icon
to see the documents you just uploaded.
Follow the steps below to save your Document Group. The numbers below correspond to the numbers in the screenshot below.
Search for Documents by name.
Click the plus icon to add more Documents.
Click the reload icon to see newly added Documents.
Check the box next to the Documents you want to include in your Document Group.
Enter a name for your Document Group. Important: This is the name that will appear on the button label in your lead capture form.
Click Save.
If you're not sure of the name of your Document, you can also browse in thumbnail view by clicking the tile icon in the top-right corner.
You can also sort documents within a document group. The three available sorting options are:
A to Z
Z to A
Custom
To apply sorting, first select documents from Not-selected section and move them over to Selected section using the + and - buttons as shown here:
If you select Custom sort order, you can drag/drop the documents in the "Selected" section to change the order of the documents within the document group.
Once your Document Group is setup, return to your event form by navigating to Events > Capture.
Add the Documents object into your form by dragging/dropping it from right to left.
Adding More than One Document Group
More than one Document Group may be added to your form. When using the Document menu option on the mobile device, the list of Documents will be shown right away when there's only one Document Group in your form. When there's more than one Document Group, the user will need to select the Document Group to select Documents from within that Document Group.
Click on the Document object on the left to open the settings panel on the right.
Field Label: This label will not be used in the lead capture form on your mobile device. It’s intended to be used in the form builder to help you separate multiple Document Groups.
Document Group: Select the Document Group to be associated with your button. When a user taps on this button they will see all of the Documents within this Group.
Click the
icon to add another Document Group to the dropdown list.
Click the
icon to edit the Document Group selected from the dropdown.
You can also map the Document field to any "Large Text" type system field. When a form is submitted, if the form has a document element and the element is mapped to system field, then it will be updated with the submitted document names (comma separated). For example:
Document 1, Document 2, Document 3
Including Documents in Follow Up Emails
To include Documents in your email when following up with your leads do the following:
Navigate to your email by going to Content > Emails.
In the email builder, click the Fields button:
Select Document Group from the Category option.
Select your Document Group from the Field option.
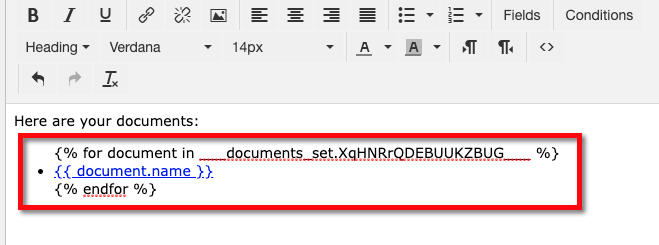
The system will insert dynamic content into your email with a bullet point as shown inside the red box below. Only selected Documents will be included in the bullet list inside your email.
On the recipient's side, they will see links to their Documents as shown below:
Here's a sample follow up message. When Documents are included, there will be a perfect amount of spacing between the paragraphs and signature with each Document link preceded by a bullet list item. If no Documents are included, the Document section will not appear in the email.
Example Follow Up
Hi %%FirstName:default=there!%%,
Thank you for stopping by our booth at ___! I hope you had a safe trip back from Miami, FL. Please reply to this email if you have any questions about our solution.
I look forward to sharing more with you and %%Company:default=your company%% in the coming days/weeks.
{% if ( ___documents_set and ___documents_set.YpqGReWCKUpOAIhaX___ ) %}
Here are the docs you requested:
{% for document in ___documents_set.YpqGReWCKUpOAIhaX___ %}
{% endfor %}
{% endif %}
Best regards,
%%leadowner_firstname%%
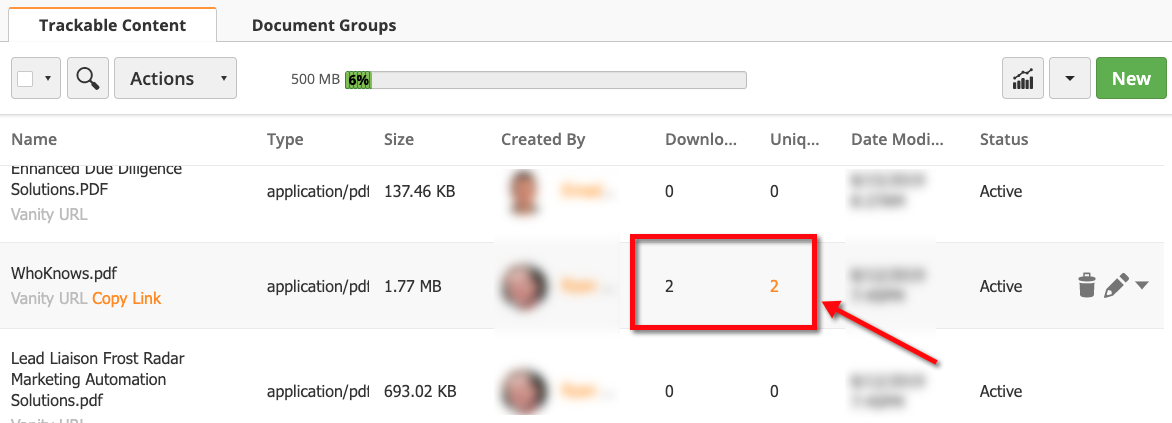
All links are trackable. Every time a Document is downloaded the system will measure engagement. To see your Document statistics navigate to Content > Trackable Content.
Total and Unique Downloads are recorded. Click on the Unique Downloads stat (inside the red box below) to see who downloaded your Documents!
Using Documents on Your Mobile Device
Mobile app users can use your Documents to:
Share Documents from the Event Menu.
Select Documents to include in follow up.
Video Tutorial
Tip: Long press on a Document thumbnail to open the Document.
Sharing Documents
To share Documents do the following:
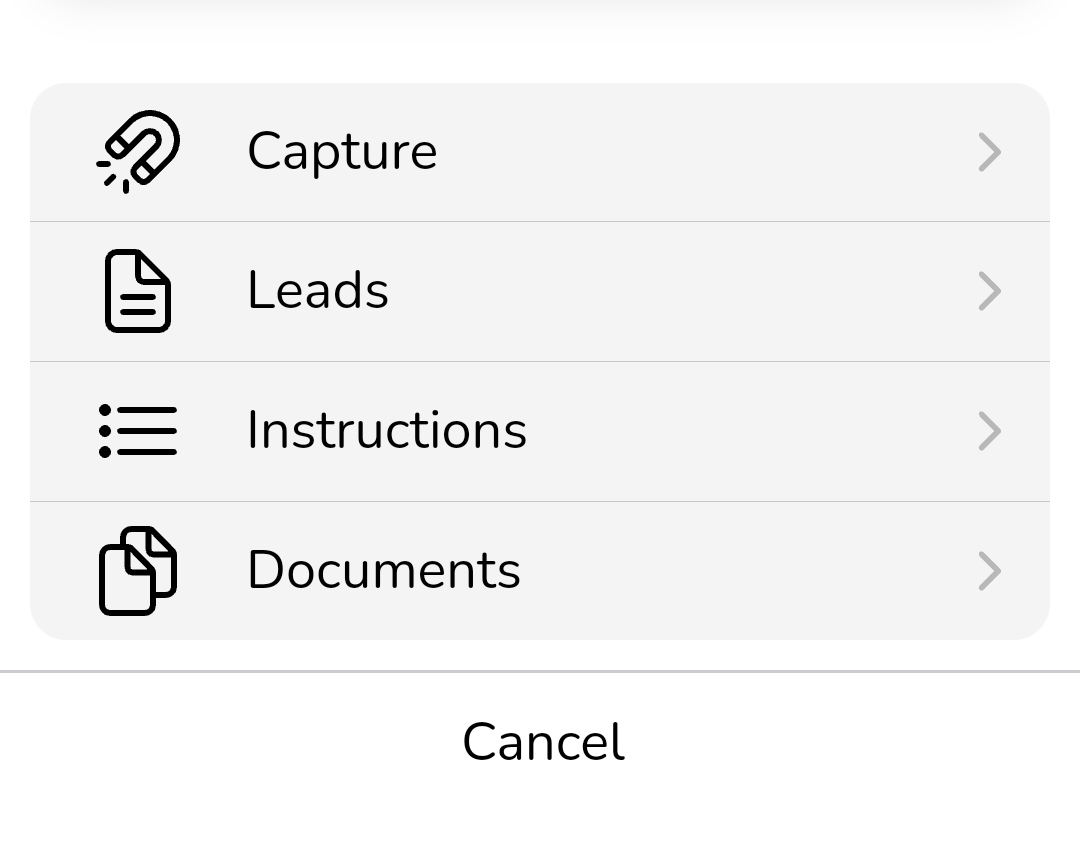
Tap on the event to open the Event Menu.
Select Documents.
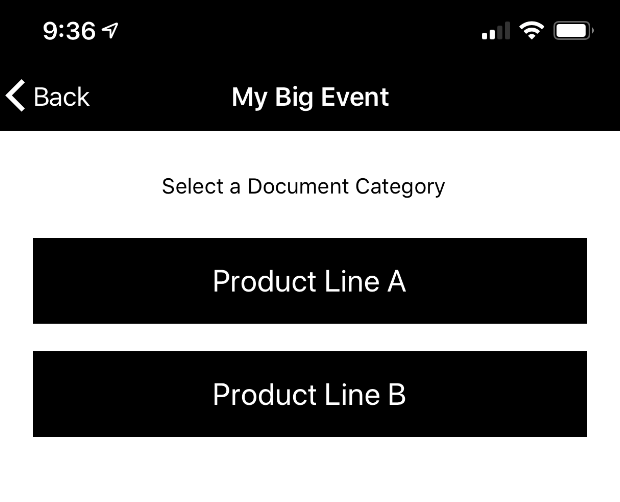
If more than one Document Group exists then the user will need to tap on the relevant button first. If only one Document Group exists then skip to the next screen below.
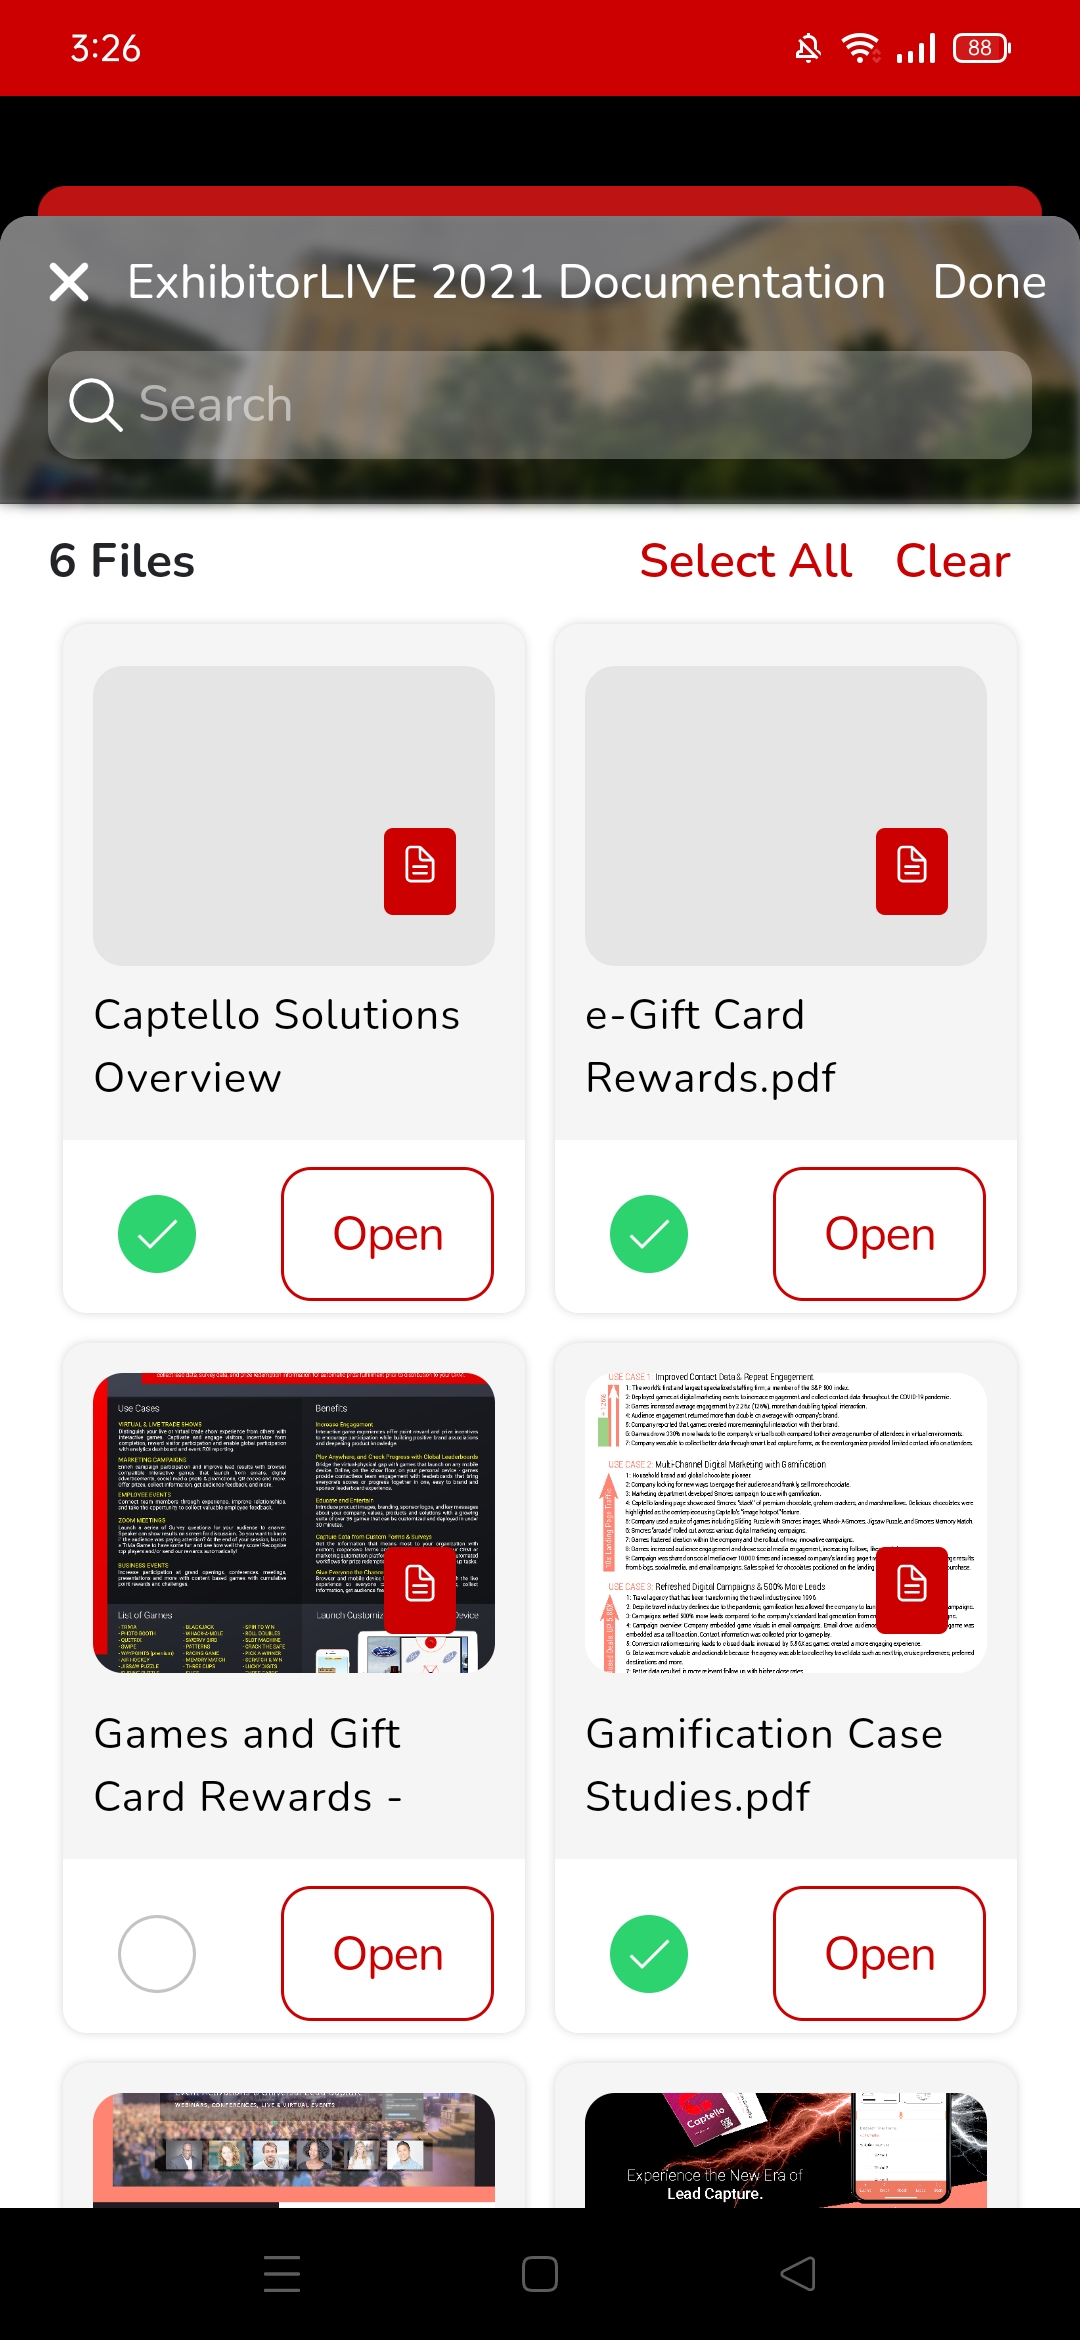
Tap on the Documents to share. A green check will appear at the bottom right of the Document thumbnail indicating it's been selected.
Click the Send button.
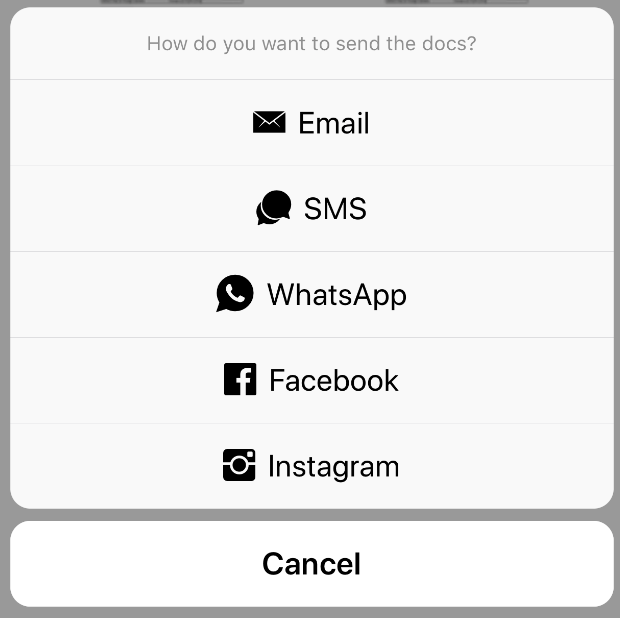
Choose your share method. The following sharing methods are supported:
Email: Opens the device's native email client and inserts trackable links for your Document(s).
SMS: Opens the device's native SMS client and inserts trackable links for your Document(s).
WhatsApp: Opens WhatsApp and inserts trackable links for your Document(s).
Selecting Documents for Follow Up
To share Documents for follow up in an email do the following:
Open your Event form on your mobile device.
Capture lead information on your device as your normally would.
Tap the button for the Document(s) you'd like to include in your follow up. In the example below, two buttons (a.k.a. Document Groups) are added to the form.
Tap on the Document(s) to select them. A green check mark will appear for all selected Documents.
Click the Done button.
Enabling Order Questions (Hospitality)
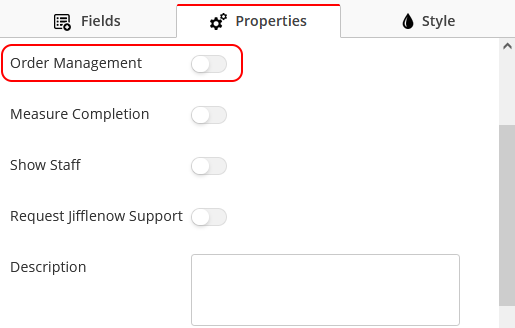
To enable order questions, navigate to your capture form properties, and enable order management.
For more information on setting up order management, refer to Order Forms.
Sections
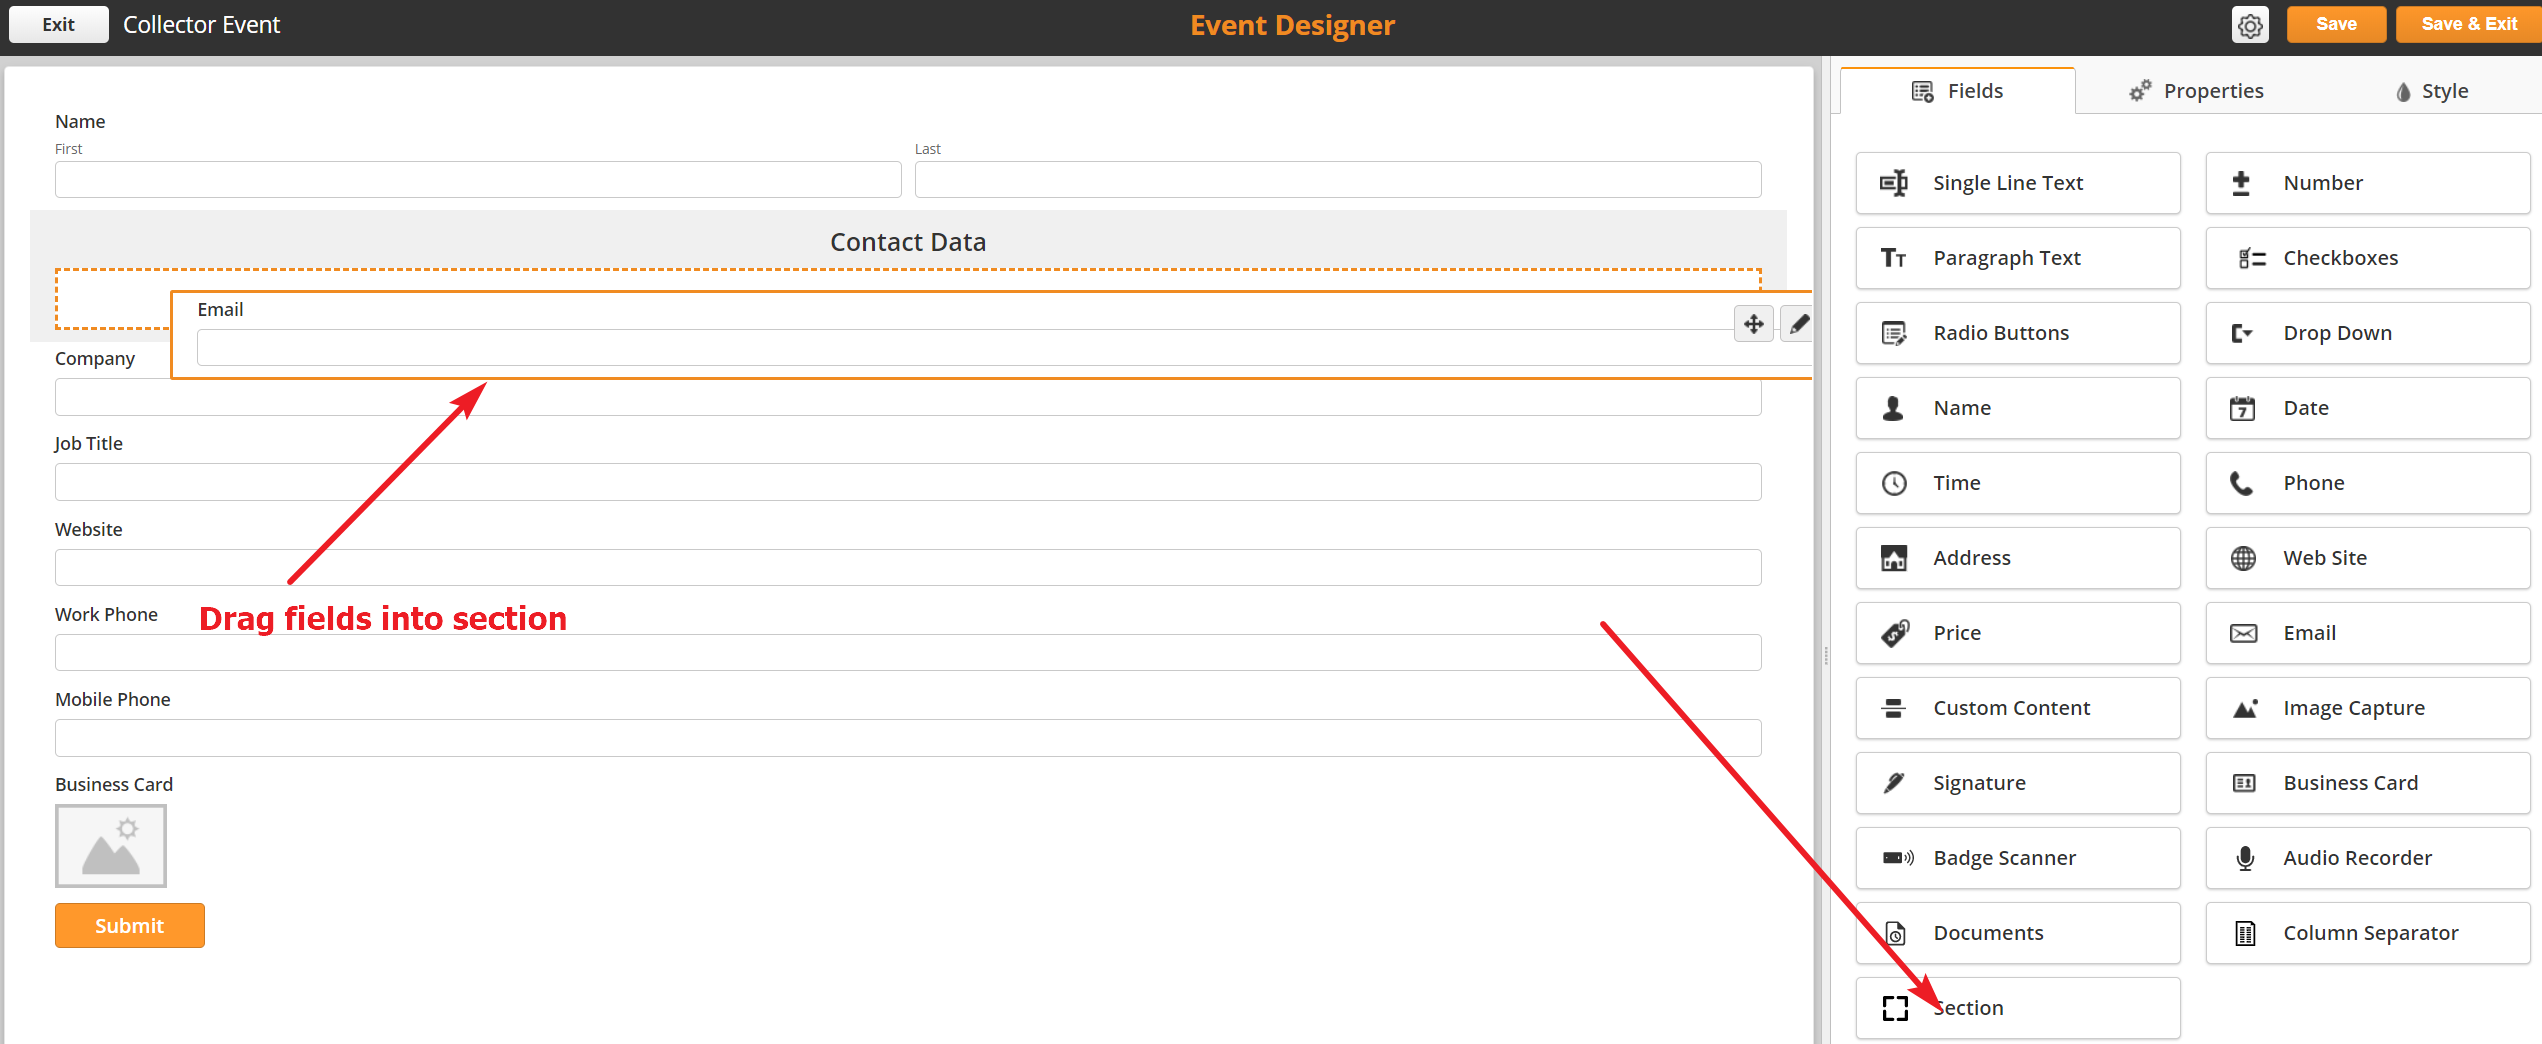
Organize your lead capture forms using Sections. Sections group together common fields like contact data, company info, or survey questions. With Sections, your form is cleaner and easier to manage for end users. To add a Section
Drag over the Section element
Drag fields into the section
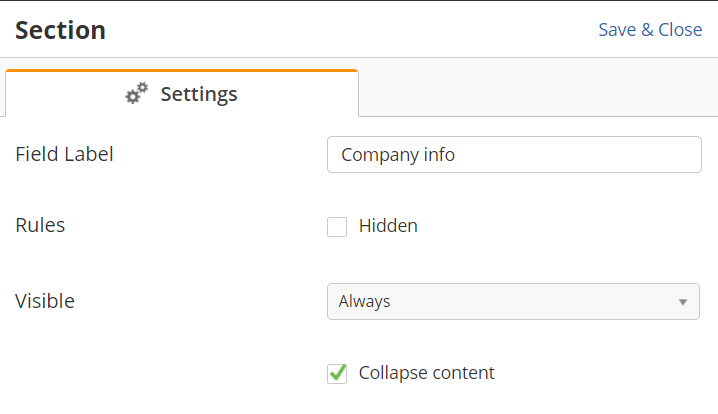
Click the section header to edit
Give the section a name
Select whether the Section should be open or collapsed by default
Optionally add visibility rules
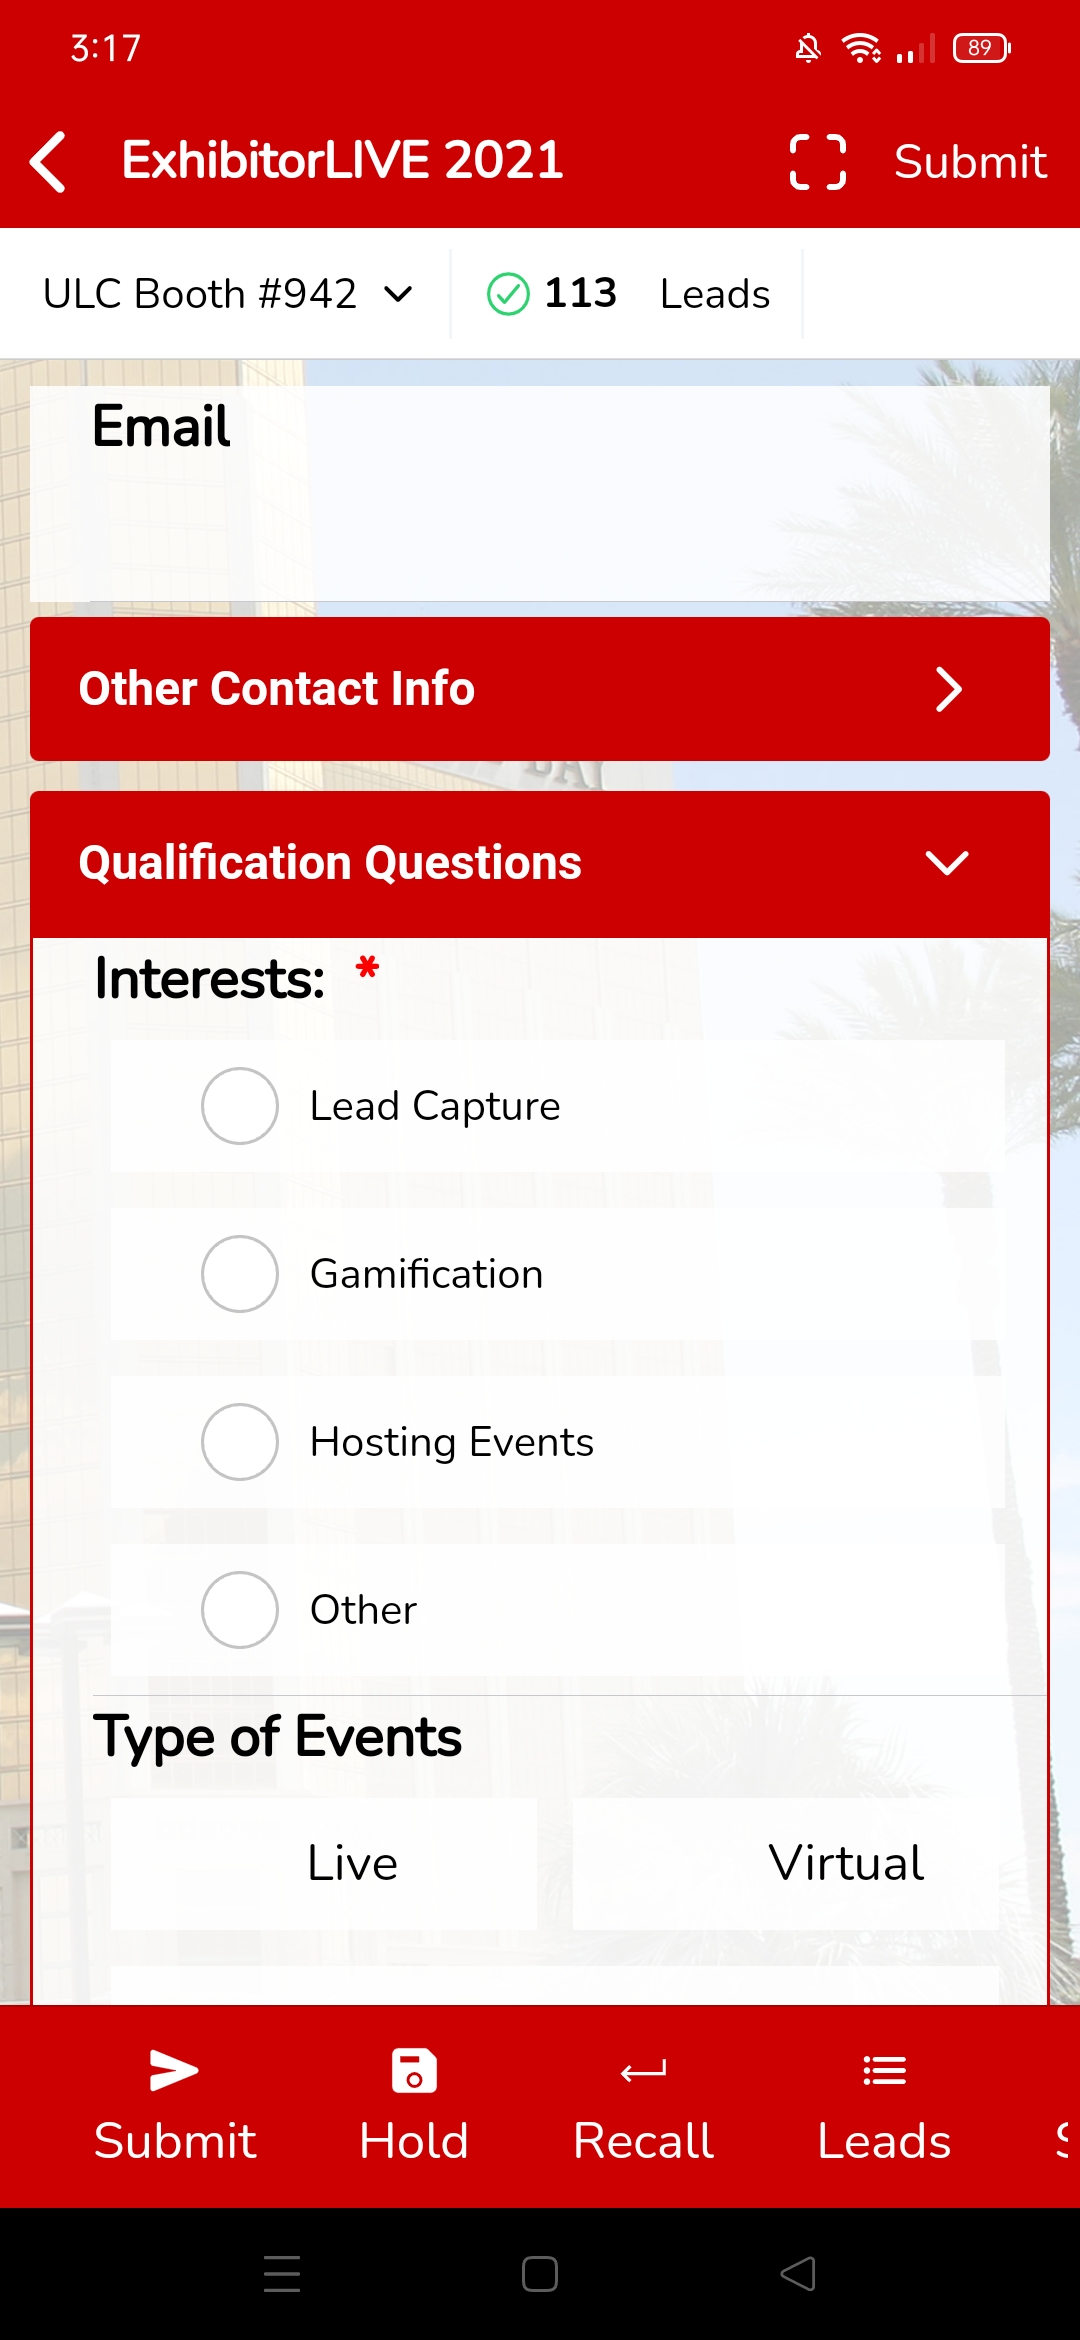
On the app, users can tap on sections to show/hide their fields. See the screenshot below. The Qualification Questions Section is expanded while the Other Contact Info Section is collapsed.
Form Styling
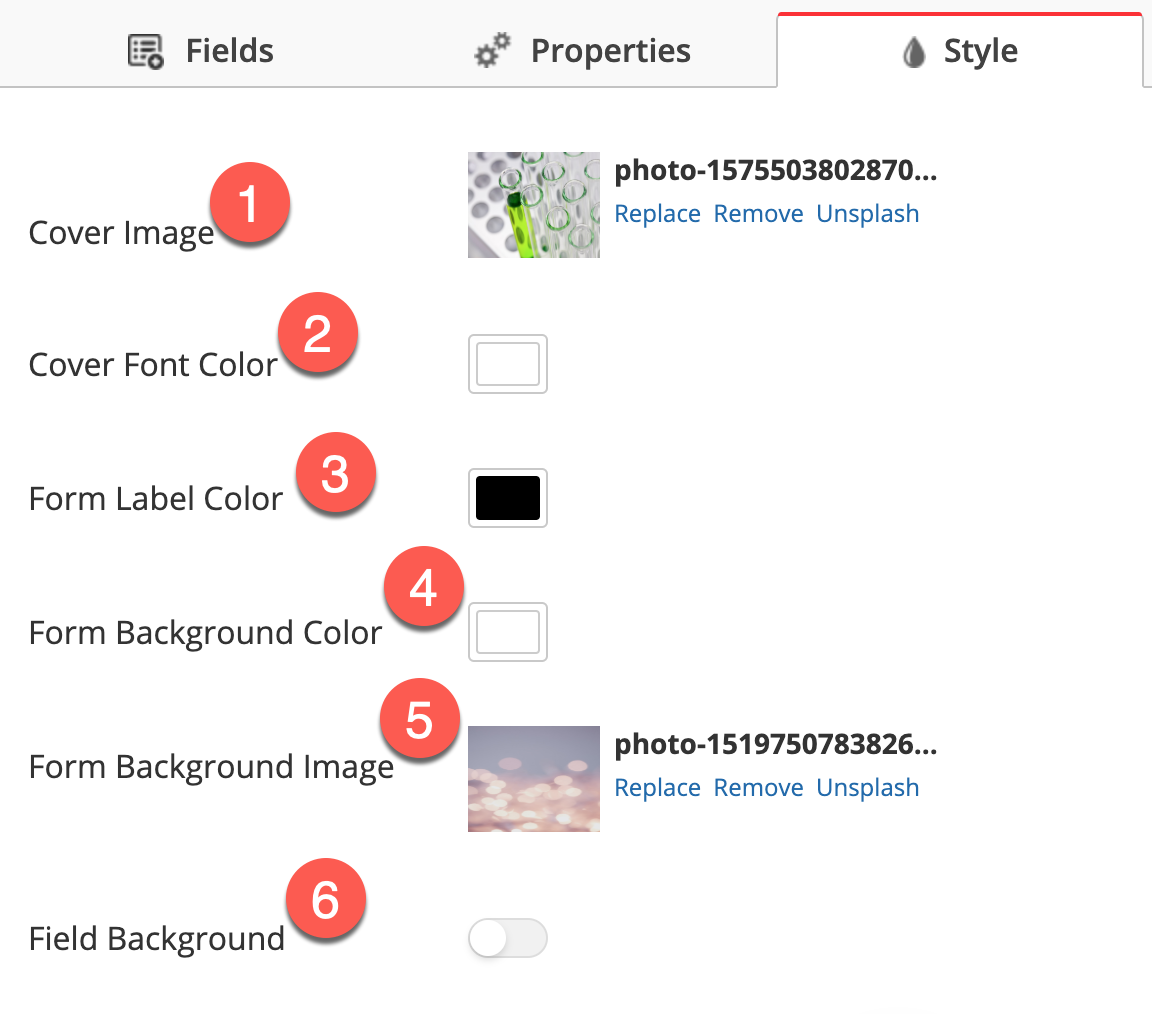
You can add custom styling to event capture forms to match your branding and provide and exciting end user experience. To change your style options, open the Event Designer and Click on the Style Tab.
#1 and #2: Cover Images and Cover Fonts
Cover images make your events easier to distinguish and add a bit of flare. You can select your own custom cover image, or click the Unsplash icon to select from thousands of images in Unsplash's library. Otherwise, the system will use one of 10 stock images.
Custom Images
Use an aspect ratio of 1.75 width x 1 height for custom images.
You can adjust the font color of the Event name and address by clicking on the box next to Font Color. You can either use our color selector or enter a specific hex code.
#3: Form Label Color
The color of all of the fields / questions on your form can be changed using this setting. You can change the font color of the form labels. Form labels include the Field Labels as well as Field Sub Labels (for example, First and Last under the Name field). You can either use our color selector or enter a specific hex code.
#4 and #5: Form Background Color and Form Background Image
Change the color of the form's background or add a background image.
#6: Field Background
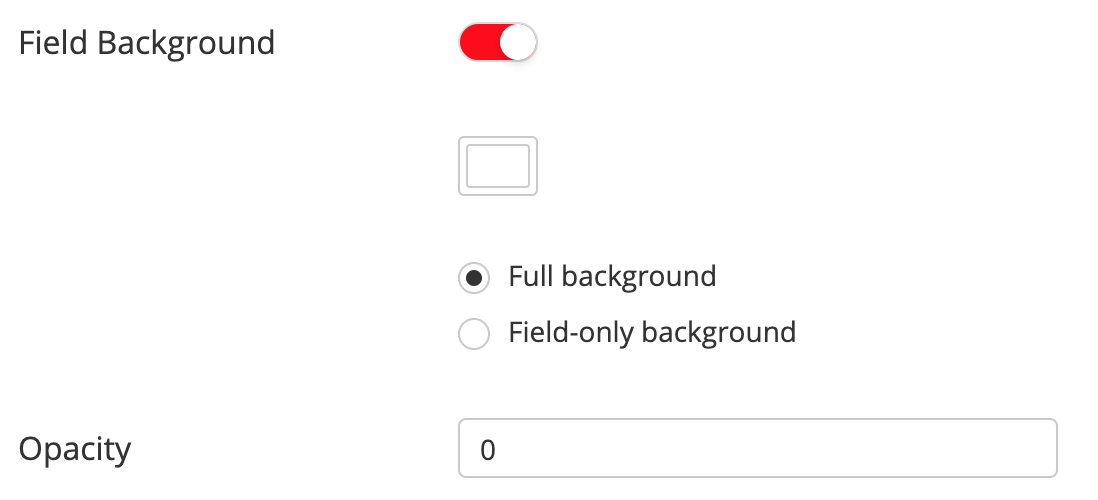
If you're using a background image on your form you might benefit from using the Field Background setting. This setting adds a background behind each question / field label.
Max Width
This determines the maximum width of the event form in Web View. Turning this option ON will do the followings:
Set a max-width to the capture form container
Make it centered
If the form has a background, make the background on the entire page, not just the capture form.
You can also customize the Submit Button Text for the web view and make it either full width or fit text.
Document and Section Background Color
The buttons generated for Documents and Sections inherit your themes color. However, you can override the theme color by clicking on the Document or Section on the canvas, clicking the Style tab, and toggling the switch to change the button background color and font.
Menu Color
By default, the mobile app menus are orange. You can change the color of the app's menus from Settings > App Setup > Events.
If you would like to add a custom color, please contact your Lead Liaison representative. Include the exact HEX code for the color you would like to use.
If you are already logged into the mobile app when you change the color, you will need to unauthenticate and re-authenticate your device to see the color changes.
Menu Options
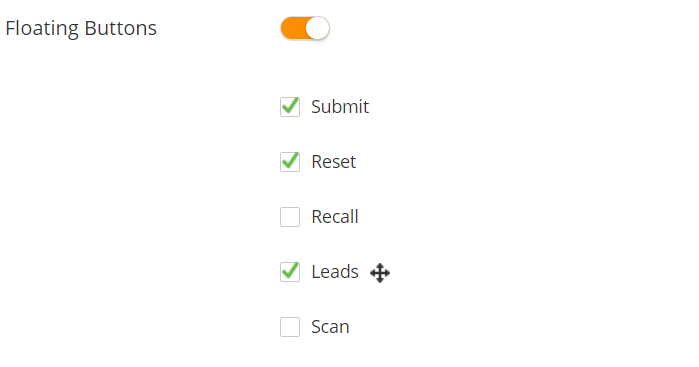
You can choose from two different menu options: the Buttons Menu and Floating Buttons. The menus to be configured per event, so customize them to fit the capture style of the associates attending your event.
Buttons Menu
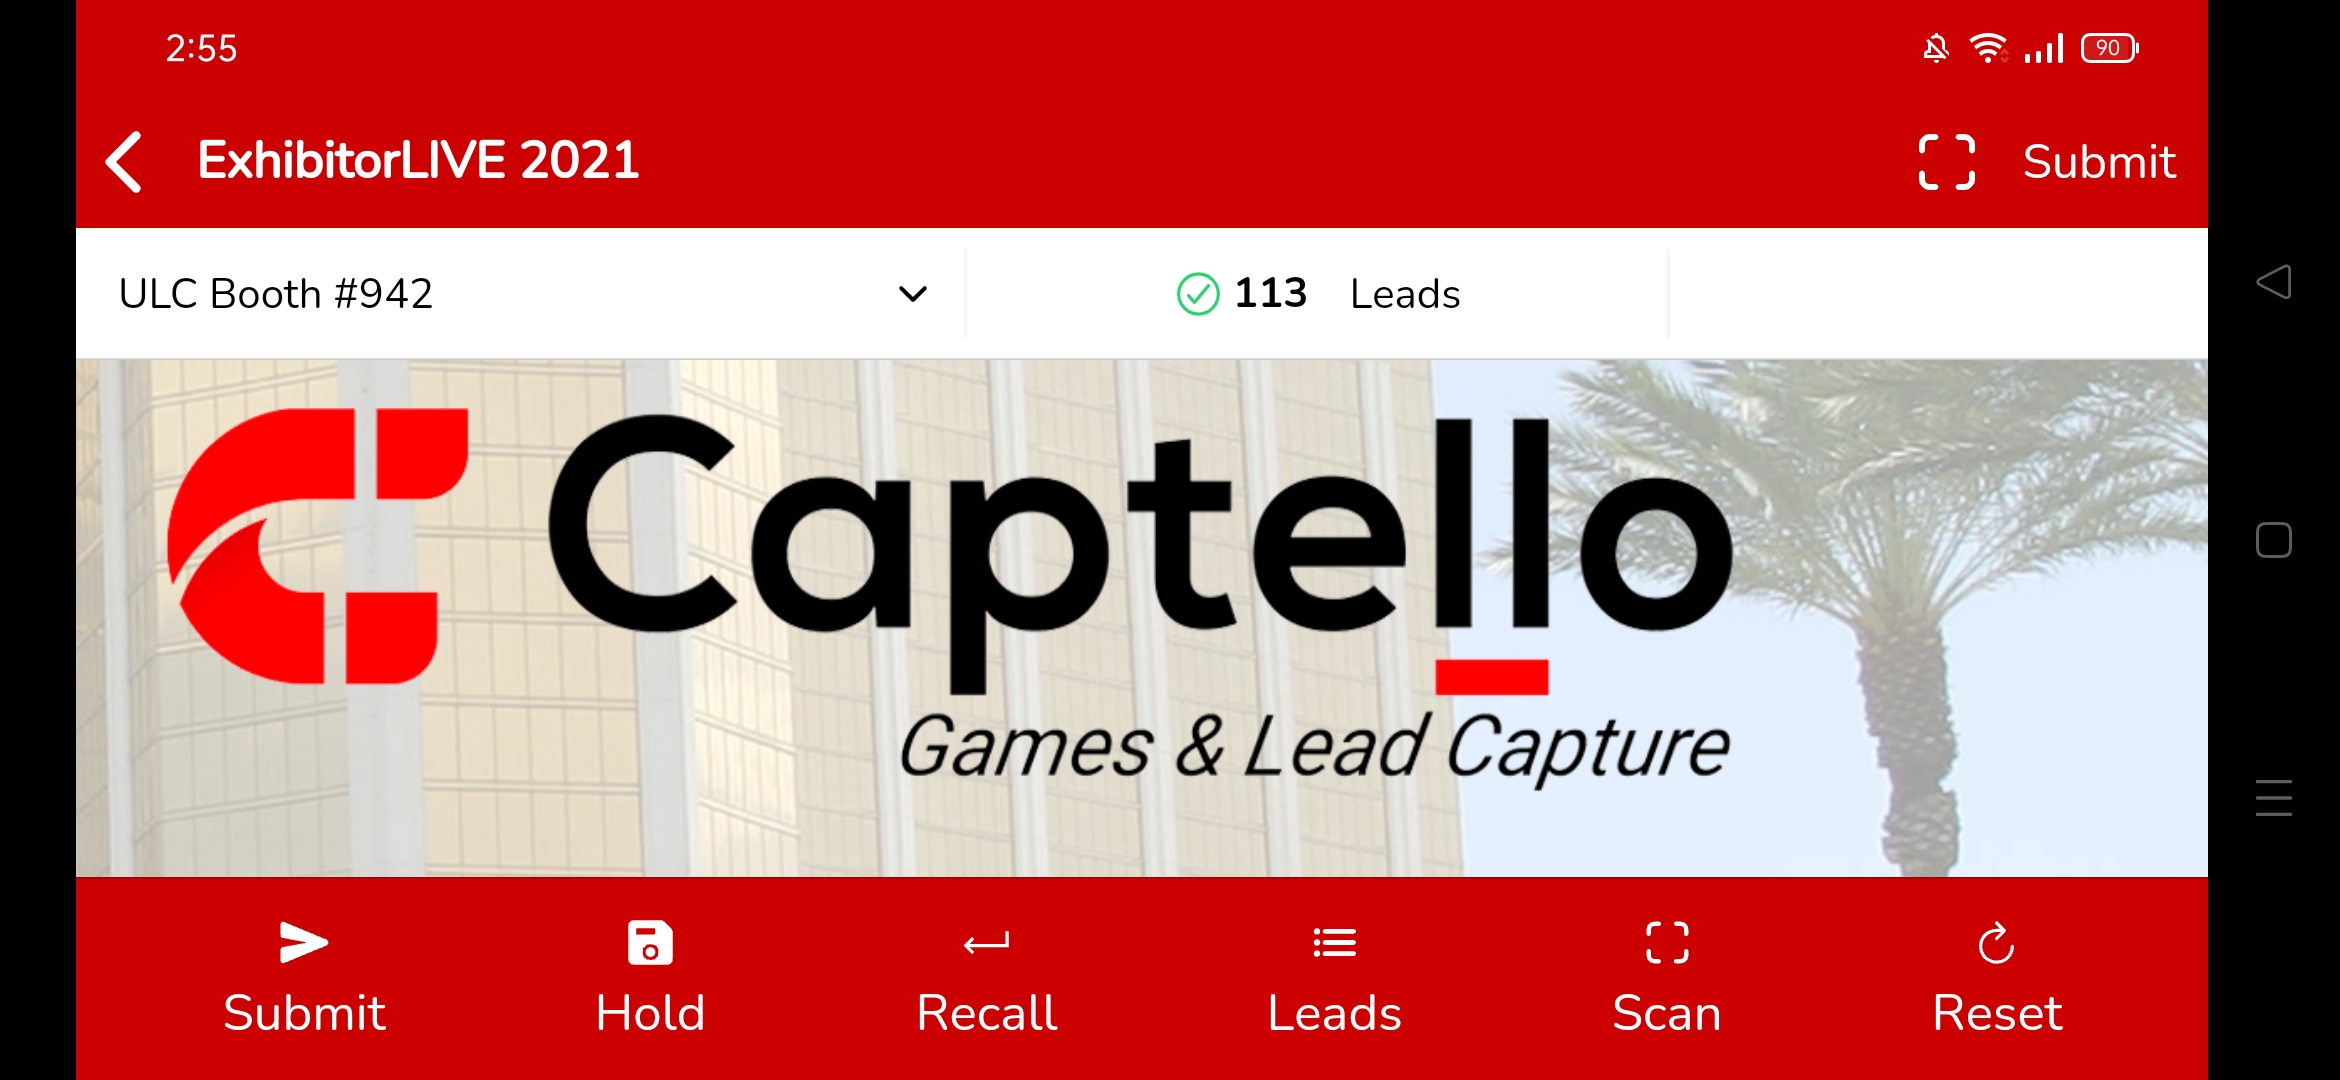
The Buttons Menu is a horizontal menu at the bottom of the form.
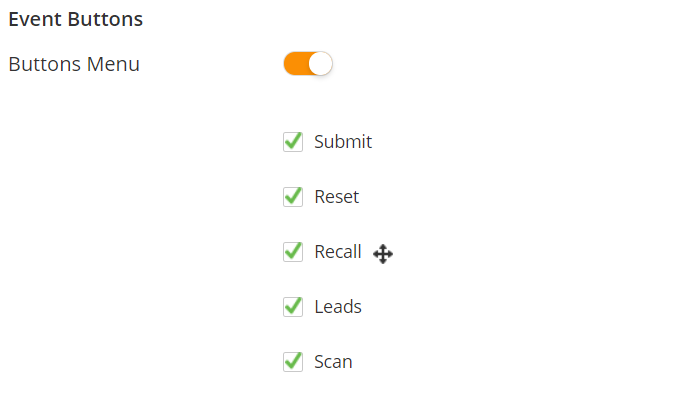
Use the checkbox to select/deselect which buttons you would like present on the Buttons menu. Use the cross arrow to the right of the buttons to rearrange them.
Submit – submit current submission
Reset – clear all form fields, scans, images, and recordings
Recall – retrieve the last submission for editing
Leads – takes user to the Review Submissions page
Scan – scan a name badge or business card (depending on if those elements are on the form
If your form is in Kiosk Mode, the only buttons available will be Submit and Reset.
Floating Buttons
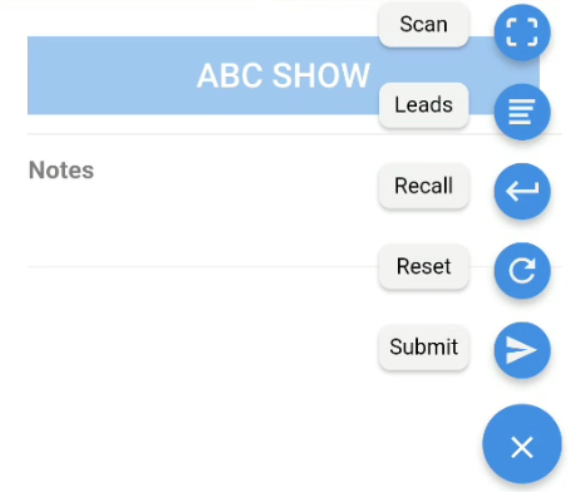
The Floating Buttons are an alternative menu style to the Buttons Menu. Instead of displaying across the bottom of the form, the buttons can be shown/hidden by tapping an icon.
Use the checkbox to select/deselect which buttons you would like present on the Buttons menu. Use the cross arrow to the right of the buttons to rearrange them.
Submit – submit current submission
Reset – clear all form fields, scans, images, and recordings
Recall – retrieve the last submission for editing
Leads – takes user to the Review Submissions page
Scan – scan a name badge or business card (depending on if those elements are on the form
If your form is in Kiosk Mode, the only buttons available will be Submit and Reset.
Screensavers
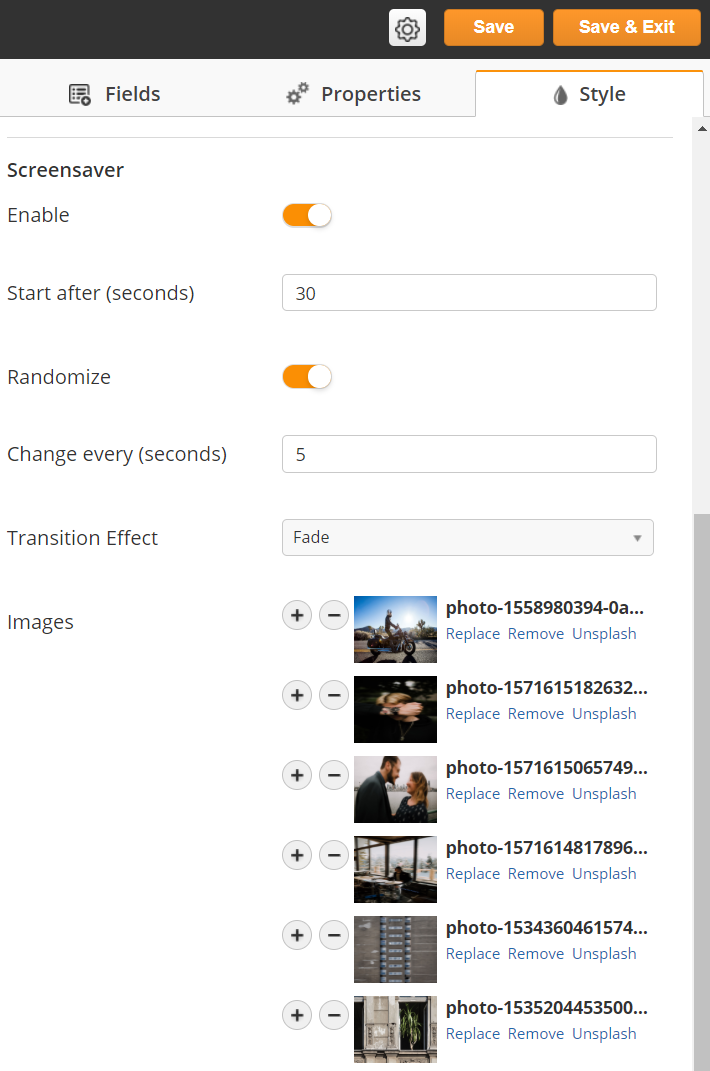
Screensavers are a great way to display advertising and other exciting graphics on kiosk forms. To add a screensaver, click on the Style tab in the Event Designer and scroll down.
Enable – turn on/off the screensaver on this form.
Start after – time in seconds before the screensaver activates.
Randomize – randomize the selected images.
Change every – time in seconds each image displays.
Transition effect – effect while changing images.
Images – select your own images or select from Unsplash; use the +/- buttons to add or remove images.
Once you close the form using the Save and Exit button, the updated screensaver will be pushed to all devices.
Stations
If you are capturing data at multiple locations in an event, use Stations to report where your leads are coming from. For example, you could see which leads you captured at your booth versus which you captured at your networking party. The system will roll up Prospects from the stations into a single event report, so you don't have to manually combine the data after the event.
To add stations,
Click on the Settings gear in the top-right corner of the Event Designer
Click Stations
Enter Station names
Use (+) or (-) to add/remove stations
Click Save
You can also add Fulfillment Actions for any or all of your Stations by clicking on the small gear icon next to the station name:
This will open up the Fulfillment Actions dialog box where you can configure your actions for the particular Station.
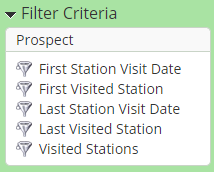
When exporting Event Metadata, the following options are available when using stations:
First Visited Station
Last Visited Station
First Station Visit Date
Last Station Visit Date
Visited Stations
You can use these fields in Automations, Segmentations, and Prospect Filters as well.
Instructions
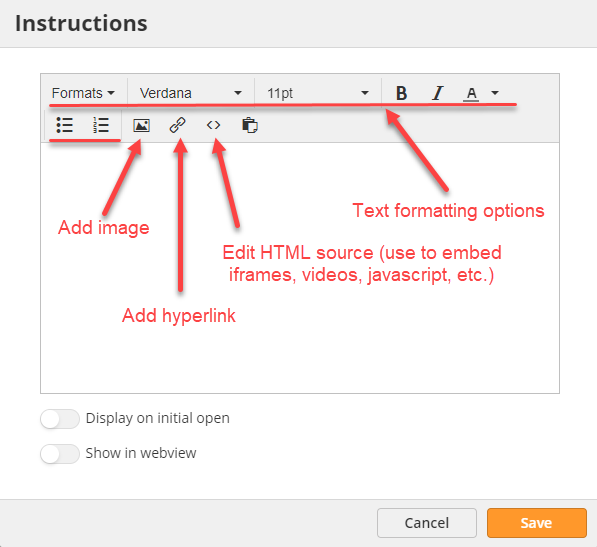
Use Instructions to add HTML 5 content for users to view when they select a capture event. You can add text, images, links, and embedded content like YouTube videos or Google Maps. To add Instructions, select the Instructions button in the Properties tab of the Event Designer.
Display on initial open - opens the instructions in a popup when a user taps on a capture event for the first time. To see instructions after the initial tap, users can select the "Instructions" from the event menu on the mobile device.
Show in webview - opens the instructions in a popup when a user launches the web view of the capture form for the first time.
Visibility
You can set the “Visibility” of the event form as:
Public
Private
Shared
When "Shared" is selected, you can specify the users and teams to share the event form with:
On the Manage Events pages, these badges are displayed to show the visibility status of an event form:
Web View
You can launch a Web View of your Event Forms for use in virtual events or PC-based kiosks. To launch the Web View, use the action menu to the right of the Event to select Launch Web View.
The form will launch in a new browser window. Copy the URL of that tab to share a link or embed.
There are a few options you can configure for the Web View. To view the options, edit the Event and go to Properties > Web View.
You can set if the Event form should attempt to collect and record someone's location using Collect Location option
You can also set what happens when the form is submitted.
Start over – reloads the form; good for kiosks and terminals.
Thank you message – displays text confirming submission.
Redirect to a Link – redirects browser window to specified link.
Field visibility
Every field you have added to the form can be configured for if it is visible on Web view, Mobile view or both
Duplicates
Lead Liaison normally merges duplicate prospects into one profile. However, lead capture forms can create prospect profiles by name only. If you want to create a new profile for every submission, navigate to the Properties tab in the form builder and select "Create new" under "In case of duplicate names."
If you do capture an email address, the system will use the email as the prospect's unique identifier instead of the name. You can control the behavior of the system when this is the case.
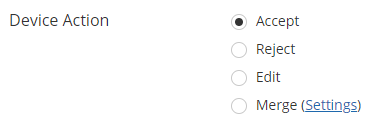
Accept - the system will create a duplicate submission for the same Prospect. This could result in a different number of total submissions vs total unique Prospects.
Reject - the system will reject the duplicate, leaving the submission Blocked on the user's device.
Edit - the app will open the previous submission and give the user the option to edit.
Merge - the system will merge duplicate submissions with the first submission. Click settings to determine field-level settings (overwrite, ignore, update if empty.)
Block Submissions
This option allows you to block submissions from domains and emails. When this option is enabled, you can block submission using the following options:
Domain List(s) - Pick from a predefined domain list.
Enter domain(s) - Manually enter the domains to block e.g. gmail.com, hotmail.com.
Enter email(s) - Enter email addresses to block submissions from.
There are two methods of blocking:
Mobile device submissions - When enabled, you can specify a message to show when the submission is blocked. Default is "Form not submitted."
Web view submissions - When enabled, system will not accept web view submissions. With this option, you can either show an error message or you can add a redirect URL. If you choose a Redirect to URL then you can also specify whether you'd like to record the submission in the backend. This is controlled by enabling or disabling the "Accept submissions" option.
Note: If Block Submissions is turned ON then you cannot save the event form unless at least one of the above blocking methods is enabled.
Measure Completion
This feature is used to create competition with staff members / sales teams who are collecting leads at a trade show. For example, suppose there are 10 fields in your form. If Measure Completion is checked on four (4) of the fields then these fields will be used in the calculation while the other six (6) fields are not. If a user fills in three (3) of the four (4) fields with Measure Completion enabled then they’d have a Completion Rate of 75%.
You can enable this feature from the form Properties tab here:
Measure Completion: When enabled a Measure Completion option will be available under the Rules section for each field. Check this box on a field to use this field when measuring completion rates.
Re-evaluate when Editing Submissions: When enabled, the lead will go through the Completion Calculation again if it is edited.
User Completion Rate
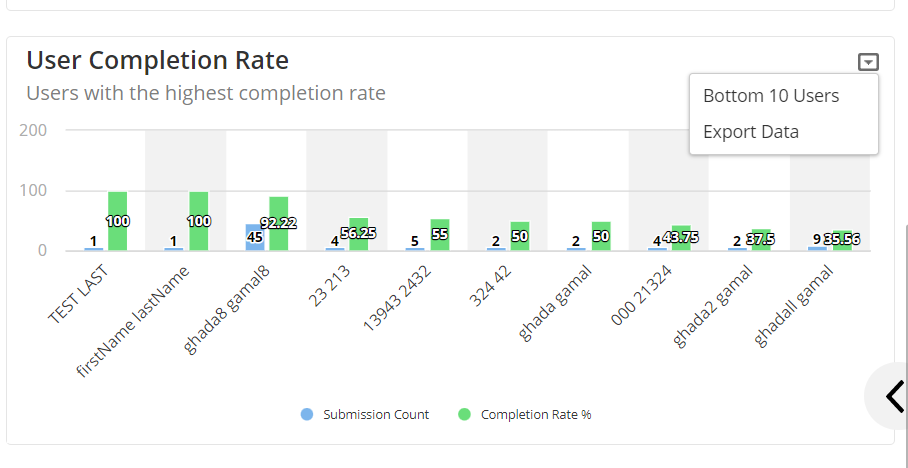
On the Event Dashboard page, you’ll see a User Completion Rate graph that shows the top “x” number of users with their # of submissions and their completion measurement %. You can also view top 10 or bottom 10 users based on their completion rate.
Export
For any given event, you can also export the results from the graph directly. The export will include username, email, no. of submissions and the completion rate in %.
Submission Actions
The following submission actions are available:
Collect Rating
You can collect a lead rating at the time of capturing the lead information. Four different rating options are available i.e. Cold, Warm, Hot and Urgent.
Collect Rating: Prompts the user to select a rating after a new lead is submitted.
Use "None" as a Value: Adds None in addition to Cold, Warm, Hot and Urgent as a value.
Default Rating : The default value selected for the rating once a lead is submitted.
When Collect Rating option is enabled, a ratings field is displayed after an event form is submitted. This allows the users to pick a rating for the lead. Or they can select "None" if no rating is applicable.
Captured rating information is also available on the event results page for each captured lead:
The rating element is meant for the staff users to use, so it will not show in web view neither kiosk nor activation launches.
Add to SFDC Campaign
This action facilitates seamless synchronization of form submissions with SalesForce campaigns. Users can select the desired campaign and specify lead status, automating lead management processes and ensuring data accuracy within SalesForce. This functionality streamlines workflows.
Just select the desired SFDC Campaign and its status, and you'll be all set!
The fulfillment action still needs to be configured to synchronize the lead with SFDC.
Add to Automations
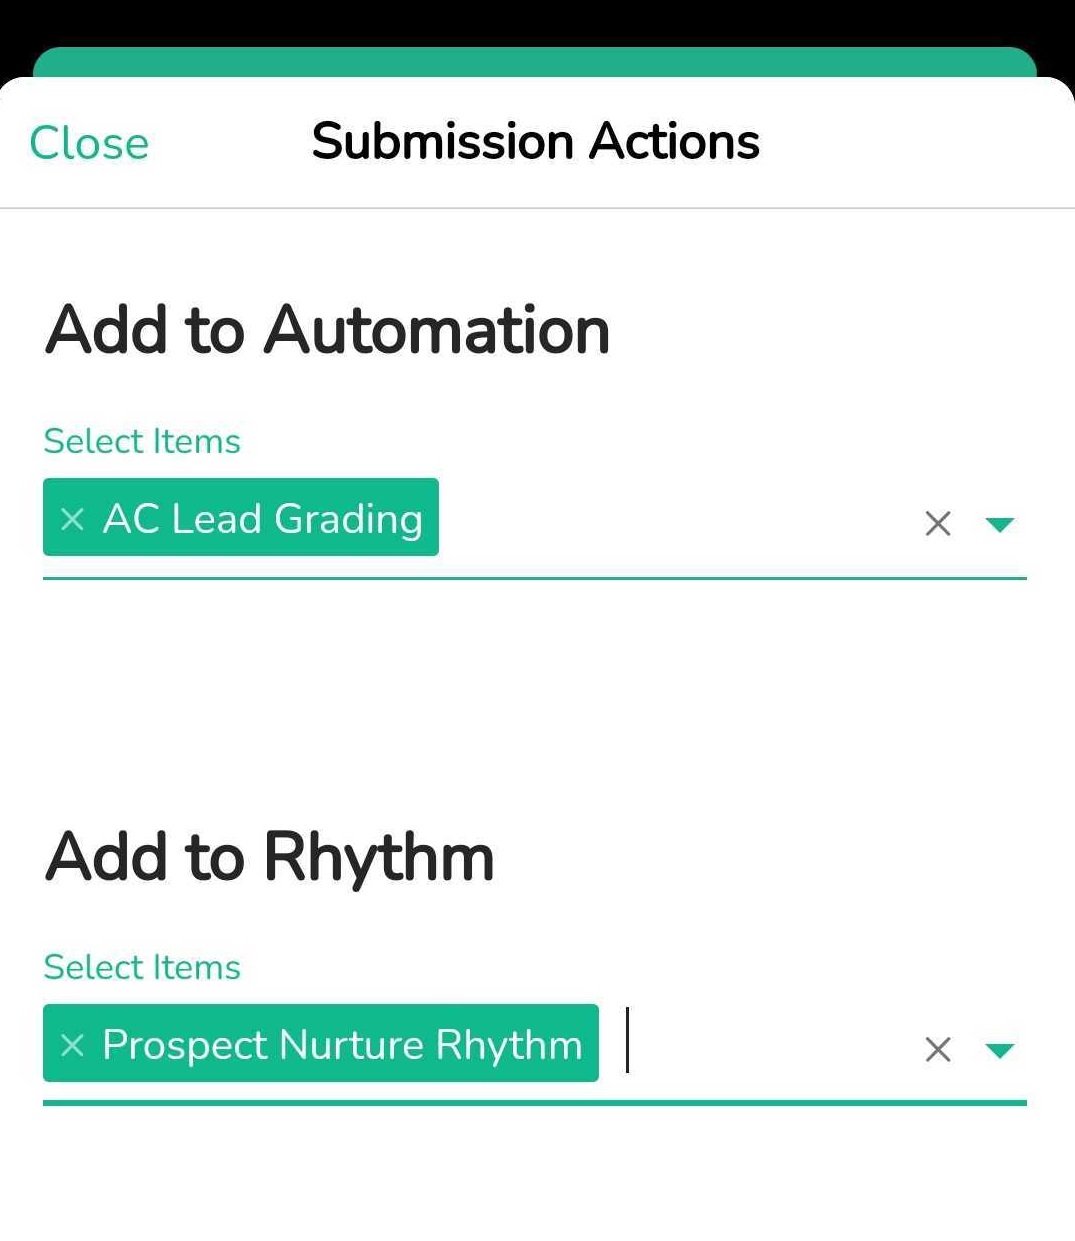
This action prompts the user to add to Automations after a new lead is submitted. You can choose multiple Automations which will be available on the app for selection.
Add to Rhythms
This action prompts the user to add to Rhythms after a new lead is submitted. You can choose multiple Rhythms which will be available on the app for selection.
This is how these actions will display on the mobile app:
Fetch Related Prospects
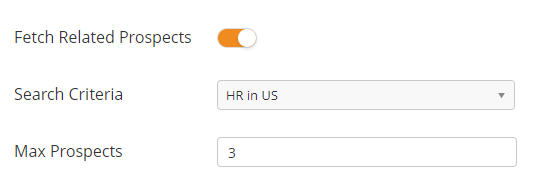
Using this option, you can find other related Prospects through our DataSpring feature. This prompts the user to search for related contacts after a new lead is captured. Prospects are fetched using your selected Search Criteria and the related company name or domain name from DataSpring to find and source the specified number of records. Related Prospects are saved in your database as a new Prospect record.
Use case: Suppose you are exhibiting at a tradeshow and meets Janice, the Director of Marketing at Philips Medical. The staff member scans Janice’s badge, fills out a custom form to collect data that’s meaningful to your business, then submits the lead. The staff member is prompted to optionally find other qualified marketing contacts at Philips Medical. The other contacts are automatically found by setting up a filter to find anyone with “Marketing” in their title and located in the United States or Europe. The additional contacts get saved into your database for later follow up and/or nurturing.
Search Criteria
Here you can select from pre-saved DataSpring search criteria. Instructions on creating/saving a new search criteria is available here.
Max Prospects
You can use the Max Prospects setting to limit the number of records that can be pulled in from a DataSpring search. If a record was already purchased in DataSpring (using any method) then it will be skipped. For example, if Max Prospects is 5 and 3 records were already purchased in DataSpring (even from a direct search) then 2 additional records will be purchased.
Viewing Fetched Prospects
You can view the prospects you have added from the Fetch Prospects action from the Events Dashboard. When on the dashboard, you need to select your specific event that has had Fetch enabled as the target dashboard to be viewing. You will see a box for Related Prospects which shows how many have been fetched, and allow you to view those prospects.
DataSpring search feature requires a Sales Enablement license. Contact your Account Manager for more information about licensing.
Social Append
This option allows you to enrich leads with information from social networks. When a lead is captured it is appended in real time with social information. You can enable this option from the event form Properties tab here:
The Social Append feature includes these personal data fields to the Prospect record:
First Name
Last Name
Middle Name
Family Name
Full Name
Education Name
Education Degree
Education Year
Current Organization Title
Current Organization Name
Age
Age Range
Birthday
Gender
City
Region
Region Code
Country
Country Code
Location General
Twitter URL
Twitter Username
LinkedIn URL
LinkedIn Bio
Social Profile Website URL
Social Profile Website Name
Social Profile Photo URL
Account admins can further control other Social Append settings (such as allowing for overage) from Settings > App Setup > Data Enrichment as outlined in the documentation here.
Here is a quick video overview of this feature:
Notify Lead Owner
This option allows you to send an email alert to the lead owner when the lead is captured.
There are two available Notification Frequencies:
Always - system will always send an email alert to the lead owner every time a lead is captured.
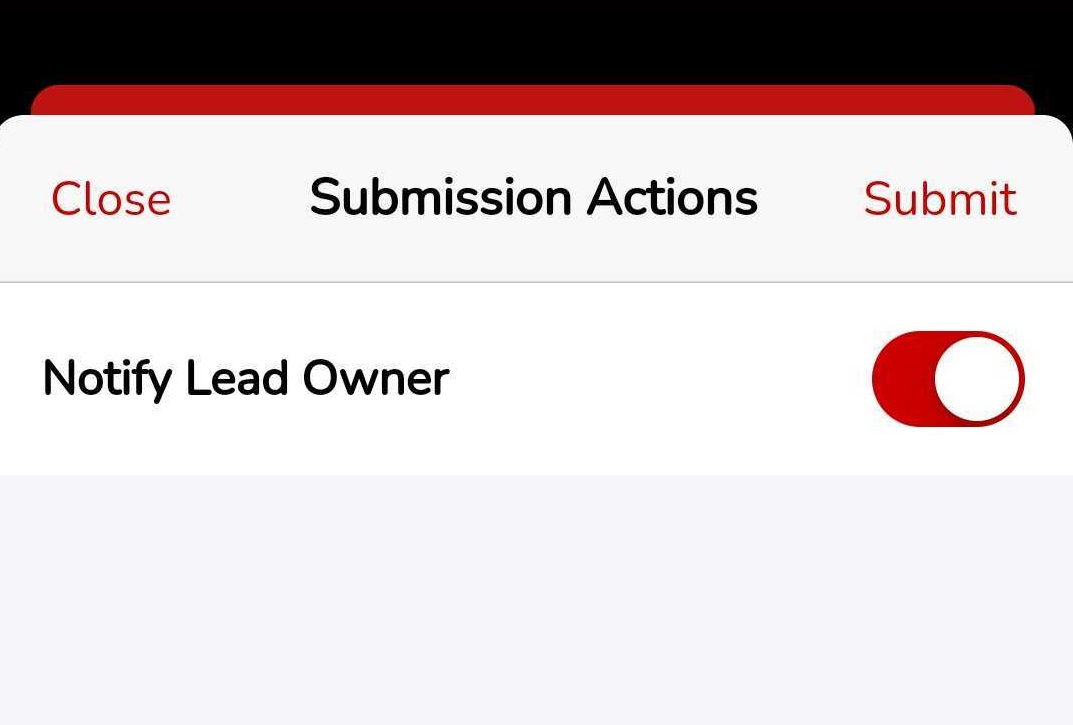
User preference: user will get an option to select whether or not to send the alert. They'll see this prompt at the submission actions screen:
The resulting email alert will contain information such as:
Which event they were captured at.
Who captured the lead.
Time of capture.
Which Station they were captured at (if added to the Form)
Submission data.
Here is an example notification:
Personal Email Addresses
You can block personal email addresses. For example, you may not want to process leads who have a yahoo.com or gmail.com email address. You can also use this function to block specific email domains (a competitor's email domain, for example). To block personal email domains,
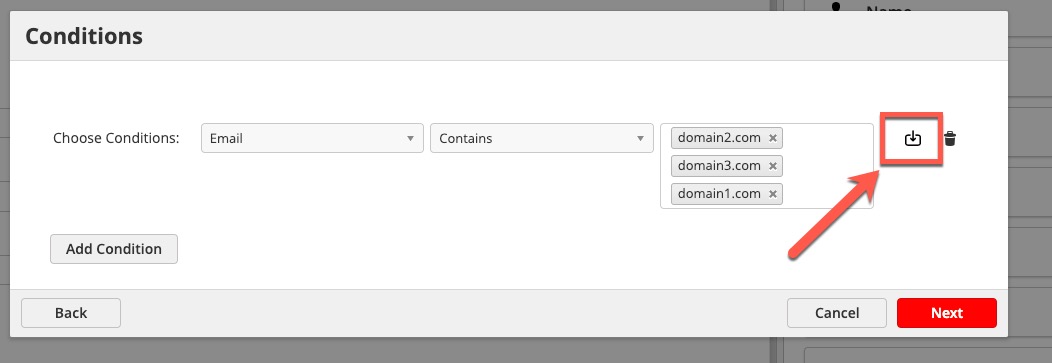
Set up your Personal Email Domain List (learn how here).
Navigate to your Event Form's Settings menu.
Click the box shown in the screenshot below.
If a user tries to submit the Form with a domain on your Personal Email Domain List, they will see an error and be unable to complete the form. You can customize the error message using the box that appears below the "No Personal Email Addresses" checkbox. Note: it will only appear when the box is checked.
Owner
By default, when a device user submits a prospect from a lead capture form, the system will assign the user as the prospect's owner. You can change this setting in the form builder under the Properties tab.
Prospect Owner (Mobile)
These settings will apply to the leads captured through Captello mobile app.
Device user – system assigns prospects to the user associated with the submitting device
Specific user – system assigns prospects to a specific user of your choosing
Leave Unassigned – does not assign an Owner and relies on any default settings
Default owner – system assigns prospects to the global default (must be set in Lead Distribution Settings as shown in the screenshot below)
If you would like the system to override any current lead owners in the system in favor of your form settings, simply click the checkbox on the bottom.
Prospect Owner (Web View)
These ownership settings apply to leads that are captured using the web view specifically.
If “Event Owner” is selected, then system will use the event owner as the owner of the captured lead.
If “Specific User” is selected, then system will use the selected user.
Changing Owner on Webapp
To change the owner of a prospect, simply go to their prospect profile, click on the current owner, and select the new owner.
Note
Note that after you change an owner on the web-app, the change will not sync automatically to the mobile app. To sync the owner change, click on the sync icon in the mobile app.
Quick Capture Mode
When your Event is in Quick Capture Mode, the Event Form will reload after the end user hits Submit. This mode is perfect for high-traffic events.
Kiosk Mode
If you plan on setting up a form that event attendees will submit on their own, use kiosk mode. Kiosk mode locks the app so users cannot back out of the form without a passcode. When an attendee submits the form, the form will reload for the next attendee.
To enable kiosk mode, enter the form builder and click on the Properties tab. Check the "Enable kiosk mode" box.
To set the kiosk passcode in the app, go to the main menu in the top-left corner, select the Settings menu, in the "Kiosk mode" section set your Passcode.
While kiosk mode will lock the mobile app, it will not prevent users from accessing your device. We strongly recommend you lock the device software on the app. At a minimum, iOS users should set their device into Guided Access mode (https://support.apple.com/en-us/HT202612). While Android users can pin their app for some security (https://support.google.com/nexus/answer/6118421?hl=en), its effectiveness may vary from device to device. You should consider using an approved third-party kiosk app from the Google Play store.
In addition to configuring your device for kiosk mode, make sure you also lock down your physical device. We recommend using something that limits access to the device's home and power buttons at a minimum. Make sure it has a physical lock connecting it to a stand or table that someone would not be able to easily take without notice.
Edit or Delete a Form
Editing and deleting a device form is the exact same process as editing or deleting a web form. From the Events menu, use the trashcan and pencil icons to the right of the appropriate form. If you edit a form, device owners will receive a push notification letting them know a form has been updated. If you delete a form, the form and its submissions will be removed from their device.
Templates
Templates make it much easier to create new Event forms. They also help make sure you have a consistent experience across all events, while also reducing human error with event coordinators who may not be as familiar with the process.
To create a new Template,
Navigate to Events > Capture.
Click on the Templates tab.
Click New.
Follow the instructions above for creating a new Event Form.
Click Save and Exit.
If you give users Event Access on the Template, they will have access to every Event Form created from this Template. Only add users like event coordinators who should see every Form created from this Template on their device.
Unlike an Event Form, Templates will not appear on user's devices. Instead, when creating a new Event, select the Template from the Template drop-down menu. This will create a new form using the exact settings you used with the Template. Users can then Save and Exit to send out the new Event Form, or they can modify the new Event Form to better match their show.
You can control how much users can edit forms created from Templates. First, you can control who can add, edit, or delete fields using the Security Profile settings described above in this document. Second, you can set field permissions in the template itself. See below.
Edit – if unchecked, users cannot edit this field on Forms created from this Template, even if they have the appropriate Security Profile settings.
Delete – if unchecked, users cannot delete this field on Forms created from this Template, even if they have the appropriate Security Profile settings.
Once you've completed the Template, you can add a Fulfillment Action to it. The Fulfillment Action will apply to every Event created from the template. See below for more on Fulfillment Actions.
Fulfillment Actions
You can add a fulfillment action to any device form. Fulfillment actions are one-step, instant automatic actions performed the moment a form submission comes in. You might add a tag with the event's name to the prospect profile, send the prospect to a deeper nurture automation, or use a webhook to send a text message thanking the attendee for their time.
To add a fulfillment action, use the drop-down menu in the action menu to the right of the form. There are seven options available:
Actions (Doc Request) - This action will trigger when the form is submitted with selected Documents.
Actions (Form Fields) - This action will trigger based on the value of a given form field.
Actions (On Input) - This action will trigger when a condition is met baesd on values of given form fields. Click here for more details.
Actions (Ratings) - This action will trigger when the form is submitted with some Rating selected.
Actions (Submission - Existing Prospect) - This action will trigger on form submission when the submitted lead exists on OneFocus.
Actions (Submission - New Prospect) - This action will trigger on form submission when the submitted lead does not exist on OneFocus.
Actions (Submission) - This action will trigger on every form submission.
Note that in case of duplicate submissions, Actions (Submissions), Actions (Submission - New Prospect) and (Submission - Existing Prospect) will not trigger for if the form is set to merge duplicate submissions.
In order for them to trigger on duplicate submissions, the form has to be set to accept duplicate submissions.
In the Fulfillment Action pop-up window, use the drop down menu to select your desired action.
Toggle whether an action is repeatable using the green circular arrows to the left. Use the (+) icon to add additional actions. Remember, all actions will happen instantly.
To lean more about using fulfillment actions, click here.
Data Transformation
Requires Event Automation module
Depending on your needs you may want to transform you data. For example, perhaps your CRM requires all state fields to have a standard two character format. In other words, every time a lead with the state field value equal to "Michigan" was captured you need to transform the value into the two character abbreviation, MI. The video below shows how to do this using the Event Automation module:
Actions (On Input)
Actions (On Input) are actions or alerts that are applied on the Captello mobile app side. These Actions can send alerts, pop-ups, sounds or vibrations when form data matches any of the criteria you choose. For example, let's suppose company ABC is of great importance to your business and you want to remind your staff to pay special attention towards such leads. So using Actions (On Input), you can display a custom text message inside the Captello mobile app every time a lead from company ABC is captured.
Creating Actions (On Input)
To create an action, click on the gear sign at the top of the event builder page and select Actions (On Input):
Then click on the Add New button:
Next, provide a name and description for the action:
Now, select some conditions to trigger the action. Remember, in our example, we'd want to target people from company ABC and perhaps from USA only. In this case, we can use a condition similar to this:
Use the dropdown shortcut feature as shown below to pre-load values for easier selection:
In this way, the action will only trigger when the Company is ABC and the Country is USA.
Next, select the Action you'd like to trigger. The following actions are available:
Block Submission: To not record the submission.
Clear Field: To clear a field before the submission is recorded.
Notify Users: Sends a notification that lasts a few seconds inside the app to selected users.
Play Sound: Plays a sound inside the app.
Send to Capture Portal: Once a lead is submitted meeting the previously added conditions, they will go to the capture portal.
Show Message: Displays a message inside the app.
Update Field: To update a field before the submission is recorded.
Vibrate: Vibrate the device.
In our example, we are using the Show Message action. This is how we can configure the message:
When an action is added, you get to select to apply it on 'Mobile device', ‘Webview’ or both.
You can use any custom message as well as text and background color.
Edit or Delete Actions (On Input)
If you want to edit or delete an Action (On Input), simply click on the gear icon at the top, select Actions (On Input) again and use any of these options to make your changes:
Importing a Pre-event List
You can import a list to easily pull up contact information at your event. If your event organizer provides a list beforehand, follow these instructions to connect the List to your form.
To import a list from a CSV, XLS or .XLSX file do the following:
Prepare your file for import. For a contact to be imported, the contact must have at least an email address or full name. If an email address is not provided then we check for a Full Name (or First Name and Last Name). If a Prospect is found with the same name then the import record is matched with the first contact the system finds. If no match is found then a new Prospect record will get created.
Optionally create a List. Note, it's not mandatory to import contacts into a list. They can be directly imported into the system.
Click Prospects > Import
ORClick Sales > Import and select Prospects if you are using OneFocus™ CRM
Drag & Drop the file into the dashed border box or select your file using the Upload button
Map fields. Most fields are automatically mapped; however, check all your fields to ensure the data is mapped to a Lead Liaison field.
Import options per field:
For Multi-Picklist Values:
Ignore: Ignores the imported field data.
Overwrite: Overwrites the data in the list and Prospect data if the imported data is not empty.
Merge: Applies only to multi-picklist fields. Imported data will be used to update a Prospect's info without deleting existing information. For example, if the field is "Favorite Colors" and the Prospect's field has "Red, Blue and Green" and the imported data is "Brown, Green", then the resulting field data will be "Red, Blue, Green and Brown". Use a semicolon (; to separate multiple fields on your imported data.
For Everything Else:
Ignore: Ignores the imported field data.
Overwrite: Overwrites the data in the list and Prospect data if the imported data is not empty.
Update if empty: Overwrites the data in the list and Prospect data if the imported data is not empty and the Prospect's existing field data is empty.
Preview results. The first ten rows of data will be shown in the preview.
Set your import options. Lead Liaison provides several options to add Prospects to a list, tag them, assign ownership, assign to a Campaign, set a Lead Source, and more. You must import your Contacts into a List to attach them to a Captello form. Each option is explained below:
Add to Lists(s). Select which list(s) to import contacts into. Note, this step is optional. Click the Create New List link to create a new list on the fly.
Add Tags. Assign one or more tags to your imported Prospects. Click the Create New Tag link to create a new tag on the fly. To learn more about Tags read this.
Assign Owner. Select which Owner to be assigned to all imported contacts. See Setting Lead Owner section below to assign individual Ownership within the import file. Assigning ownership within the file overrides the Owner: settings as shown in the screenshot above. Select Unassigned from the Owner drop down to not assign an Owner to each contact. The default Owner will be the user who is conducting the import.
Assign to Campaign. Assigns imported Prospects to a Lead Liaison Campaign. To learn more about Campaigns click here. To create a new Campaign click the plus icon to the right of the drop down.
Set Lead Source. Assigns a value to the Original Lead Source field. If the Prospect already exists you can override the Original Lead Source value by enabling the Override Existing Lead Source toggle switch. To create a new Lead Source, click the plus icon to the right of the drop down.
In order to connect the List to a Captello form, you must import your Contacts into a List.
Click Next.
Click Run.
View Results, Go Home, or import another file.
Download Past Import Files
To download files that have been previously imported do the following:
Navigate to Prospects > Import
Click the name of the file under the File Name column as shown below
Viewing Imported Prospects
To view prospects from previous imports do the following:
Navigate to Prospects > Import
Select Results under the actions column as shown below
Setting Lead Owner
Add a "Lead Owner" field to your import CSV file to automatically set (or overwrite) the existing lead owner value in Lead Liaison.
Use Lead Liaison Username
Please note the value of the Lead Owner must be the Lead Liaison username of the Lead Owner. The Lead Liaison username is the username used when logging into Lead Liaison. To see your teams usernames look under the "User Name" column on the Managing Users page.
Importing Names
When importing names the First Name and Last Name must be separated into two distinct columns. Here are simple instructions on how to split names using Microsoft Excel.
Importing Boolean Fields
When importing a boolean field (1 or 0, true or false, yes or no) the following values are accepted:
"true" or "false" (not case sensitive)
"yes" or "no" (not case sensitive)
"0" or "1"
Using 0
When using "0", the imported value will be empty. If you want the imported value to show up as "No" use "false" or "no".
These Lead Liaison Standard Fields are examples of fields that accept boolean values:
Do Not Email
Do Not Call
Bounced
Importing Submissions
In some cases, you may need to import form submission data. For example, one of your representatives may have taken down a Prospect's information on a paper form rather than using the mobile app.
Managing Transcription Fees
If you're importing into an event that had the transcription feature turned on, then make sure your import file does not have a "Business Card" column and is not mapped to the "Business Card" field. As long as that is the case, then a transcription request will not be triggered.
If you're merging a record with an existing record in the same event that was already transcribed, then you will not be charged as the record will only be updated.
To import submissions,
Navigate to Settings > Import
Select Event Leads
Select the Event the submissions are from
Choose whether to merge or create duplicate records
Drag your spreadsheet into the uploader
ORClick the Upload button and select your file
Map spreadsheet fields to the event form fields
Check the preview for accurate mapping
Select additional options, such as adding to a List or a Campaign (learn more here)
The system will treat these imports like they are real-time Event submissions. This means Automations and Fulfillment Actions tied to these Events will trigger.
ORNavigate to Events > Capture and click on the drop-down box and click Import Event Leads if you are not using OneFocus™ CRM
Question Stats
You can use Question Stats to see aggregate response data. For example, you could review which of your products were of the most interest. To view question stats
Navigate to Events > Capture
Use the drop-down menu on the right to select Question Stats
Select a date range
Most fields will have different reports available. You can use the toggle in the upper-right corner of the field to change the report type.
The following reports are available:
Range Analysis: all responses in a Single-Line Text field by percentage.
Column Chart: all responses in a multi-select field by percentage.
Stacked Chart: responses by date and percentage for multi-select field. Note: this will only show empty/has value for text-entry fields.
Pie Chart: percentage of response vs. no response for text-entry fields.
Editing Submissions
You can edit any of the submissions made previously in order to update information or add missing information.
To edit submission data, you need to:
Nativate to Events > Capture
Locate the appropriate Event
Click on the number of captured submissions in the Submissions section
You should now be on an overview page showing all your submissions to date. Hovering over any of them will show a menu of icons on the left with options to Delete, Preview, Edit or Assign to Lead Analyzer. Preview or Edit will bring up a preview of your form, with the information filled out with the submission data. If your editing you can make any changes needed in this preview form and save the changes.
Exporting Data
Web-App:
You can export your event data to migrate it to a third party system if needed. To export event data:
Navigate to Events > Capture
Locate the appropriate Event
Access the drop-down menu to the right
Select Export
You can choose to export the data below. The last two options have groupings of the first three options to make it easier to export.
Export Type | Description | Example Fields Included |
|---|---|---|
Prospects | Export that focuses on any Prospect data from standard and custom fields. Data captured in your Event form can be mapped to Prospect fields. Spreadsheet is customizable before export. Search fields on left, drag and drop items to right. Fields on the right are included in export. Make sure your field mapping is in place before you export Prospects | Address, Phone Number, Activities, Campaign, Owner, Program, Prospect Type, Prospect URL, Company, Create Date, Email, Grade, Job Title, Full Name, Notes, Original Lead Source, Score, Work Phone, Trade Show Notes, Last Event Submission Captured By, Last Submission Event Station, Custom Fields (any custom fields you create) |
Event Metadata | Event metadata includes the event name, date, location, owner, user capturing the data, and labels. | [Event] Export Date, [Event] ID, [Event] Name, [Event] Campaign, [Event] Campaign Cost, [Event] Start Date, [Event] End Date, [Event] Owner, [Event] Labels, [Event] Full Address, [Event] Country, [Event] State, [Event] City, [Event] Zip Code, [Event] Street Address, [Event] Archive Date |
Submissions | All data captured from a lead via your Event form. | Logo, Contest QR Code, QR Code, Enter to Win, Capture Method, Business Card, Name, [Name] First, [Name] Last, Email, Phone, Job Title, Company, Contest Confirmation, Opt In, Sales Qualifiers, Sales Rep, Buyer Type, Product Interest, Audio Notes, Manual Notes, Documents, Rating, Custom Content |
All Event Data (Event Metadata, Submissions) | Includes Event Metadata and Submissions data. | [Event] Export Date, [Event] ID, [Event] Name, [Event] Campaign, [Event] Campaign Cost, [Event] Start Date, [Event] End Date, [Event] Owner, [Event] Labels, [Event] Full Address, [Event] Country, [Event] State, [Event] City, [Event] Zip Code, [Event] Street Address, [Event] Archive Date; [Submission] ID, [Submission] Date, [Submission] Capture Date, [Submission] Device, [Submission] Captured By, [Submission] Capture Method, [Submission] Initial Station, [Submission] Stations, [Submission] Location Latitude, [Submission] Location Longitude, [Submission] Rating; [Form Field] Capture Method, [Form Field] Business Card, [Form Field] Name, [Form Field] [Name] First, [Form Field] [Name] Last, [Form Field] Email, [Form Field] Phone, [Form Field] Job Title, [Form Field] Company, [Form Field] Opt In, [Form Field] Sales Rep, [Form Field] Buyer Type, [Form Field] Product Interest, [Form Field] Audio Notes, [Form Field] Manual Notes, [Form Field] Documents, [Form Field] Rating |
Everything (Prospects, Event Metadata, Submissions) | Includes Prospects, Event Metadata, and Submissions data. Spreadsheet is customizable before export. Search fields on left, drag and drop items to right. Fields on the right are included in export. Make sure your field mapping is in place before you export Prospects | Includes all of the fields above. |
Once you have selected the type of data to export, continue to export following the instructions located here.
In the video below, we walk you through the export experience and how to choose Prospect data:
Mobile App:
Data can be exported from the Captello mobile app as well. In order to allow for this option, make sure you have the "Mobile App - Export" permission selected under the appropriate security profile as shown here:
The exact process of exporting submissions from the mobile app is outlined here.
Glossary of Terms
Form Field Element | Description |
|---|---|
Assign Owner | Assigns owner of lead in web app on prospect's profile |
Audio Recorder | Press to start recording audio note |
Audit | Recorder will automatically start on badge scan, selecting from a list, or business card scanning (using PureAI) |
Boolean | Toggle between two choices (for example: yes/no or on/off) |
Checkboxes | Multiple choices possible, tick as needed Uses more space on form than multiselect |
Column Separator | Divides form into 2 columns |
Custom Content | Insert text, web link, video, image, source code or other custom content |
Date | Choose specific date from calendar |
Datetime | Choose both date & time simultaneously |
Documents | Attach a document or document group to form. Can send select documents from group to prospects post-scan |
Drop Down | Select one option from a dropdown menu |
Event Notes | Allows large amount of text to be inserted; auto-maps to "notes" field |
Image Capture | Pulls up the device camera to take a selfie or select photo from album |
Multi Select | Choose multiple options from a list (can select more than one choice). Uses less space on form than checkboxes |
Number | Allows only numerical input. On mobile, displays a number pad. Features inline arrows for adjusting the number value |
Numeric Survey | Rate using numbers, typically on a scale. Can increase or decrease number values. Only allows one selection |
Paragraph Text | Type in larger amounts of texts; does not auto-map to a field |
Radio Buttons | Selectable options, one choice allowed |
Rank | Order the options by preference. Can move the choices around. Do not need to select all choices. |
Rating | Will allow team members to rate lead as Urgent, Hot, Warm, or Cold. This element does not work in kiosk mode or activations (designed for staff use). |
Section | Organizes related elements into a single section, such as contact information, allowing you to group related items like address, city, and other details together. |
Selfie | Pulls up the device camera to take a selfie or select photo from album |
Signature | Sign using a trackpad or touchscreen for a handwritten signature |
Single Line Text | Type one answer into form |
Star Survey | Rate with stars, usually from one to five |
Time | Choose a specific time from clock |
