WordPress Tracking Code Installation Guide
WordPress Tracking Code Installation Guide
- Ryan Schefke
- Sam Mahboob
Owned by Ryan Schefke
Last updated: Aug 26, 2020 by Sam Mahboob
Overview
Lead Liaison offers a plug-in to WordPress, the popular Content Management System (CMS). The plug-in helps users seamlessly install Lead Liaison's tracking code into a WordPress instance. Instructions to install the plug-in are below.
Instructions
- Contact your Client Success Manager or download the plug-in from the Revenue Generation App Cloud by going to Settings > Integrations > App Cloud and searching for "Wordpress".
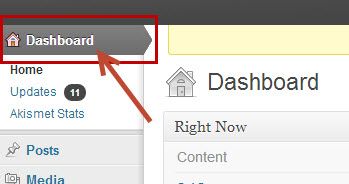
Go to the WordPress Dashboard (your-site.com/wp-admin).
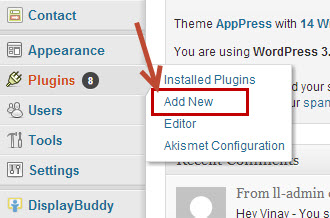
At the left menu hover over Plugins, then click Add New item.
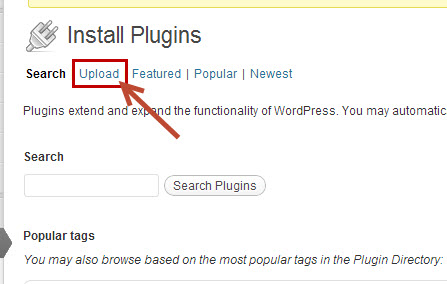
- At the top of the page click on the Upload tab.
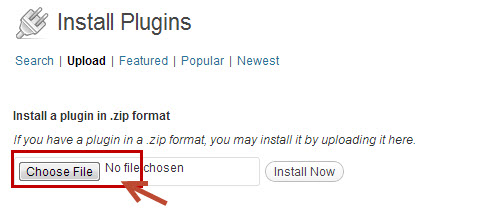
- Click Choose File and locate the folder where you saved the .zip file and select the .zip file.
Upload Zip File
You will be uploading the .zip file. Do not extract the .zip file and do not upload the extracted .zip file contents.
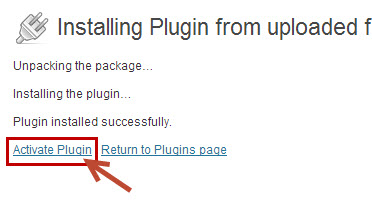
- Click Install Now, then click Activate Plugin.
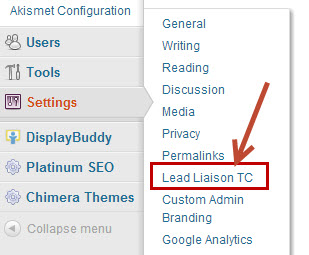
- At the left menu hover over Settings, then click Lead Liaison TC.
- Paste the Tracking Code from your Lead Liaison Management Console into the text box and click the Save button.
![]()
- Enjoy your revenue experience!
De-Activating the Plugin
If at any time you should need to deactivate the plug-in do the the following:
- Click Plugins on the left menu
- Locate the Lead Liaison Tracking Code plugin
- Click Deactivate

Troubleshooting
- Problem: Tracking code is not inserted into the footer when the "Place tracking code at the Footer" option is selected.
- Solution: Make sure your theme has the wp_footer(); function in the footer. Many other plugins rely on this function (as well as wp_head() one). wp_footer() is a missing core WordPress function and it is considered a best practice to include this function, as well as wp_head() in your WordPress installation.
, multiple selections available,
Related content
Salesforce (Professional) Installation Guides
Salesforce (Professional) Installation Guides
More like this
Captello Lead Capture Installs
Captello Lead Capture Installs
More like this
Developer Kits (Exhibitor Portal)
Developer Kits (Exhibitor Portal)
More like this
Salesforce Marketing Cloud
Salesforce Marketing Cloud
More like this
Determining Salesforce Contacts
Determining Salesforce Contacts
More like this
Lead Liaison Wiki
Lead Liaison Wiki
More like this
![]()
© 2021 Lead Liaison, LLC. All rights reserved.
13101 Preston Road Ste 110 – 159 Dallas, TX 75240 | T 888.895.3237 | F 630.566.8107 www.leadliaison.com | Privacy Policy