Overview
The Adobe Marketo connector streamlines lead synchronization from Lead Liaison to Marketo through Automations, Fulfillment Actions, and Bulk Actions. Access the Captello Universal Lead Capture Connector on the Adobe Exchange.
Connecting to Adobe Marketo
To link your account to Marketo, first, create a Custom Service for our system. For assistance, contact Marketo Support at support.marketo.com. Then, follow these steps:
Create a Custom Service in Marketo.
Navigate to Setup > Integrations > Connectors.
Select "Marketo Integration" and provide the required details.
Click Save.
Confirm successful connection with the message: “You’re successfully connected to Marketo.”
The API user being used to connect requires the following permissions:
Read Only Person: This is for Captello to retrieve metadata for lead fields.
Read Only Campaign: This is for Captello to retrieve the campaigns in Marketo.
Execute Campaign: This is for Captello to use the API to trigger a campaign with a specified campaign ID.
Read-Write Person: This is used to create and update leads inside Marketo.
Read-Write Custom Objects: This is used to update custom objects in Marketo.
Field Mapping
When transferring data from Captello to Marketo, note that Marketo fields won't update if the corresponding Captello fields are empty. However, a value of '0' is treated as non-empty and triggers an update in Marketo.
Follow these steps:
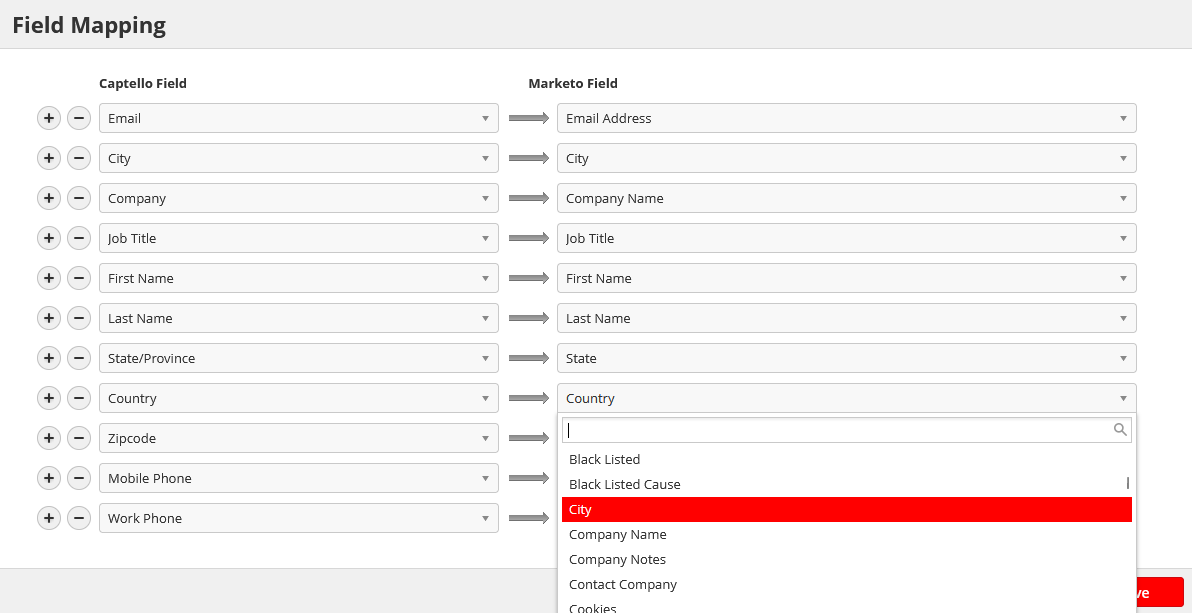
Map Lead Liaison Prospect fields to Marketo Lead fields.
Access Field Mapping via the Marketo connector.
Use the mapping menu to assign fields.
On the mapping menu, select the Lead Liaison field on the right and the corresponding Marketo field on the left.
Utilize the (+) and (-) buttons to add or remove fields and click Save.
Mapping Diagram
Mapping process:
WebApp User (through WebApp):
Connect Marketo Credentials
Setup Field Mapping
Configure Capture Forms
Setup Custom Field Mapping
Setup Automations + Fulfillment Actions
Configure capture forms + FA > Captello servers + Captello database
Captello Mobile App + Captello Web View > Captello API > Captello servers + Captello database
Captello servers + Captello database > Send to Marketo + Send Capture Submissions to Marketo > Marketo.
Here is a diagram illustrating the field mapping between Captello and Marketo:
Revoke Access
Disconnect Lead Liaison and Marketo by clicking the Revoke button on the Marketo Connector.
Sync
Use the Sync button to run a force sync operation with Marketo.
Campaigns and programs are synced on a daily basis automatically, so you do not need to use the sync button unless you need to do an immediate update.
Settings (Record Update Preference)
The settings button allows you to choose what happens when you sync a record that exists more than once inside Marketo (with the same email address). You can choose one of the following options:
- Update all duplicates: Update all records in Marketo.
- Update most recently modified duplicate: Check which record has the latest modified date in Marketo and update it.
Submission Metadata Field Mapping
Used to map field data for syncing submissions, for more info, refer to Sending Submissions to Marketo Using Custom Objects below.
Logs
Access Marketo logs at Reports > Standard > Marketo Logs.
Filter by sync status i.e. success or error and hover over errors for details.
Sending Leads to Marketo
Video Tutorial
The video below explains how to:
Send leads to Marketo.
Send leads to different campaigns based on capture form answers.
Send submissions to Marketo.
Step-by-Step Guide
Utilize the Send to Marketo action in Automations, Fulfillment Actions, and Bulk Actions.
Ensure the Prospect has an email address for syncing.
Optionally, add the Lead to a Smart Campaign using the Campaign drop-down field.
Leave the field blank if not adding them to a campaign.
The system syncs new Smart Campaigns every 24 hours; manually sync by running the connector again.
If the Update records checkbox is checked, then prospects will be updated in Marketo even if they already exist.
Example: Setting up a Fulfillment Action on Capture Form Submission
In this example, a fulfillment action is used with a capture form to send leads to Marketo upon submission.
Click on the settings gear on the top right of your capture form.
Click on Actions (Submissions).
Select the ‘Send to Marketo’ action from the drop-down.
Duplicate Management
To sync a lead that already exists in Marketo, the option ‘Update records’ must be turned on. This option will allow Captello to update the person’s field inside Marketo.
Updating existing Marketo fields will cause Captello to override the field values in Marketo. If the value going from Captello is cleared, the correspondent field on Marketo will be cleared.
If there is a possibility of submitting the same lead twice and sending them to Marketo, it’s recommended to sync submissions so you do not lose data that will get overridden in the process (since some field types do not have the merge options).
If a Lead Exists Once in Marketo
If a lead exists once in Marketo (with the same email address), it will be updated normally.
If a Lead Exists More than Once in Marketo
If a lead exists more than once in Marketo (with the same email address), depending on the action you chose in Settings, it will either update all duplicates or update the most recently modified/created duplicate.
Creating and Syncing Marketo Campaigns
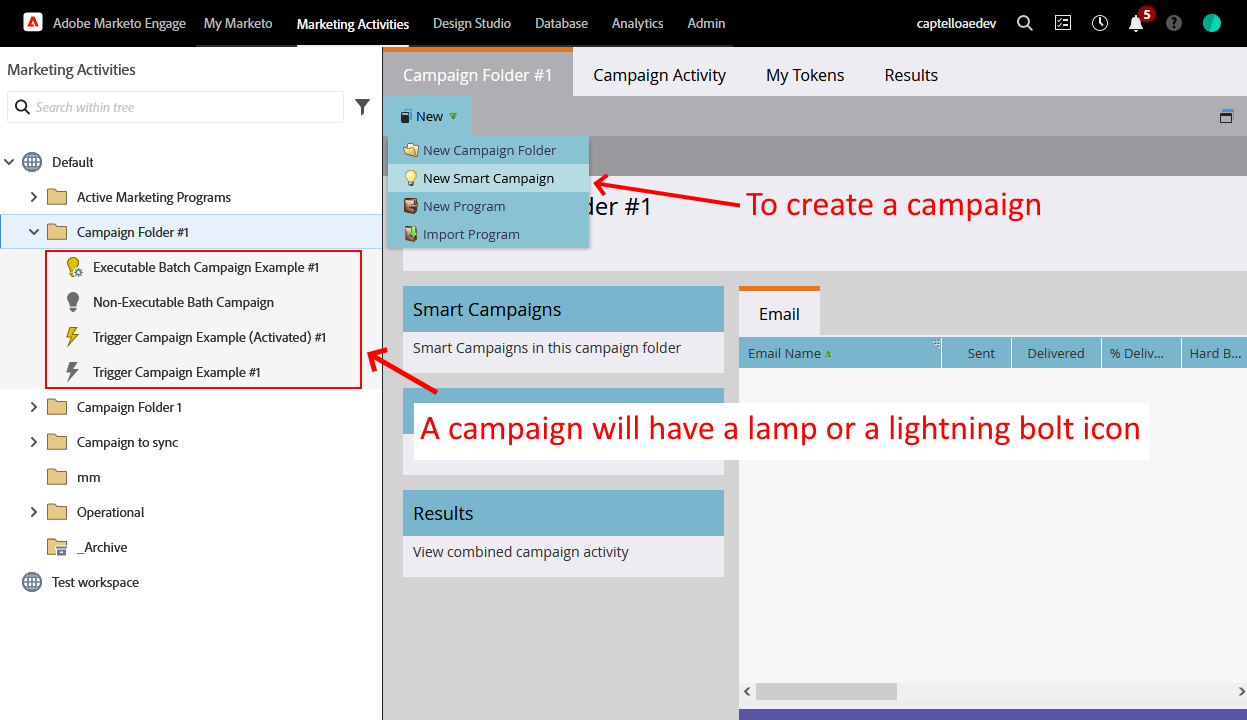
Create a campaign in Marketo by navigating to Marketing Activities > New > New Smart Campaign.
Depending on the campaign’s type, its icon will differ.
A batch campaign will have a lamp icon.
A trigger campaign will have a lightning bolt icon.
All of the active Campaigns and programs are synced automatically on a daily basis , if you need to sync a campaign immediately, use the sync button on the Marketo connector.
For a campaign to be synced to Captello, it must be:
A trigger campaign (which also means it cannot be executable).
Activated.
Sending Submissions to Marketo Using Custom Objects
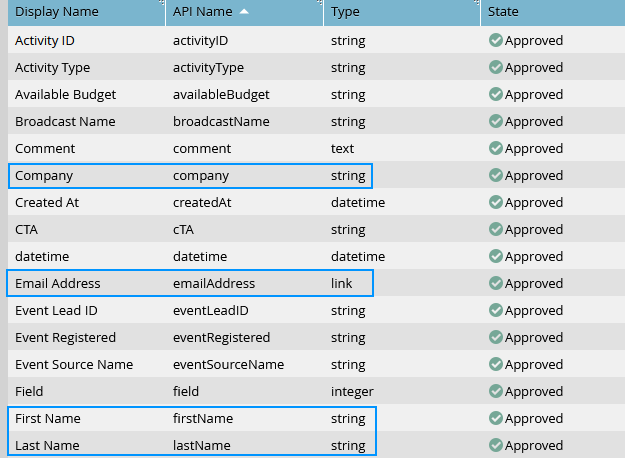
Submissions from Captello can be synced to custom objects in Marketo. An object must contain fields that correspond to the capture from questions you want to sync.
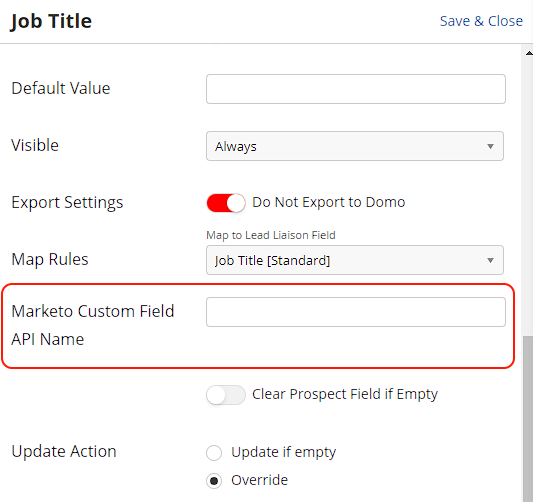
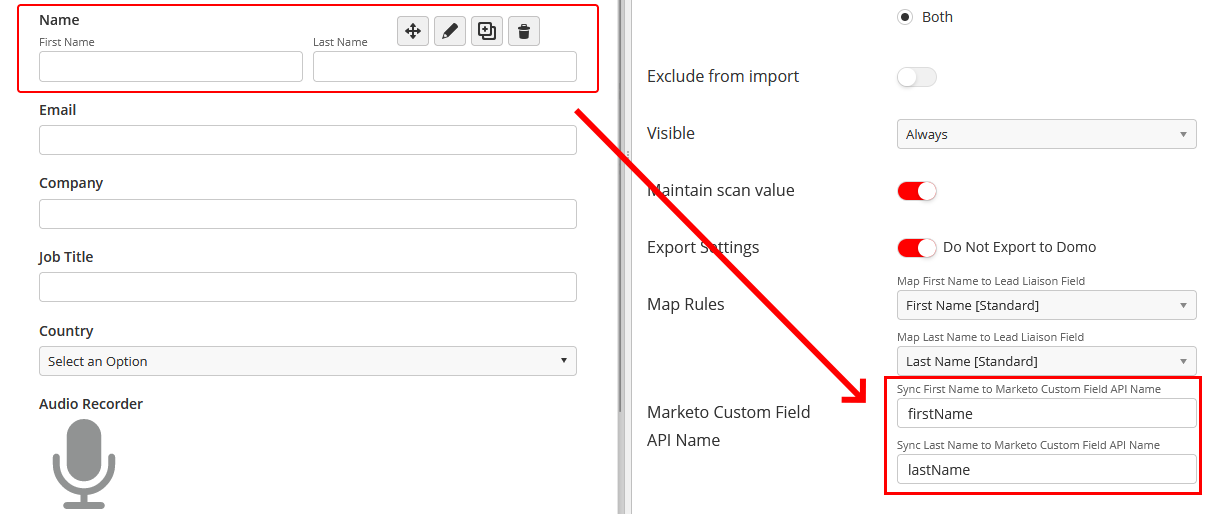
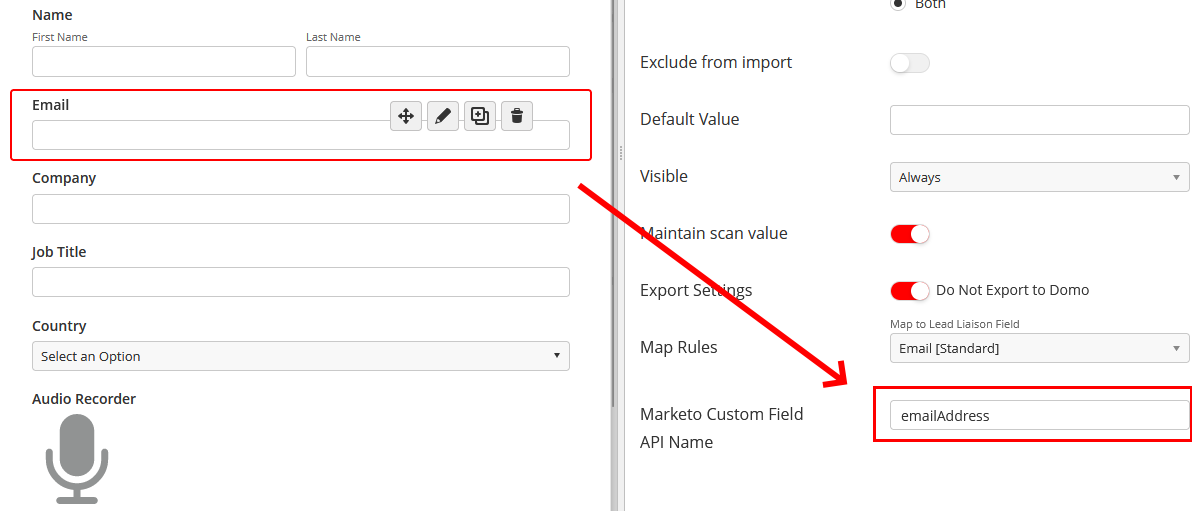
Each custom object field is mapped to its counterpart capture form question through the Marketo Custom Field API Name field.
Setting up the Custom Object on Marketo
To sync submissions to a custom object, it must have the following features:
It must be approved.
It must have a link field (recommended to be the email field, since that is the default unique identifier on Captello).
It must have a dedupe field, which acts as a unique ID generator for each submission.
The dedupe field must not be the same as the link field.
Setting up the Sync Action
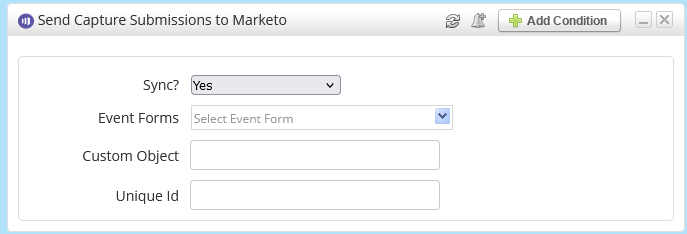
From a fulfillment action, a bulk action, or an automation, use the Send to Marketo action, followed by the Send Capture Submissions to Marketo action.
It is required to always run the Send to Marketo action before syncing the submission, as a submission is added to a person’s page, and cannot be created if the person does not exist on Marketo.
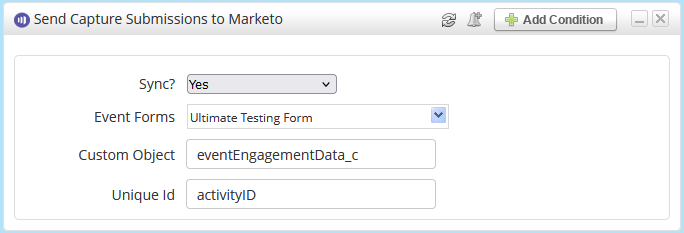
In the Send Capture Submissions to Marketo action, it will ask for a Custom Object and Unique ID.
For Custom Object: enter the API name of the Custom Object.
For Unique ID: enter the API name of the dedupe field.
Acquiring Custom Object API Name and Unique ID from Marketo
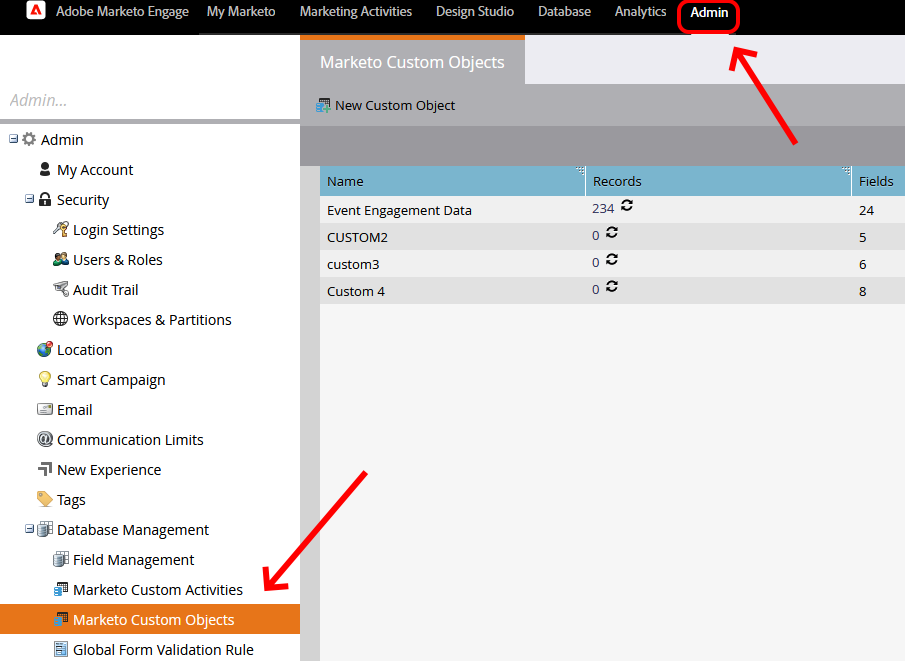
Navigate to Admin > Marketo Custom Objects.
-
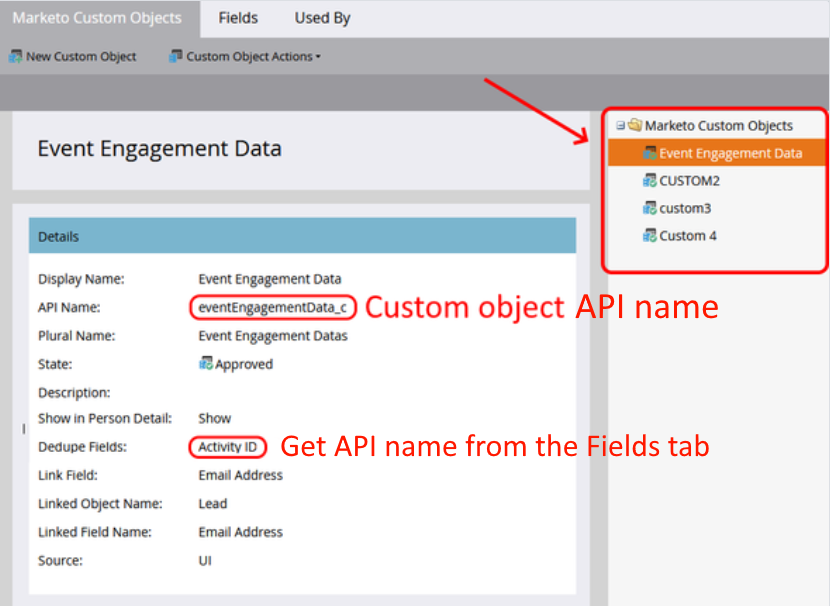
Navigate to your custom object.
API Name is your custom object API Name, use it to fill the Custom Object field in the sync action.
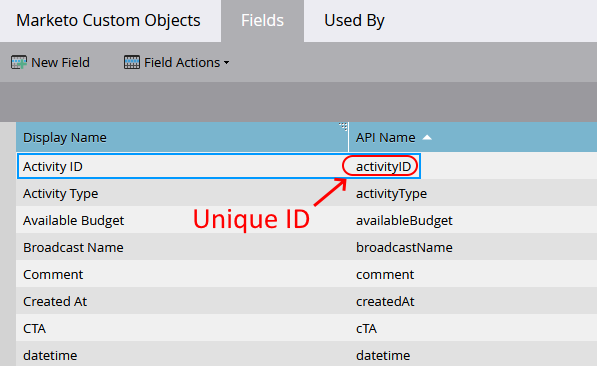
The Dedupe Fields are identified in the same page, get their API names from the Fields tab.
It is okay if there are more than one dedupe fields, the sync action will work with any of them.
Navigate to the Fields tab. Once you get the API name of the dedupe field, use it to fill the Unique ID field in the sync action.
The action should look like the following:
Sending the Event Metadata (Optional)
The submission metadata field button allows you to send the submission metadata of the capture form such as the event’s name, date, owner, etc along with the submission to the intended custom object.
The Submission metadata fields are: [Event] Archive Date, [Event] Name, [Event] Owner, [Event] Campaign, [Event] Campaign Cost, [Event] Export Date, [Event] City, [Event] Full Address, [Event] Country, [Event] City, [Event] State, [Event] Street Address, [Event] Zip Code, [Event] Start Date, [Event] End Date, [Event] ID, [Event] Labels, [Submission] Stations, [Submission] Initial Station, [Submission] Capture Date, [Submission] Captured By, [Submission] Capture Method, [Submission] Date, [Submission] Device, [Submission] ID, [Submission] Rating, [Submission] Location Longitude, [Submission] Location Latitude.
To send the event’s metadata follow these steps:
Create custom fields inside the custom object.
From Captello, navigate to Setup > Connectors > Marketo > Submission Metadata Fields
Map Captello’s field to the corresponding Marketo field using the field’s API name.
The metadata will be sent over along with the submission to the custom object as shown:
Setting Up the Capture Form
The next step is to map the capture form questions to the custom object fields.
From the Fields tab in Marketo, copy the API Names of fields that correspond to your capture form questions.
Add API Names to the Marketo Custom Field API Name of each field in the capture form.
Now you are ready to run the sync action on the capture form!
Results in Captello Logs
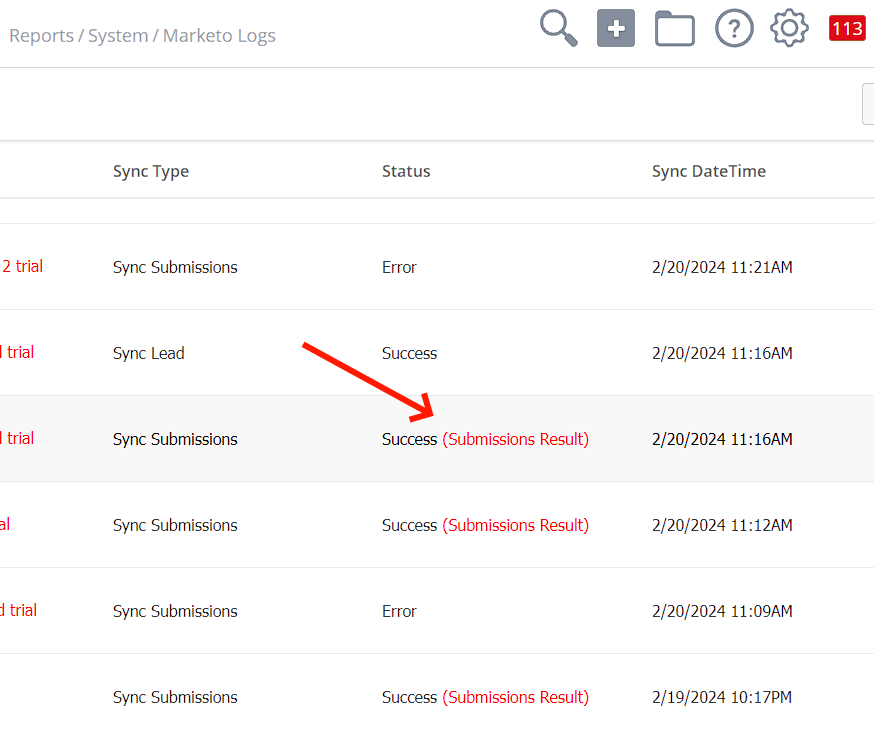
After using The Send to Marketo & The Send Capture Submissions to Marketo actions, the Marketo logs in Captello will show the synced submission statuses.
You can click on Submissions Result to see the status of a submission.
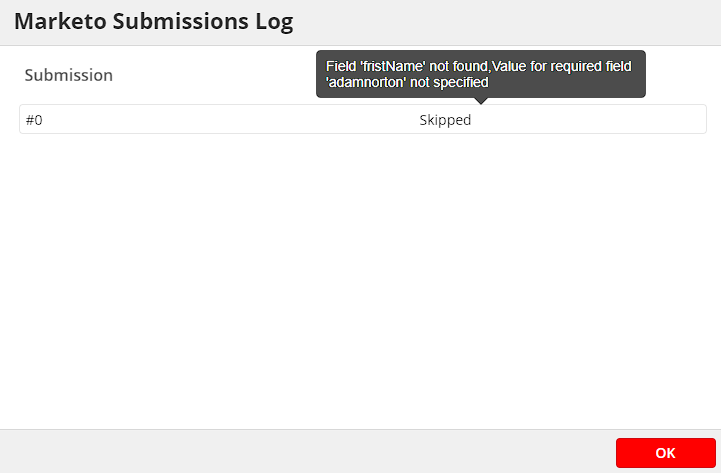
The submission status will either be ‘Skipped’ (failed) or ‘Created’ (successful).
When a submission is skipped, you can hover over the “skipped” text, and it will display the skip reason.
The most common reason for skipping a submission sync is that a lead was not synced before syncing the submission. Make sure to always add the Send to Marketo action to your fulfillment actions or automation before the Send Capture Submissions to Marketo action.
Results in Marketo
When a submission is successfully synced, it will appear under the Custom Objects tab inside the person’s profile.
To view a submission, select your custom object from the Select Object dropdown.
Showing Your Custom Object in Person Profiles
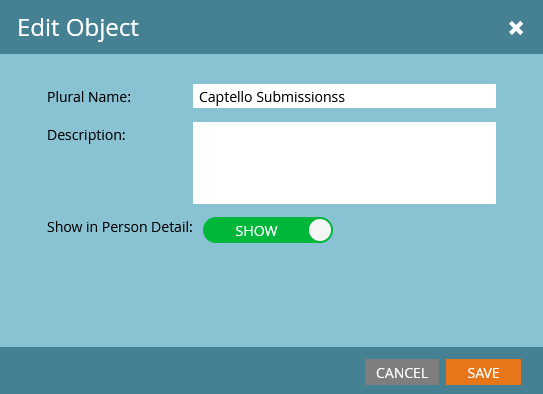
If your custom object does not appear in the Select Object dropdown, it has to be set to ‘Show’ inside a person’s profile. To do that, follow the steps below:
Navigate to your custom object.
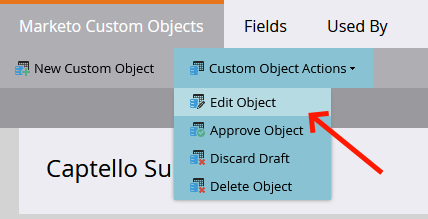
Click on Custom Object Actions > Edit Object.
Turn on the Show in Person’s Details Toggle


