| Table of Contents |
|---|
Overview
The Reward Center is a flexible area of the platform used to reward people for taking demonstrating behavior or achieving results worthy of a gift. Gifts can range from gift cards, corporate SWAG, or sponsored items depending on your use case. The Reward Center is comprised of the following components:
Tokens. Uniquely designs objects that can be exchanged for Reward Points. Exchange rates are defined by you. If you can imagine it, we can create it. Diamonds, stars, flowers, coins, logos, hearts, and more! Anything is possible.
Reward Points. Used to purchase goods or services from the Store. One (1) Reward Point equals one (1) Purchase Credit. One (1) Purchase Credit equals one (1) U.S. dollar.
Store. Catalog of gifts that can be redeemed for Reward Points.
Reward Center. Interface where a person can see their Reward Points, Tokens, Store, and History.
Users in the system are able to allocate Tokens or Reward Points to Prospects. Prospects (not Users) are able to receive Tokens or Reward Points.
| Info |
|---|
Issue Tokens or Reward Points depending on the needs of your campaign. Tokens must be exchanged for Reward Points while Reward Points are what is used to redeem gifts from the Reward Center. Tokens can be manually or automatically exchanged. |
| Note |
|---|
Reward Points are different from Leaderboard Points. However, when configuring your campaign there are options to convert Leaderboard Points into Reward Points. |
Use Cases
There are several ways to create and issue rewards. The system is designed to make gifting manual or automatic depending on your use case or desired workflow. Three common use cases are listed below.
Workplace Engagement
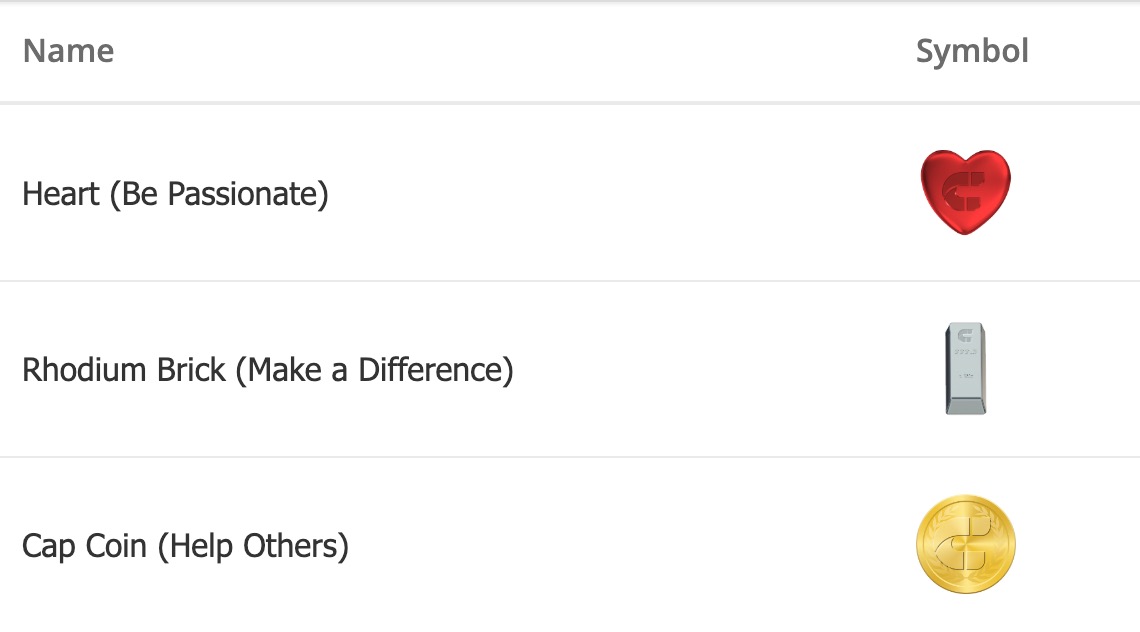
Create programs or competitions inside your company to reward individuals or teams for their contributions. For example, you might have a set of core values in your company. Every time an employee demonstrates any of these core values one of their colleagues can give them tokens that resemble your core values (i.e., a heart representing help). Here are three example tokens mapped to corporate core values.
Corporate Incentives
Similar to workplace engagement, you could design a corporate incentives program. Each team within your company could have their own program. For example, the sales team could issue specific tokens when a sales person closes a deal more than a certain amount. Marketing could give tokens every time a new inbound lead comes in.
Events
Exhibitors can use the Reward Center to reward staff members working the trade show booth. For example, the employee or sales person who captures the most leads gets Tokens or Reward Points to use in the Reward Center. Organizers can use the Reward Center to create competitions or drive engagement at their event. For example, attendees can earn Reward Points or Tokens via scavenger hunts or by demonstrating interactions with apps and people. The Store could contain gift card, exhibitor SWAP, or gifts from sponsors.
Setup
To set up your program follow the steps below:
Step 1: Create Emails
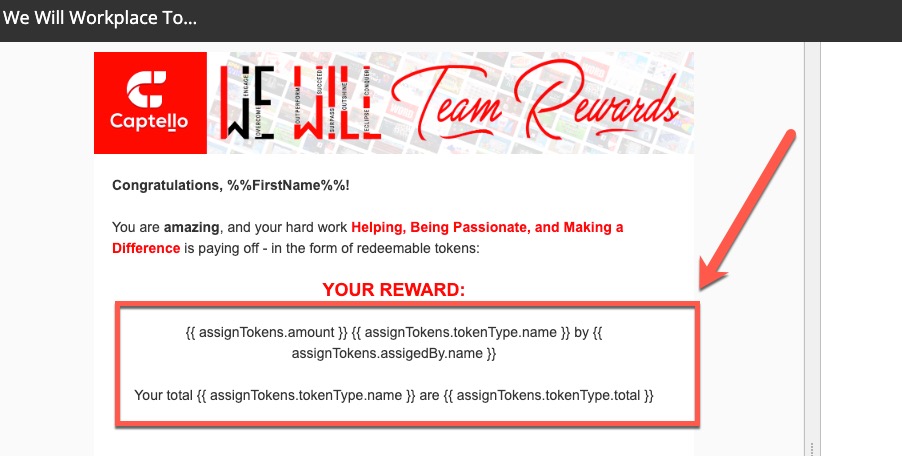
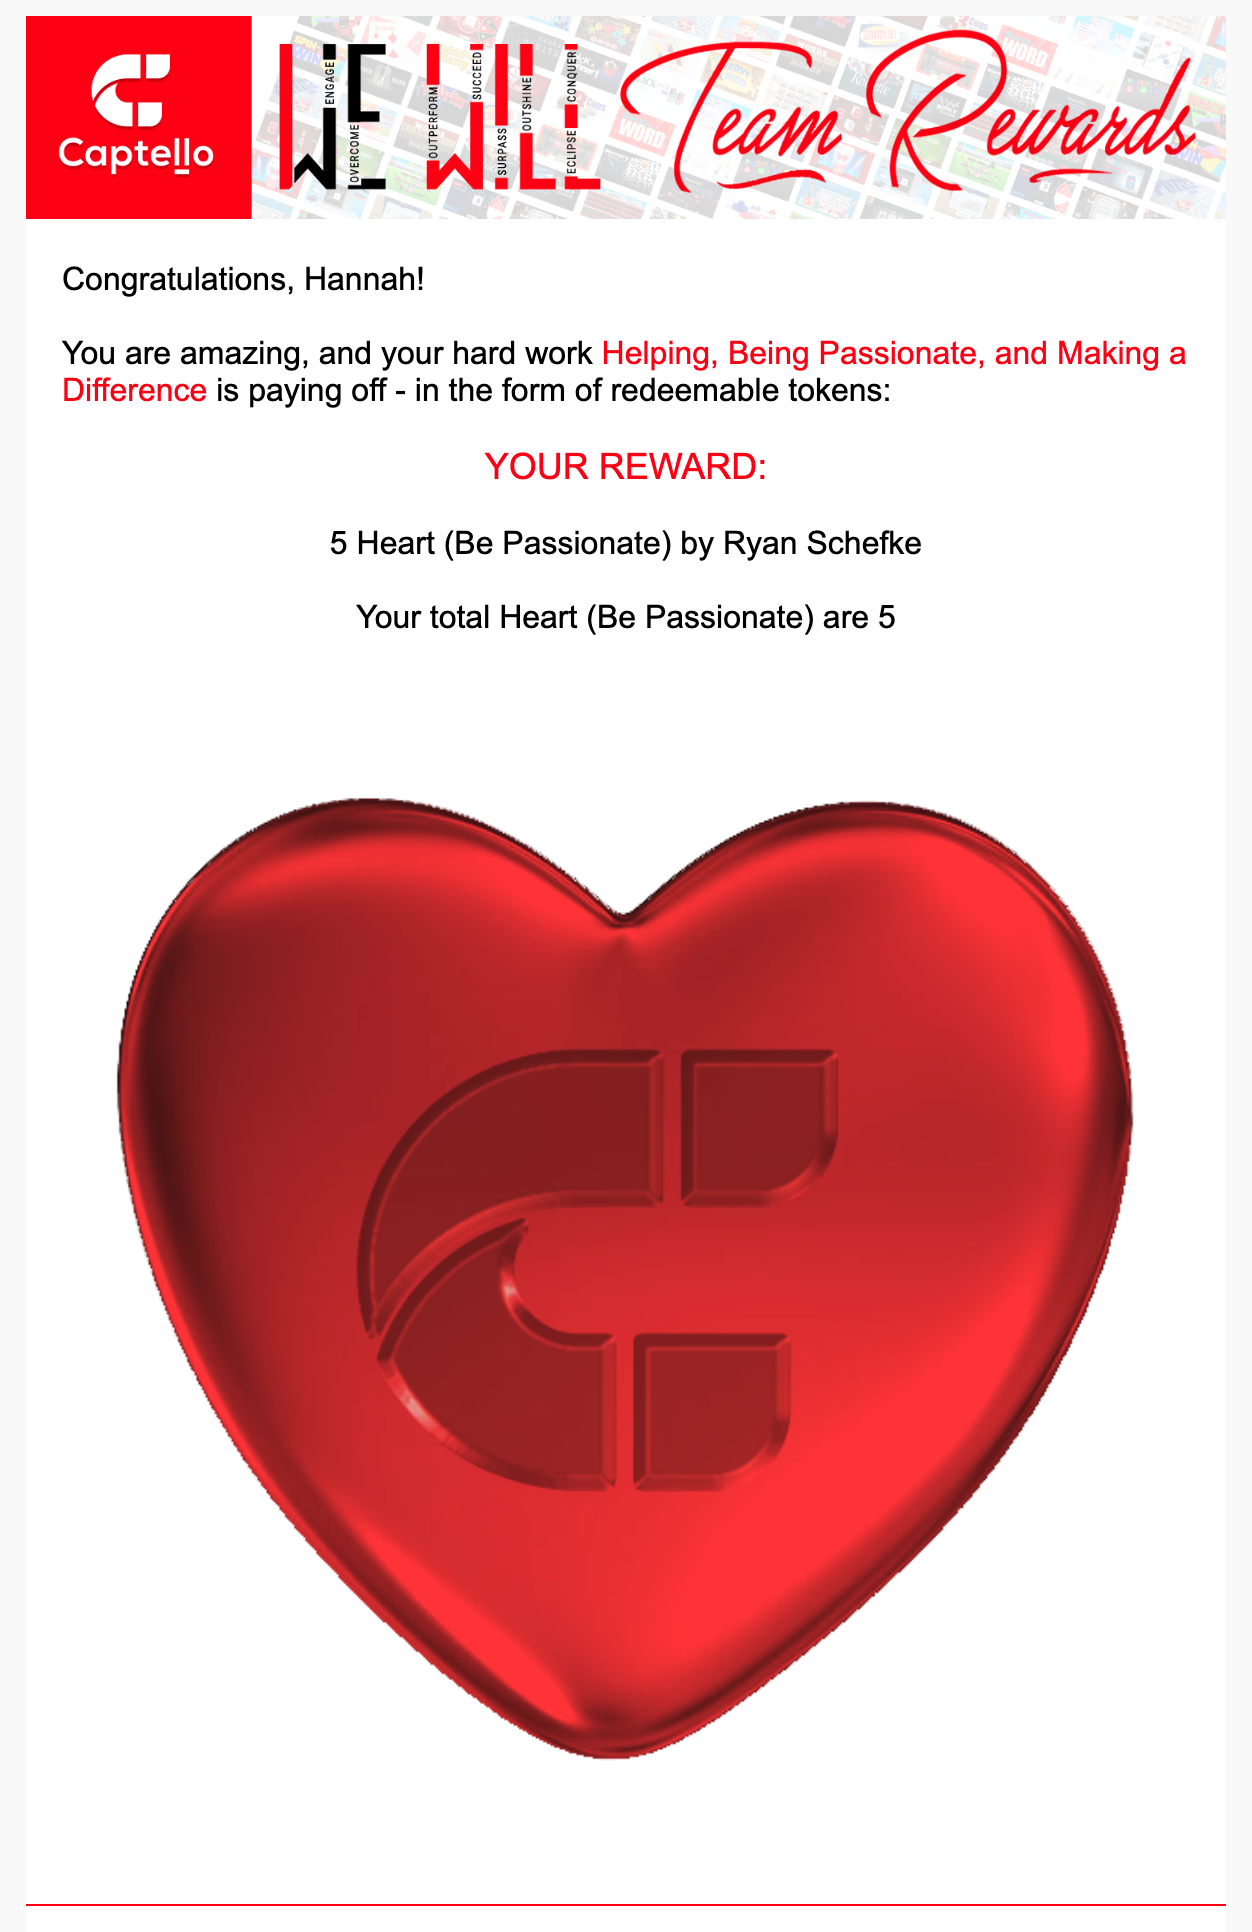
Create emails that can be sent when Tokens or Reward Points are issued. You can design a separate email for issuing Tokens and Reward Points and use the same copy but with different merge fields (see below).
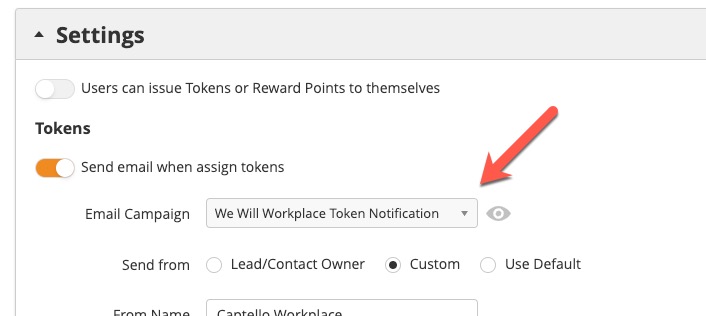
Select the email to send when Tokens are issued by navigating to Setup > Events > Activations > Rewards > Settings
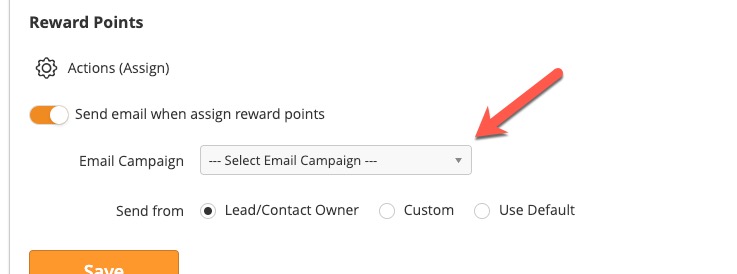
Select the email to send when Reward Points are issued by navigating to Setup > Events > Activations > Rewards > Settings
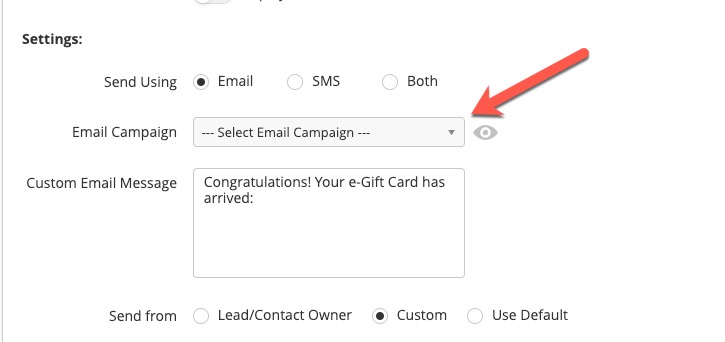
Select the email to send when gifts are redeemed by navigating to Setup > Events > Activations > Rewards > Reward Store
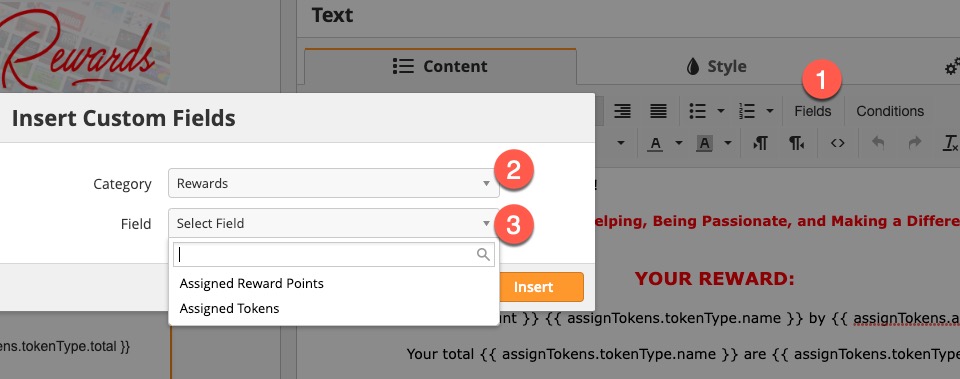
When designing your email insert merge fields from the email builder as follows:
Click Fields
Select Rewards from the Category dropdown
Choose your merge field depending on Reward Points or Tokens being issued
Step 2: Configure your Reward Center
Navigate to Setup > Events > Activations > Rewards. In this section you’ll define your Settings, Style, Point Levels, Reward Store configuration, and Exchange Rates for optionally converting Leaderboard Points into Reward Points.
Settings
Users can issue Tokens or Reward Points to themselves: When enabled, users in the system can navigate to their Prospect Profile and issue Tokens or Reward Points to themselves. To prohibit this action disable this option.
Send email when Tokens are assigned: Choose which email and how you want it to be send every time any type of Tokens are assigned. The email that you design can include a merge field with details of the issuance.
Actions (Assign): Configure a global Fulfillment Action, such as posting to Slack, every time Reward Points are assigned.
Styling: Choose how you want your Reward Center to look.
Point Levels: Define point ranges for players to “level up”. Point ranges appear in the Reward Center as shown below.
Reward Store: Choose the gifts and currencies to include in your store.
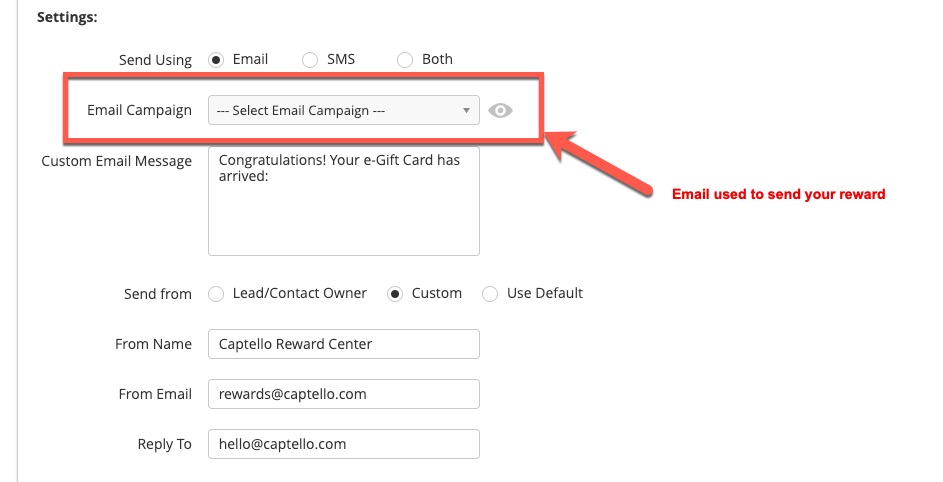
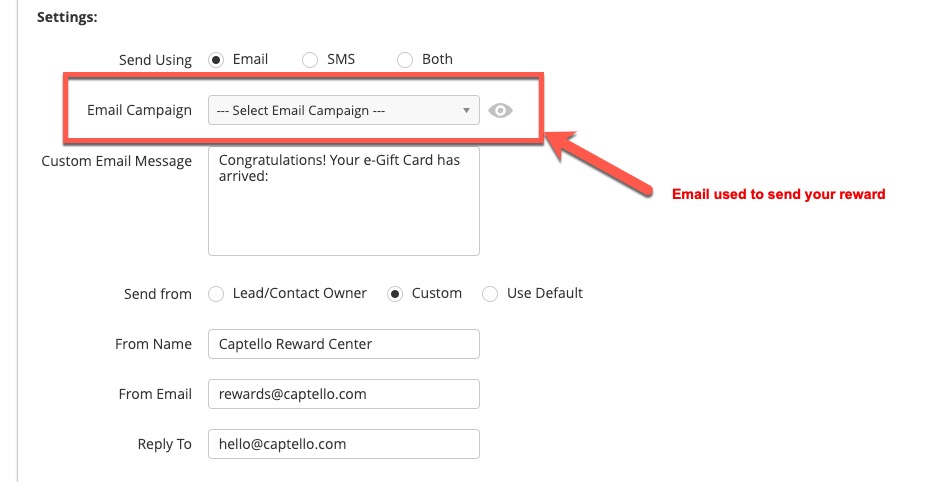
Settings: Choose how you want to send rewards once they are redeemed. See the screenshot below. Make sure to select an email from this dropdown. The Gift Cards documentation may be helpful here.
Exchange Rates: Optionally convert Leaderboard Points into Reward Points using exchange rates. For example, convert every point on “Lobby Leaderboard” to 10 Reward Points or .005 Reward Points. You have full control over conversion rates.
Step 3: Create Tokens (Optional)
To create your Tokens follow the directions below under the Tokens section
Tokens
This section discusses how to create, issue, and exchange Tokens for Reward Points.
Creating Tokens
To create Tokens follow the steps below:
Navigate to Setup > Events > Activations > Tokens
Click New
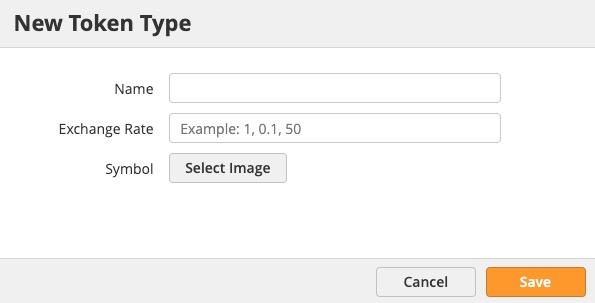
Create your Token
Name: Any name you’d like to use for your Token. For example, “Heart (Be Passionate)”
Exchange Rate: Amount of Reward Points received when exchanging a Token. For example, entering 50 will give the user 50 Reward Points for every 1 Token exchanged. Using .25 will give them 1 Reward Point for every 4 Tokens exchanged.
Symbol: Use the symbol you’d like to represent your Token with.
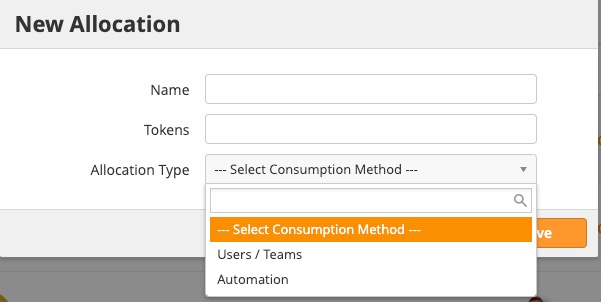
Next, create an Allocation. An Allocation defines how many Tokens should be allocated for your project. Navigate to Setup > Events > Activations > Tokens > click the drop down to the right of the Token you’re creating an allocation for and select Add Allocation. Note, more than one Allocation can be created.
Name: The name of your allocation, for example “Workplace Rewards”. This name is important as it’s a choice in a dropdown when issuing Tokens.
Tokens: Enter the number of Tokens to include in the allocation.
Allocation Type: Choose from Users/Teams or Automation.
Users/Teams: Allocate Tokens to specific Users or all Users within a Team. Click here to learn more about creating a Team. When you use this allocation type you can choose if you want to evenly distribute the number of Tokens across all people or give each person the defined number of Tokens.
Automation: Gives you the opportunity to use Tokens with Fulfillment Actions or Automation Actions in the system. Use of this feature depends on your license rights.
| Info |
|---|
When using Automation, once all Tokens are consumed they will be out of stock and no longer distributed. Keep an eye on your Tokens to replenish them as needed. |
Issuing Tokens or Reward Points
There are two ways to issue Tokens or Reward Points depending on how you’re running your campaign.
Manual Issue
To manually issue Tokens or Rewards:
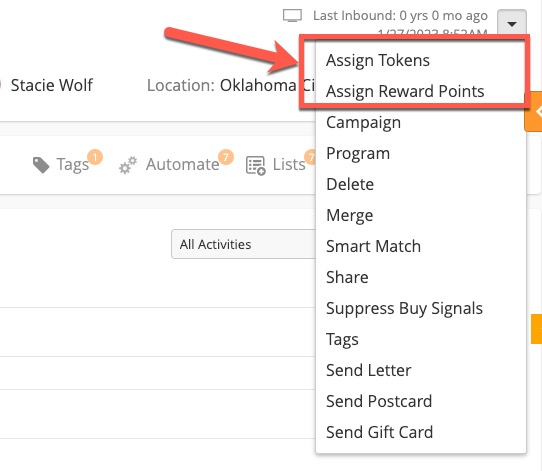
Navigate to the Prospect’s Profile
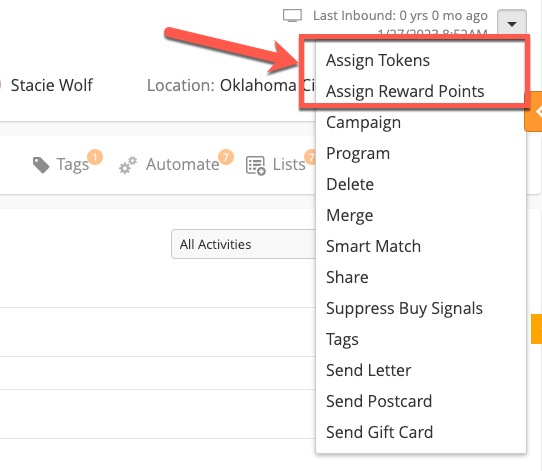
Click the down arrow at the top right of your screen and choose Assign Tokens or Assign Reward Points. In the example below we discuss issuing Tokens to a Prospect.
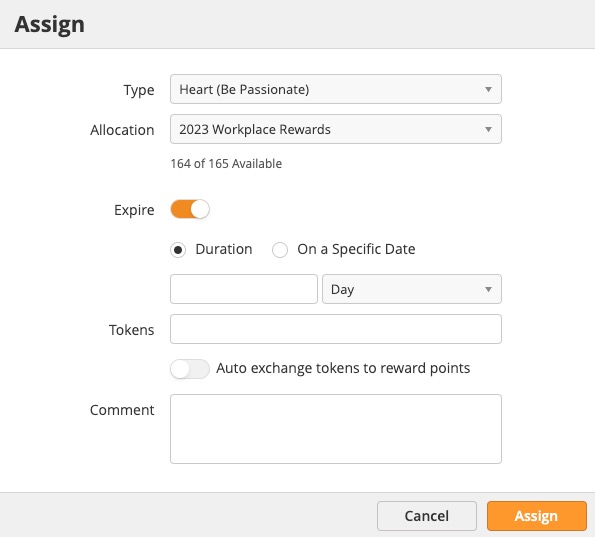
Enter details of your request:
Type: Choose the Token Type
Allocation: Choose which Allocation you’d like to draw the Tokens from. The number of Available Tokens within the Allocation is listed in small font below the Allocation dropdown.
Expire: Determine if you want the Tokens to expire after a certain amount of time or a specified date. After Tokens expire they will be removed from the Prospect’s Reward Center and can no longer be used.
Tokens: Enter how many Tokens you want to issue.
Auto exchange tokens to reward points: Enable this feature if you want the system to automatically exchange the person’s Tokens for Reward Points instead of having the person take the action to exchange them.
Comment: Enter any comments you have. For example, the reason you’re issuing the Tokens to this person.
Click Assign
Automatic Issue
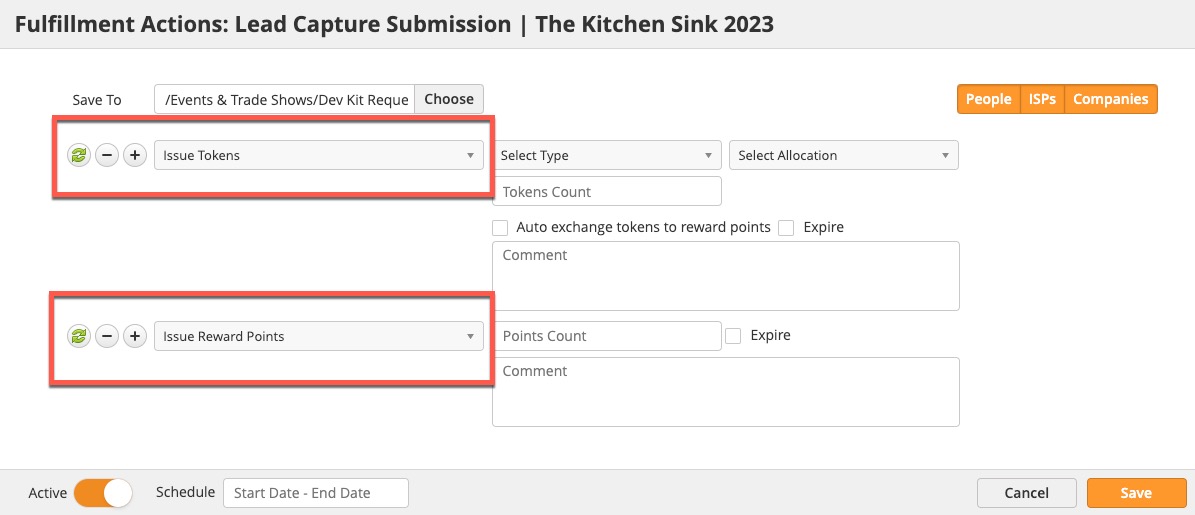
To automatically issue Tokens or Reward Points in the system use either Fulfillment Actions or Automation Actions along with the Issue Tokens and Issue Reward Points actions.
Reward Redemption
Exchanging Tokens
Tokens can be manually or automatically exchanged for Reward Points depending on your configuration. To automatically exchange Tokens use the setting when creating your Token. Auto-exchange is also available when manually issuing Tokens from the Prospect Profile.
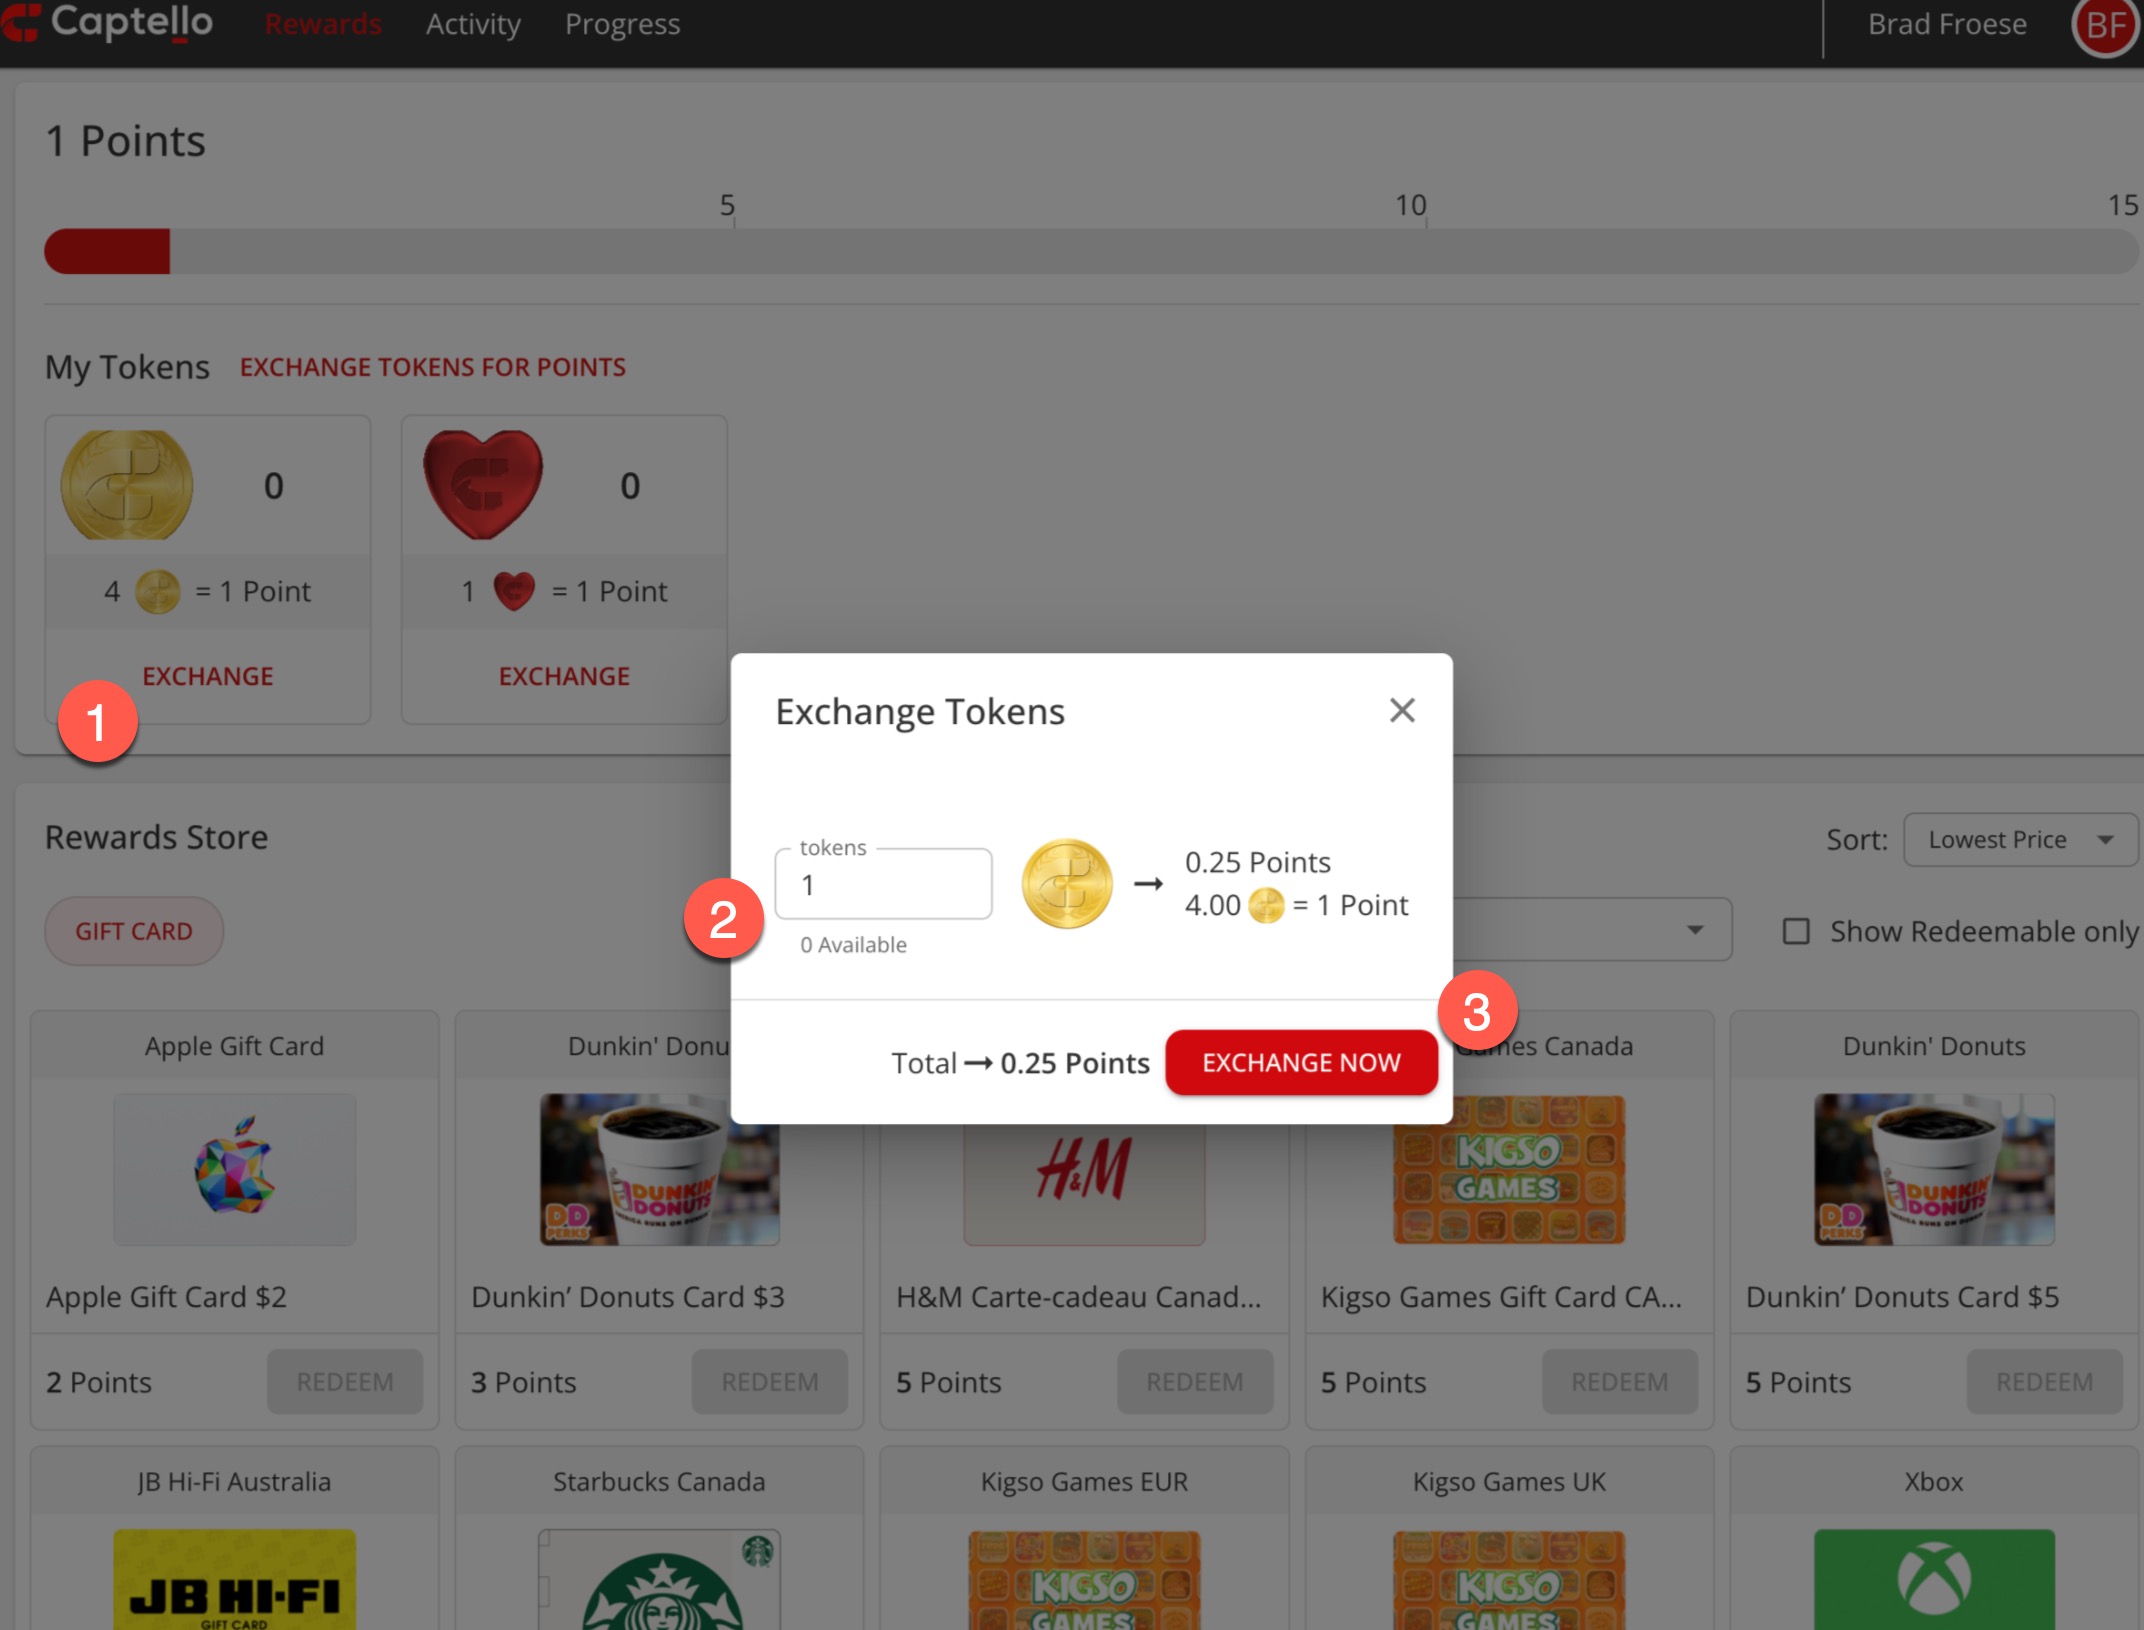
To manually exchange Tokens follow these steps:
| Info |
|---|
There is one Reward Center available for each person per Account. |
Login to the Prospect’s Reward Center. Consult with your Lead Liaison or Captello Representative to gain access to your accounts Reward Center.
Under the My Tokens section
Click Exchange
Enter number of Tokens to exchange
Click Exchange Now
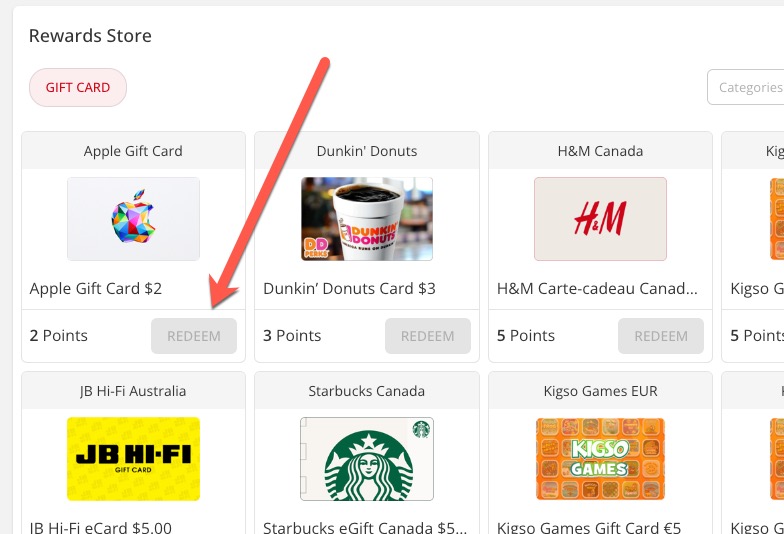
Redeeming a Reward
Click the Redeem button next to the reward you’d like to receive.
Reward Center
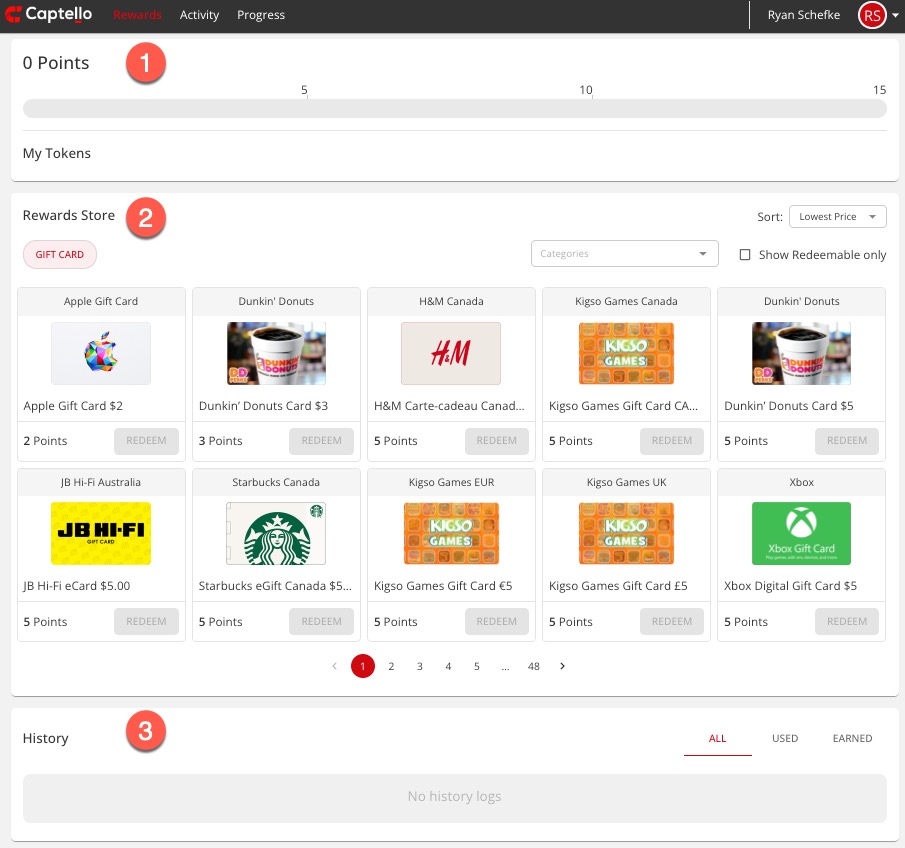
The Reward Center is comprised of three parts:
Points/Tokens: Displays the number of points and Tokens you’ve received
Store: Gifts by category
Create one or more categories to organize your gifts
Sort gifts by price or name
Show only gifts that you can redeem based on the number of Reward Points you have by checking the box Show redeemable only
History: Displays activity such as redemption, expiration, issuance and more.
Reporting
Navigate to Setup > Events > Activations > Tokens to see your Allocations, Tokens Used and more.
Setup
Login
