| Table of Contents |
|---|
Overview
Lead Liaison provides We provide a check-in and registration system for clients who need to manage hosting their own marketing eventsevent. This feature provides a customizable check-in and registration portal and works seamlessly with Lead Liaison Badges.
...
Before Your Event
Follow these helpful steps to prepare for your event.
Stay Organized
| Widget Connector | ||
|---|---|---|
|
Pre-Registering Attendees
Consider creating a microsite and form to register people before your event starts.
| Widget Connector | ||
|---|---|---|
|
Create a Check-In and Registration System (Portal)
| Widget Connector | ||
|---|---|---|
|
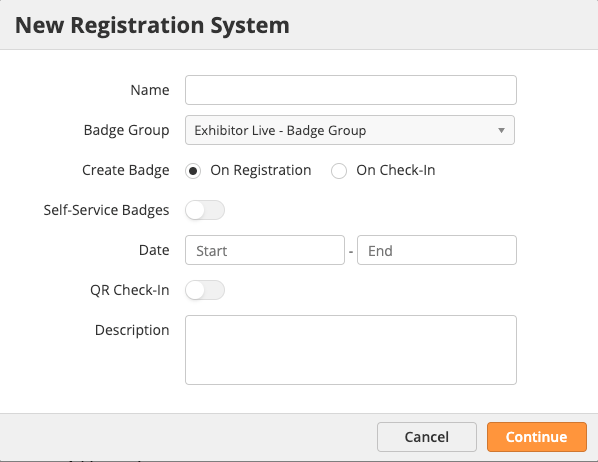
To create your check-in and registration system do the following:
- Navigate to Content > Events > Registrations.
- Click the New button to create a new Registration System.
- Name: Name of your Registration System. We suggest using the name of your event.
- Badge Group: The Badge Group you're using that is associated with your event. To learn more about Badge Groups reference this document. This is where admins will go to print new badges on demand (if badges were not printed/prepared prior to the event or for new registrants at the front door).
- Create Badge: Option to add new people to your Badge Group when they register or when they check-in. Default is on registration.
- Self-Service Badges: Allows attendees to print their own badge after Registration or Check-In (according to your settings). This feature works with laptops or desktop computers running Windows or Mac connected to a supported Dymo printer. It does not work with iPads or Android tablets.
- Date: Start and end date of your event. If check-in occurs outside of this timeframe the system will show an error on check-in.
- QR Check-In: Allows attendees to be checked in via a QR code. QR codes can be emailed to registrants. See section below on Using QR Codes for Tickets/Passes.
- Description: Description for your Registration System.
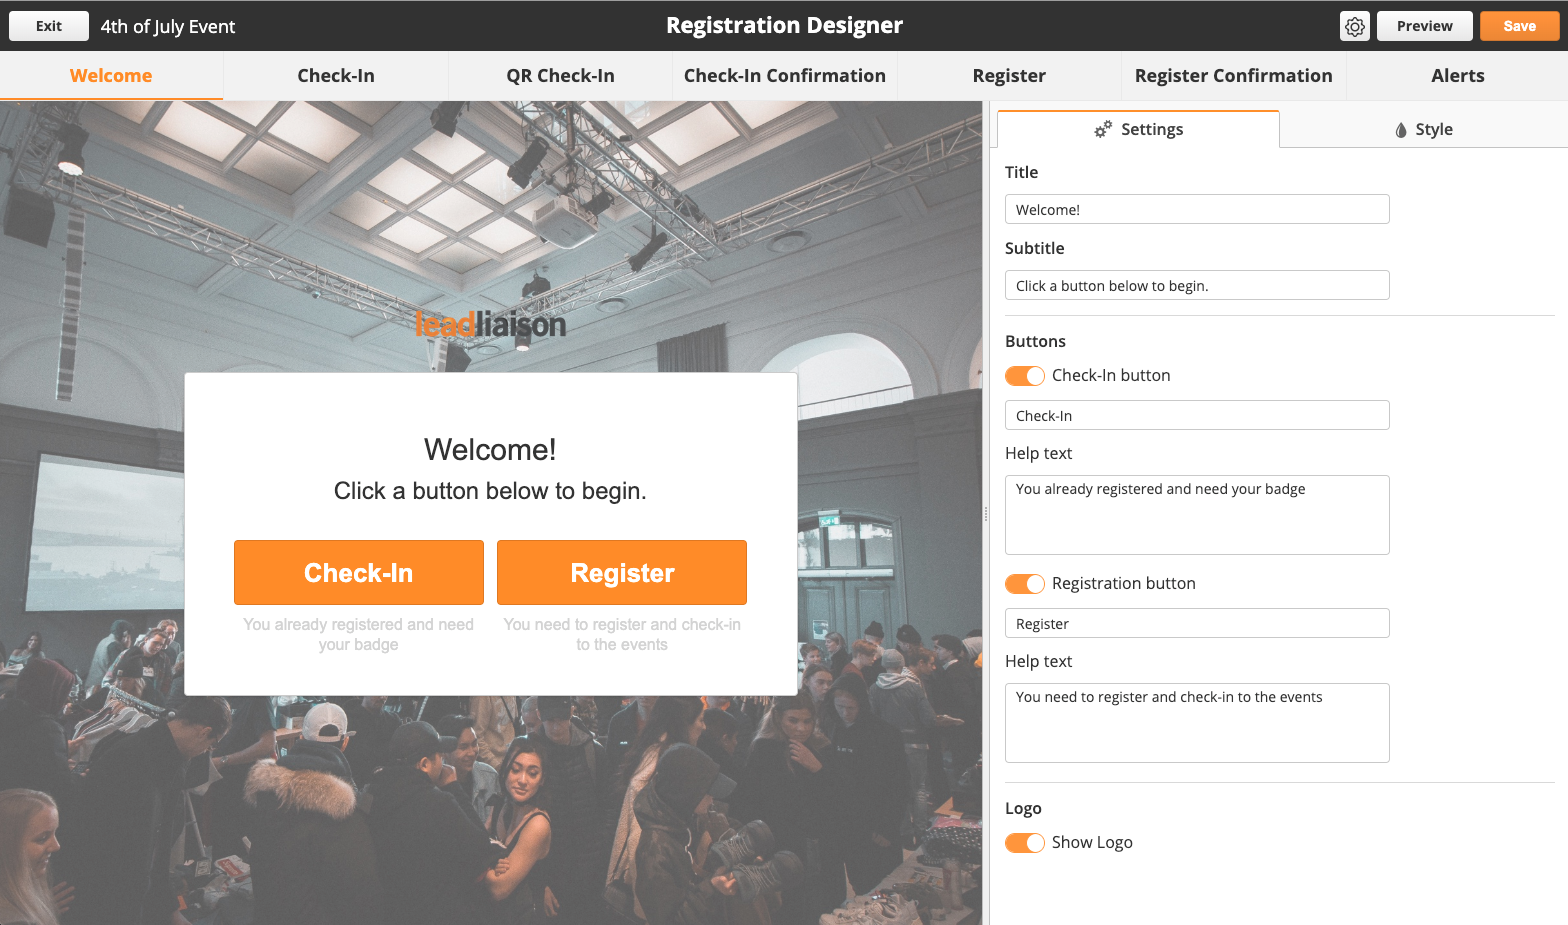
Customizing the Check-In and Registration System
- You'll see the Registration Designer after creating a new system. Alternatively, edit your existing system by navigating to navigate to Content > Events > Registrations and choosing edit next to the system you want to modify.
- In the Registration Designer you have multiple tabs. Each tab is explained below:
- Welcome: Screen that users will see when they arrive at your event. This is where they would choose to Check-In or Register. You can disable either of these options to only have a single option at your event.
- Check-In: Screen users will use to search for their registration and check-in. Control how users search by using the Inputs section on this tab.
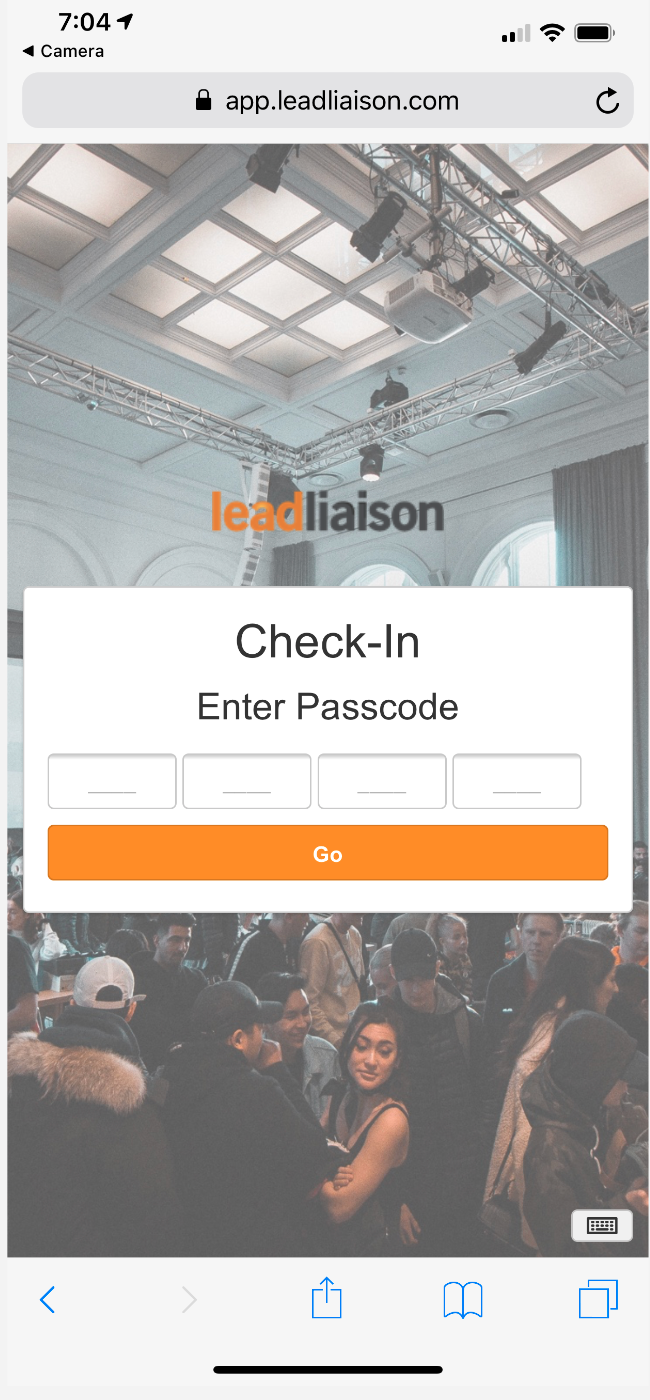
- QR Check-In: Screen to configure check-in via QR codes. Attendees can be emailed a QR code as a pass/ticket, bring the pass/ticket to the event, and check in. An initial Passcode is used by representatives before their device can be used to scan QR codes and check in registrants using this method.
- Check-In Confirmation: Screen users will see once their registration is found.
- Register: Screen users will see when they are registering for your event. Control how users search by using the Inputs section on this tab.
- Register Confirmation: Screen users see after they have successfully registered.
- Alerts: Screen users will see when a registration cannot be found on check-in, if people are already checked-in, or if people are already registered.
- Areas of the system that have input fields have an option for a virtual keyboard. If you're running your registrations and check-ins using a touch screen and don't want to hook up a keyboard, this is a good option. Users can click the small icon on the bottom right to invoke the keyboard. The virtual keyboard can also be disabled by admins in the designer by using the "Touch Keyboard" option as shown in the screenshot below.
...
| Info | ||
|---|---|---|
| ||
|
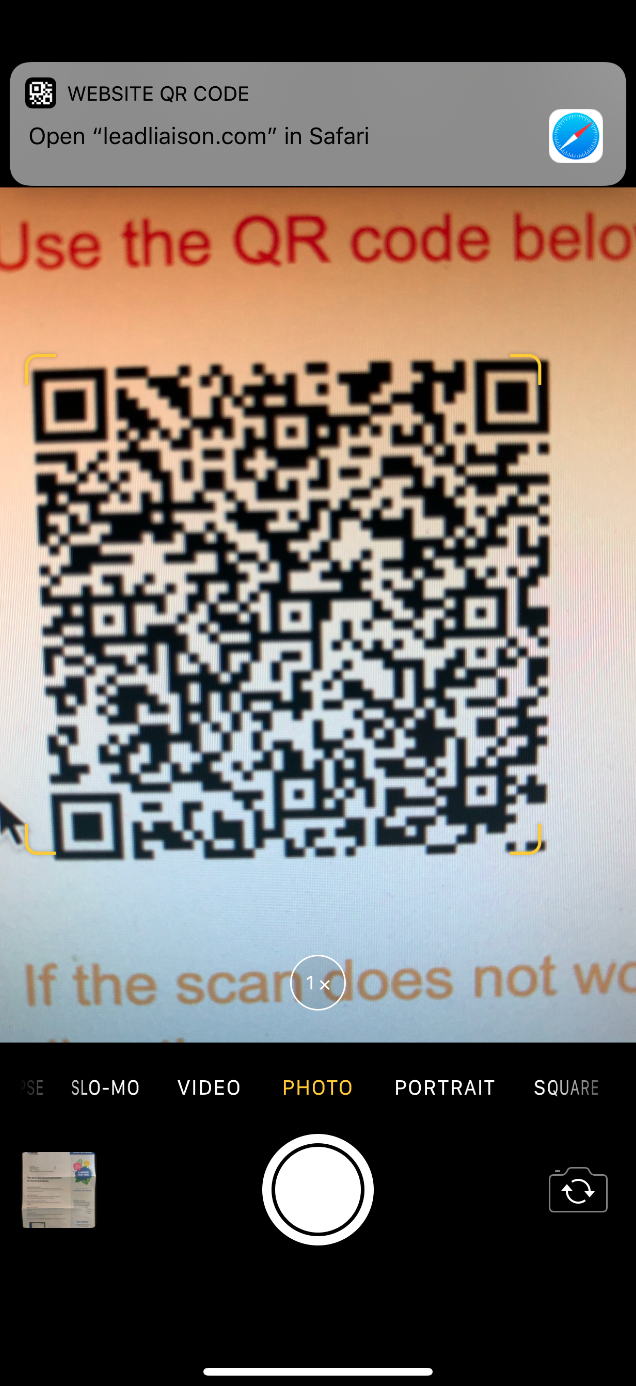
Using QR Codes for Tickets/Passes
When someone registers for an event the system can send out a pass/ticket via email that includes a QR code. The attendee can bring the QR code with them to the event to have a representative scan and check them in.
...
| 2. Enter Code (Once) | 3. Confirmation |
|---|---|---|
|
|
|

Publishing your Check-In and Registration System
After customizing your check-in and registration system make sure to Save it. You can also preview it using the Preview button in the designer. Once it's ready to go, publish your system by doing the following:
...
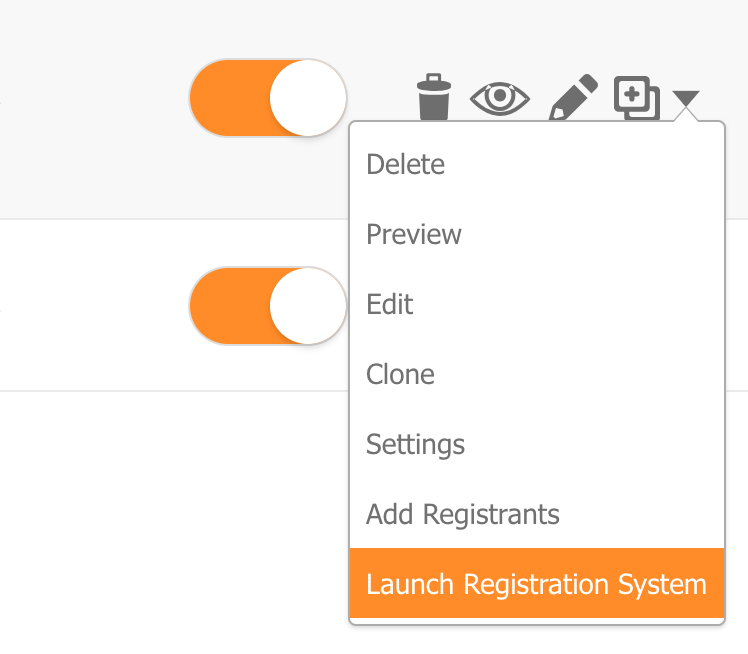
- To show your system to users at the front door, hover over your registration system and click the Launch Registration System menu option.
Registration Statistics
Lead Liaison keeps track of registrants and attendees, along with attendance. To view your statistics navigate to Content > Events > Registrations. In this view you'll see:
- Registrants: Number of people that registered for your event. The total number is the number of people that registered or were manually added using the "Add Registrants" option.
- Attendees: Number of people that attended. These are also the people who have checked-in and/or registered (if you chose the option to also check them in when they register).
- Attendance: Number of attendees divided by the number of registrants.
- Rejected: Attendees that were rejected by show Admins.
- No Show: Attendees who registered but did not check in.
...
Uploading Registrants
| Widget Connector | ||
|---|---|---|
|
Communicating Before Your Event
| Widget Connector | ||
|---|---|---|
|
Pre-Printing Badges
| Widget Connector | ||
|---|---|---|
|
During Your Event
In the tutorial video below we discuss:
- Registering attendees on-site (existing or new).
- Checking in attendees on-site.
- Self-service badge printing.
- Allowing partners/exhibitors to scan badges.
| Widget Connector | ||
|---|---|---|
|
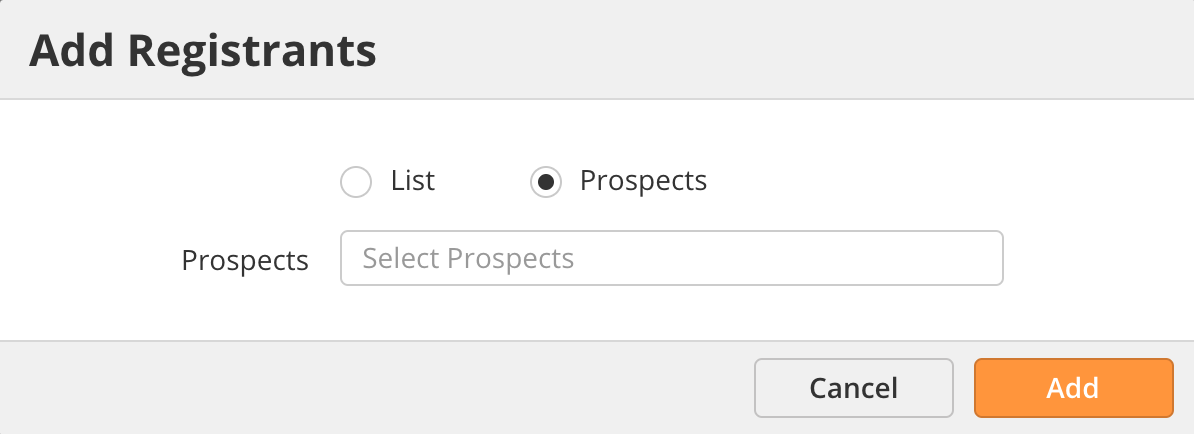
Manually Adding New Registrants
Admins can manually add new registrants to your event. Use this option if you have a pre-registration list or if you do not want attendees registering themselves. To manually add a new registrant:
...
- In the Add Registrants modal window, select how you'd like to add new Registrants. You can add them from an existing Lead Liaison List or from an existing Prospect.
- To create a new Prospect navigate to Prospects > All Prospects and click the New button. Alternatively, if you have an orange asterisk on the bottom right side of your screen you can use this shortcut to create a new Prospect.
Manual Status Changes
Manually change the status of Prospects by clicking on the number in the event's Registrants column. Use the drop-down menu to the left of the Prospect and select Change Status.
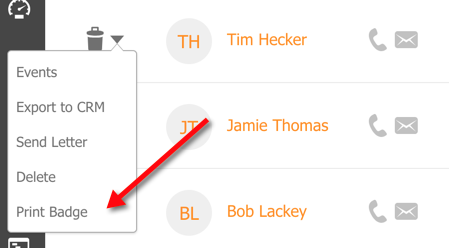
Printing New Badges
Admins can print new badges for people that register at the event or for prior registrants if a badge was not pre-printed. We suggest having an operating a computer hooked up to your badge printer. To make this process run smoothly, do the following:
- Have the operator navigate to Content > Events > Badges and click on the number under the Prospects column.
- Keep this page open during the event.
- Depending on your settings, when a new person registers for your event (or if you manually add them) they will appear on this page, at the top.
- Refresh your page to see new registrants.
- When you're ready to print the badge choose Print Badge which will open the Avery system for printing.
...
After Your Event
In the tutorial video below we discuss:
- Analyzing attendance.
- Creating surveys and analyzing responses.
- Follow up.
| Widget Connector | ||
|---|---|---|
|
Registration Statistics
Lead Liaison keeps track of registrants and attendees, along with attendance. To view your statistics navigate to Content > Events > Registrations. In this view you'll see:
- Registrants: Number of people that registered for your event. The total number is the number of people that registered or were manually added using the "Add Registrants" option.
- Attendees: Number of people that attended. These are also the people who have checked-in and/or registered (if you chose the option to also check them in when they register).
- Attendance: Number of attendees divided by the number of registrants.
- Rejected: Attendees that were rejected by show Admins.
- No Show: Attendees who registered but did not check in.
Click on the numbers in these columns to view or take action on these Prospects. If there is no number, no Prospects fit that category.
Badge Printing Setup
Follow these guidelines to purchase equipment for your event.
...