| Table of Contents |
|---|
...
Navigate to Setup > Events > Capture.
Scroll down to Localization.
Select Manage Custom Translate.
A new page will open showing any current custom translations you may have. Select one of the current ones or click on New for a new translation.
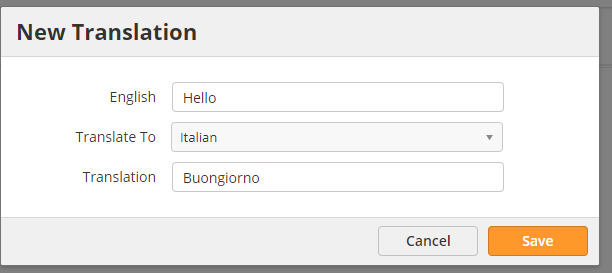

Set the English word or phrase you want to customize, and the language your changing using the dropdown. Finally enter the translation that is desired.
Click Save.
...
Events are the core of Event Lead Management. They include trade shows, conferences, meetups, and any other live event where you could capture lead data. To set up a new Event, navigate to Events > Capture and click New. Select from the following form types:
Exhibitor – Used to capture leads at live events or virtual trade shows. Includes all forms of lead capture such as kiosk, badge, and business card.
General – Used for different types of use cases such as digital marketing, employee engagement, and more.
Sales – Used by sales teams to capture leads from a mobile device while on the go. Forms never expire and are always available.
...
Name – name of your Event
Template – create Event using a Template (see Templates below)
Save to – save event to a folder
Campaign – add event to Campaign for ROI tracking purposes
Description – internal description of event
Event Date – start and end date of event used for reporting
Archive Date – the last date end users can capture new Prospects in the mobile app
Event Owner – user in charge of managing event
Event Address – physical location of the event using Google Maps
Registration List – attach a List of attendees
Labels – custom labels for segmenting reports
Visibility – Visibility of the event form can be set as Public, Private or Shared
User Access – users and groups invited to the event
...
Transcription Options
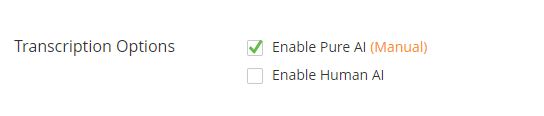
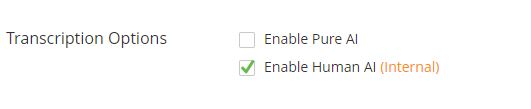
Captello offers two different transcription methods i.e. Human AI and Pure AI. Both are very distinct methods that have their own advantages.
Pure AI will be enabled by default. The submission will be in "Pending" status until the transcription is complete.
Pure AI - Pure AI uses a sophisticated process that combines machine learning, image analysis, data intelligence, and artificial intelligence to perform its magic. Results are returned quickly inside the mobile app. Here is a quick overview video:
Auto - This is the default option. Cards, once captured, will be transcribed automatically using Pure AI technology. (Click the orange text to change the setting)

Manual - Manual means you take a picture but then you'd need to tap a “transcribe” button in the app to process the transcription. This is for situations where maybe you already have a badge scan and just want a pic of the card. (Click the orange text to change the setting)
Human AI - Human AI uses an operations team of several hundred people. The workforce transcribes the contact information while artificial intelligence processes the data to find matching information and discard bad information. The result is a highly accurate process ideal for multiple use cases.
Workforce - Cards will be transcribed by Lead Liaison’s workforce for a small fee. Once transcribed, a event submission is complete. Transcription turnaround time is mentioned below depending on the use case. Click the orange text to change the setting.

Transcriber Proficiency:
Standard:Transcriptions are typically available within three (3) hours. Results may vary based workload and number of requests. Requests in bulk will be processed faster than single requests. Results will never take longer than 6 hours. Transcriptions that cannot be completed will be available in your internal transcription portal.
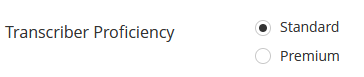
Premium: Transcriptions are typically available in 60 minutes. Results may vary based workload and number of requests. Requests in bulk will be processed faster than single requests. Results will never take longer than 2 hours. Transcriptions that cannot be completed will be available in your internal transcription portal.

Info title NOTE Results from non-US instances may take longer to process.
Internal - Submissions held inside the platform for you or our Operations Team to transcribe. (Click the orange text to change the setting)
The best method for your business depends on your use case. In the tables below we’ve highlighted six (6) use cases for transcribing contact information from documents, all of which Captello supports.
...
Localization
Select a default language for transcription. When set to English, Lead Liaison will still transcribe foreign languages, but will default to English when possible. English cards are typically available in less than an hour depending on the number of cards, time of day, and day of the week.
...
| Note |
|---|
Supported DevicesRapid Scan for business cards is supported on iOS devices only. Android support is coming soon. |
Group Scan
You can capture multiple leads from the same group or company with the Group Scan feature. Multiple people can be scanned in rapid succession. The first person scanned is always the primary person for the group. All data from the primary person’s submission, besides their contact information, is copied to every other person in the group. When enabled, the standard badge scan button will be split into two buttons, with the smaller group scan button off to the right.
All survey responses, notes, questions and follow up documentation settings will apply to the entire group. To enable Group Scan as an option, turn on the Enable Group Scan toggle in the Settings tab of the Scanner element.
...
Here is a quick video overview:
Troubleshooting Ba by Running a Test Scan
...
You can select from the list of available specific users and meetings.
...
If you select specific user, you will have the option to select from all available meeting types for that user and book a time on the calendar:
...
However, if you select specific meetings then only the selected meetings will be available on the form. For example, if you select a user's 30 minutes meeting type then the app will show only that option. You can also choose multiple specific meetings from the list.
...
First, create a Document Group.
Navigate to Content > Trackable Content > Document Groups.
Click the New button.
Click the


icon at the top right of the popup.
A new browser tab will appear. New Documents are added to the system as Trackable Content. Upload all of your Documents. See the tutorial on Trackable Content for more info.
Return to the original tab with the Documents popup and click the reload icon


to see the documents you just uploaded.
Follow the steps below to save your Document Group. The numbers below correspond to the numbers in the screenshot below.
Search for Documents by name.
Click the plus icon to add more Documents.
Click the reload icon to see newly added Documents.
Check the box next to the Documents you want to include in your Document Group.
Enter a name for your Document Group. Important: This is the name that will appear on the button label in your lead capture form.
Click Save.
...
Click on the Document object on the left to open the settings panel on the right.
Field Label: This label will not be used in the lead capture form on your mobile device. It’s intended to be used in the form builder to help you separate multiple Document Groups.
Document Group: Select the Document Group to be associated with your button. When a user taps on this button they will see all of the Documents within this Group.
Click the


icon to add another Document Group to the dropdown list.
Click the


icon to edit the Document Group selected from the dropdown.
...
For more information on setting up order management, refer to Order Forms.
Sections
Organize your lead capture forms using Sections. Sections group together common fields like contact data, company info, or survey questions. With Sections, your form is cleaner and easier to manage for end users. To add a Section
...
You can also add Fulfillment Actions for any or all of your Stations by clicking on the small gear icon next to the station name:
...
This will open up the Fulfillment Actions dialog box where you can configure your actions for the particular Station.
...
When exporting Event Metadata, the following options are available when using stations:
...
You can set if the Event form should attempt to collect and record someone's location using Collect Location option
...
You can also set what happens when the form is submitted.
...
This option allows you to block submissions from domains and emails. When this option is enabled, you can block submission using the following options:
Domain List(s) - Pick from a predefined domain list.
Enter domain(s) - Manually enter the domains to block e.g. gmail.com, hotmail.com.
Enter email(s) - Enter email addresses to block submissions from.
...
There are two methods of blocking:
Mobile device submissions - When enabled, you can specify a message to show when the submission is blocked. Default is "Form not submitted."
Web view submissions - When enabled, system will not accept web view submissions. With this option, you can either show an error message or you can add a redirect URL. If you choose a Redirect to URL then you can also specify whether you'd like to record the submission in the backend. This is controlled by enabling or disabling the "Accept submissions" option.
Note: If Block Submissions is turned ON then you cannot save the event form unless at least one of the above blocking methods is enabled.
Measure Completion
This feature is used to create competition with staff members / sales teams who are collecting leads at a trade show. For example, suppose there are 10 fields in your form. If Measure Completion is checked on four (4) of the fields then these fields will be used in the calculation while the other six (6) fields are not. If a user fills in three (3) of the four (4) fields with Measure Completion enabled then they’d have a Completion Rate of 75%.
...
The following submission actions are available:
Collect Rating
You can collect a lead rating at the time of capturing the lead information. Four different rating options are available i.e. Cold, Warm, Hot and Urgent.
...
Collect Rating: Prompts the user to select a rating after a new lead is submitted.
...
| Info |
|---|
The rating element is meant for the staff users to use, so it will not show in web view neither kiosk nor activation launches. |
Add to SFDC Campaign
This action facilitates seamless synchronization of form submissions with SalesForce campaigns. Users can select the desired campaign and specify lead status, automating lead management processes and ensuring data accuracy within SalesForce. This functionality streamlines workflows.
Just select the desired SFDC Campaign and its status, and you'll be all set!
...
| Info |
|---|
The fulfillment action still needs to be configured to synchronize the lead with SFDC. |
Add to Automations
This action prompts the user to add to Automations after a new lead is submitted. You can choose multiple Automations which will be available on the app for selection.
...
Add to Rhythms
This action prompts the user to add to Rhythms after a new lead is submitted. You can choose multiple Rhythms which will be available on the app for selection.
...
This is how these actions will display on the mobile app:
...
Fetch Related Prospects
...
Using this option, you can find other related Prospects through our DataSpring feature. This prompts the user to search for related contacts after a new lead is captured. Prospects are fetched using your selected Search Criteria and the related company name or domain name from DataSpring to find and source the specified number of records. Related Prospects are saved in your database as a new Prospect record.
Use case: Suppose you are exhibiting at a tradeshow and meets Janice, the Director of Marketing at Philips Medical. The staff member scans Janice’s badge, fills out a custom form to collect data that’s meaningful to your business, then submits the lead. The staff member is prompted to optionally find other qualified marketing contacts at Philips Medical. The other contacts are automatically found by setting up a filter to find anyone with “Marketing” in their title and located in the United States or Europe. The additional contacts get saved into your database for later follow up and/or nurturing.
Search Criteria
Here you can select from pre-saved DataSpring search criteria. Instructions on creating/saving a new search criteria is available here.
Max Prospects
You can use the Max Prospects setting to limit the number of records that can be pulled in from a DataSpring search. If a record was already purchased in DataSpring (using any method) then it will be skipped. For example, if Max Prospects is 5 and 3 records were already purchased in DataSpring (even from a direct search) then 2 additional records will be purchased.
...
| Info |
|---|
DataSpring search feature requires a Sales Enablement license. Contact your Account Manager for more information about licensing. |
Social Append
This option allows you to enrich leads with information from social networks. When a lead is captured it is appended in real time with social information. You can enable this option from the event form Properties tab here:
...
The Social Append feature includes these personal data fields to the Prospect record:
...
Account admins can further control other Social Append settings (such as allowing for overage) from Settings > App Setup > Data Enrichment as outlined in the documentation here.
...
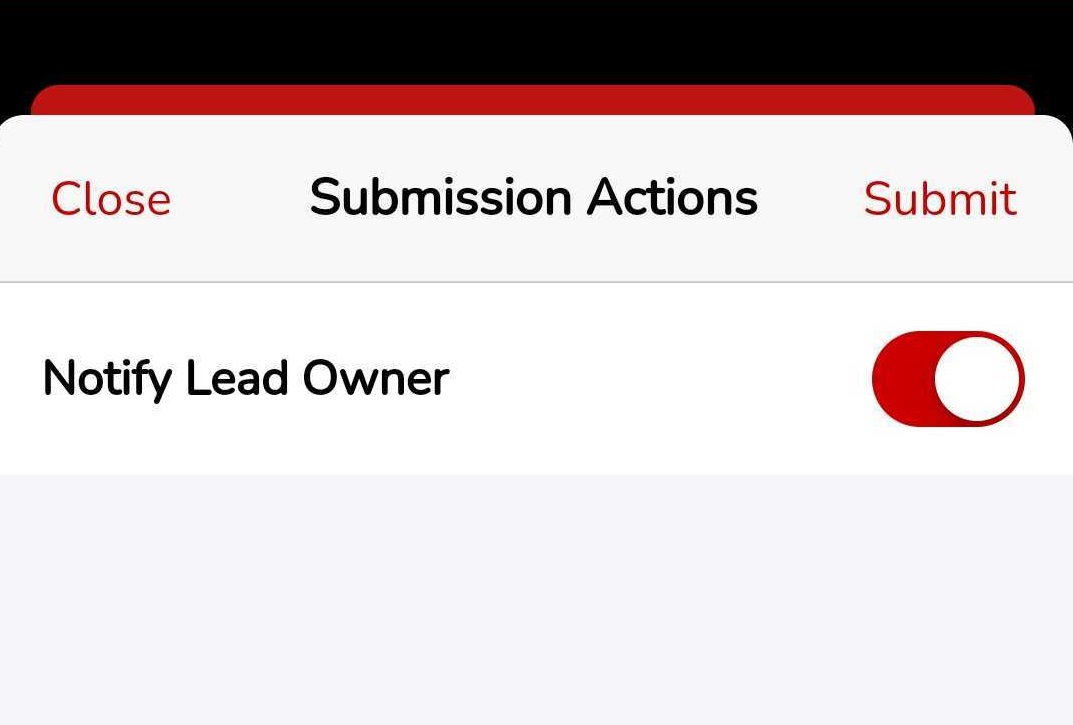
Notify Lead Owner
This option allows you to send an email alert to the lead owner when the lead is captured.
...
There are two available Notification Frequencies:
Always - system will always send an email alert to the lead owner every time a lead is captured.
User preference: user will get an option to select whether or not to send the alert. They'll see this prompt at the submission actions screen:
...
By default, when a device user submits a prospect from a lead capture form, the system will assign the user as the prospect's owner. You can change this setting in the form builder under the Properties tab.
Prospect Owner (Mobile)
These settings will apply to the leads captured through Captello mobile app.
...
Device user – system assigns prospects to the user associated with the submitting device
Specific user – system assigns prospects to a specific user of your choosing
Leave Unassigned – does not assign an Owner and relies on any default settings
Default owner – system assigns prospects to the global default (must be set in Lead Distribution Settings as shown in the screenshot below)
...
If you would like the system to override any current lead owners in the system in favor of your form settings, simply click the checkbox on the bottom.
Prospect Owner (Web View)
These ownership settings apply to leads that are captured using the web view specifically.
...
If “Event Owner” is selected, then system will use the event owner as the owner of the captured lead.
...
Actions (On Input) are actions or alerts that are applied on the Captello mobile app side. These Actions can send alerts, pop-ups, sounds or vibrations when form data matches any of the criteria you choose. For example, let's suppose company ABC is of great importance to your business and you want to remind your staff to pay special attention towards such leads. So using Actions (On Input), you can display a custom text message inside the Captello mobile app every time a lead from company ABC is captured.
...