Take the following steps to send an existing email campaign:


Email Campaign Settings
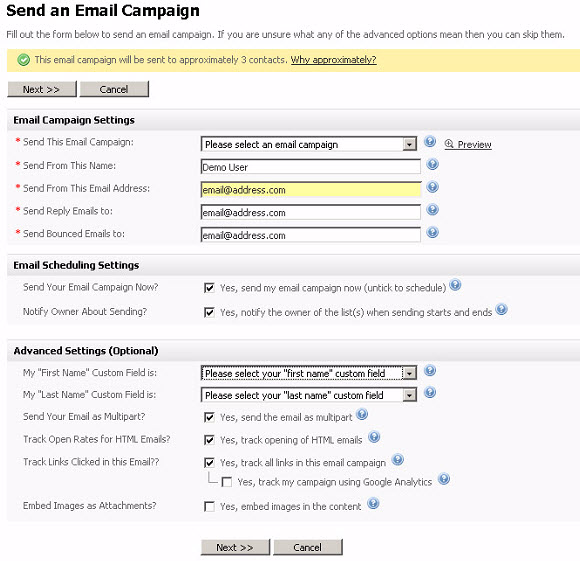
Send this email campaign | Select the email campaign that you want to send from the list. Click Preview to see the campaign in a new browser window. |
Send from this name | This displays the default "from" name for the contact list you selected. If you want to use a different name, enter the new name in this field. |
Send from this email address | This displays the default "from" email account for the contact list you selected. If you want to use a different email account, enter the new address in this field. |
Send reply emails to | This displays the default reply email address for this contact list. When a contact replies to your email campaign, this is the address to which the reply is sent. If you want to use a different address, enter the new address in this field. |
Send bounced emails to | This displays the default bounced email address for this contact list. This is the address to which undeliverable emails are sent. If you want to use a different address for handling bounced emails, enter the new address in this field. |
Send your campaign now? | Select this if you want to send the email campaign immediately. |
Notify owner about sending? | Select this if you want to send an email to the list owner when a scheduled campaign starts sending, and another when it finishes sending. |
My "first name" custom field is | If your email campaign uses a custom field to define a recipient's first name, select it here. |
My "last name" custom field is | If your email campaign uses a custom field to define a recipient's last name, select it here. |
Send your email as multipart? | Select this to send both HTML and text elements of a multipart email campaign to recipients. This allows a recipient's email client to choose the correct display method. |
Track open rates for HTML emails? | Select this to have the email software track the proportion of HTML emails opened by their recipients. |
Track links clicked in this email | Select this to have the email software track the proportion of links in this email campaign that are clicked by the recipient (click-through rate). |
Yes, track my campaign using Google Analytics | Select this to have the email software use Google Analytics to track your campaign's links. |
Embed images as attachments | Select this to embed the images you send in HTML emails, rather than linking to them. This allows recipients to view the email campaign offline, but can increase the email size significantly. |