Lead Liaison enables marketers to apply a wide array of actions to any automation. Additional actions may be added through the Lead Liaison App Cloud. To add an action simply drag and drop it from the left side to the right side (canvas).
Additional CRM actions are also available. See the CRM Actions section here for more information. |
 > image2014-3-17 23:23:15.png")
|
 > change lead score.jpg")
|
 > change lead grade action.jpg")
User with Administrative rights can change the default lead grade. To change the default lead grade do the following:
 > setting default lead score.jpg")
A prospect's lead grade can be viewed from the prospect's profile page. Click on the name of the prospect anywhere in Lead Liaison to go to the prospect page. Alternatively, go the Sales tab and type in the name of the prospect in the "Find Prospects" box. Once you're on the Prospect Profile page you can view or manually change a prospect's lead grade. See the screenshot below for more information:
 > image2020-7-29_16-10-25.png")
Attempts to find personal email addresses and phone numbers using the Prospect's work email. This action costs Purchase Credits, though is only charged if there is a match.
 > image2020-6-11_21-36-42.png")
Once an email marketing campaign (message) is setup and saved it automatically appears in the drop down. Email campaigns are sorted alphabetically in the drop down. Type any part of the email campaign in the drop down field and Lead Liaison automatically searches the campaign and selects only campaigns that contain the search phrase. |
 > image2014-8-3 23:33:9.png")
 > image2014-8-3 23:33:21.png")
 > image2020-7-29_16-7-54.png")
With an email selected, click on the eye icon to preview the email. The preview will open in a new tab.
Lead Liaison allows marketers to send email messages on behalf of their sales team but have the email message look like it comes from the sales person (Lead Owner). Additionally, individual email messages can be delayed by any number of hours, days, weeks or months. To view these additional settings click the gear icon to the right of the drop down box.
The three radio buttons change who the email message is sent from. Options are as follows:
 > send email expanded.jpg")
 > send email custom.jpg")
Suppose you want to send Email B to a Prospect only if they did not open Email A. To do that, any one of the following two options will work. Both accomplish the same result.
1) The action below says, if Email A was not opened then send Email B.
 > image2015-8-31 8:58:8.png")
2) The action below says if Email A is open then send nothing; otherwise send Email B.
 > image2015-8-31 8:58:38.png")
Select your event from the dropdown under Use Event to associate a specific event with your email. The merge fields in your email will be replaced with the specific data points from the selected event.
 > image2016-6-26 21:38:19.png")
Reference this documentation page for more information on sending handwritten letters.

Tip: To make sure you're not introducing a bunch of scheduling errors add conditions around the Send Handwritten Letter action to only send the letter if the Prospect has an Address, City and State in their profile.

Alerts may be incorporated into an Automation program. When this action is executed Lead Liaison will send an email message with the Title, Prompt and Message specified to the Lead Owner, Teams or individual users. A default alert template is populated when the Send Alert action is dragged/dropped to the canvas.
 > image2020-5-5_15-51-21.png")
You can put the alert into Test Mode as shown below. Test Mode will not send the alert and can be used while testing a workflow.
 > image2014-8-3 23:35:14.png")
The Send Alert action is sent via email only. Text messages will not be sent. |
If there is no valid email address or user to send the alert to then Lead Liaison will dismiss the Send Alert action and mark the action as "Skipped" in the Audit tab of the Prospect Profile page. |
 > send alert action results.jpg")
You can customize the content of the Alert email in the Send Alert action. In the example above, notice the Activity History at the bottom of the email. If you do not want this sent with the alert, uncheck the Activity History box.

Use the Change Event Status action to change a Prospect's Event status. An Event could be an Event Brite, GoToWebinar, WebEx or other kind of online event. The Change Event Status action has an accompanying Send Email action. When an email is used in conjunction with the Change Event Status action this tells Lead Liaison that the Event mail merge fields in the email should use the Event in the "Event" fields of the Change Event Status. In the example below, the Prospect's status is changed to Invited and an email is sent that uses mail merge fields for the "How to Nurture Leads" GoToWebinar event.
 > image2014-8-24 23:6:23.png")
Use the Send to Workflow action to add a prospect to another Workflow. For example, if you setup a 30-day nurturing campaign and the prospect makes it through all steps of your nurturing program then you might want to send the prospect to a 60-day nurturing program. Create the 60-day nurturing Workflow first. Once the Workflow is created, add the Send to Workflow action to the canvas then search for the name of the 60-day nurturing Workflow and select it in the drop down box.
 > image2014-8-24 16:20:59.png")
Use the Remove from Workflow action to remove a prospect from a Workflow. For example, if you send a prospect an email message and they don't click a link in the email message after 30 days then you might want to remove the prospect from your Workflow to keep your communications clean and relevant. Simply enter the name of the Workflow from which you'd like to remove the prospect in the drop down box. Alternatively, the Prospect can be removed from all Workflows using the second radio button as shown below.
Note that you can remove Prospects from an existing Workflow using the Remove from Workflow action. If you do not see your Workflow in the drop down make sure to first save your Workflow then return to editing to add the action. |
 > image2014-12-15 9:59:24.png")
Use the Add to LL Campaign action to add a prospect to a Lead Liaison Campaign. Programs/Campaigns are covered in more detail here.
 > image2013-7-28 23:15:54.png")
After a Prospect has been added to a Lead Liaison Campaign you can see them as a Member by going to Marketing > Programs and clicking the number under the Members column next to the Campaign the Prospect has been added to.
Removes the Prospect from a Lead Liaison Campaign. Select the Lead Liaison Campaign to remove the Prospect from in the Campaign field. There are three options for handling each Prospect's Campaign status once the Campaign is removed:
 > image2017-2-1 11:38:37.png")
Removes the Prospect from a Lead Liaison Program. Select the Lead Liaison Program to remove the Prospect from in the Program field. There are three options for handling each Prospect's Program status once the Program is removed:
 > image2017-2-1 11:39:1.png")
Use the Add to List action to add a prospect to a List. A List is similar to a contact list. There are Static and Dynamic Lists. A Static List is a contact list built with rules that run only once. A Dynamic List is a contact list built with rules that continuously run. Select the name of the List you'd like to add a prospect to once you drag/drop this action to the canvas.
 > add to target list.jpg")
Use the Add to List action to add a prospect to a List. A List is similar to a contact list. There are Static and Dynamic Lists. A Static List is a contact list built with rules that run only once. A Dynamic List is a contact list built with rules that continuously run. Select the name of the List you'd like to add a prospect to once you drag/drop this action to the canvas.
 > image2017-9-18_15-27-11.png")
Changes a Prospect's Lifecycle Stage.
 > image2017-9-18_15-26-6.png")
When the Suspect Lifecycle Stage is chosen, the user can also update the Suspect Status as shown below:
 > image2017-9-18_15-28-31.png")
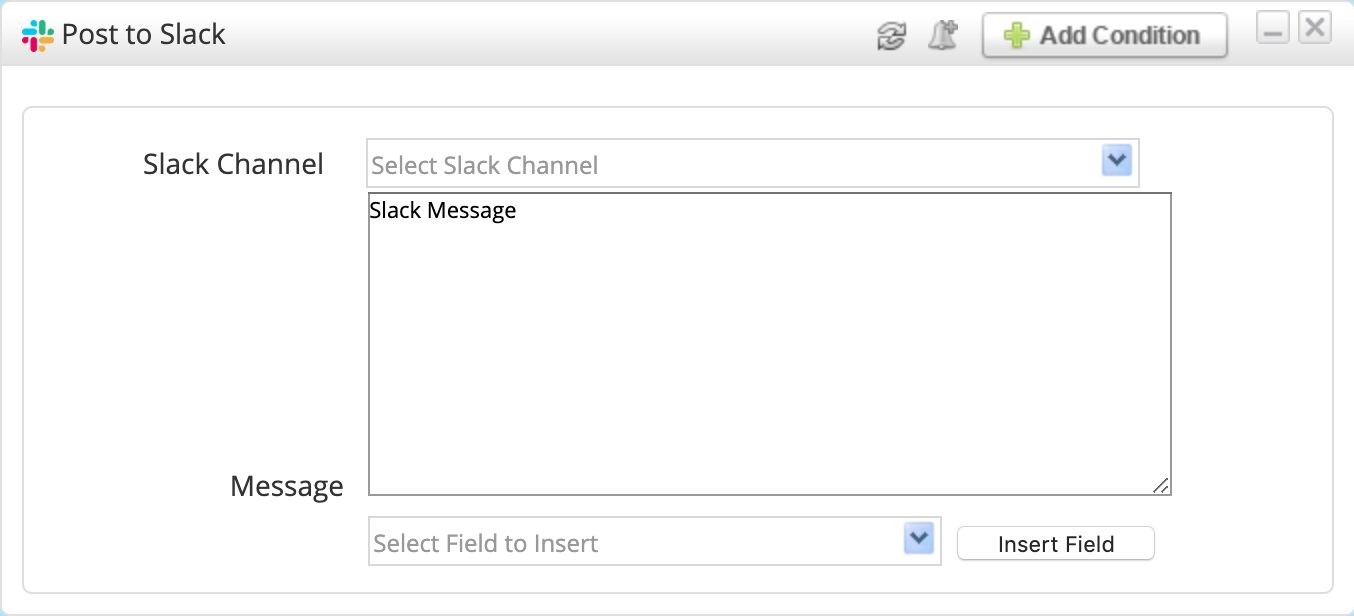
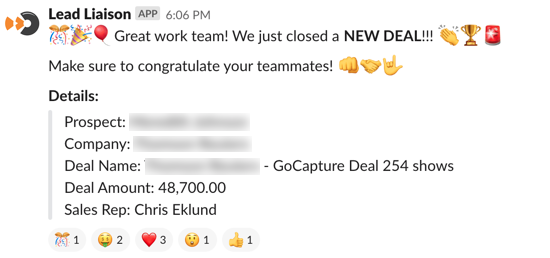
Posts any type of update to a Slack Channel. Include merge fields with your message along with emojis.
Remove from List is the opposite of the Add to List action. Use the Remove from List when you need to remove a prospect from a List (contact list). Select the name of the List you'd like to remove the prospect from once you drag/drop this action to the canvas. Alternatively, the Prospect can be removed from all Lists using the second radio button as shown below.
 > image2014-12-15 10:2:8.png")
Use the Distribute Lead action to send leads to users. This action is often used to disseminate leads to sales people. When used in combination with Lead Liaison's Auto-Assignment Rules organizations have a powerful and flexible approach to distributing leads. Leads can be directly distributed or distributed in round robin fashion based on a set of rules (defined by you) when "Assignment Rules" is selected. To bypass Lead Liaison's Assignment Rules and directly distribute a lead to a user select the user's name in the "User" drop down.
 > image2017-4-21_18-19-26.png")
There's also an "Alert Owner" check box within the Distribute Lead action. This box is unchecked by default. When the box is checked the person receiving the lead will get a "Distributed Lead" email (and/or text message) similar to the one below. If the lead is not distributed or the action was dismissed then the owner will not get notified.
Individual users can change their "Distribute Lead" alert methods. To do so, navigate to Home > Setup alerts and change the alert type to Email, SMS or Both. |
 > distribute lead email.jpg")
If a user is selected as the "Send To" then the lead will be distributed to the new user even if the lead was already assigned to another user. |
If "Assignment Rules" is selected then leads will be distributed according to the Assignment Rules specified in the Lead Distribution section. However, if a lead is already assigned and a lead distribution rule has the "Do Not Reassign Owner" enabled then the lead will not be distributed. The system will move to the next lead distribution rule until all rules have been executed. |
It takes between 3 to 4 minutes to distribute a lead. |
It is important to understand the process and timing used by Lead Liaison to distribute leads. The "lead distribution engine" runs as a separate process and operates on a queue of leads. When the Distribute Lead action is executed, new prospects are pushed to the lead distribution queue. See the highlights below to better understand how Lead Liaison distributes leads:
The Suspend Workflow action pauses a prospect in one or multiple workflows. Use this feature to stop prospects from moving on to the other steps in the workflows. Combined with conditions, you can choose who is suspended and who moves forward. For example, if a prospect has not clicked on any links in an email drip campaign, you might suspend them from your email nurture campaigns.
 > suspend.png")
If new actions are added to a Workflow after a prospect has been affected by a Suspend Workflow action then the new actions will be applied to the prospect. |
Automation can have either an Activated or Suspended status. To Activate or Suspend an action go to:
|
The resume workflow will unpause the prospect from suspended workflows. Combined with conditions, you can choose who is unpaused from the selected workflows.
 > resume.png")
If the prospect was suspended directly before a Wait action, the system will honor the original wait time from the day the prospect was suspended. For example, if the prospect is suspended before a 3-day Wait action and is resumed after 2 days, the system will wait 1 more day before moving on. Likewise, if they are resumed after 5 days, the system will move on to the next action. |
Use the Wait action to place a "wait state" in between specific actions. The wait state will hold the campaign, preventing any further actions from executing until the holding period expires. A holding period may be specified in minutes, hours, days, weeks or month.
When modifying a Workflow in the Activated or Completed status and adding a Wait action, make sure to understand how the Wait action works on Prospects who are already in the Workflow. Before every save, the Wait action applies the Wait period (hours, days, weeks or months) to the ensuing actions. This is important if you're continually modifying a Workflow. As a rule of them, when there are existing Members in a Workflow and you want to delay future actions with a Wait action make sure to simultaneously add the Wait actions with the actions you need to postpone before saving. |
There is also a Wait parameter built into the Send Email action as shown below. This delay functions different from the Wait action. Consider the Workflow scenarios below. The column on the left is an example of a Workflow campaign using the Wait action. The column on the right is an example of a Workflow campaign using the Delay feature.
| Workflow Action | Using Wait Action (Scenario 1) | Using Delay Feature on Send Email Action (Scenario 2) |
|---|---|---|
| 1 | Send Email A | Send Email A |
| 2 | Wait 1 Week | If Lead Status does not equal "New" then send Email B but schedule it 1 Week out |
| 3 | If Lead Status does not equal "New" then send Email B |
Here's the difference. In Scenario 1, the Workflow could be suspended and all emails will be paused. Also, the Lead Status value will be checked after 1 Week. In Scenario 2, the Lead Status value will be checked right away and if the Lead Status did not equal "New" the email will be scheduled 1 Week out. If this Automation was suspended then the emails that were scheduled 1 Week out will still be sent. To cancel scheduled emails go to Content > Emails > Email Campaigns > View Scheduled Email Queue and manually delete or pause each email message to prevent delivery.
 > image2013-4-26 9:25:34.png")
Here's the standard Wait action:
 > wiat.jpg")
Make sure to add actions that follow the Wait action otherwise an error similar to the one below will occur.
 > image2013-4-29 21:47:28.png")
Both the Wait and Wait until Date (below) actions allow ensuing actions to be postponed to a specific time. The time parameter is not available when waiting for "Minute(s)" or "Hour(s)" and is available for all other options (Days, Months, etc.). This feature is helpful when making sure future actions execute in a timely fashion. For example, suppose you want to wait until 10AM a few days out before sending a second email. Click the gear to the right after selecting Day(s) in the dropdown and choose the time and timezone in which you want to run the ensuing actions and in this case, add the Send Email action below the Wait.
Note, if the Wait action uses 1 day along with a time the system waits until the very next day, at that time. For example, if the Wait action runs at 9PM Central on Thursday, waits 1 day until 10AM before sending the next email, then the system will send the next email at 10AM on Friday (the very next day).
 > image2014-12-15 10:26:39.png")
Instead of waiting a specific number of minutes, days, weeks or months between actions you can wait until a certain date using the Wait until Date action. The Wait until Date action has two types, one that uses Month / Day / Year and one that does not use a year (Month / Day). Both types have a time component that go with it, where the general time can be specified.
Use the Wait until Date type without a year when you want to postpone all ensuing actions until the next time this day occurs. For example, suppose it's March 15th, 2017 and you add a Wait until Date for February 20th. All ensuing actions will be postponed until the current day equals next February 20th, which would be February 20th, 2018. The two types are illustrated in the screenshots below:
With the Year:
 > image2014-8-4 0:10:56.png")
Without the Year:
When no year is used, ensuing actions will not get applied until the first "Wait until Date" action runs. |
 > image2014-8-4 0:11:36.png")
In the example below, we illustrate how an entire annual workflow is constructed which sends monthly emails to a specific list. Anytime a Prospect is added to the list for a first time they'll get added to the workflow and depending on the date they were added they'll start receiving emails after the Wait until Date in the workflow. For example, if a Prospect was added to the workflow on January 14th, 2015 they would not receive the first email in the workflow, called the January Email, and they would received the second email and so on since the first Wait until Date is in the past and the second Wait until Date action has yet to occur.
 > image2014-8-4 0:20:3.png")
The first two actions would be skipped if the Prospect was added after 8AM on January 1st, 2015. Similarly, if the Prospect was added after 8AM on February 1st, 2015 the second and third actions would also be skipped and the March email (and future actions) would apply on the Prospect.
 > image2014-8-4 0:24:4.png")
Keep the following information in mind when working with the Wait and Wait until Date actions.
Consider the following example.
The Wait and Wait Until Date actions can be modified once they've run. Keep the following in mind when modifying a wait action:
To Tag Prospects using a workflow do the following select the Tag action and enter one or more Tag values separated by a semicolon (";") as shown below:
When using the Tag action only one Tag can be added. Multiple Tags may not be added separated with a semicolon, like "tag1;tag2". Also, the Tag must already exist. |

Use this action to add a prospect to the Blacklist. When a prospect is added to your Blacklist (company-wide) they will not be tracked by Lead Liaison's lead tracking system. To learn more about Blacklisting visitors read this section.
 > add to blacklist.jpg")
Use this action to remove a Prospect from Lead Liaison. The Prospect can be permanently removed or moved into the recycle bin. See deleting prospects and the recycle bin for more information. If your Lead Liaison instance is connected to a CRM then an option exists to remove the connected record from your CRM as well. When left unchecked, the Prospect will be deleted in Lead Liaison but not removed from your CRM. Only when the CRM record is updated/modified, the Prospect will get imported again into Lead Liaison and a new Prospect will be created.
Note that when the Delete Prospect action gets applied to a Prospect all subsequent automation actions will be cancelled. The Prospect will receive no further automated actions.
 > image2015-6-9 10:51:4.png")
Use this action to change any Lead Liaison Standard or Custom field. Select the Standard/Custom field you'd like to change in the "Attribute" field. Once selected, Lead Liaison displays a "New Value" field below the "Attribute" field based on the data type. For example, selecting "Lead Source" in the Attribute field displays a drop down below it with the list of Lead Sources. Also, say you had a "CRM Solution" field as a Custom field defined in Lead Liaison. If the CRM Solution field is a multi-select data type then multiple values will be displayed in the New Value section if this attribute is selected. See the two screen shots below to better understand how the New Value field dynamically changes according to the data type selected in the "Attribute" field:
 > change data value.jpg")
 > change data value crm.jpg")
 > image2014-8-7 7:34:23.png")
 > image2017-5-9_17-59-57.png")
 > image2018-1-6_8-53-10.png")
 > change-data-value.JPG")
Adds the Prospect to every List in the selected Category and marks them as Active.
 > image2020-3-30_19-42-31.png")
Marks the Prospect as Inactive in Lists of the selected Category. Note: this will not remove the Prospect from the Lists, but they will no longer receive emails sent to the Lists.
 > image2020-3-30_19-45-49.png")