Sending Credentials
When setting up a new user they will not receive an email notification with temporary login until their account is Activated. Once a user account is Activated they will receive the new account email (Activation Email) with login credentials.
Managing Users
Lead Liaison users may be activated or deactivated, added/removed from Teams, removed from your account, or modified in multiple ways from the Manager Users section.
To get to the Manage Users screen, do the following:
- Go to Settings > Users > All Users
Activating a User
When the "Activate" menu option is selected for a Deactivated account a popup confirming the action will appear. Once you confirm, the user will receive an Activation Email along with temporary login credentials.
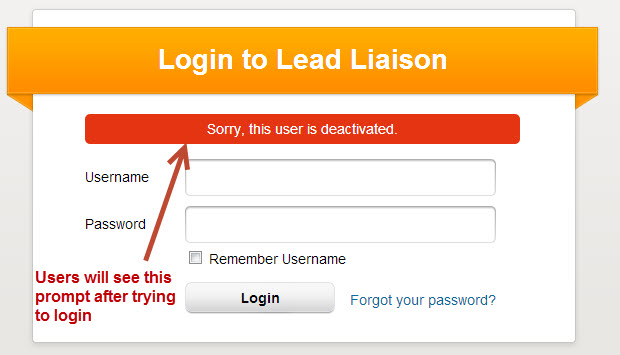
When a user account is in the Deactivated status, they will not be able to login and see a prompt similar to the one below when trying to login:
Setting Alerts on Behalf of a User
Admins can set alerts on behalf of a user by doing the following:
- Go to Settings > Users > All Users
- Click "Alerts" under the Actions column
Setting Alerts for a Team
Admins can set alerts for an entire Team. To do this, do the following:
- Go to Settings > Users > Teams
- Click "Alerts" under the Actions column
Managing Capture Portal Users
A setting called Capture Portal User is included for clients with GoExhibit! installed. When this setting is enabled for a user they will only have access to the Capture Portal.

Adding New Users
To add a new user go to:
- Go to Settings > Users > All Users
- Click Add User
When adding a new user you will see an "Activate and Send Email" check box. If you choose to add the new user but keep them in a Deactivated status do not check this check box. You can always activate the new user at a later time by clicking the "Activate" link on the Manage Users page as described above.

Modify User's Info for Mail Merge (Personal Signature)
Lead Liaison allows each user to customize the information used in email marketing mail merge. This feature is helpful when inserting email signatures or other details on the Lead Owner.
To modify a user's personalized mail merge information go to:
- Go to Settings > Users > All Users
- Click the gear and select Edit
- Look for the section similar to the one below
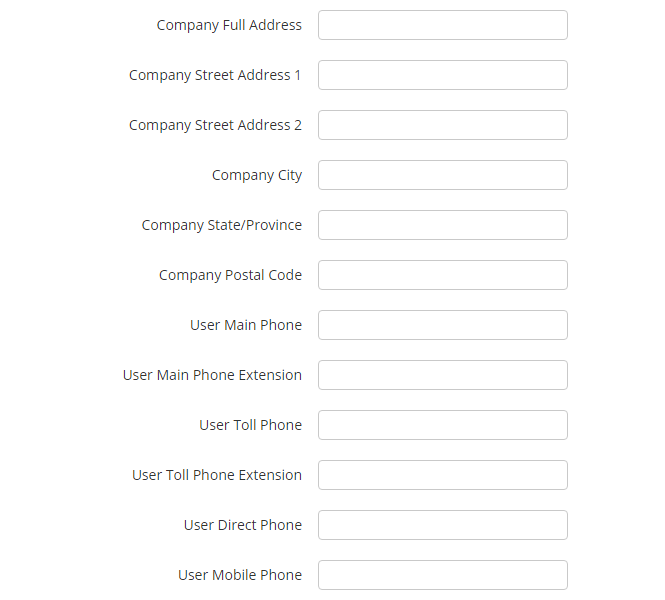
When creating an email campaign, values from the fields above can be merged into an email by inserting these mail merge tokens into the email message. These fields are kept under the "Lead Owner Fields" section.
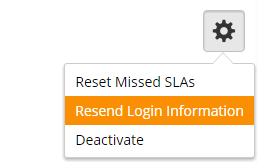
Sending Credentials
To resend user credentials, do the following:
- Go to Settings > Users > All Users
- Click the Edit link or user's name.
- Click the gear then Resend Login Information
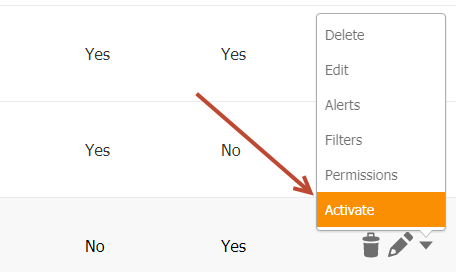
Activating Users
For users that are deactivated you can activate their account by doing the following:
- Go to Settings > Users > All Users.
- Click the down arrow and choose Activate.
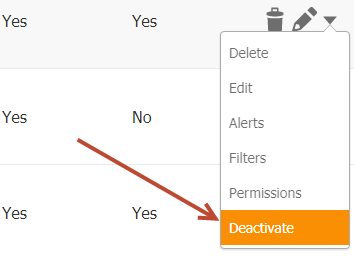
Deactivating Users
To deactivate a user do the following:
- Go to Settings > Users > All Users.
- Click the Edit link or user's name.
- Click the gear then Deactivate.
OR
- Go to Settings > Users > All Users.
- Click the down arrow and choose Deactivate.
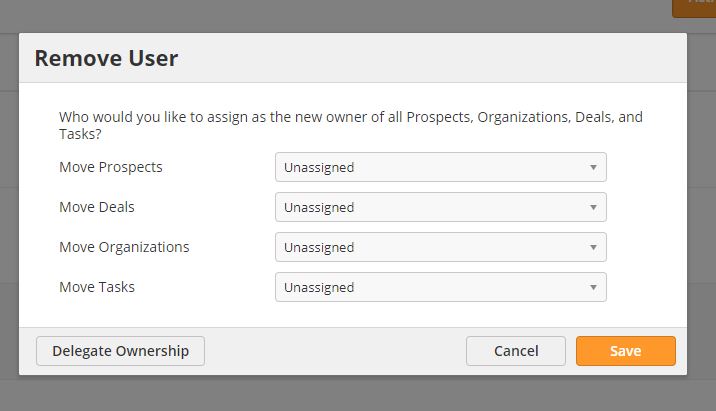
Deleting Users
You can delete users who no longer need access to Lead Liaison. To delete a user, do the following:
- Go to Settings > Users > All Users.
- Click on the Delete icon to the right of the user.
OR
- Click on the drop-down menu and select Delete.

After selecting Delete, the system will ask you to reassign the user's Prospects. If you have OneFocus™ CRM, you can also reassign Organizations, Deals, and Tasks.
Importing SFDC Users
Lead Liaison makes it easy when importing users from Salesforce.com. To get to the page to manage imported Salesforce.com users do the following:
- Go to Settings > Users > All Users
- Click Actions and then Link CRM Users
On the left hand side of the Link CRM Users table you will see a list of your Lead Liaison users. On the right hand side you will see a list of the Salesforce.com users. To link a Salesforce.com user to a Lead Liaison user check the box under the "Link" column of the table. To change a user mapping from a Salesforce.com user to a different Lead Liaison user double click the value under the "LL User Name" column. You might need to change a user mapping if users leave, change roles, etc.
Automatic Import, Lead Liaison User Creation, and Linking
New and Active SFDC users are automatically imported and linked to Lead Liaison users (matched by email address) on a nightly basis. However, to instantly import a new user once they have been created in Salesforce.com click the "Refresh SFDC Users" button on the bottom of the Link CRM Users page.
If a Lead Liaison user does not exist for the imported SFDC user to map to then a new Lead Liaison will automatically be created. This setting may be changed in the Admin panel if this feature is enabled on your account.
Deactivated by Default
Imported CRM users mapped to Lead Liaison users are in the Deactivated status by default. To activate each user follow the steps above under the Manage Users section.
