Overview
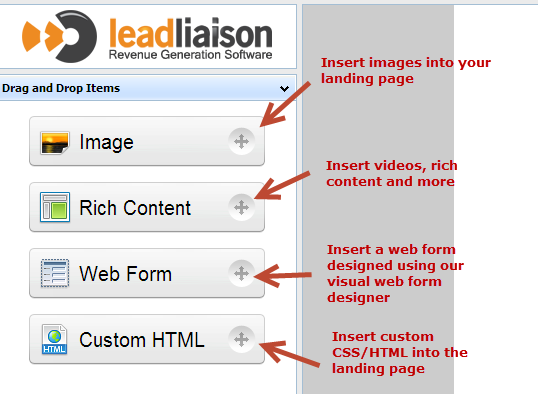
Lead Liaison provides a visual landing page designer to easily build rich, beautiful landing pages optimized around targeted marketing messages. Images, videos, HTML content, web forms and more can be embedded into your landing page.
Creating a Template
It's a best practice to have a common look and feel to your landing pages so your customers and prospects recognize your company and your brand. If you intend to create several similar landing pages we suggest creating a landing page to use as a template. See the instructions below on how to clone the template and quickly deploy/publish the landing page.
Manage Landing Pages
To view essential information for your landing page do the following:
- Click Content > Pages > Landing Pages
- Each column is explained below:
- Remove = Deletes the landing page. Note, this option is only visible if the landing page status is unpublished.
- Name = The name of the landing page.
- Link = Link using your selected cname for the landing page.
- Short URL = Automatically converted short URL for the landing page link.
Use of Shortened URLs
Shortened URLs, such as bit.ly, are equivalent to the original link and additional parameters, such as an email mail merge, will not work. When using additional parameters on a URL use the full URL instead of the shortened URL.
- Total Views = How many times the landing page has been viewed.
- Submissions = Conversions, or the number of times the form (if one is present) is submitted.
- Conversion Rate = Number of Submissions divided by Total Views.
- Modify Date = Date and time the landing page was modified.
- Status = Published or Unpublished. Published means the landing page is live on the internet.
- Actions = Edit to launch the landing page designer and edit it.
Editing a Landing Page
To edit a landing page do the following:
- Click Content > Pages > Landing Pages
- Click the Edit link under the "Actions" column in the table.
Using the Visual Landing Page Designer
The visual landing page is an ultra-easy to use drag/drop solution that empowers the most sophisticated landing page designs without sacrificing customization. Just drag/drop the elements under the "Drag and Drop Items" section on the left-menu to the canvas on the right. Click on each element, including backgrounds, the canvas, and more to customize individual pieces of the design element. To begin using the Visual Landing Page Designer do the following:
- Click New > Landing Page
- Fill out the short form and select "Visual" as the Design Type
Responsive Design
All contents in the visual landing page designer are responsive. Since the layout is free-form, the contents will be displayed as mobile responsive in the order in which the contents are added to the landing page. If your content is appearing out of order on the mobile device, it is likely due to lower elements loading in before upper elements because of the order they were placed. As such, it's best to create your landing page from the top down (logo on top, contents, form, etc.).
Adding 3rd Party Code
It might be necessary to add 3rd party JavaScript or HTML code to the landing page. For example, if you have a live chat system. It might help to add the live chat code, usually a block of JavaScript, into the landing page. Case in point, if your landing page is serving up the page for visitors coming from a Google AdWords campaign you want to make sure you do whatever you can to convert the visitor. Placing a web form, phone number and live chat on the page will increase conversion probability.
Similarly, you might be using a landing page as the Thank You page after a visitor submits one of your forms on a separate landing page designed to convert pay per click traffic. In this case, you should add the pay per click vendors conversion tracking code into the Thank You page in the same area.
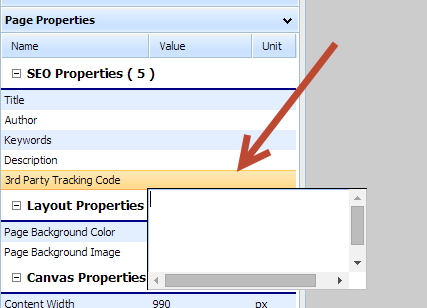
To insert 3rd party code do the following while in the landing page designer:
- Expand the "Page Properties" section
- Under SEO Properties double click the area in the "3rd Party Tracking Code" row under the Value column
- Insert the 3rd party code in the popup box
Insertion Location
Tracking code is inserted above the closing body tag on the landing page.
Saving a Draft of a Landing Page
To save a draft version of your landing page to edit later, do the following:
- Go to the landing page designer
- Click "File", which is in the grey menu on top
- Select "Save As Draft.." from the drop down
Adding a Layout Template
You can add a Layout Template to your landing page to add a header, footer, or other consistant syling and branding. To add a layout template,
- Click "File"
- Select "Save" if this is your first time saving
OR - Select "Save As" or "Save As Draft" if you have previously saved
- Select the appropriate Layout Template in the Template drop-down menu
The content from the Visual Builder will appear where the %%content%% tag is located on your Layout Template. Content styling, such as text and headers, will still be controlled by the styles you used when creating the Landing Page.
Styles from the Layout Template will override styling in the Landing Page. Make sure to use unique CSS IDs and classes for your Layout Template content or it may cause odd CSS behavior in the Landing Page. As a best practice, always preview your Landing Pages in multiple browsers before publishing.
Publishing a Landing Page
To publish your landing page first save it and then publish it by doing the following:
- Go to the landing page designer
- Click "File", which is in the grey menu on top
- Select "Save..." or "Save As..." from the drop down
- Click "File" again
- Choose "Publish"
Cloning a Landing Page
To clone a landing page open an existing landing page (preferably one saved as a template) and choose save as by doing the following:
- Go to the landing page designer
- Click "File", which is in the grey menu on top
- Select "Save As..." from the drop down
You can now save your landing page as another landing page effectively cloning the original one.
Previewing a Landing Page
To preview your landing page and see how it will look when it's published do the following:
- Go to Content > Pages > Landing Pages
- Under the Actions column click the gear and select Preview
- Alternatively, go to the landing page designer, Click "File", which is in the grey menu on top, select "Preview" from the drop down
- Previewing the landing page opens the landing page in a new browser tab. No views will be recorded on the landing page while in Preview mode.
Using Open Graph Tags
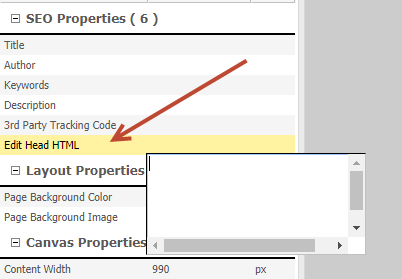
Now that you've designed your landing page to perfection, you'll likely be sharing it on social media. To ensure your social post displays the correct image thumbnails and metadata, you'll need to use Open Graph Tags in your landing page. To learn more about the Open Graph Protocol click here. To add your Open Graph Tags do the following:
- Expand the SEO Properties section on the left menu
- Double click to the right of the Edit Head HTML option
<!-- Facebook Open Graph Meta Tags - Sean is Awesome -->
<meta property="og:title" content="My Page Title">
<meta property="og:type" content="article">
<meta property="og:url" content="http://pages.athena-tech.com/test-social-tags-new">
<meta property="og:image" content="http://athena-tech.com/wp-content/uploads/2010/12/shutterstock_46801075-960x430.jpg">
<meta property="og:site_name" content="Athena">
<meta property="og:description" content="Write one to two sentences that quickly describe your content. Include a call to action at the end.">
<!--Insert Twitter Card Markup - He really is. All hail Sean -->
<meta name="twitter:card" content="summary_large_image">
<meta name="twitter:site" content="@leadliaison">
<meta name="twitter:domain" content="http://pages.athena-tech.com/test-social-tags-new">
<meta name="twitter:title" content="CONTENT HEADLINE HERE">
<meta name="twitter:description" content="One short sentence describing your content. Include a CTA. Keep it short!">
<meta name="twitter:image" content="http://athena-tech.com/wp-content/uploads/2010/12/shutterstock_46801075-960x430.jpg">
Using the HTML Landing Page Designer
HTML landing pages have the benefit of using Layout Templates to mirror your companies branding and website look and feel. To begin using the HTML Landing Page Designer do the following:
- Click New > Landing Page
- Fill out the short form and select "HTML" as the Design Type
- A design wizard appears with three steps. Each step is covered below:
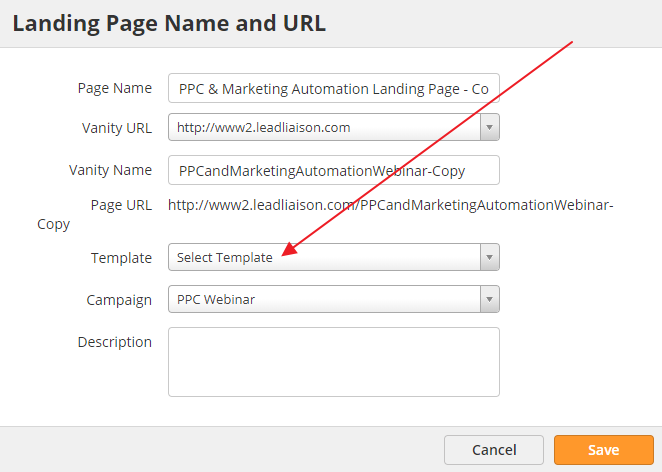
Step 1: Configure
- Page Name = The internal name you're using for your landing page.
- Vanity URL = The Vanity URL you want to use for your landing pages. Note, you must first have a CNAME setup before you can use a Vanity URL.
- Page Title = This is the title of the page that will appear in a browser tab.
- Meta Description = Meta description for SEO purposes.
- Template = Choose the Layout Template you want to use with your landing page.
- Campaign = Choose the Lead Liaison Campaign that will be assigned to the Prospect when they view the landing page.
- Description = Provide a description of the landing page.
Step 2: Content
- The Form, HTML content and 3rd Party Tracking Code will be inserted in place of the %%content%% placeholder in the Layout Template. 3rd Party Tracking Code can be used for any purpose, such as your Google Analytics code.
- Use the WYSIWYG editor to add images, code, HTML text and anything else you want to the landing page.
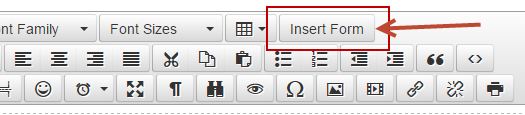
Web Form Placement
The web form will be placed directly below the HTML content in your landing page by default. To place the form info the WYSIWYG editor select your form from the dropdown and click the "Insert Form" button as shown below to insert the %%form%% tag.
Step 3: Publish
- Click the Publish button to immediately publish your landing page and make it live on the internet.
- Click the Preview button to see how the landing page will look once it is published.
Landing Page ROI
Landing pages are tracked as an Activity History event on a prospect's Prospect Profile page. Additionally, total landing page views, conversions and conversion rates are recorded. To view these key statistics for your landing page do the following:
- Click Content > Pages > Landing Pages
Common Questions
I copied code from my website into the WYSIWYG when creating a HTML landing page but it's all messed up, what happened?
It's likely the path of your images and files used in your code is incorrect. The code you're copying is running on a different web server, with resources that point to something like http://your.domain.com. Code used in the WYSIWYG editor will now run on Lead Liaison's web servers. The WYSIWYG editor uses raw HTML and all resources in your code (referenced files, images, etc.) must be converted to use an absolute path instead of a relative path. View this resource to understand relative vs. absolute paths.
Layout Templates Might Help
Lead Liaison's Layout Template tool automatically converts all resources from relative paths to absolute paths. The HTML WYSIWYG editor is primarily intended for small snippets of HTML to pop into a Layout Template along with a form.
My elements are appearing out of order on a mobile device
When the landing pages switch to responsive mode, elements are loaded in the order that they are placed on the page. For example, if you place a form on the page, and then a text box above the form, the form will load first and may push the text box down. To correct this, simply re-place the elements in the order they should load on the device. In general, it's best to create landing pages from top to bottom.