Introduction
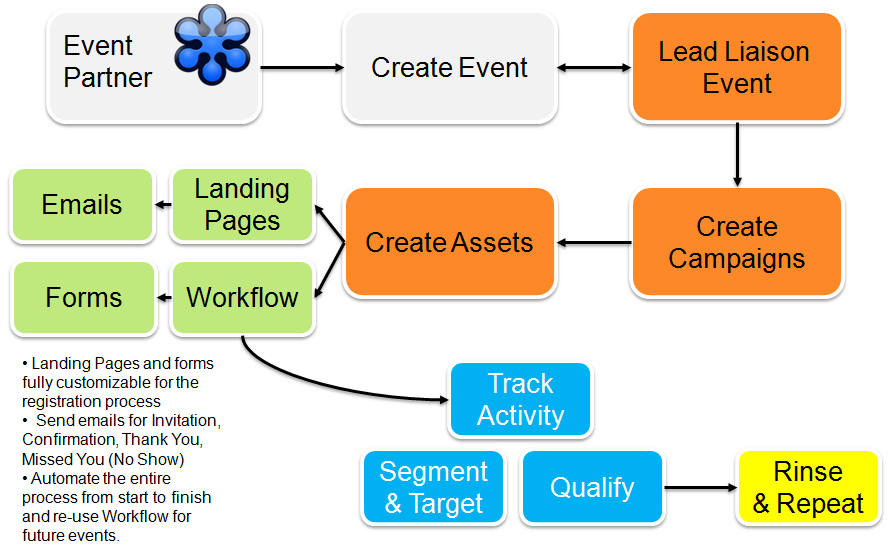
Lead Liaison's GoToWebinar integration allows customers to fully automate and repurpose events using our Event Connector. Customers manage their webinar by creating a Lead Liaison Event and adding all Prospects in the event into a Lead Liaison Campaign, or adding them into a Lead Liaison Campaign depending on event status. Registration information is captured from a Lead Liaison landing page hosting a form, a standalone form, or pulled in directly from GoToWebinar. As event members change status from register, attend, don't show, etc. their status is updated and captured in Lead Liaison.
Customers can automate the entire process, from invite to registration confirmation, to short-term follow up and long-tail communication using Lead Liaison Workflows. Thankfully, customers no longer have to manually send out webinar invitations, reminders and follow ups all while trying to time their communication around the event. With Lead Liaison's GoToWebinar integration customers pre-configure all aspects of event communication and launch the Workflow ahead of time, removing stress around the event. The process is automated from end-to-end.
Additionally, instead of incorporating email-only invitations and follow up, customers can now include multi-channel communication (postcards, gifts, print material, etc.) and use a members status to pull reports or slice and dice their database to retarget prospects and customers.
Lead Liaison provides the following Event statuses. Note the suggested emails to prepare for each status to ensure your webinar is well managed from start to finish.
| Event Status | Suggested Email | Equivalent GoToWebinar Status | Notes |
|---|---|---|---|
| Invited | You're Invited | N/A | This is a Lead Liaison only status and not a status in GoToWebinar. |
| Registered | You're Registered | Approved | Make sure to understand your approval mode in GoToWebinar. Check if it's automatic or manual. |
| Pending Approval | Your Event Registration is Pending Approval | Waiting | Changes made in Lead Liaison will not get sent to GoToWebinar; however, if status is set to "Waiting" in GoToWebinar then this status will appear as Pending Approval in Lead Liaison. If the registrant does not exist in GoToWebinar and the status is set to Pending Approval in Lead Liaison then GoToWebinar will return a removed response and the status in Lead Liaison will be updated to Removed. |
| Wait List | We've Added you to the Wait List | N/A | This is a Lead Liaison only status and not a status in GoToWebinar. |
| Rejected | Sorry, Your Registration has been Rejected | Denied | Changes made in Lead Liaison will not get sent to GoToWebinar; however, if status is set to "Denied" in GoToWebinar then this status will appear as Rejected in Lead Liaison. If the registrant does not exist in GoToWebinar and the status is set to Rejected in Lead Liaison then GoToWebinar will return a removed response and the status in Lead Liaison will be updated to Removed. |
| Removed | Your Registration has Been Removed | Changes made in Lead Liaison will not get sent to GoToWebinar; however, if the status at Lead Liaison was Registered, Pending Approval or Rejected and the Prospect was removed from GoToWebinar by the user or registrant (cancelling the registration) then the status will be updated in Lead Liaison to Removed. | |
| Reg Error | A Registration Error Occurred | N/A | Appears when no name or email was used when the contact registered for the webinar. Changes made in Lead Liaison will not get sent to GoToWebinar. |
| Attended | Thanks for Attending! | Attended | |
| No Show | Sorry we Missed you! | Not Attended | When an event is finished Lead Liaison imports the list of attendees every 2 hours for 2 straight days. After this period, registered Prospects not marked as "Attended" will be marked as "No Show". |
Features and Benefits
Feature | Benefit |
Automatically add Prospects from Events | More efficient with less data entry and easier follow up |
Automate invitation and follow up | Create rich workflows leading up to and after the event |
Segmentation | Target all attendees for relevant messaging and stronger relationships |
Scoring | Automatically qualify attendees for sales |
Activity history | More sales intelligence (who attended, didn’t show, etc.) |
Cloning | Save an enormous amount of time on your events. Systemize the process for common and consistent event management. |
Setting Up a GoToWebinar Event (Summary)
Here's a summary of how Lead Liaison can be used to get more out of your GoToWebinar event and help automate the process. All assets described in the overview below, including emails, forms, landing pages and automation can be built with Lead Liaison.
- Create a registration web form, map fields, add it to a landing page and then publish it.
- Build an invitation email with the link of the landing page in the email.
- Build a registration confirmation email and add the prospect Join URL token to the email.
- Set up an "Invitation Workflow" and select your invitees.
- At the Define Actions page add a "Change Event Status" action to change the event status to "Invited" and send the invitation email in #2 above.
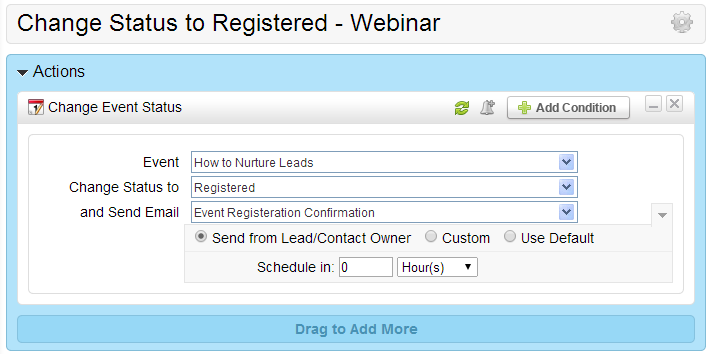
- Set up a behavior-based automation to match people who submitted the web form setup in #1 above. The Automation action would be "Change Event Status" to "Registered" and send a registration confirmation email as described in #3 above.
- In the Automation, add a "Wait Until Date" action for 1 to 2 days after the webinar. Next, add a Send Email action with two conditions. One condition to check if the status is "Attended" and send a follow up email. The second condition to check if the status is "No Show" and send a "Missed You" email.
- Rinse and repeat for your next webinar!
Setting Up a GoToWebinar Event (Detailed Walk Through)
Setup a Trial Account
We suggest setting up a trial GoToWebinar Account or a trail Webinar and running a full life cycle on the test webinar before launching your official event. This will give you good experience before going live.
The instructions below explain how to setup and automate an Event Workflow using GoToWebinar.
Step 1: Create a Campaign
Lead Liaison Campaigns are used with GoToWebinar Events in two ways. First, any member of an Event, or a member based on event status (i.e. registered), can be associated with a specific Campaign. Second, a Campaign can be assigned to all new and existing Prospects created in Lead Liaison after being imported from GoToWebinar (see Step 2) or added to the GoToWebinar events. Campaigns help marketers measure ROI and attribute sales to their marketing efforts. If the GoToWebinar Event is the Prospect's first campaign touch then a First Touch Campaign will be recorded.
Learn how to create Lead Liaison Programs/Campaigns here.
Step 2: Connect Your GoToWebinar Account(s)
Connect Multiple Accounts
Multiple GoToWebinar accounts may be connected to Lead Liaison.
To setup your GoToWebinar account do the following:
- Go to Settings > Integrations > Connectors
- In the GoToWebinar section click the "Connect more" button
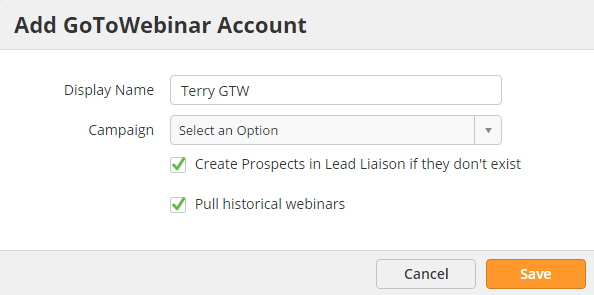
- In the popup, choose your settings for the GoToWebinar Connector
- Display Name = The internal name for the GoToWebinar account
- Campaign = The Lead Liaison Campaign assigned to any Prospects created via syncing with GoToWebinar or already existing in Lead Liaison. The Campaign is also assigned to any Prospects added to any GoToWebinar event. Campaign assignment can also be done based on the Prospect's status (i.e. registered) in the event.
- Create Prospects in Lead Liaison if they don't exist = If the Prospect is not in Lead Liaison they will automatically be added as a new Prospect when the system imports registrants from webinars in the GoToWebinar account.
- Pull historical webinars = Loads all historical webinars which includes webinars created before connecting the account. Note, we do not import the list of registrants with historical webinars. This is a limitation of the GoToWebinar API.
- Click the Create Connector button
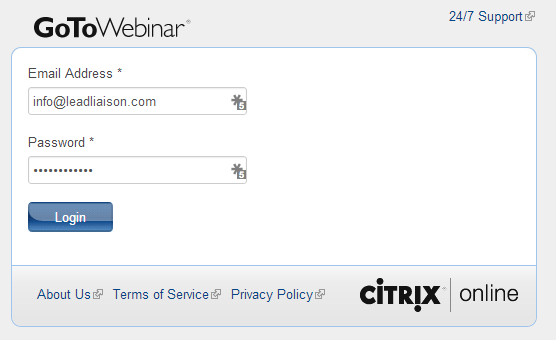
- Enter your GoToWebinar credentials
- Click the Login button
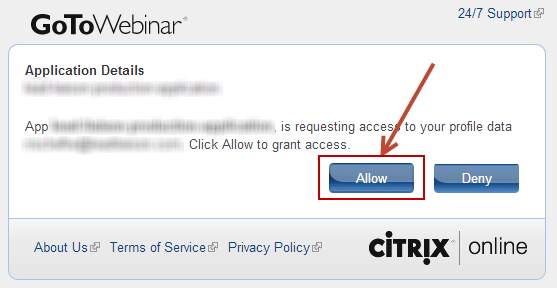
- Click the Allow button
- You'll be redirected back to Lead Liaison.
- Congrats! Your GoToWebinar account has been connected to Lead Liaison.
Step 3: Create a New Lead Liaison Event and Link it to your Webinar
Create a new Lead Liaison Event and associate it with your GoToWebinar event by doing the following:
- Go to New > Event
- Setup your Event
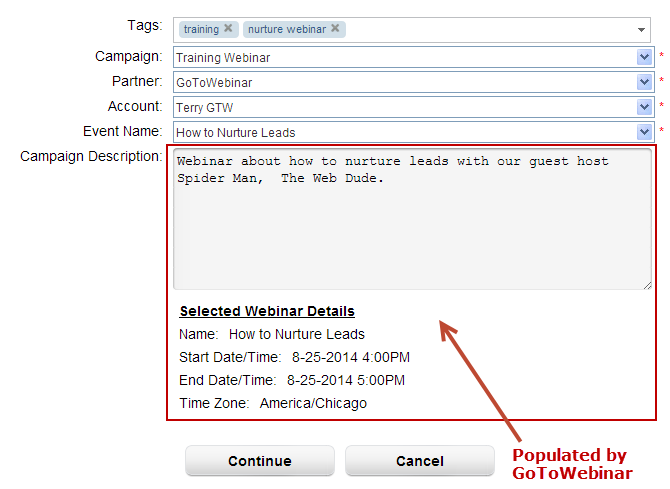
- Tags: Tag your Event. Tags make it easy to find events later on.
- Campaign: Members of the Event, or members based on event status (i.e. registered), are added to this Lead Liaison Campaign.
- Partner: Choose your Event partner, in this case GoToWebinar.
- Account: Choose the GoToWebinar account you'd like to use for your Event.
- Event Name: Once you choose the Partner and Account the Event Name field will be populated with Events from your GoToWebinar account. If you don't see any GoToWebinar events in the drop down make sure to "Sync Events" (see Configuring GoToWebinar Accounts below).
- Campaign Description: Populates with the description of the event as entered into GoToWebinar.
- Once you select your webinar Lead Liaison will pull in the Campaign Description and webinar details as shown below.
- Validate your webinar information and proceed to the next step.
Step 4: Setup Registration Workflow
Turning Off GoToWebinar Emails
To have more control over the emails you send and use multi-channel marketing workflows for specific phases make sure to turn off the automatic GoToWebinar emails for different stages of the webinar. To do that, do the following:
- Login to GoToWebinar
- Go to My Webinars
- Click the Title of your webinar
- Go to the Emails section
- Edit the status of emails for each stage you want to control with Lead Liaison instead of GoToWebinar
You can use one of three options to register your audience.
- Option 1: Use a Lead Liaison form. Send people an invitation email pointing them to a Lead Liaison registration form. When the form is submitted run a Workflow to change the person's Event Status to Registered and use Workflow to automatically move them through the webinar process.
- Option 2: Use GoToWebinar. When people register directly through GoToWebinar registrants will automatically be pushed into Lead Liaison. Note, GoToWebinar allows additional registration form fields; however, Lead Liaison will only import First Name, Last Name and Email Address. If you need to capture the additional form data for your event we suggest using a Lead Liaison web form with an optional Landing Page.
- Option 3: Use both a Lead Liaison form and GoToWebinar form to register your audience.
Option 1: Use Lead Liaison to Register Attendees
Create Your Registration Assets
Most events follow a certain flow, as follows: Registration => Confirmation => Attendance/No Show => Thank You => Future Communication. It's a good idea to build communication with your audience around each phase of your event. In the example below, we'll use email as our means for communication and create a landing page with a form using Lead Liaison to accept registrations for the webinar.
Create Your "Thanks for Registering" Email
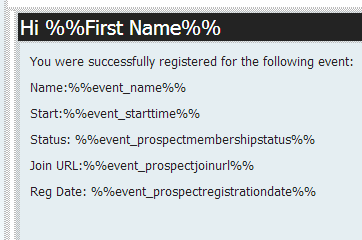
Create an email that you'll send to new registrants. Make sure to include the Join URL, which is what the registrant will click to join the webinar on the day and time of the event.
Associating an Event with an Email
When sending your email to your Prospects with the Send Email action in Automation, associate the Event with the email to insert event-specific data in place of your merge fields. Do this by using the Use Event dropdown in the Send Email action as shown below.
Create Your Registration Form
Design your web form in Lead Liaison by doing the following:
- Go to New > Web Form
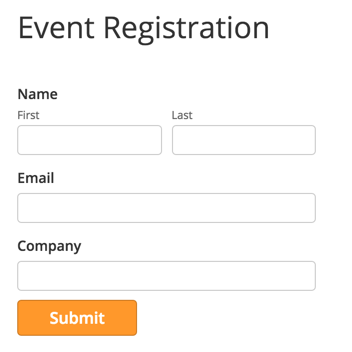
- Make sure to include name and email fields. Any extra fields are optional.
- Your registration form might look similar to the one below
- Map your form fields to Lead Liaison fields.
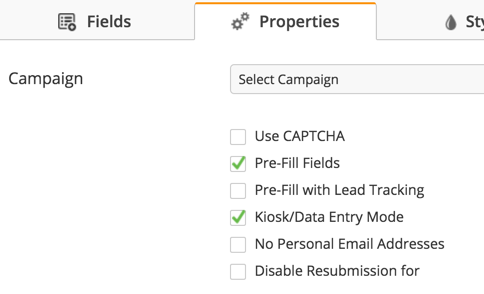
- Turn on Kiosk/Data Entry Mode on the form. Often times one person will register multiple people in their company for an event. If this happens, you'll face issues with registrations unless you put the form into Data Entry Mode.
- Add an internal alert to notify your team when someone signs up for a webinar
Avoid Step 3
Don't do anything in Step 3, unless you want to add your attendees into a special contact list.
Add Your Form to a Lead Liaison Landing Page (Optional)
Build a landing page and embed your web form into the landing page. To learn about building landing pages visit the documentation area here.
Setup an Automation to Change Event Status to Register
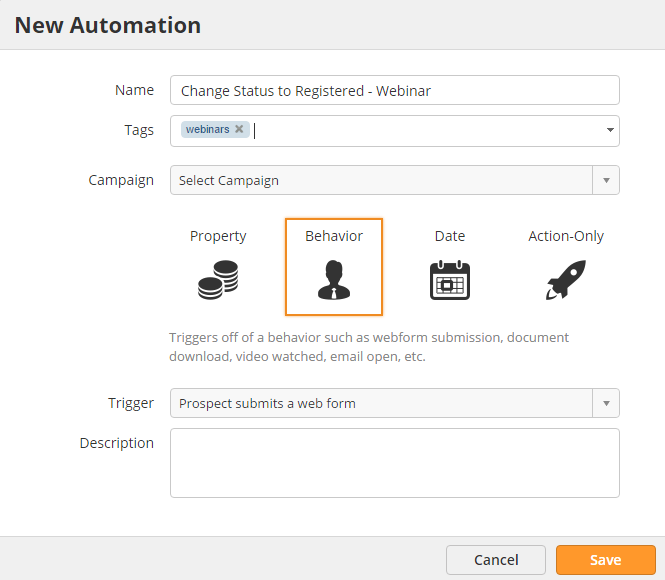
For this step we'll create a behavior based automation. The Automation will detect the web form submission and allow you to update the Prospect's status to Registered. Note that Prospects run through a Workflow only one time unless a Future Event is added to the criteria. When you use a Spark it abstracts the registration process and makes it easy to reuse the registration process for future webinars.
- Go to New > Automation
- Select Behavior
- Select Criteria as "Prospect submits a web form"
- In Step 1 of the automation, select the web form you're using to register attendees.
- Keep in mind you could re-use this asset by adding additional event registration forms using the green plus (as shown below). Each time you create a new web form update the Automation.
- In Step 2, use the Change Event Status action to update the status of the Event and send your Event Registration Confirmation email simultaneously.
Option 2: Use GoToWebinar to Register Attendees
Setup a Registration Workflow
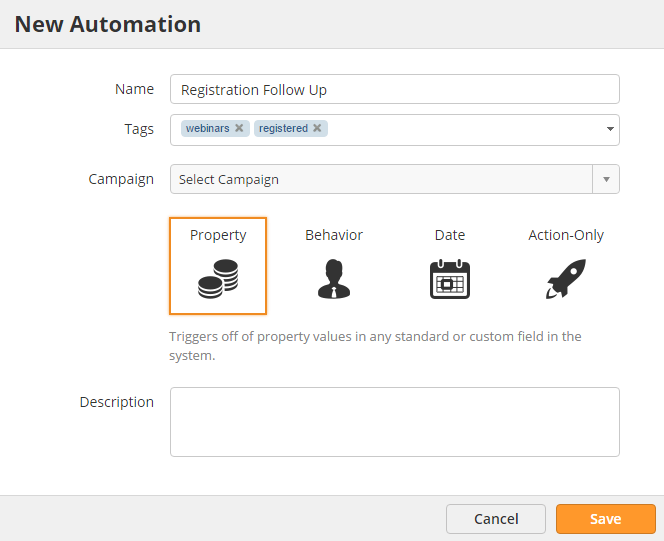
- Go to New > Automation
- Configure your automation
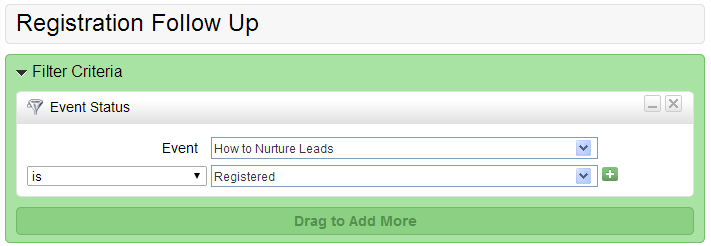
- In Step 1 we select the criteria of the event as Registered
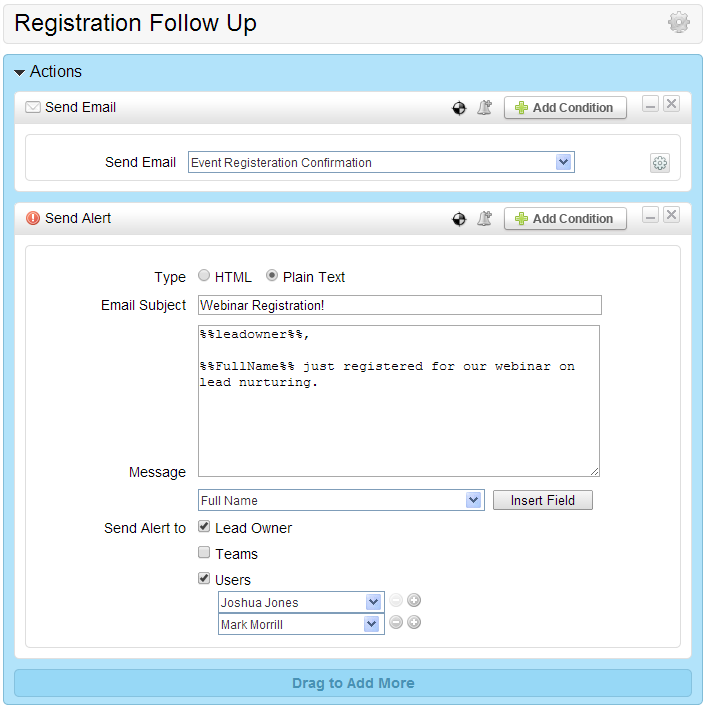
- In Step 2, we highlight the power of controlling the registration experience with Lead Liaison. In this example, we'll add an additional action to send an alert to the Lead Owner and members of our team letting them know someone registered for our upcoming webinar.
Option 3: Use GoToWebinar and Lead Liaison to Register Attendees
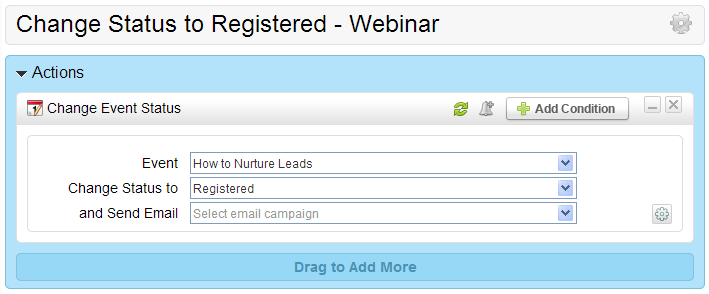
Follow the same procedure in Option 2 and in Option 1; however, in Step 2 of Option 1 don't send an email as part of the Change Event Status action since this email will be sent by the Workflow that governs the Registration status for the event. Your Change Event Status action should look similar to the one below.
Step 5: Build Out Mid-Stage Event Emails and Workflow
It's important to invest time upfront to build nice looking emails since your emails and the workflow you build around them can be reused for future events. We suggest creating an email for event stages where you want to communicate with your audience. Below is a list of the stages (or status) a person might go through during a typical Event and the suggested email to use for each stage.
At this step in the process, we've already built out our Invited and Registered emails. Now, let's build out an email for each of the additional phases discussed in the Introduction section of this documentation.
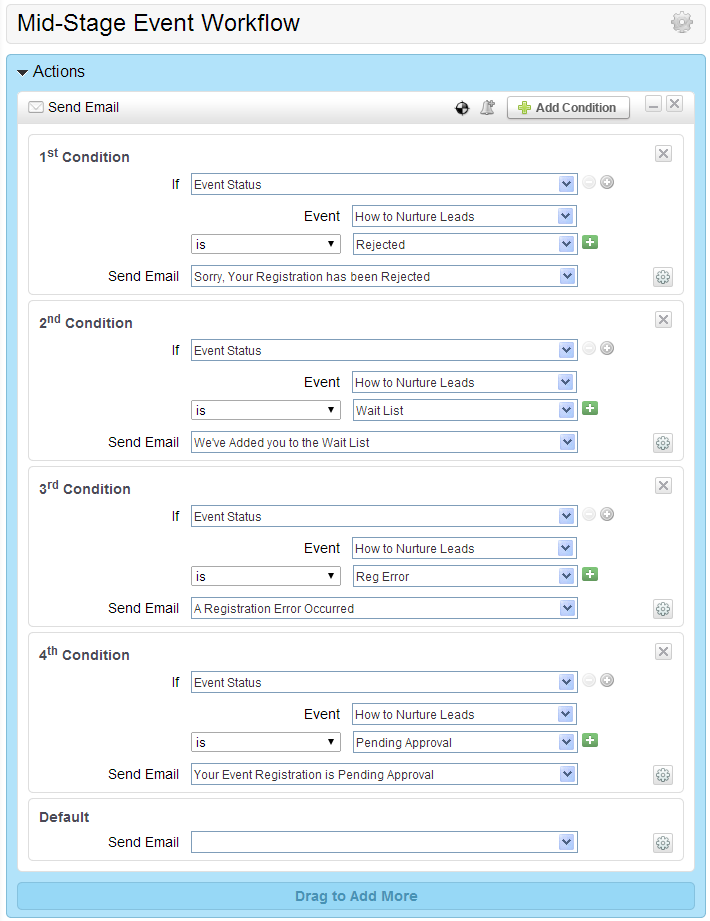
For the Pending Approval, Wait List, Rejected and Reg Error statuses we'll build the following Workflow which can be re-used for future Events. After the Event we can suspend the Workflow and clone it for the next Event.
Tip: Prospect's Pass Through a Workflow Only Once
Keep in mind that Prospect's pass through a Workflow only one time. In other words, the same Prospect cannot go through the same Workflow more than once. For this reason, you should clone the Workflow and re-use it for your next Event.
- Go to New > Automation
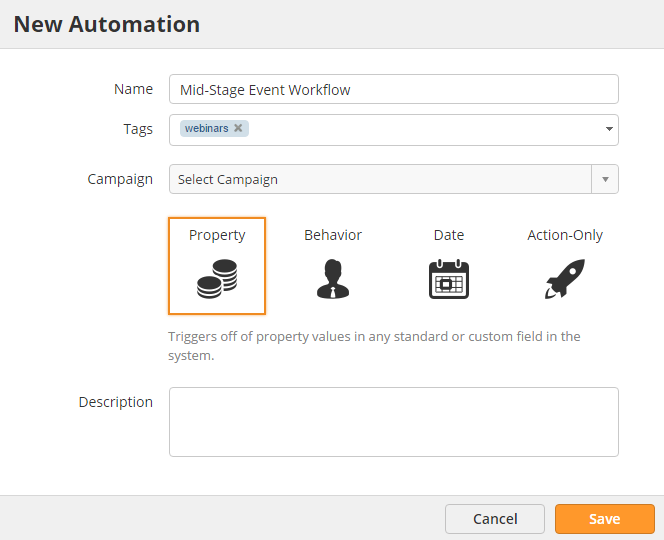
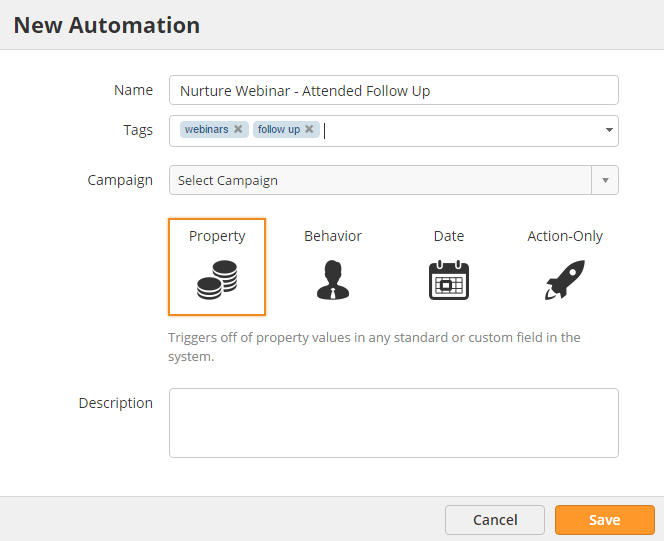
- Fill in the details of the Workflow
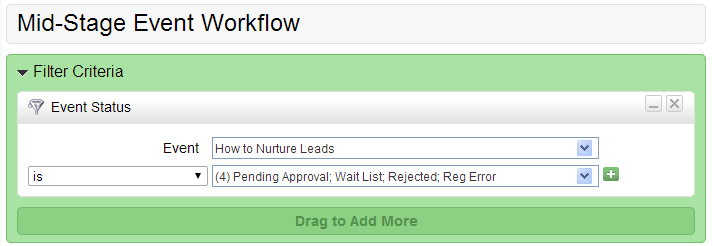
- In Step 1, we'll add our first webinar Event and look for people in the Event who are in the four stages we discussed.
- In Step 2, we use the Send Email action along with four conditions to manage each of the middle-stage event statuses.
Step 6: Setup Post-Event Workflow
Build Lead Liaison Workflow for the end of your event based on people that Attended and were No Shows.
Consider Multi-Channel Communication
You could easily add postcards, tactile marketing items, text messages and other forms of marketing to communicate with your audience instead of traditional email messages.
- In the example below we create a Workflow for people who attended the Event. You could easily build a similar Workflow for people that had a status of No Show. You might consider making these people aggressive offers or following up with a recording of the webinar so they could watch it later.
- Go to New > Automation
- Configure your Workflow
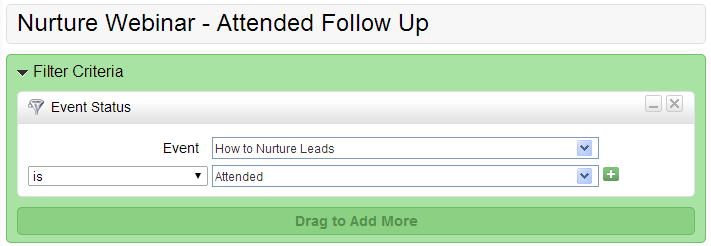
- In Step 1 we add the criteria for people who attended the Event.
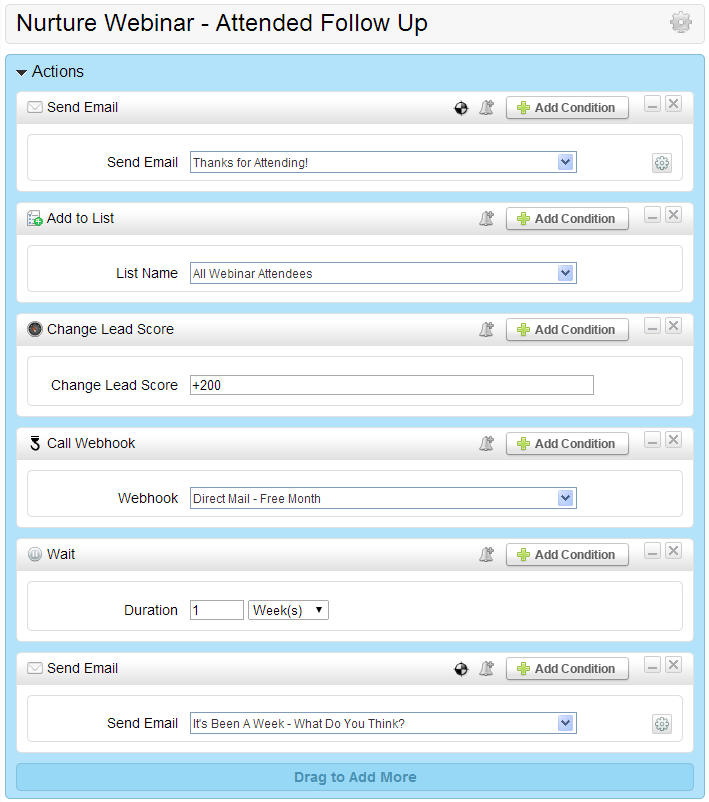
- In Step 2, we'll thank the person for attending, add them to our master webinar list, increase the lead score by several hundred points, send them a postcard for a discount on our services, wait a week and then follow up letting them know it's been a week and we'd love their feedback.
Step 7: Invite Your Audience
In this step we'll create an invitation email with the webinar details then build a workflow to send out the invitation email and update the invitees status to "Invited". We do this step last to make sure all the other pieces of the Event are assembled before inviting our audience.
Create the Invitation Email
Lead Liaison includes a number of mail merge fields to make it easy to insert information about the person and the webinar into an email. More importantly, a single email needs to be created which can be reused for future Events. To learn how to create an email in Lead Liaison read the instructions here. In the example below, we'll create an invitation email which we'll use to send to a targeted list of folks and invite them to our webinar.
- First, create your email as shown in the instructions above.
- Insert mail merge fields for your webinar. Event mail merge fields are described below:
- Event Name : The imported event name
- Event Description: The imported event description
- Event Start Time: The event start date time
- Event End Time: The event end date time
- Event Time Zone: The event time zone
- Event Registration Key: The event registration key, which is a unique identifier for the event and used to generate the registration URL.
- Event Registration URL: The event registration URL. Prospects can use this to register to the event if your registration process will be done through GoToWebinar instead of your landing page or a Lead Liaison landing page.
- Prospect Join URL: The Join URL to join the event when it starts
- Prospect Membership Status: The Prospect's current Event Status in Lead Liaison.
- Prospect Register Key: The Prospect's unique registration key for the event. Used to identify the Prospect's registration to the event.
- Prospect Registration Date : The date the Prospect registered for the Event.
Associating an Event with an Email
When sending your email to your Prospects with the Send Email action in Automation, associate the Event with the email to insert event-specific data in place of your merge fields. Do this by using the Use Event dropdown in the Send Email action as shown below.
Create the Invitation Workflow
In this step we'll build a Workflow to invite certain people to the webinar, send them the invitation email we just prepared and then update their status to Invited.
- Go to New > Automation
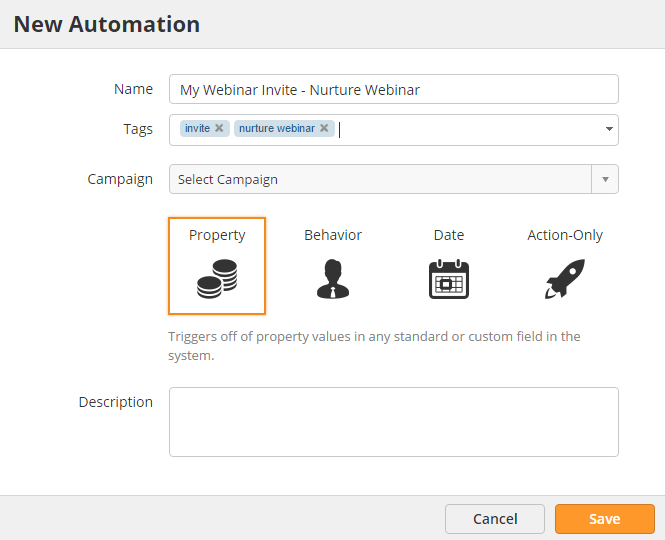
- Add the details for your Workflow
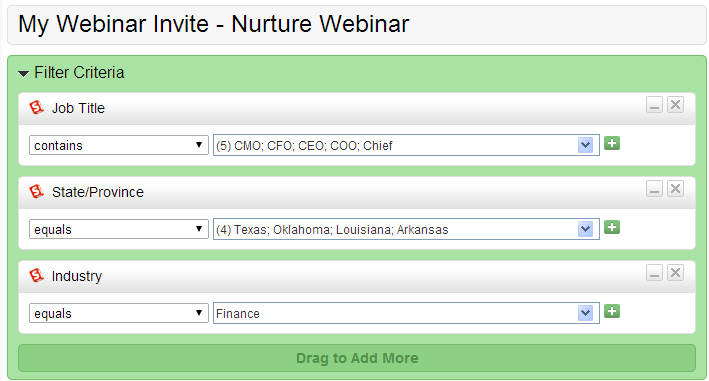
- In Step 1, add the criteria for the people you want to invite to the webinar event. Select from a combination of social, behavioral and demographic information. You could also invite people from past events using the "Event Status" filter. In this scenario, we'll invite people who are C-Level folks in the finance industry. Since our webinar is targeting financial institutions in South Central region we'll target Texas, Oklahoma, Louisiana and Arkansas for this smaller event.
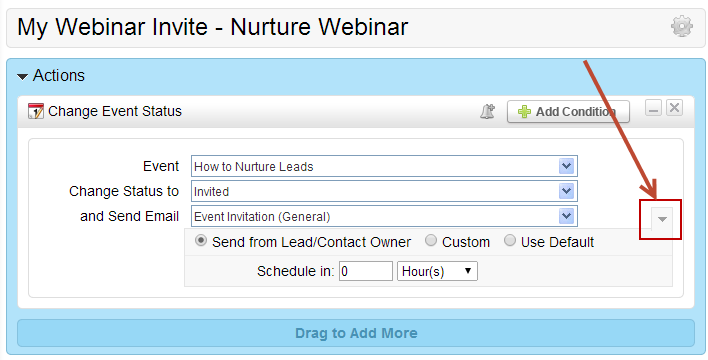
- In Step 2, we'll add the Change Event Status action, select our Event, change the status of the people we're inviting to Invited and send them the invitation email we built in the prior step.
- Make sure to click the gear next to the email to send the email from different people. For example, to send the email from a salesperson (Lead/Contact Owner) use the first option. To send the email from a marketing person use the "Custom" option.
- In Step 3, you can activate your Workflow immediately or schedule to run it in the future. In other words, you might want to plan the day and time in which your webinar invitation will go out.
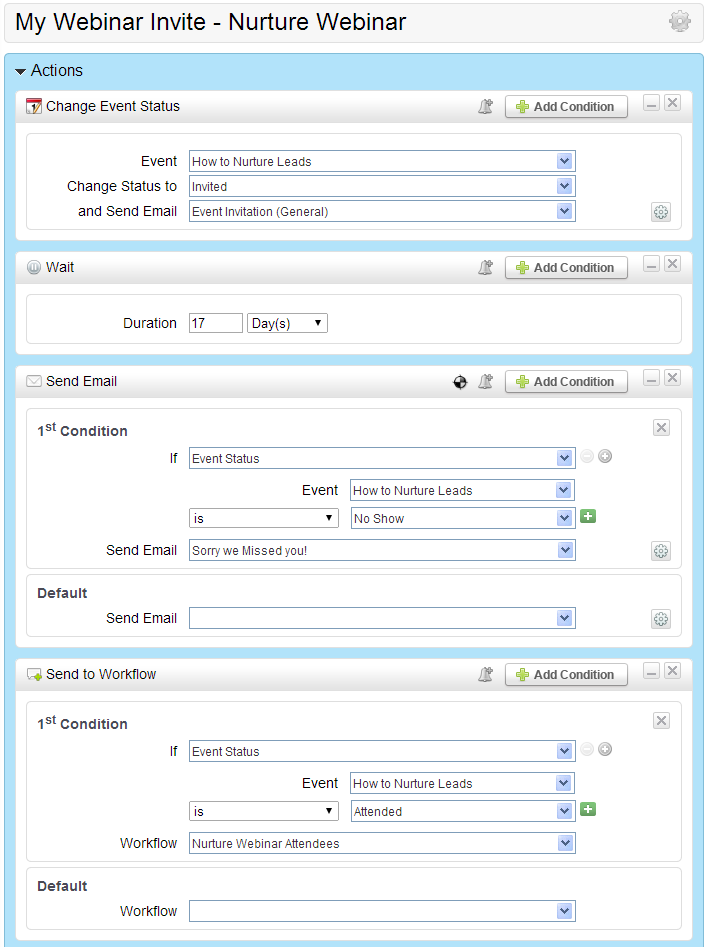
- The screenshot below shows another way to follow up with your audience. Instead of creating independent No Show and Attended Workflow you could combine these steps with your invitation email. In the example below, we schedule the invite Workflow to go out two weeks before the event and check the status of the people we invited three days after the end of the event (hence the Wait 17 days action).
Managing Your Events
Viewing Events
To view your events in one area do the following:
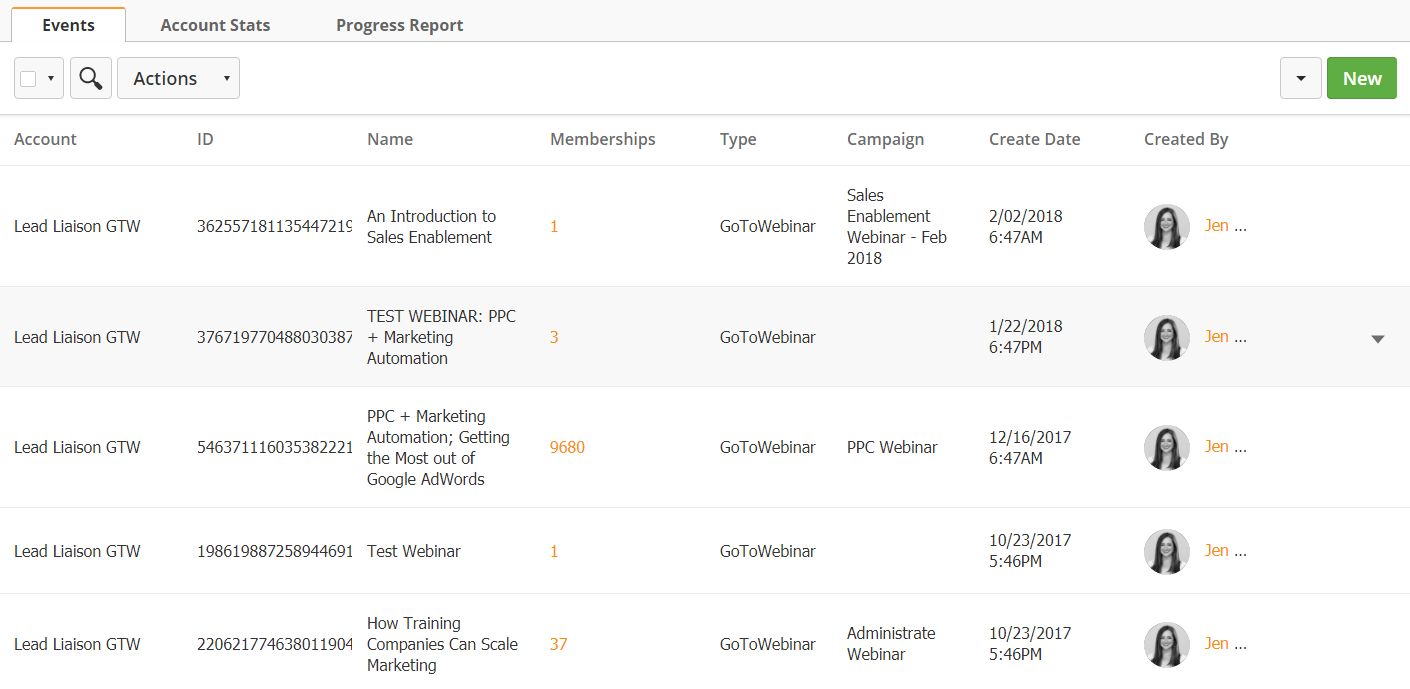
- Go to Content > Events
- Under the Type column select GoToWebinar
- Columns are explained below
- Account = The GoToWebinar Account used for the Event
- Name = Name of the Event
- Memberships = Prospects currently in the Event in any status
- Type = Event type
- Campaign = Default Lead Liaison Campaign assigned to new Prospects imported into Lead Liaison from your webinar Event, or by event status (i.e. registered).
- Create Date = Date and time the Event was created
- Created By = Person who created the Event
- Actions = Tag the Event or view the Event Schedule
Renaming Events
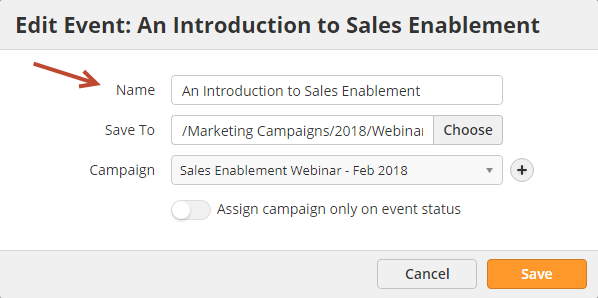
- To change the name of your Lead Liaison Event, click the pencil icon next to the Event as shown in the screenshot above. If you do not see the pencil icon then the you'll need to create a Lead Liaison Event and associate it with your GoToWebinar event. In the popup, change the name of your event using the Name field as shown below.
Changing Event Name in GTW
When changing the name of an event inside GoToWebinar, the new name will only show in Lead Liaison if the event is not linked to a Lead Liaison Event. If the event is linked to a Lead Liaison Event (from the Add Event popup), then the name provided in the popup will be used. The Lead Liaison Event name can also be changed by editing the event as shown above.
Manually Changing a Prospect's Event Status
There may be times when you want to move a person to the Wait List, perhaps there's no more room. Similarly, what if one of your competitors register, you might want to Reject their registration. To change a Prospect's Event status do the following:
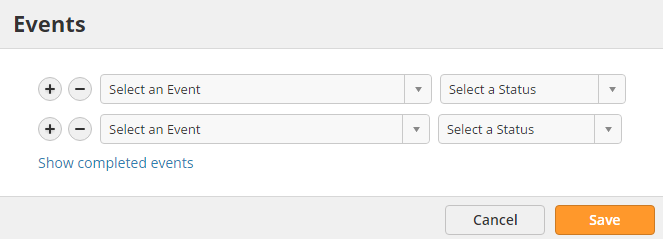
- Go to the Person's Prospect Profile
- Click the Events link on the top of the page
- Alternatively, from the Memberships page (clicking any number when managing Events), click the gear and select Events
A Prospect's Event Status has different levels and definitions as shown below. When changing the status of a Prospect within an event, the status can not change to another status in a lower level. The new status must be in the same or greater level than the old status. For example, if the status is "Wait List" then it can change to "Pending Approval" or "Registered"; however, it can not change to "Invited".
Level 0: "No Status" and "Removed"
Level 1: "Invited"
Level 2: "Pending Approval", "Wait List" and "Rejected"
Level 3: "Registration Error" and "Registered"
Level 4: "Attended" and "No Show"
Reporting on Events
To view a report of all your Events do the following:
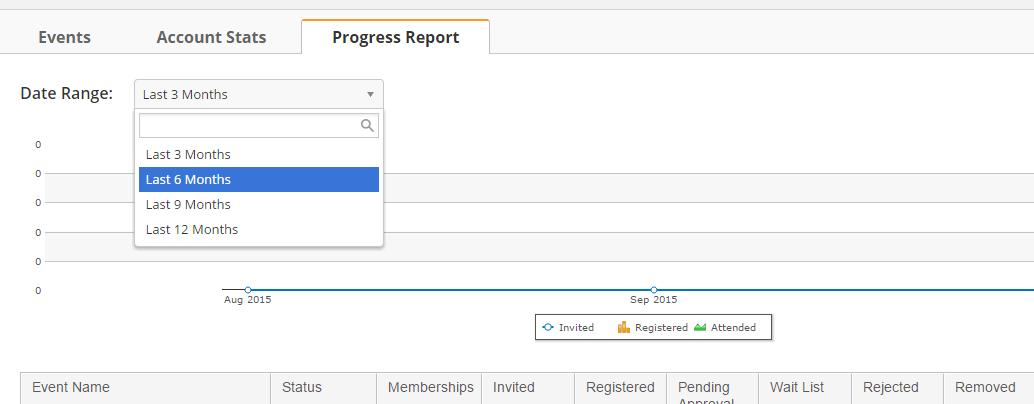
- Go to Content > Events
- Select a timeframe for which you want to run your report
- The graph at the top shows statistics for all people in the Invited, Registered and Attended status for all events.
- Drill down and look at statistics for one account, click the Account Stats tab. Then click the number under the Events column for the account you'd like to drill down into.
Scoring Event Activity
Lead Liaison can automatically score people that Register, Attend and are a No Show for your Events. Default lead scores are:
- Registered: +100
- Attended: +200
- No Show: -100
To view default scores or change them do the following:
- Go to Settings > App Setup > Lead Qualification > Lead Scoring
Tracking Event Status
Each time a Prospect's Event status changes, from Invite to Attended/No Show and anything in between Lead Liaison records this activity in the Activity History section on the person's Prospect Profile. When a status is recorded it will look similar to the screenshot below:
Tips
- When setting up your automation and you're ready to schedule and run it have it run for the period around the event. This will avoid running the automation outside of the event and minimize any potential issues if statuses change outside the timing of an event.
- Use AddToCalendar to insert calendar invite links into your registration confirmation emails. Use the "Just fill in the form" option as shown in the screenshot below.
Configuring GoToWebinar Accounts
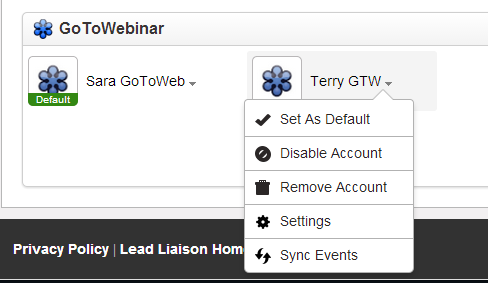
To configure your GoToWebinar account go to Settings > Integrations > Connectors. In the GoToWebinar connection click on the GoToWebinar account you want to configure. As shown in the screenshot below a settings menu appears. Options are explained below:
- Set As Default = Sets the GoToWebinar account as your default account. Default accounts appear in dropdowns by default.
- Disable Account = Removes the account and associated webinars from Lead Liaison dropdowns.
- Remove Account = Removes the account from Lead Liaison
- Settings = Accesses the original settings used when setting up your GoToWebinar account (creating new Prospects, pull in historical events, assign Campaigns to new Prospects, changing the Display Name).
- Sync Events = Syncs new webinars from your account in real-time. Use this option if you need webinar information to appear in Lead Liaison immediately after creating a webinar.
Usage Notes
- Syncing with GoToWebinar:
- Each Lead Liaison customer has their GoToWebinar accounts synced twice every day at 00:47 and 12:47 Central US time. For a newly created webinar to show up in Lead Liaison wait until the automatic sync process runs or use the "Sync Events" option on the Connectors page to sync the event in real-time.
- Lead Liaison syncs the list of "Registration Fields" for all upcoming webinars once daily at 4:43 Central US time. Registration Fields are the list of fields that the user fills out when registering for a webinar. GoToWebinar refers to them as "Questions". We currently map the required values, which are Email, First Name and Last Name to Lead Liaison. If any changes to the Registration Fields are made in GoToWebinar they can be pushed into Lead Liaison using the "Sync Events" option on your Connector.
- Additional fields in the GoToWebinar questionnaire may be mapped to Lead Liaison Standard and Custom Fields. Please contact your Lead Liaison specialist with this request.
- Sync Schedule from GoToWebinar to Lead Liaison:
Every 30 minutes: For events that start within 2 weeks.
Every 1 hour: For events that start after 2 weeks and within 3 weeks.
Every 2 hours: For events that start after 3 weeks.
- When an event is finished Lead Liaison imports the list of attendees every 2 hours for 2 straight days. After this period, registered Prospects not marked as Attended will be marked as "No Show".
- For the "Change Event Status" Workflow action, if the action has the "and Send Email" option with a selected email campaign then the email campaign will only be sent if the Event Status was successfully changed in the Event. For example, if the action was to change the status to "Invited" however the prospect status was "Wait List" then this means the status will not change (since Invited is a status at a lower level) and the email campaign will not be sent.
If the Change Event Status action registers a Prospect for a webinar there are few cases to consider:
If the approval process in GoToWebinar is set to automatic and the registration process was successful then this will set the prospect status as Registered and schedule the email campaign.
If the approval process in GoToWebinar is set to automatic and the registration process failed (missing Prospect name) then this will set the prospect status to Registration Error and will not schedule the email campaign.
If the approval process in GoToWebinar is set to manual then the registrant will need to be approved in GoToWebinar. When the registration request is sent to GoToWebinar the Prospect's status will change to Pending Approval. Once the registrant is approved GoToWebinar will notify Lead Liaison according to the Sync Schedule and the status will change to Registered.
A Prospect's status can be changed manually or automatically in Lead Liaison. When changing status to any of the following please take note of the behavior:
Registered: If the approval process in GoToWebinar is manual then the status in Lead Liaison will change to Pending Approval until the status is updated in GoToWebinar. Once the status is updated in GoToWebinar the status will be synced to Lead Liaison according to the Sync Schedule. If the approval process in GoToWebinar is automatica the status in Lead Liaison will be set to Registered immediately.
