...
Ticket name
Type: Paid or Free
Quantity type:
Fixed: Establishes a predetermined quantity of tickets available for sale.
Group inventory: Establishes a unified total quantity across different ticket types, where the purchase of any ticket affects the overall availability, regardless of the specific ticket type bought.
Visibility:
Visible: always shown. If the ticket is unavailable, it will appear grayed out.
Visible Only When on Sale: if the ticket is unavailable, it will be hidden in the ticket menu.
Hidden: always hidden, even when available.
Quantity: total tickets available.
Show available ticket quantity: show/hide the available quantity in the Registration Center.
Min/Max Quantity: number of tickets required/allowed per purchase.
Sales Channel:
Everywhere: available on both the Registration Center and EventGen mobile app.
Online Only: available only on the Registration Center.
At the Door Only: available only on the EventGen mobile app.
If paid, the price. There is an option to enable the original price if there is a discount on the ticket price. Checking absorb fees option means that the price includes the fees and unchecking it means the fees will be added to the price. For example, if the ticket price is $50 and fees is $1, if ‘Absorb Fees’ is checked, the ticket price remains $50 and the $1 fees will be deducted from it. But if the ‘Absorb Fees’ is unchecked, the $1 is added to the $50 and the final ticket price becomes $51.
The sales channel: will this ticket be available for selling Everywhere/ Online Only/At the door only.
Sale start date: date/time for ticket to be available to purchase.
Ticket Sales End: amount of time before/after the event that sales end.
Activities and Add-Ons: the Activities/Add-Ons automatically included when this ticket is purchased.
Ticket Design: the template/info used for the ticket. See the Ticket Design section below.
Event check-in Limit:
Unlimited: attendee can check-in/out multiple times per day.
Limited Per Event: attendee has a set number of check-ins across the entire event.
Limited Per Day: attendee has a set number of check-ins per day.
Badge design: customize the design of the badges to be printed.
Badge Design
To design a badge, do the following:
click on the '+' sign.
...
Choose a name, width, and height for the badge.
Click Create.
...
You will be prompted to the Badge Designer
...
Click on the desired elements to be shown on the badge.
Click on Preview to preview the badge’s design and click on Reset to start over with a blank badge.
Once the design is complete, click Save.
Badge Designer Elements
The badge design comprises various customizable elements, categorized into three sections.
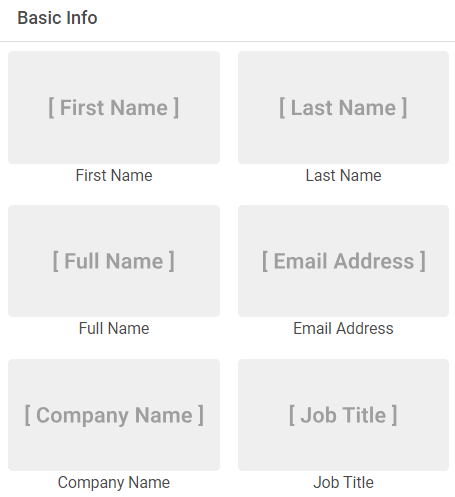
Basic Info Section:
This section contains the attendee’s information such as:
First Name
Last Name
Full Name
Email Address
Company Name
Job Title
Note:
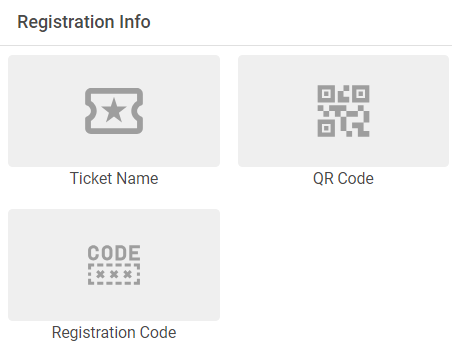
Registration Info Section:
This section contains the attendee’s registration information such as:
Ticket Name.
QR Code.
Registration Code.
More elements:
Border Box
Horizontal Line
Vertical Line
Image
...
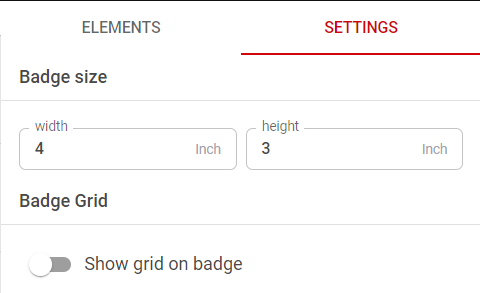
Badge Designer Settings
In the badge settings section, you can adjust the badge size by specifying the width and height. Additionally, you have the option to toggle the badge grid setting to show or hide the grid lines on the badge.
Customizing Elements:
You have the flexibility to drag and drop elements onto the badge, resize them, or delete them as needed. Additionally, you can manage typography settings, including selecting text fonts, adjusting sizes and weight, and aligning text.
...
Preview Badge Design
To preview the badge design, click on the Preview button.
...
Click anywhere outside the displayed badge to exit the preview mode.
Edit Badge Design
To edit a design for a badge, click on the Edit icon. You will be prompted to the Badge Designer. Adjust your design and then click Save.
...
| Info |
|---|
Note: you can also design a badge for all tickets on the event level. Go to Settings > General, Scroll down to Badge design, customize your design, and then click Save. |
...
Advanced Settings
You can customize both the online and onsite (EventGen mobile app) registration forms. You can ask any number of questions and map them to the Prospect Profile.
...
The ULC Form can be used as a registration form in the Event Directory. A template is created from the Registration Forms tab. Then the template is then chosen while creating or editing the ticket.
...
| Info |
|---|
The Registration forms tab is only displayed to users who have the Manage registration forms permission activated in their security profile. |
...
While creating a ticket or editing an existing one, scroll down to Advanced Settings > Forms, choose Advanced from the Form Type dropdown, choose the template from the Online registration form dropdown or the Mobile app registration form dropdown,and then click Save.
...
Ticket Design
...
If you want to hide your registration center from search engines like Google, you can disable search engine visibility here. Make sure to do this early in the process or search engines might crawl it when it first comes online.
...
first comes online.
Badge Design
Allows you to customize a design for the event’s badges.
...
Badge Scan
Configure badge scanning in the EventGen mobile app. You can allow:
Captello Tickets: tickets generated through Captello’s EventGen registration system.
Captello Badges: badges provided by Captello Hosted Events for exhibitors using the Universal Lead Capture app.
External Badges: badges provided by a third party for exhibitors using the Universal Lead Capture app.
...
Payment Gateway
Configure the event's payment account.
Cash payment
...
Self-Service Cash Payments - Allows the attendee to purchase tickets, activities, or addons using cash payments while self serving in Kiosk Mode via mobile application.
Staff- Enabled Cash Payments - Enables the option to purchase tickets using cash payments via the mobile application.
Cash payment verification
...