| Table of Contents |
|---|
Overview
...
By checking the box next to Lead Capture, you can add or remove all permissions. Press the (+) to the left of the checkbox to view the following individual options:
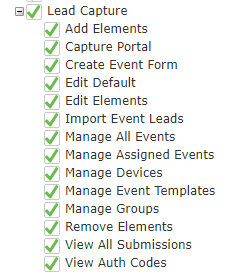
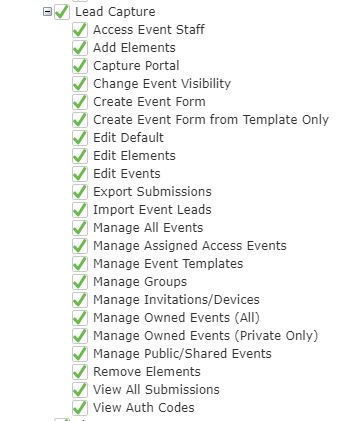
- Access Event Staff
- Add Elements – add new elements to existing Lead Capture forms.
- Capture Portal – access, complete, or delete incomplete business card transcriptions and barcode captures.Create Event Form – create
- Change Event Visibility – change the event visibility of the events user has access to
- Create Event Form – create a new form that will appear on devices.
- Create Event Form from Template Only – user must select from a template to create a new event
- Edit Default – edit only the default value of existing elements on an existing form.
- Edit Elements – edit elements on an existing form.
- Edit Events – user can edit events
- Export Submissions – export all the submissions data of the event
- Import Event Leads – mass import new submissions into an existing event.
- Manage All Events – edit or delete any event.
- Manage Assigned Access Events – edit – edit or delete only events assigned to the user.
- Manage Invitation/Devices – add or remove devices from the device list.
- Manage Event Templates – create, edit, or delete templates.
- Manage Groups – create new device groups for form assignment.
- Remove Elements – remove exiting elements from existing forms.
- View All Submissions – when using a device, see submissions from other devices.
- View Auth Codes – retrieve authorization codes for device users.
Devices
...
- Manage Owned Events (All) – view, edit or delete the events owned by the user
- Manage Owned Events (Private Only) – view, edit or delete ONLY private events owned by the user
- Manage Public/Shared Events – view, edit or delete public and shared events
Notes:
- Events with “Private” visibility can be accessed by any user that have the “Manage All Events“ permission
- Events with “Public” visibility can be access by any user who have the “Manage Public/Shared Events” permission
- Events with “Shared” visibility can be accessed by any user who have the “Manage Public/Shared Events” permission and the event is shared with the user or any assigned team to the user. - Remove Elements – remove exiting elements from existing forms.
- View All Submissions – when using a device, see submissions from other devices.
- View Auth Codes – retrieve authorization codes for device users.
Devices
View, edit, or remove devices by navigating to Event > Capture > Invitations > Devices.
...
Use the trashcan icons to delete the device from your system. Deleting a device will also prevent the user from accessing the mobile app.
Use the pencil to the pencil to edit the device's name on the device list. This is a helpful option to use if you have multiple users and will be sorting them into groups for various events.
The drop-down menu contains the following options:
- Deactivate/Activate – temporarily remove or add access to the mobile app
- Delete – delete the device
- Edit – edit the device's name
...
The drop-down menu contains the following options:
...
- Groups – manage which groups the device is in
| Info |
|---|
If the user has not activated his or her device, you can edit or resend the invitation from the Invitations tab. |
Staff Directory
Staff Directory shows a list of your team members on Captello mobile app who have access to the specific events that you're attending. For live events, this means you can view and communicate with people from your company attending the event.
Every user that has access to the event will be included in the Staff Directory. You can view your staff directory from under the settings gear on event designer page:

You can also change the status of individual staff member to available or unavailable.

In the Captello app, a Staff Directory would display like this:
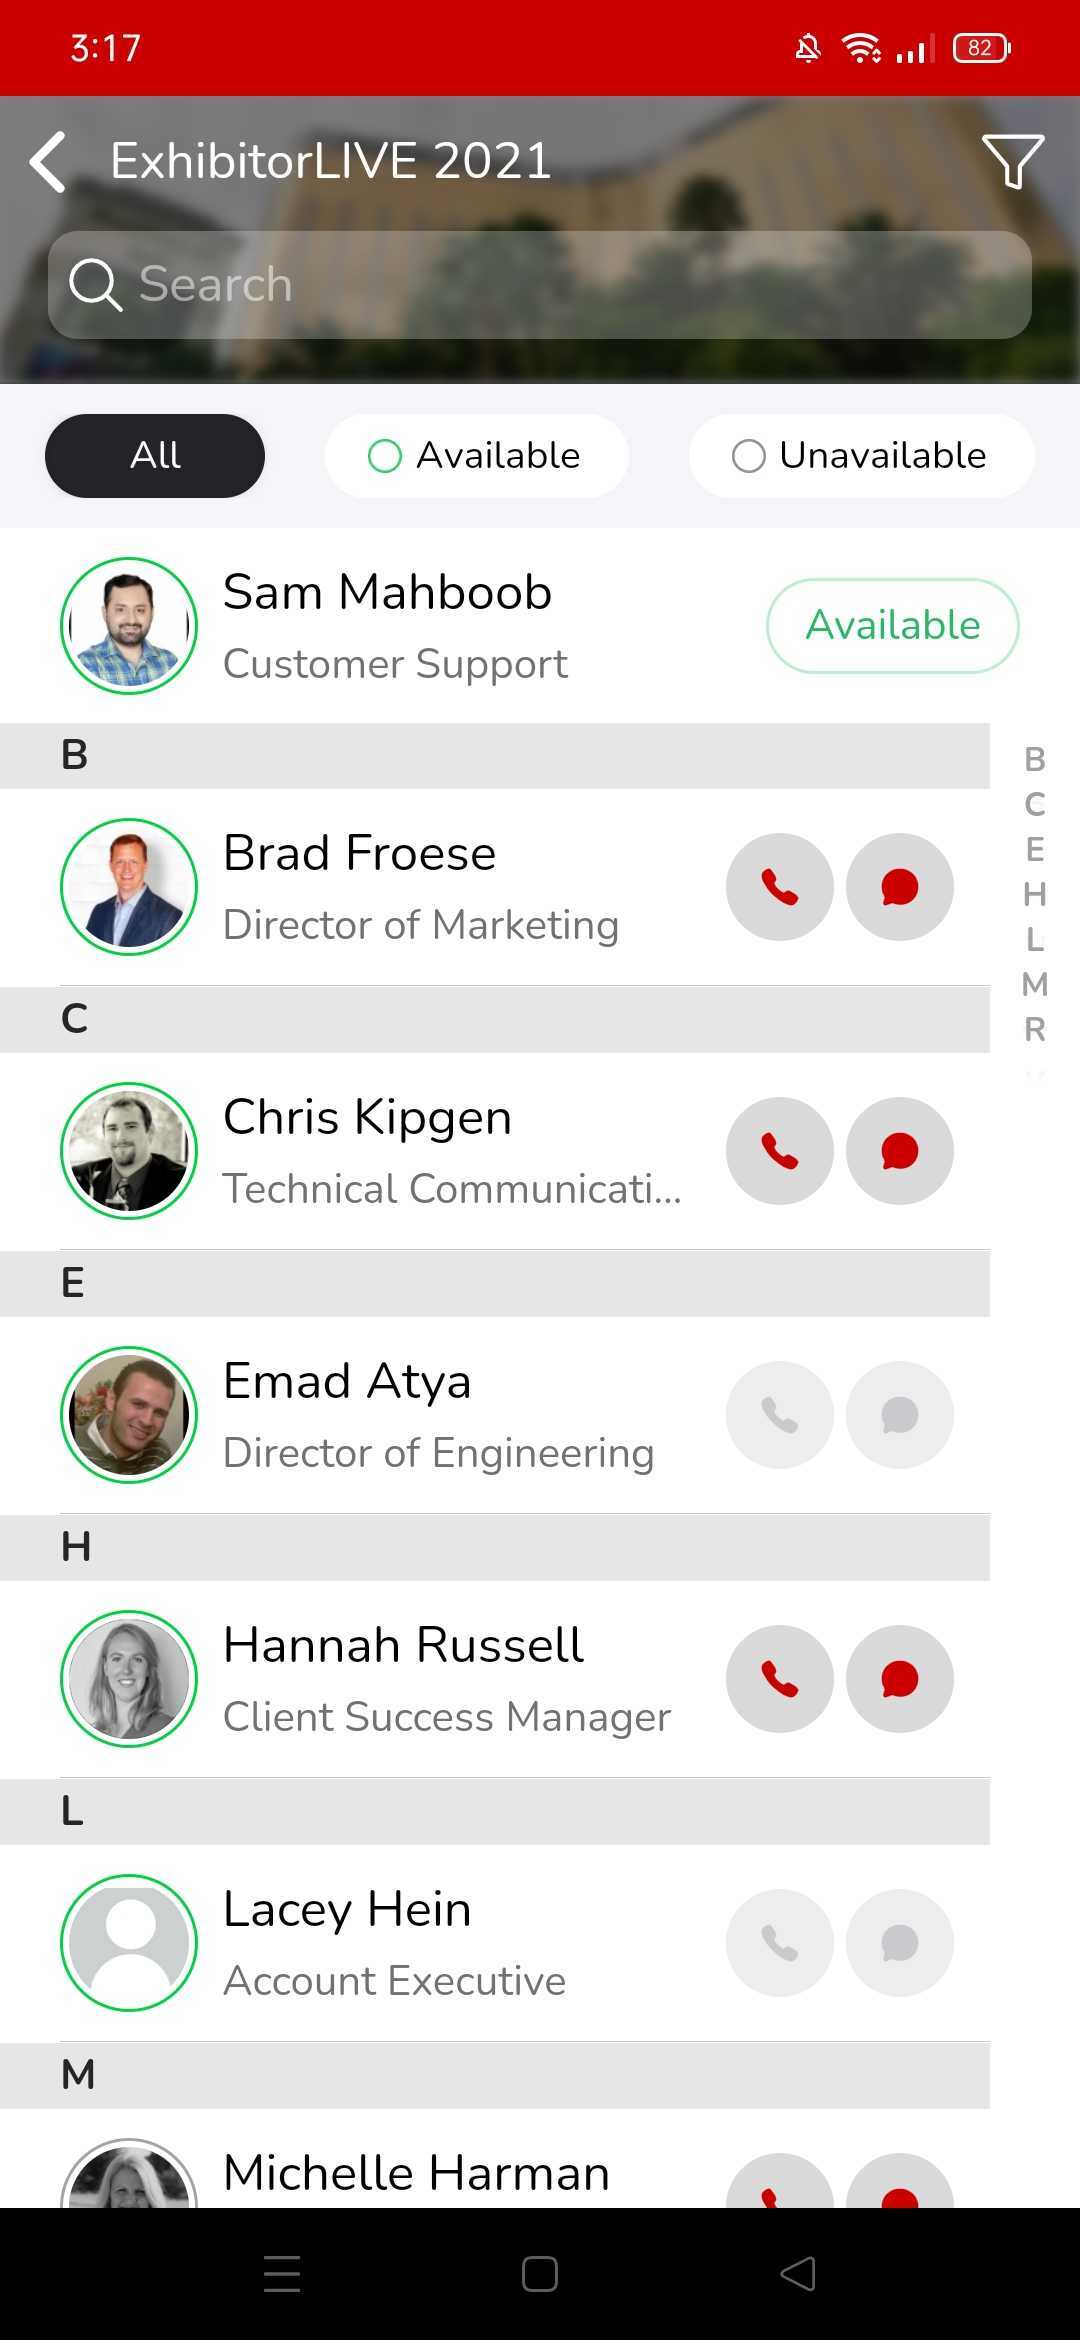
You can call or text any of the available team members on event. And you can also change your availability status from that page.
Event Groups
Event groups allow you to send forms to select users. For example, if you have a team that is heading to a particular event and have made a custom form for them, you can create a group for that show and add their devices. Only their devices will show the form. To manage device groups, navigate to Settings > Integrations > Groups.
...
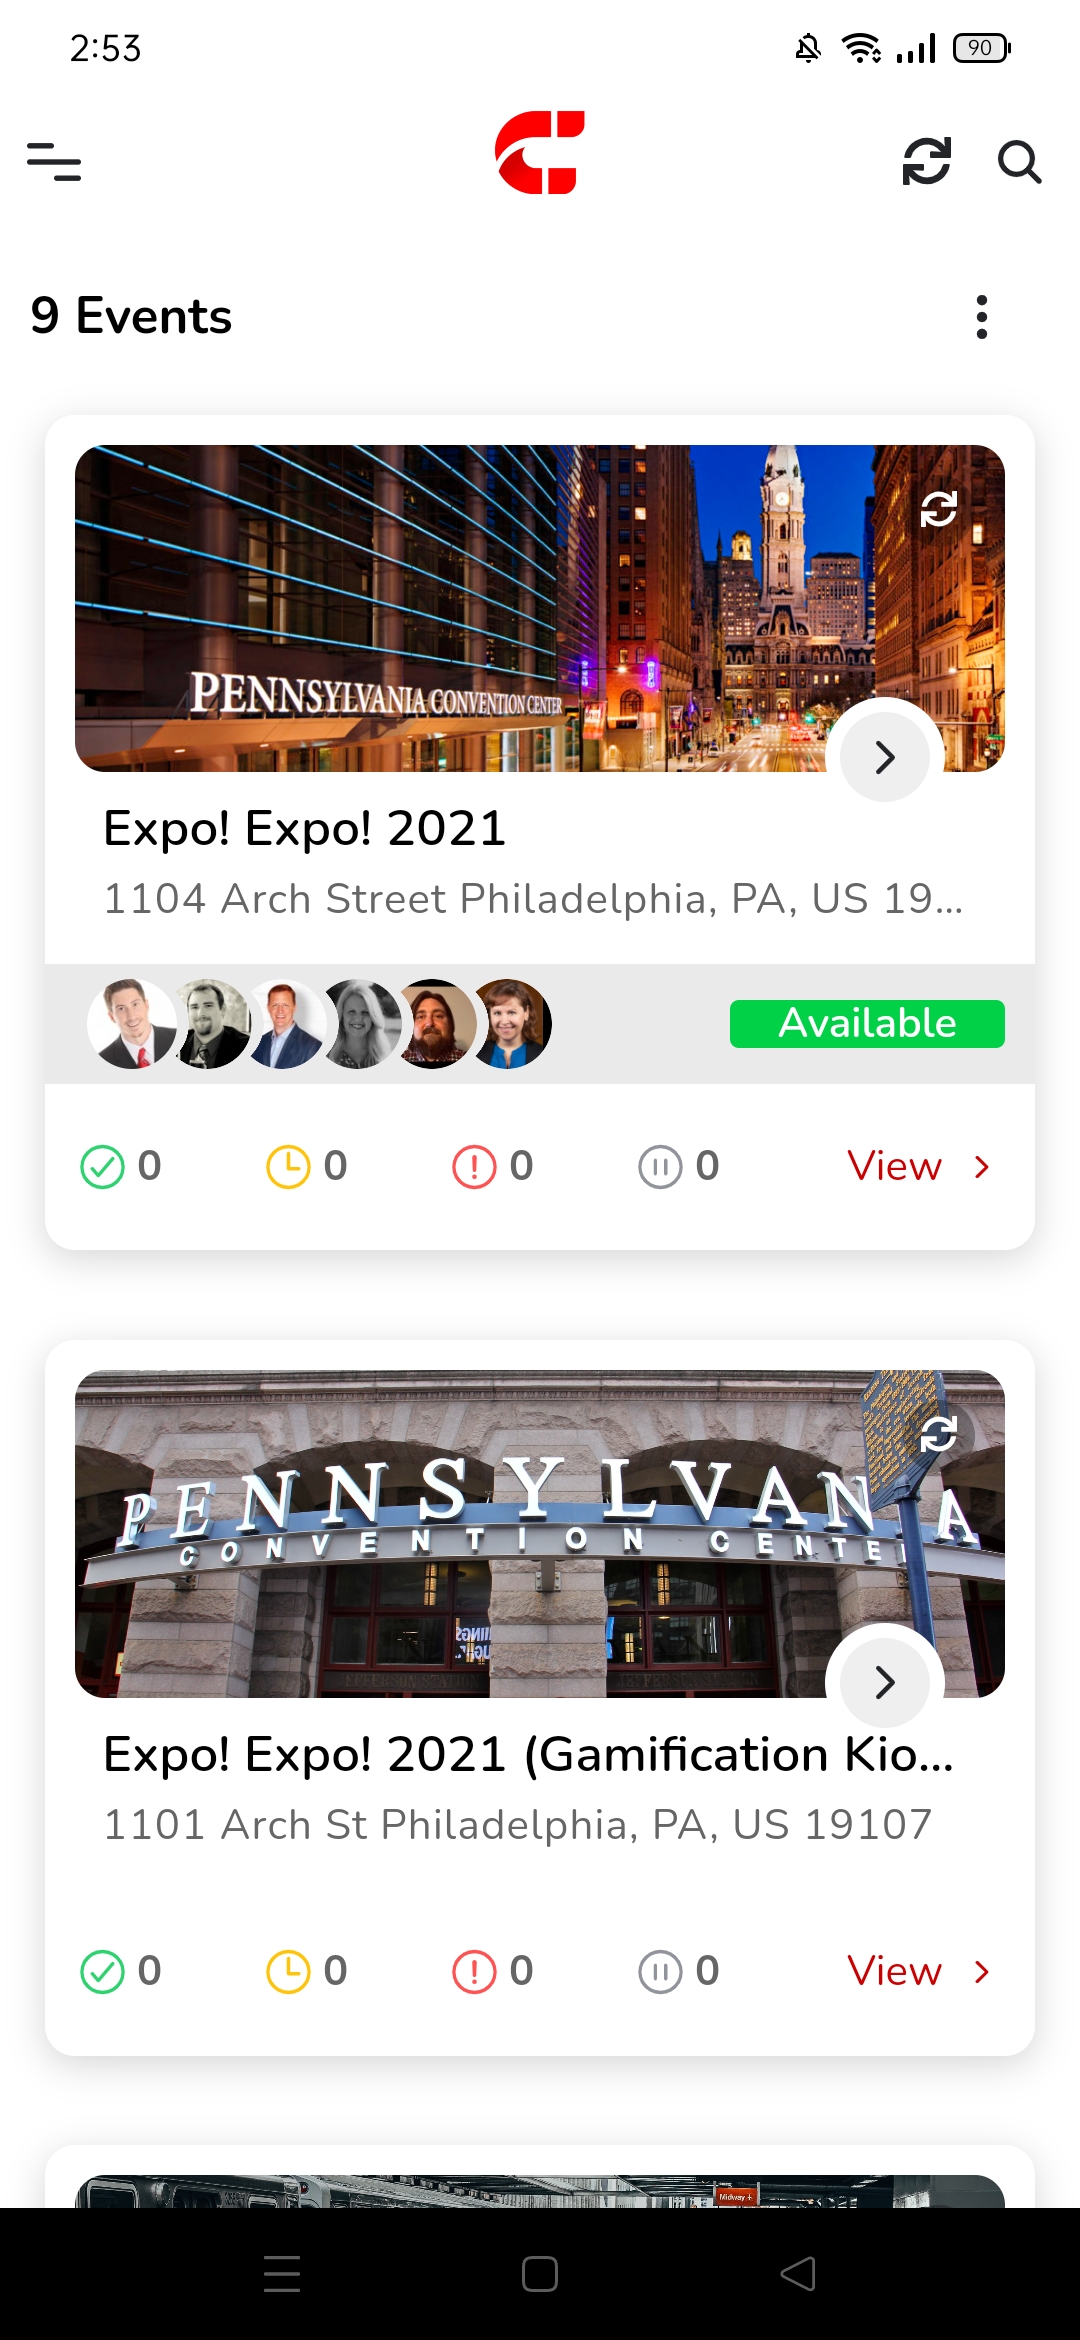
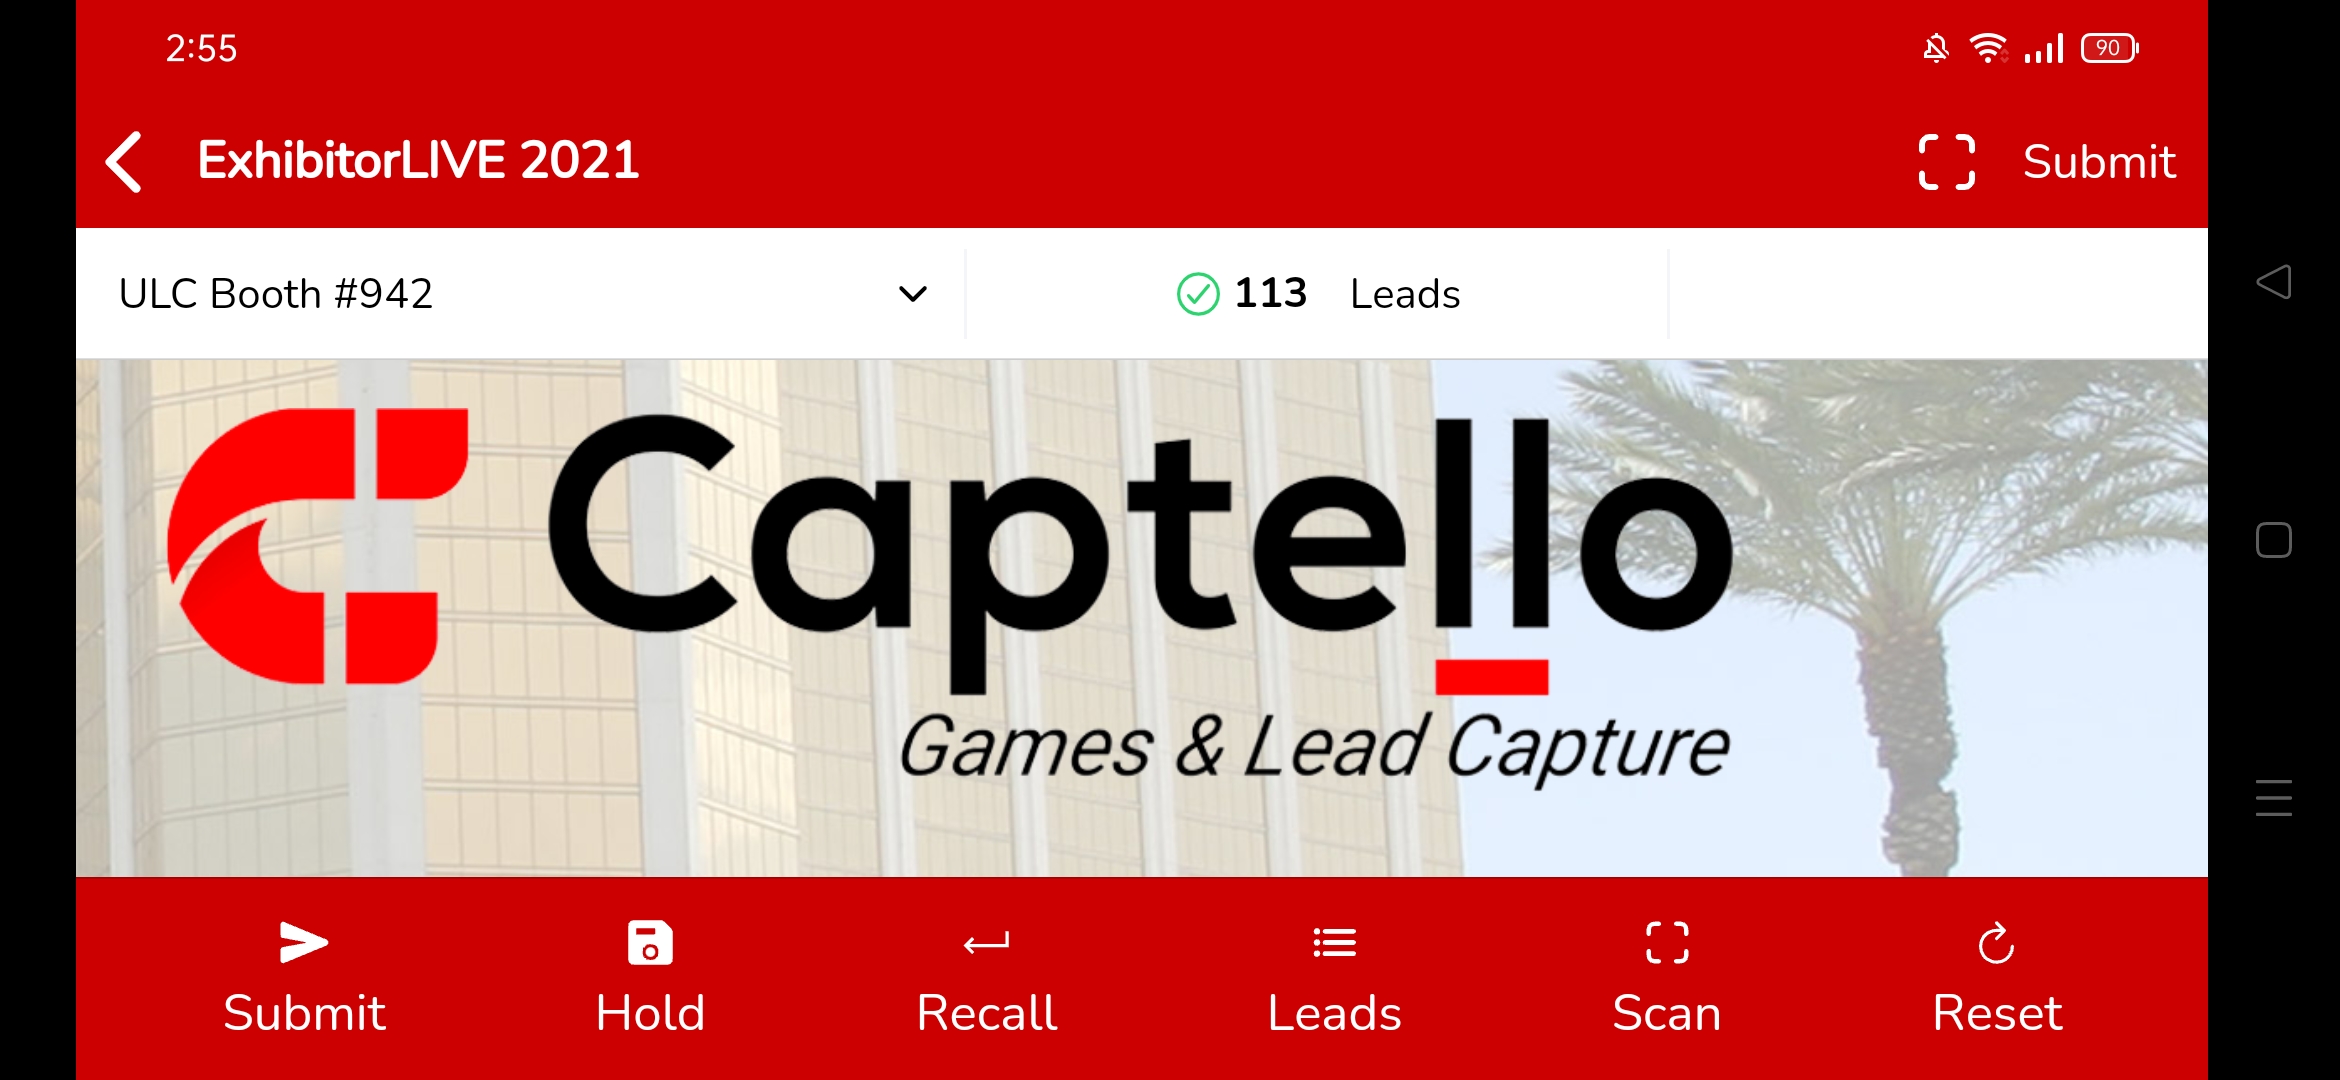
Events are the core of Event Lead Management. They include trade shows, conferences, meetups, and any other live event where you could capture lead data. To set up a new Event, navigate to Events > Capture and click New. Select from the following form types:
- Exhibitor – Used to capture leads at live events or virtual trade shows. Includes all forms of lead capture such as kiosk, badge, and business card.
- General – Used for different types of use cases such as digital marketing, employee engagement, and more.
- Sales – Used by sales teams to capture leads from a mobile device while on the go. Forms never expire and are always available.
Note: the options on the New Capture Form menu will change depending on your form type. Set additional options by clicking the Advanced Settings button.
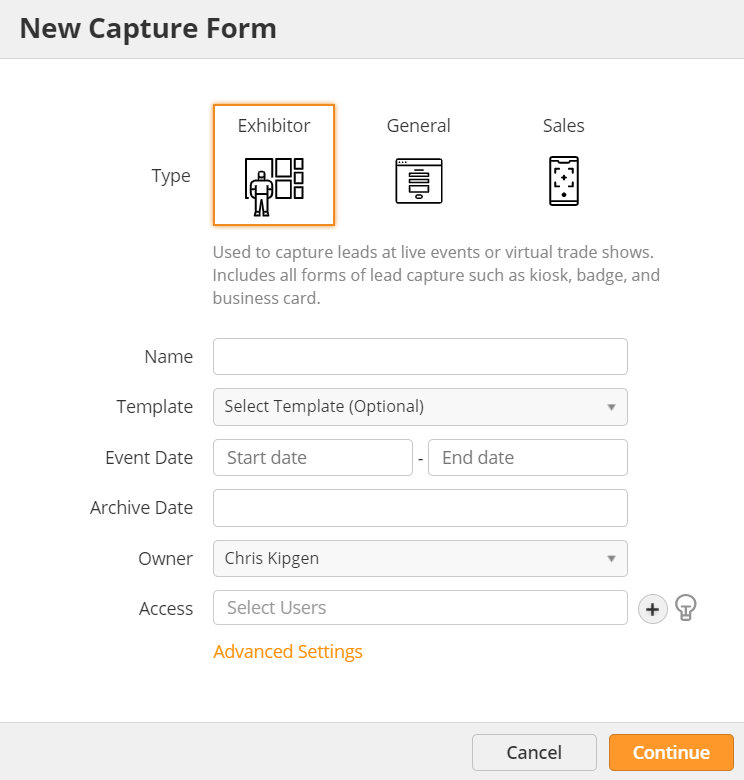
- Name – name of your Event
- Template – create Event using a Template (see Templates below)
- Save to – save event to a folder
- Campaign – add event to Campaign for ROI tracking purposes
- Description – internal description of event
- Event Date – start and end date of event used for reporting
- Archive Date – the last date end users can capture new Prospects in the mobile app
- Event Owner – user in charge of managing event
- Event Address – physical location of the event using Google Maps
- Registration List – attach a List of attendees
- Labels – custom labels for segmenting reports
- Event Access – users and groups invited to the event
- Visibility – Visibility of the event form can be set as Public, Private or Shared
- Event Access – users and groups invited to the event
When providing Users Event access, existing users will appear in a drop down. If the User is not already in the system, you can add a new user by clicking on the (+) button to the right.
...
Specifying a language ensures we default to that language and only use transcribers certified for that language. Localized transcriptions tend to take longer, around 1-3 business days after the end of the event.
If you need transcription in a new language not already listed, please contact our support team at least one week in advance with the following details so we can make necessary arrangements on our end for the transcription:
...
ATS BadgerScan Capture Technologies Community Brands CompuLEAD CompuSystems Conexsys Convention Data Services Core-apps Customer Registration Cvent eShow Experient Expo Leads Swoogo | ExpoBadge IDM ITN Leadature Lead Liaison Lead Retrieval MCI Onsite Oxford Tech API Potato Expo SmartSource Trade Show Leads (TSL) vCARD |
...
The system will save the transcription as a Note in the Prospect's Timeline. You can also save the transcription to a Prospect Field by mapping it in the Update Field drop-down menu.in the Update Field drop-down menu.
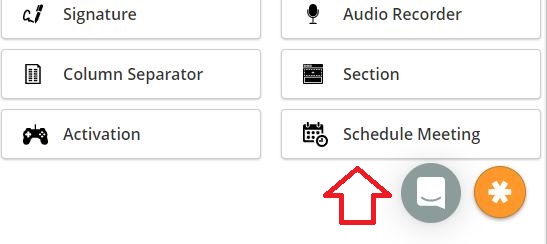
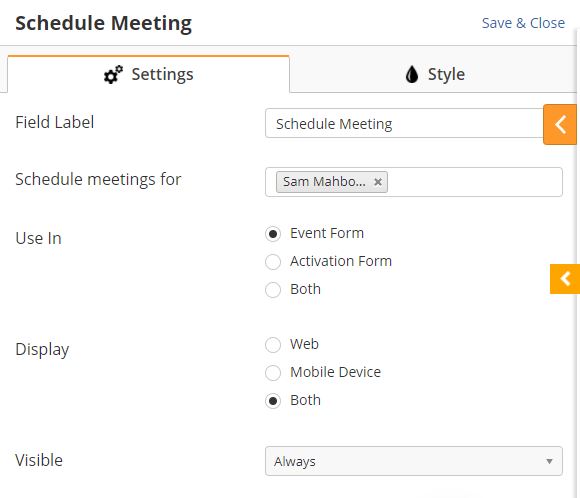
Schedule Meeting
With the Schedule Meeting option, you can insert a meeting scheduler to the event form for your team to book one on one meetings with the Prospects.
You can also select from the list of available users to schedule the meetings for.
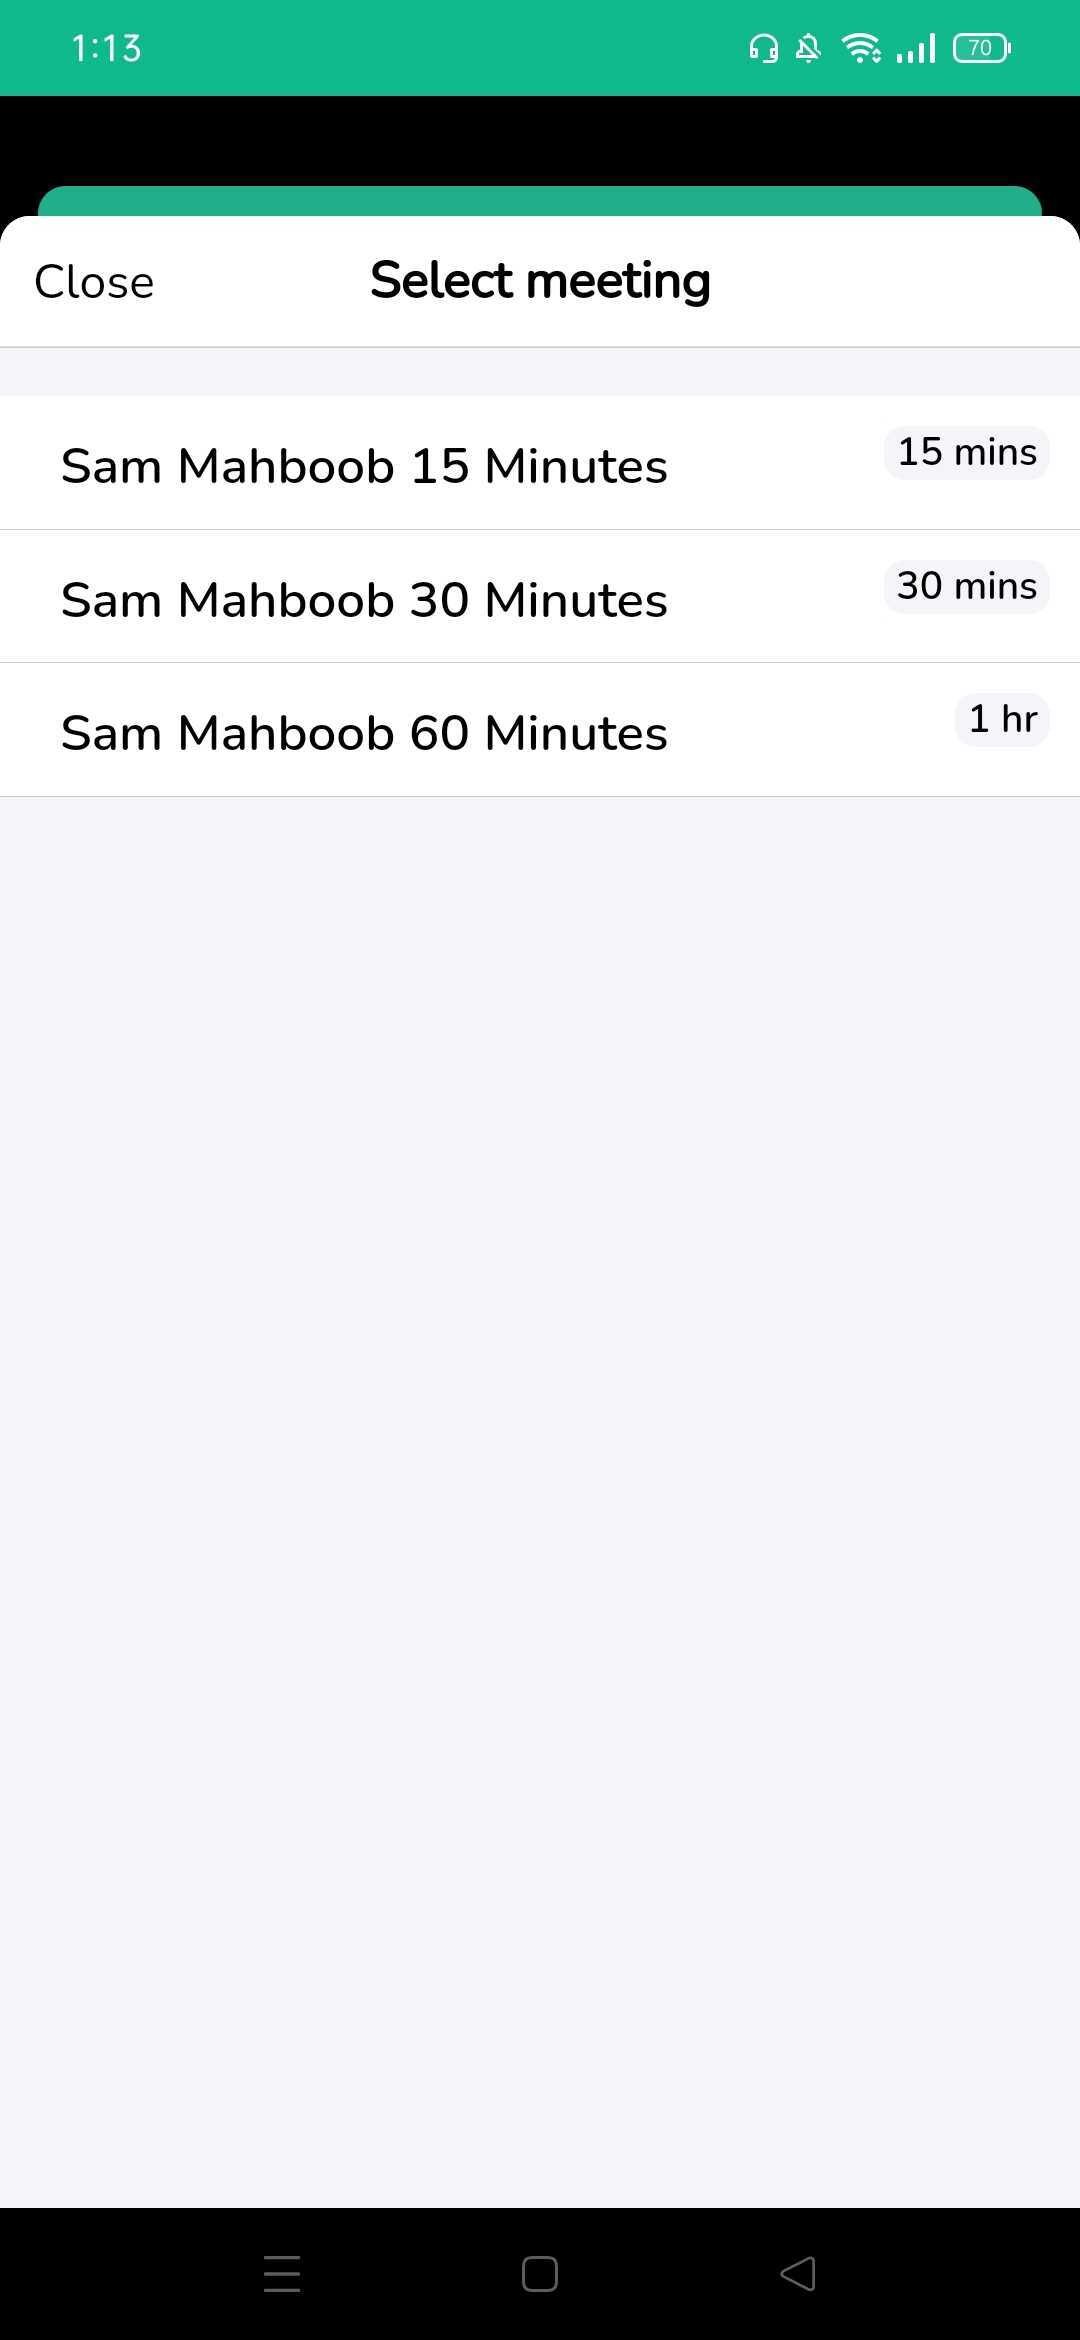
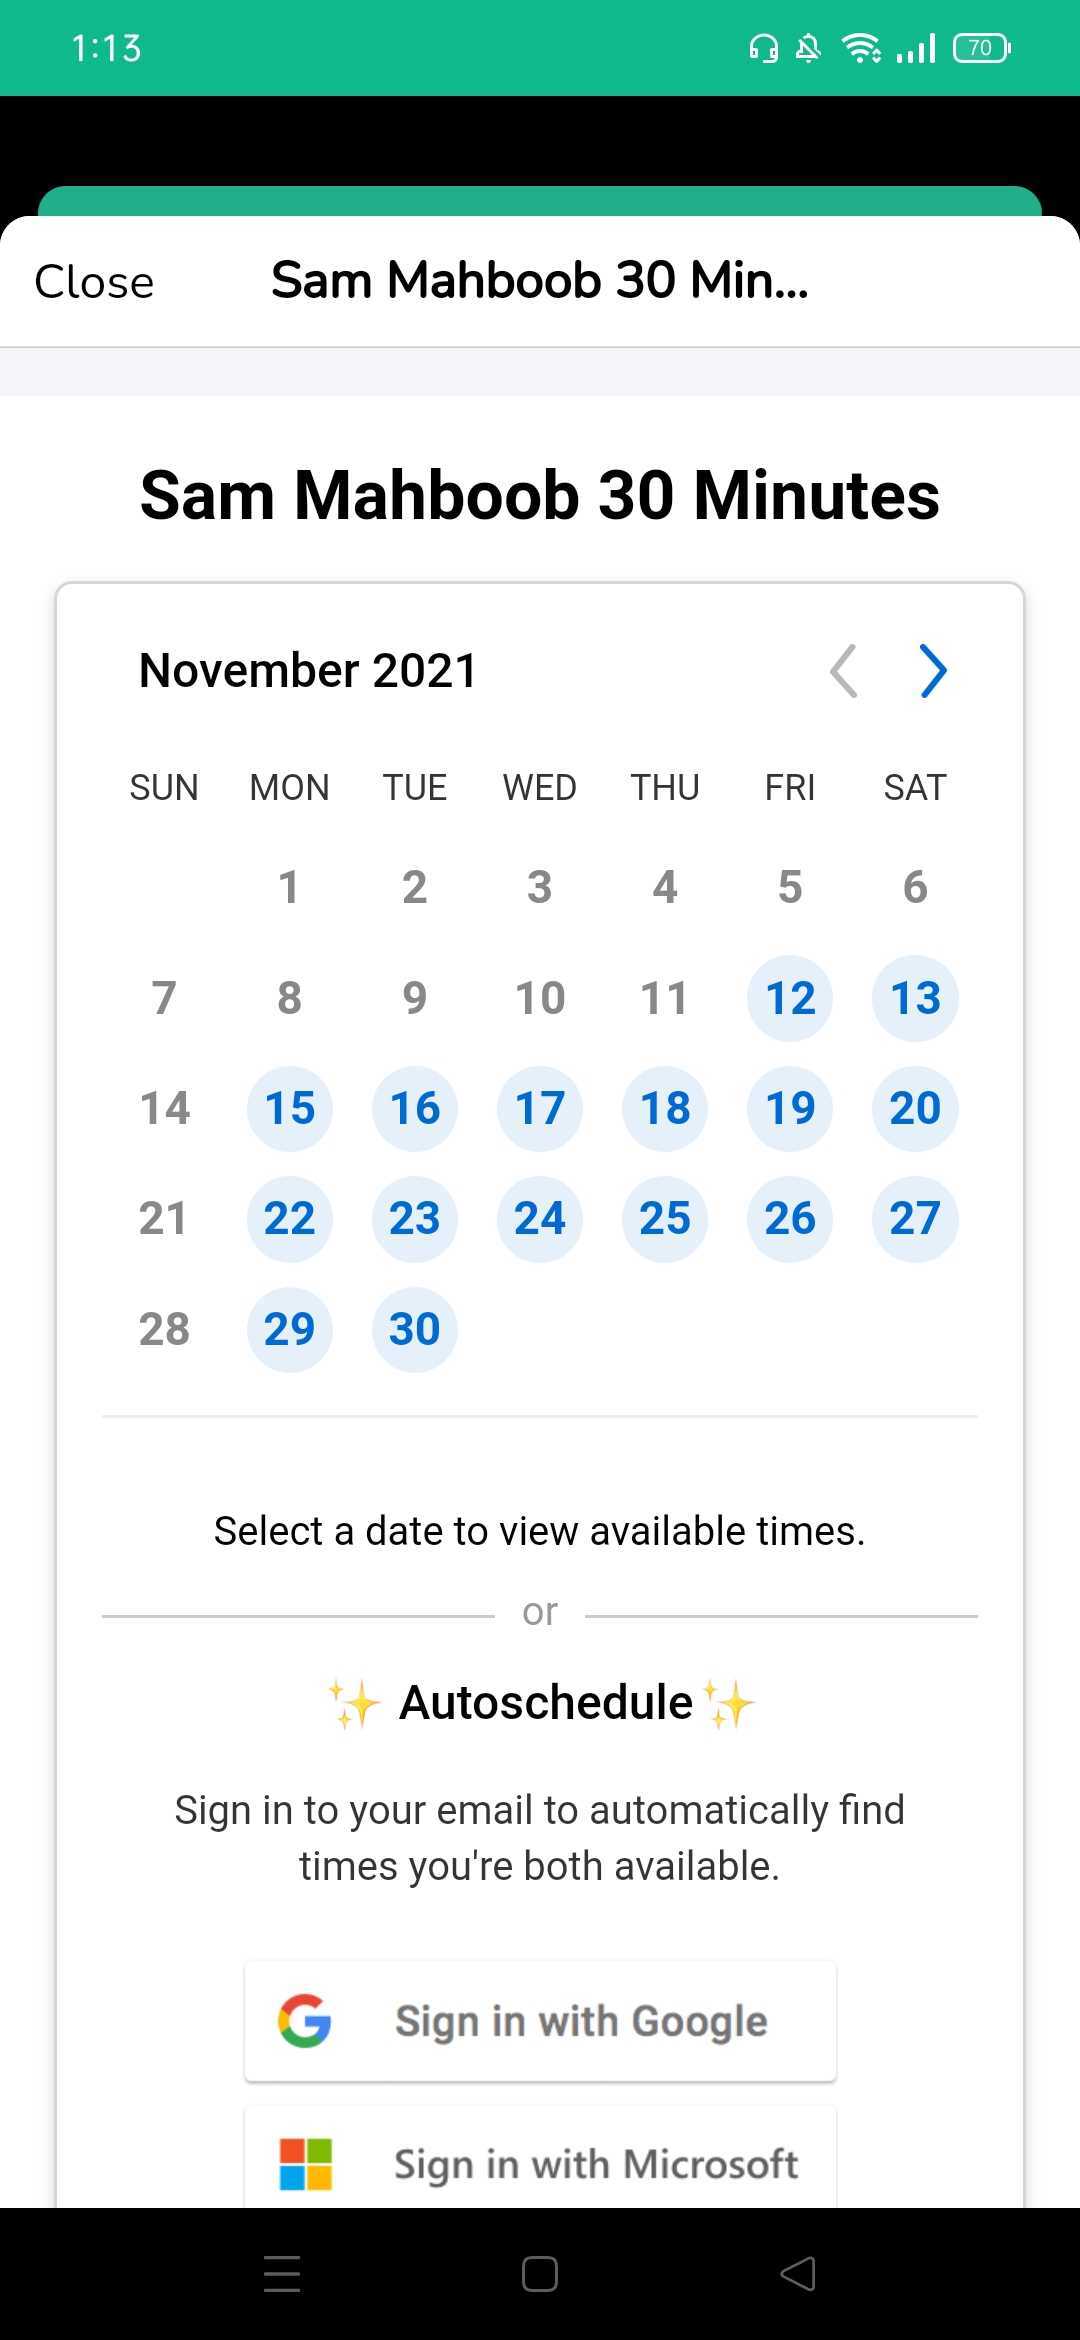
On the event form, users will have the option to select from all available meeting types and book a time on the calendar:
Documents
Use this feature to share documents (or e-literature) during your event. Documents can be previewed and shared outside of the form or selected during form submission and added to an email for follow up. Documents are uploaded to the system and grouped into Document Groups. One or more Document Groups can be included in your event lead capture form.
...
- Once your Document Group is setup, return to your event form by navigating to Content Events > EventsCapture.
- Add the Documents object into your form by dragging/dropping it from right to left.
...
- Tap on the event to open the Event Menu.
- Select Documents.
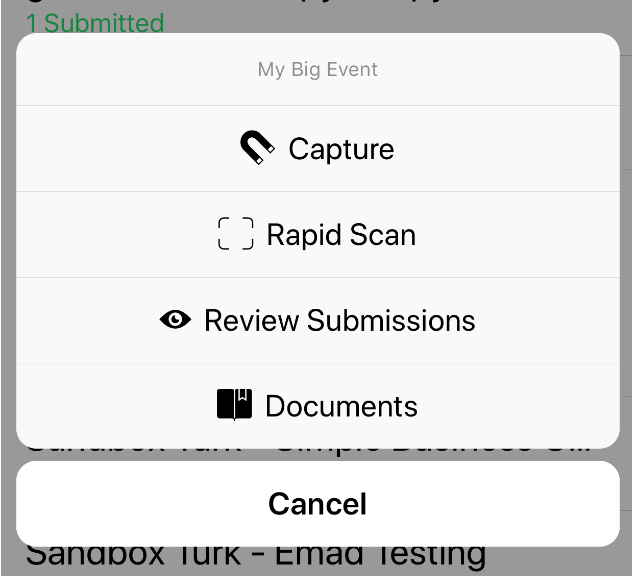
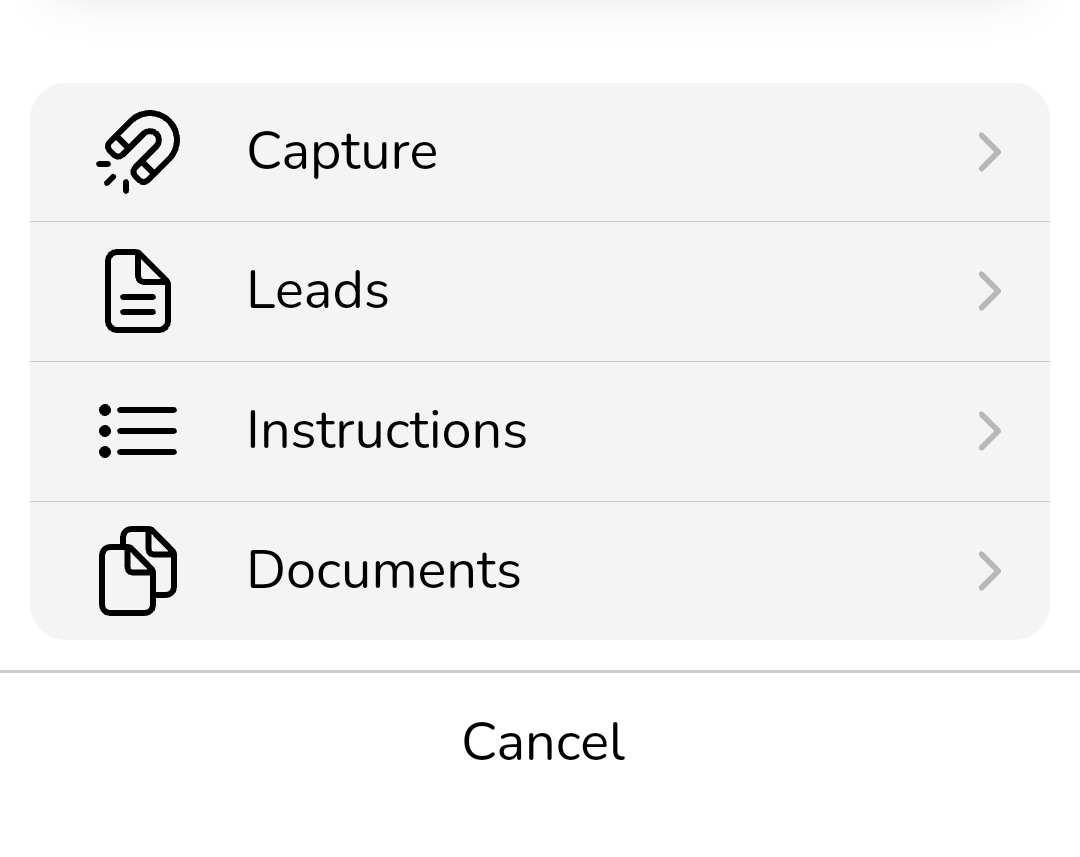
- If more than one Document Group exists then the user will need to tap on the relevant button first. If only one Document Group exists then skip to the next screen below.
...
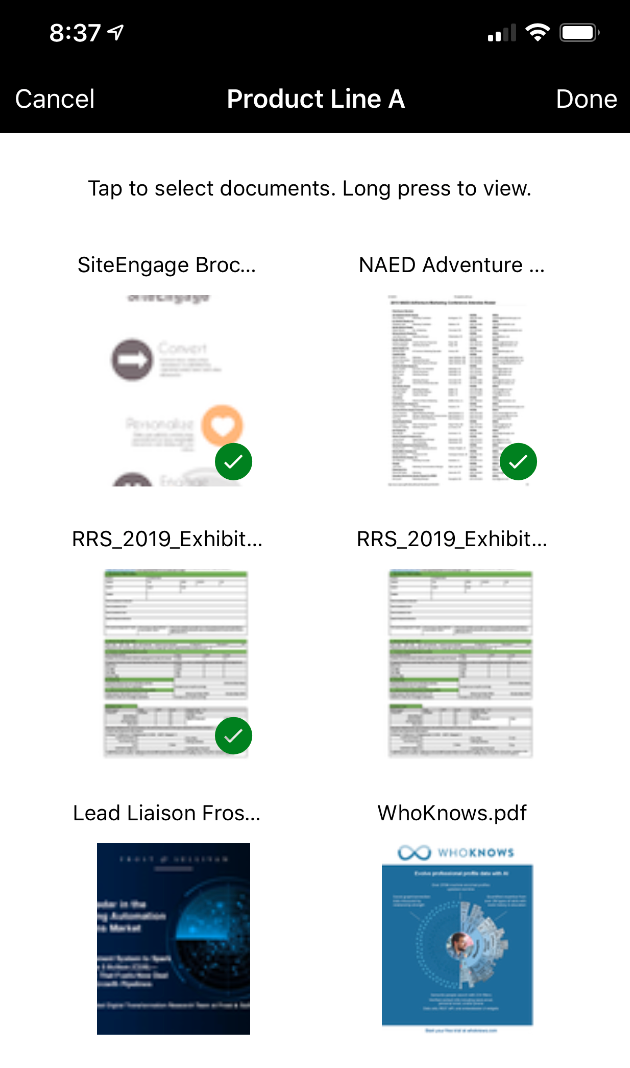
- Tap on the Documents to share. A green check will appear at the bottom right of the Document thumbnail indicating it's been selected.
- Click the Send button.
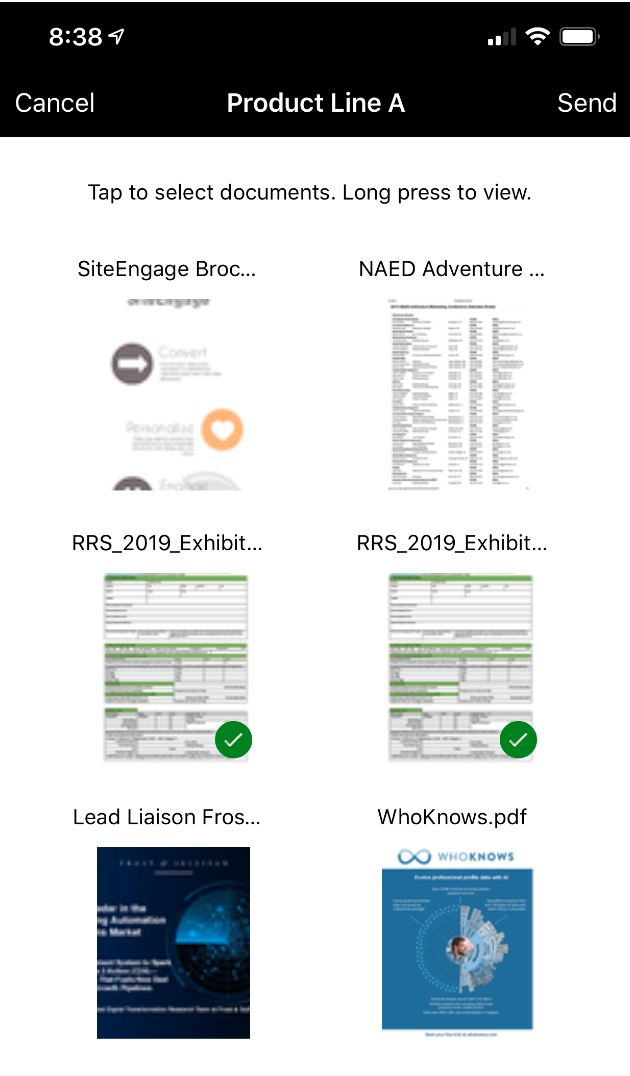
- Choose your share method. The following sharing methods are supported:
- Email: Opens the device's native email client and inserts trackable links for your Document(s).
- SMS: Opens the device's native SMS client and inserts trackable links for your Document(s).
- WhatsApp: Opens WhatsApp and inserts trackable links for your Document(s).
...
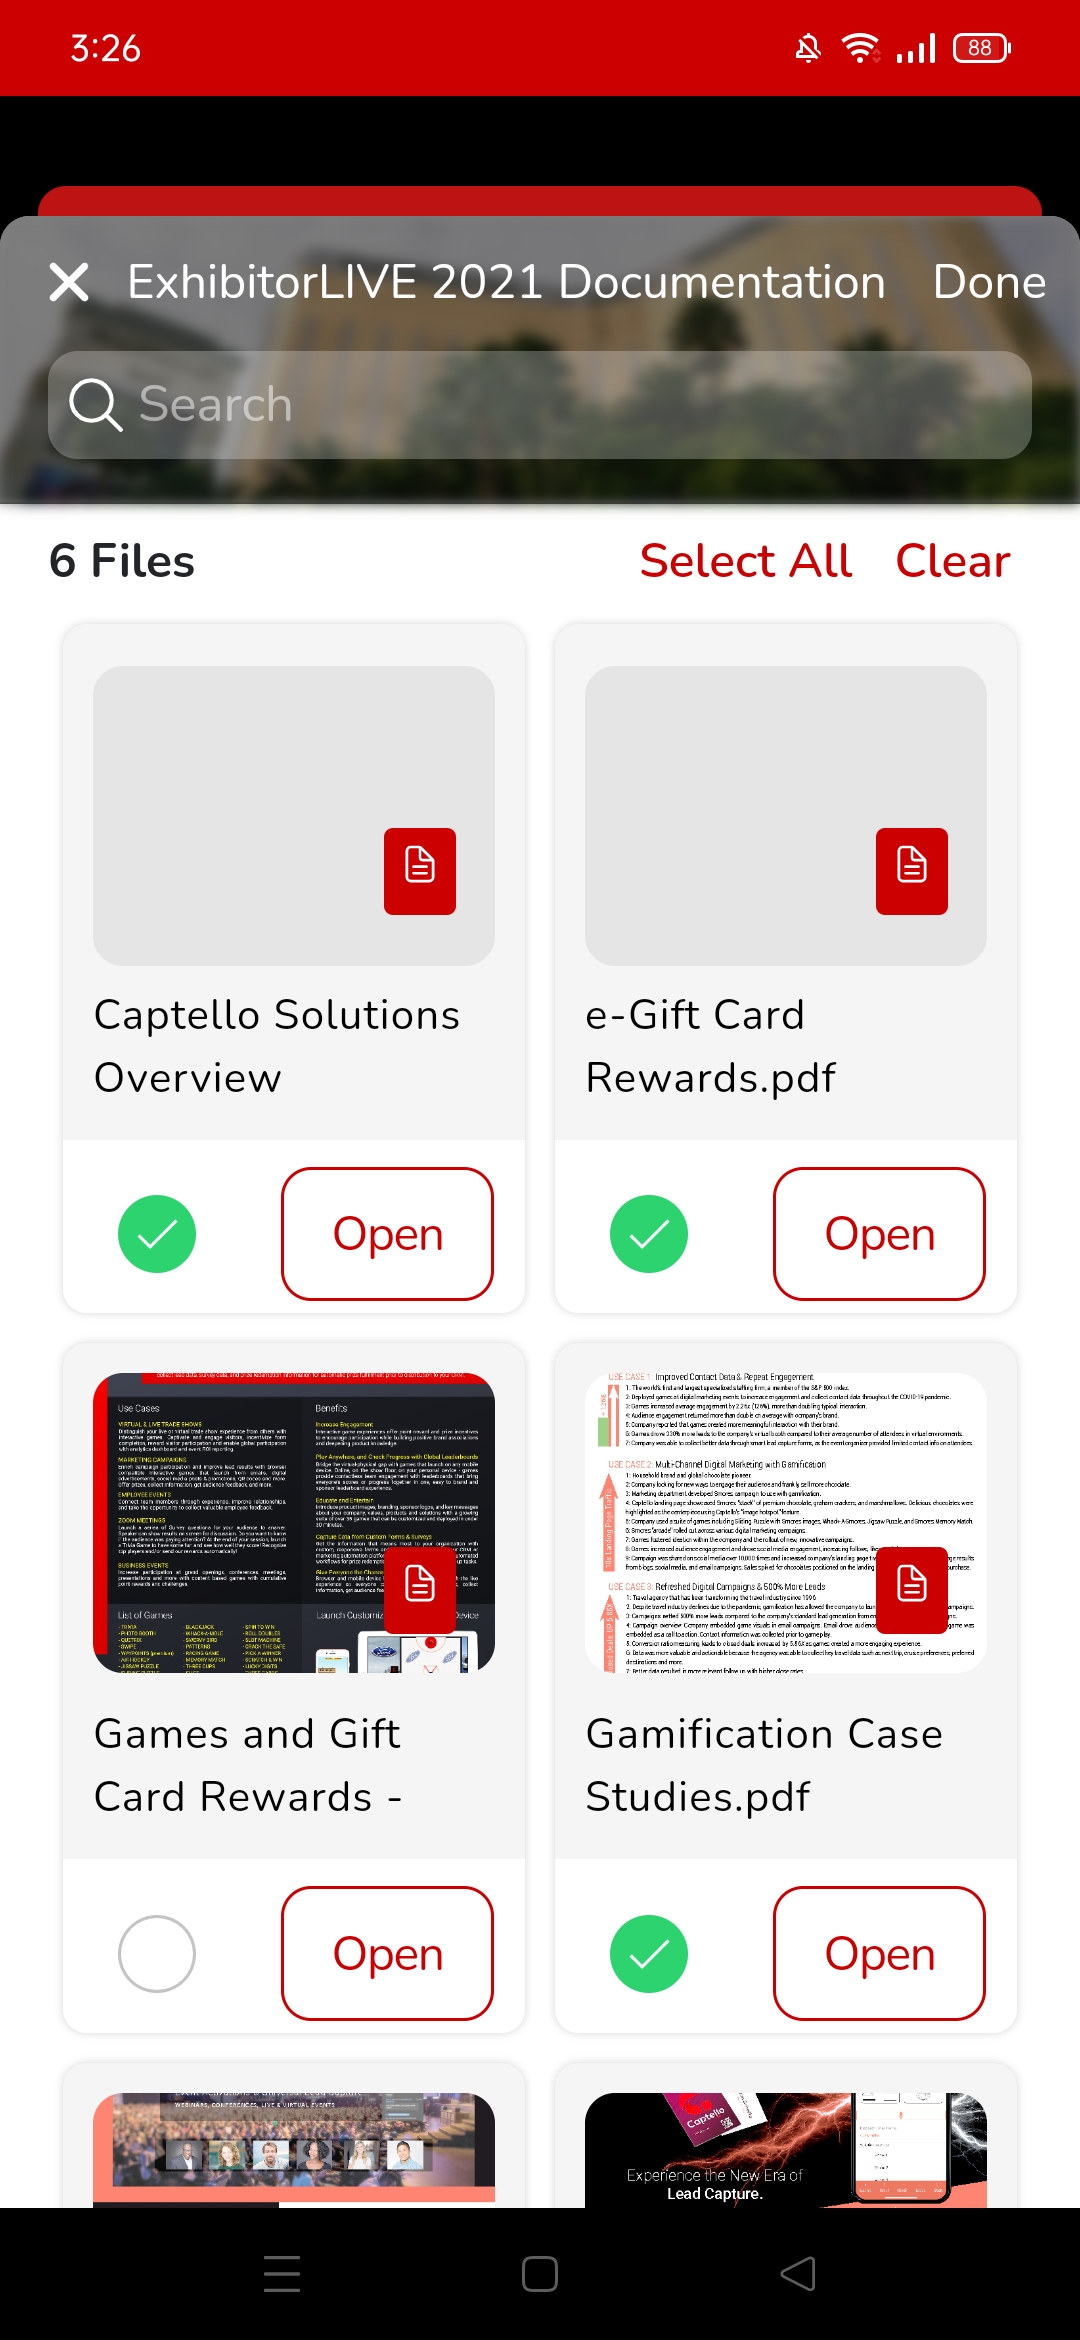
- Tap on the Document(s) to select them. A green check mark will appear for all selected Documents.
- Click the Done button.
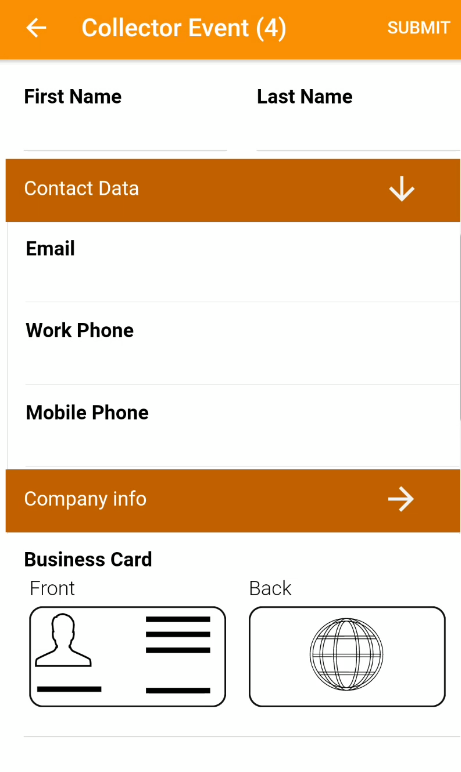
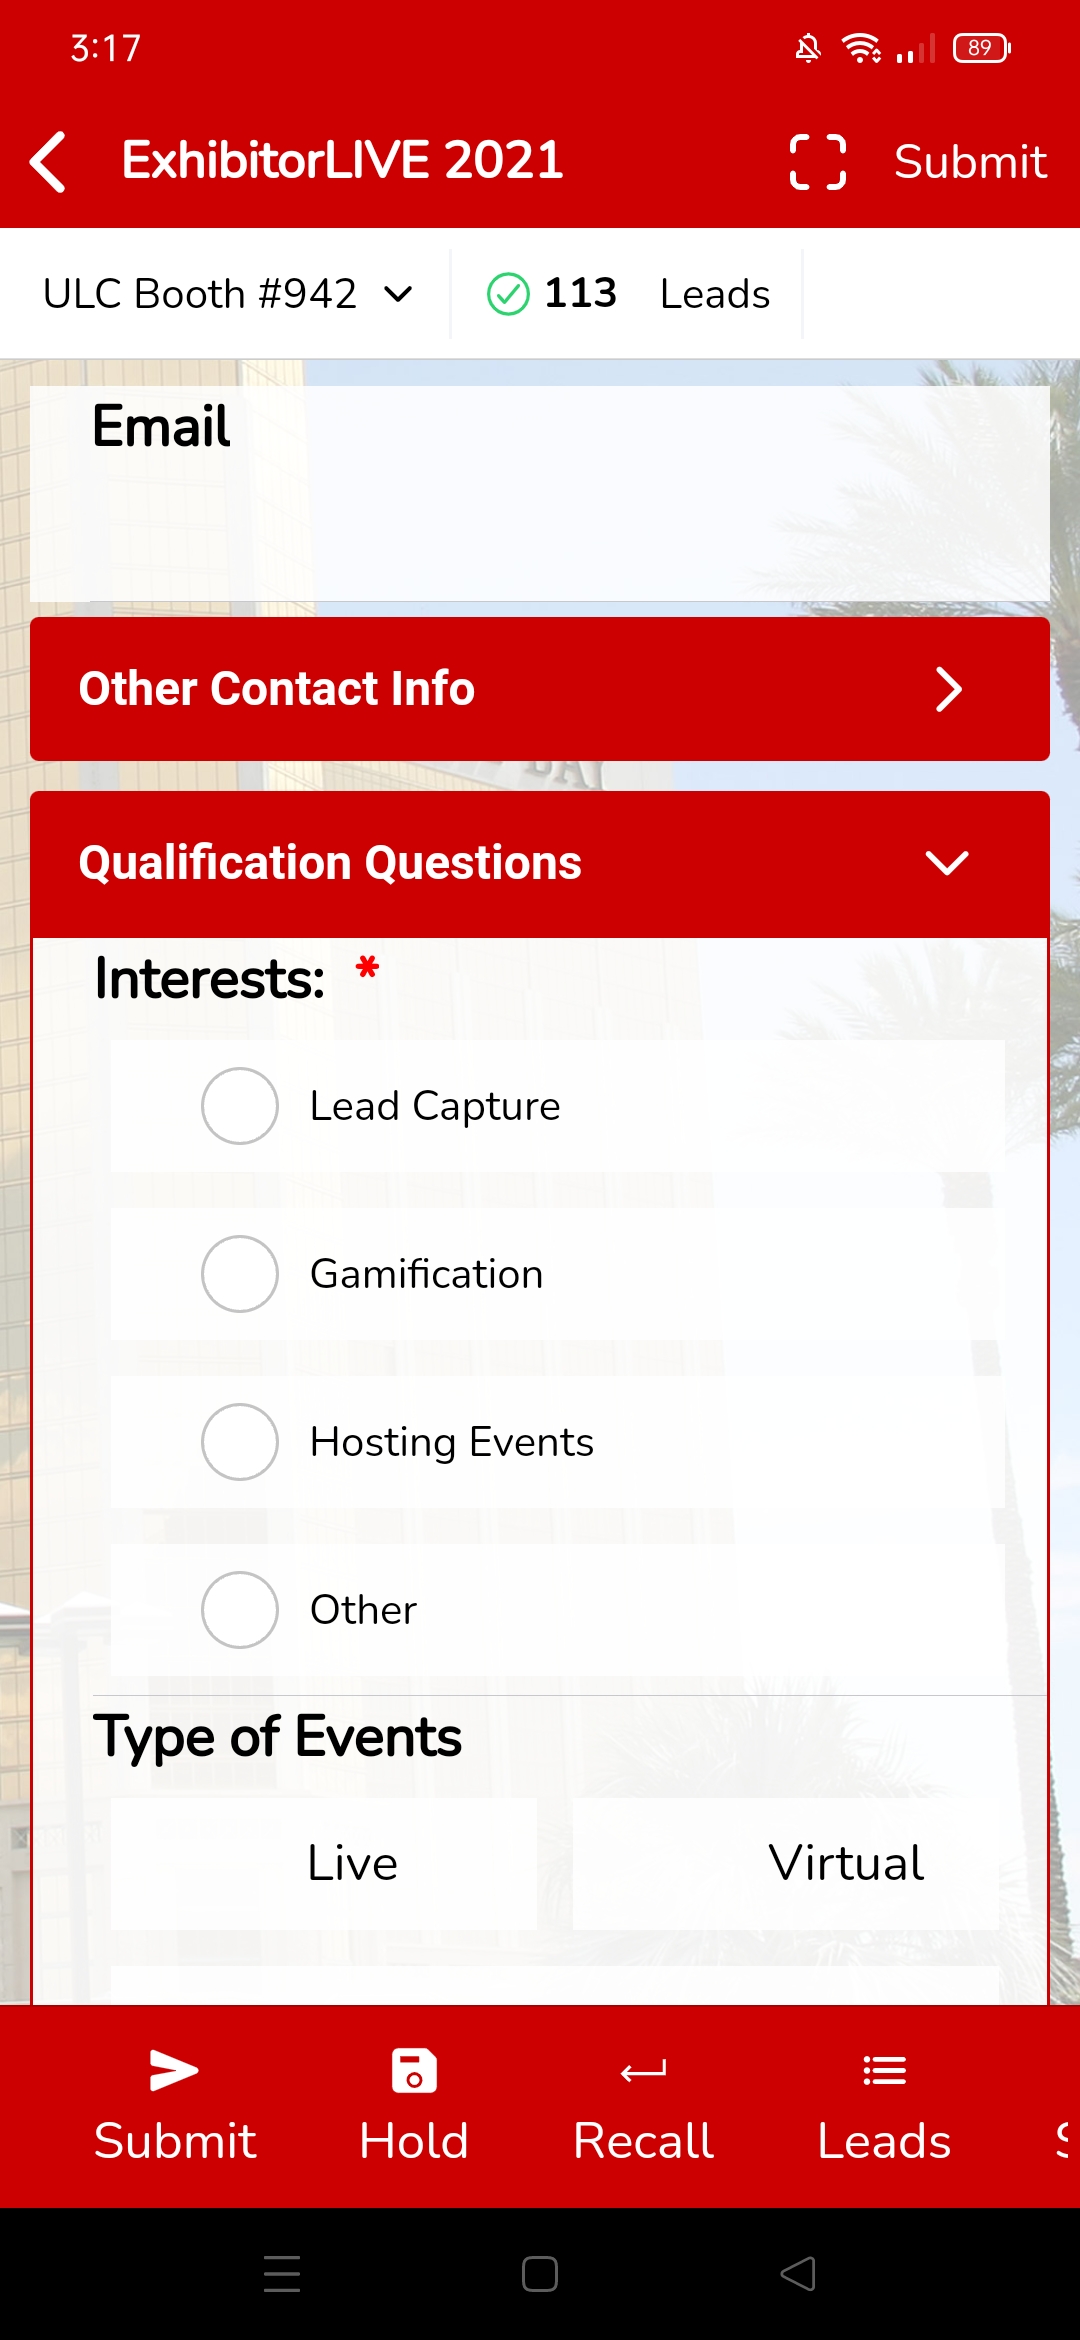
Sections
Organize your lead capture forms using Sections. Sections group together common fields like contact data, company info, or survey questions. With Sections, your form is cleaner and easier to manage for end users. To add a Section
...
On the app, users can tap on sections to show/hide their fields. See the screenshot below. The Contact Data Qualification Questions Section is expanded while the Company Other Contact Info Section is collapsed.
Form Styling
You can add custom styling to event capture forms to match your branding and provide and exciting end user experience. To change your style options, open the Event Designer and Click on the Style Tab.
...
| Info | ||
|---|---|---|
| ||
Use an aspect ratio of 1.75 width x 1 height for custom images. |
You can adjust the font color of the Event name and address by clicking on the box next to Font Color. You can either use our color selector or enter a specific hex code.
...
The Buttons Menu is a horizontal menu at the bottom of the form.
Use the checkbox to select/deselect which buttons you would like present on the Buttons menu. Use the cross arrow to the right of the buttons to rearrange them.
...
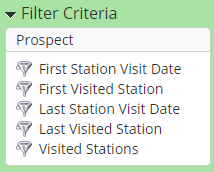
You can use these fields in Automations, Segmentations, and Prospect Filters as well.
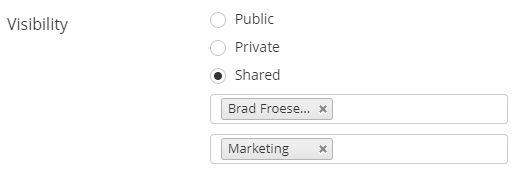
Visibility
You can set the “Visibility” of the event form as:
- Public
- Private
- Shared
When "Shared" is selected, you can specify the users and teams to share the event form with:
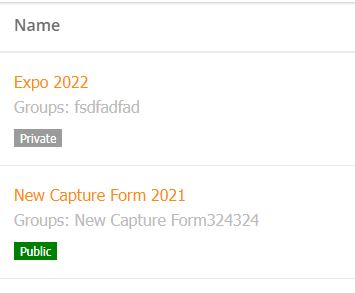
On the Manage Events pages, these badges are displayed to show the visibility status of an event form:
Web View
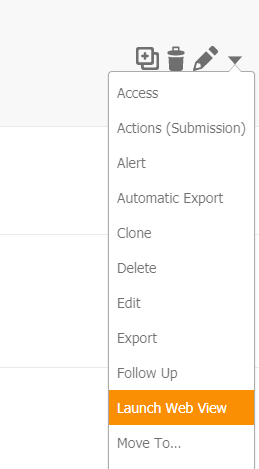
You can launch a Web View of your Event Forms for use in virtual events or PC-based kiosks. To launch the Web View, use the action menu to the right of the Event to select Launch Web View.
The form will launch in a new browser window. Copy the URL of that tab to share a link or embed.
...
You can set if the Event form should attempt to collect and record someone's location using Collect Location option

You can also set what happens when the form is submitted.
...
This option allows you to block submissions from domains and emails. When this option is enabled, you can block submission using the following options:
- Domain List(s) - Pick from a predefined domain list.
- Enter domain(s) - Manually enter the domains to block e.g. gmail.com, hotmail.com.
- Enter email(s) - Enter email addresses to block submissions from.
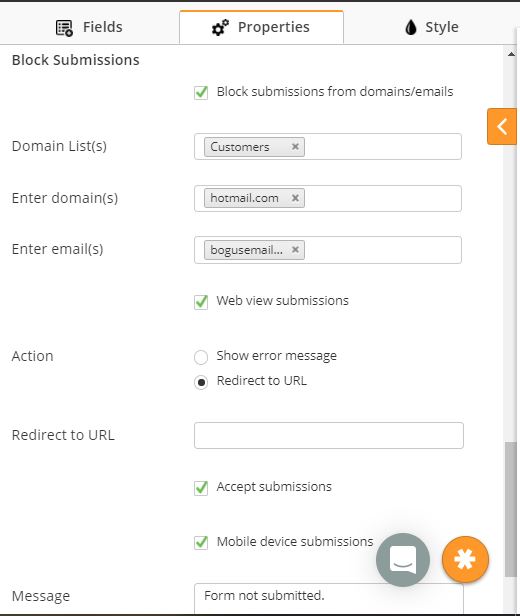
There are two methods of blocking:
- Mobile device submissions - When enabled, you can specify a message to show when the submission is blocked. Default is "Form not submitted."
- Web view submissions - When enabled, system will not accept web view submissions. With this option, you can either show an error message or you can add a redirect URL. If you choose a Redirect to URL then you can also specify whether you'd like to record the submission in the backend. This is controlled by enabling or disabling the "Accept submissions" option.
Note: If Block Submissions is turned ON then you cannot save the event form unless at least one of the above blocking methods is enabled.
Personal Email Addresses
You can block personal email addresses. For example, you may not want to process leads who have a yahoo.com or gmail.com email address. You can also use this function to block specific email domains (a competitor's email domain, for example). To block personal email domains,
...
To create a new Template,
- Navigate to Content Events > EventsCapture.
- Click on the Templates tab.
- Click New.
- Follow the instructions above for creating a new Event Form.
- Click Save and Exit.
...
You can use Question Stats to see aggregate response data. For example, you could review which of your products were of the most interest. To view question stats
- Navigate to Content Events > EventsCapture
- Use the drop-down menu on the right to select Question Stats
- Select a date range
...
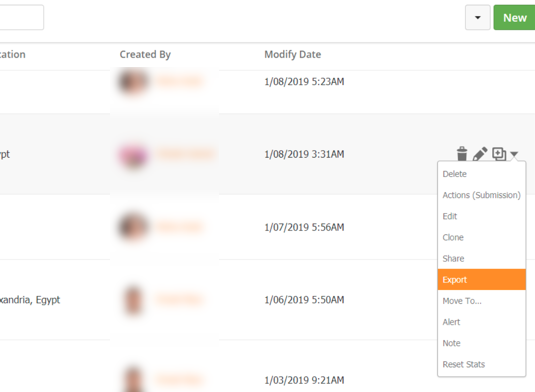
Lead Liaison can export event data to third party systems. To export event data,
- Navigate to Content Events > EventsCapture
- Locate the appropriate Event
- Access the drop-down menu to the right
- Select Export
...