Setting Up Single Sign-On (SSO) with Lead Liaison
...
To set up SSO with Lead Liaison
...
| Table of Contents |
|---|
Step 1: Provide IdP Metadata to Lead Liaison
Provide your IdP metadata to Lead Liaison. You should provide a file similar to the one below.
| Code Block |
|---|
<?xml version="1.0" encoding="UTF-8"?>
<EntityDescriptor xmlns="urn:oasis:names:tc:SAML:2.0:metadata" xmlns:ds="http://www.w3.org/2000/09/xmldsig#" xmlns:shibmd="urn:mace:shibboleth:metadata:1.0" xmlns:xsi="http://www.w3.org/2001/XMLSchema-instance" entityID="https://byuidp.byu.edu/idp/shibboleth">
    <IDPSSODescriptor errorURL="http://it.byu.edu/helpdesk/index.shtml" protocolSupportEnumeration="urn:mace:shibboleth:1.0 urn:oasis:names:tc:SAML:1.1:protocol urn:oasis:names:tc:SAML:2.0:protocol">
        <Extensions>
            <shibmd:Scope regexp="false">byu.edu</shibmd:Scope>
            <mdui:UIInfo xmlns:mdui="urn:oasis:names:tc:SAML:metadata:ui">
            <mdui:DisplayName xml:lang="en">Brigham Young University</mdui:DisplayName>
            <mdui:InformationURL xml:lang="en">http://it.byu.edu/index.shtml</mdui:InformationURL>
            <mdui:Logo height="64" width="85" xml:lang="en">https://byuidp.byu.edu/idp/images/byulogo.jpg</mdui:Logo>
            </mdui:UIInfo>
        </Extensions>
        <KeyDescriptor>
            <ds:KeyInfo>
                <ds:X509Data>
                    <ds:X509Certificate>
MIIDJDCCAgygAwIBAgIVAM7rDFYiAD7ejQynyojPagGeGUuGMA0GCSqGSIb3DQEB
BQUAMBkxFzAVBgNVBAMTDmZpdWlkcC5maXUuZWR1MB4XDTEyMDMxMzEzNTEzNVoX
DTMyMDMxMzE0NTEzNVowGTEXMBUGA1UEAxMOZml1aWRwLmZpdS5lZHUwggEiMA0G
CSqGSIb3DQEBAQUAA4IBDwAwggEKAoIBAQCnubM4QbTQQYvUMNGlVB1uO4xwDlcy
9tyXYqE4sjAFu/Fqjv+C4IkDD1BZy+pI+glAWgftq9Vox/dvC1oMcfuhSxAWB7st
+aBlKusubh7UAQs+2lym/x0i4E30OMrG2MAcO9pZoGJT+xiOTgba+Vd977KzZdOv
o2wAvABy9dJmH+TboHR7w8AOgzQ/QDqOlTq75uMG5fuZhtRAULUKUsMG7niWQCXe
Yf3zGE4hStEXos17DnFWzP7S+BZtaPShkPupLR7A23ZiEg8UMRNtdAzXl5ljbrus
A6UgnbYslO3NTinTUlRzeB79P7iv3tGujsKEZBZM7jnbEaCnYOthhrwlAgMBAAGj
YzBhMEAGA1UdEQQ5MDeCDmZpdWlkcC5maXUuZWR1hiVodHRwczovL2ZpdWlkcC5m
aXUuZWR1L2lkcC9zaGliYm9sZXRoMB0GA1UdDgQWBBQ/EzTBahbswoM9gJhVbmdK
LzJsBjANBgkqhkiG9w0BAQUFAAOCAQEAE/oT8PSELMiKXo9QKG3YiHY5+2QxQBs2
hqUI3HpTrRCegfQMc8ymCp3nWU6MMa/R2JxPyekKHTCJyrBvYv8FT/sBPnRXXLHV
bfZk10puNnuILfkT8vsdd3fBJ1/dBWd2Aop5axWdPCse2zB8ChJ1ImrhCu8fhI1T
H4Rqr8AkOIuUXRvDvlOj6PUP6J1luFFcQZl5v+uREv5Pih8W5NhKY+ENPrFX2g59
iWZ7NojDxss/TtqsvGDbMHlt3PNg/FC6rHlcW9gH0qudXf1wLh8u+quX/7mGGvIv
FfPU6B1stKoyNoo42HbUm+KOc8S3L3yaxGZfWtL8kNhY0hSXrYI13w==
                    </ds:X509Certificate>
                </ds:X509Data>
            </ds:KeyInfo>
        </KeyDescriptor>

        <ArtifactResolutionService Binding="urn:oasis:names:tc:SAML:1.0:bindings:SOAP-binding" Location="https://byuidp.byu.edu:8443/idp/profile/SAML1/SOAP/ArtifactResolution" index="1"/>
        <ArtifactResolutionService Binding="urn:oasis:names:tc:SAML:2.0:bindings:SOAP" Location="https://byuidp.byu.edu:8443/idp/profile/SAML2/SOAP/ArtifactResolution" index="2"/>

        <NameIDFormat>urn:mace:shibboleth:1.0:nameIdentifier</NameIDFormat>
        <NameIDFormat>urn:oasis:names:tc:SAML:2.0:nameid-format:transient</NameIDFormat>
        <SingleSignOnService Binding="urn:mace:shibboleth:1.0:profiles:AuthnRequest" Location="https://byuidp.byu.edu/idp/profile/Shibboleth/SSO"/>

        <SingleSignOnService Binding="urn:oasis:names:tc:SAML:2.0:bindings:HTTP-POST" Location="https://byuidp.byu.edu/idp/profile/SAML2/POST/SSO"/>
        <SingleSignOnService Binding="urn:oasis:names:tc:SAML:2.0:bindings:HTTP-POST-SimpleSign" Location="https://byuidp.byu.edu/idp/profile/SAML2/POST-SimpleSign/SSO"/>

        <SingleSignOnService Binding="urn:oasis:names:tc:SAML:2.0:bindings:HTTP-Redirect" Location="https://byuidp.byu.edu/idp/profile/SAML2/Redirect/SSO"/>
    </IDPSSODescriptor>
    <AttributeAuthorityDescriptor protocolSupportEnumeration="urn:oasis:names:tc:SAML:1.1:protocol urn:oasis:names:tc:SAML:2.0:protocol">
        <Extensions>
            <shibmd:Scope regexp="false">byu.edu</shibmd:Scope>
        </Extensions>
        <KeyDescriptor>
            <ds:KeyInfo>
                <ds:X509Data>
                    <ds:X509Certificate>
MIIDJDCCAgygAwIBAgIVAM7rDFYiAD7ejQynyojPagGeGUuGMA0GCSqGSIb3DQEB
BQUAMBkxFzAVBgNVBAMTDmZpdWlkcC5maXUuZWR1MB4XDTEyMDMxMzEzNTEzNVoX
DTMyMDMxMzE0NTEzNVowGTEXMBUGA1UEAxMOZml1aWRwLmZpdS5lZHUwggEiMA0G
CSqGSIb3DQEBAQUAA4IBDwAwggEKAoIBAQCnubM4QbTQQYvUMNGlVB1uO4xwDlcy
9tyXYqE4sjAFu/Fqjv+C4IkDD1BZy+pI+glAWgftq9Vox/dvC1oMcfuhSxAWB7st
+aBlKusubh7UAQs+2lym/x0i4E30OMrG2MAcO9pZoGJT+xiOTgba+Vd977KzZdOv
o2wAvABy9dJmH+TboHR7w8AOgzQ/QDqOlTq75uMG5fuZhtRAULUKUsMG7niWQCXe
Yf3zGE4hStEXos17DnFWzP7S+BZtaPShkPupLR7A23ZiEg8UMRNtdAzXl5ljbrus
A6UgnbYslO3NTinTUlRzeB79P7iv3tGujsKEZBZM7jnbEaCnYOthhrwlAgMBAAGj
YzBhMEAGA1UdEQQ5MDeCDmZpdWlkcC5maXUuZWR1hiVodHRwczovL2ZpdWlkcC5m
aXUuZWR1L2lkcC9zaGliYm9sZXRoMB0GA1UdDgQWBBQ/EzTBahbswoM9gJhVbmdK
LzJsBjANBgkqhkiG9w0BAQUFAAOCAQEAE/oT8PSELMiKXo9QKG3YiHY5+2QxQBs2
hqUI3HpTrRCegfQMc8ymCp3nWU6MMa/R2JxPyekKHTCJyrBvYv8FT/sBPnRXXLHV
bfZk10puNnuILfkT8vsdd3fBJ1/dBWd2Aop5axWdPCse2zB8ChJ1ImrhCu8fhI1T
H4Rqr8AkOIuUXRvDvlOj6PUP6J1luFFcQZl5v+uREv5Pih8W5NhKY+ENPrFX2g59
iWZ7NojDxss/TtqsvGDbMHlt3PNg/FC6rHlcW9gH0qudXf1wLh8u+quX/7mGGvIv
FfPU6B1stKoyNoo42HbUm+KOc8S3L3yaxGZfWtL8kNhY0hSXrYI13w==
                    </ds:X509Certificate>
                </ds:X509Data>
            </ds:KeyInfo>
        </KeyDescriptor>
        <AttributeService Binding="urn:oasis:names:tc:SAML:1.0:bindings:SOAP-binding" Location="https://byuidp.byu.edu:8443/idp/profile/SAML1/SOAP/AttributeQuery"/>

        <AttributeService Binding="urn:oasis:names:tc:SAML:2.0:bindings:SOAP" Location="https://byuidp.byu.edu:8443/idp/profile/SAML2/SOAP/AttributeQuery"/>

        <NameIDFormat>urn:mace:shibboleth:1.0:nameIdentifier</NameIDFormat>
        <NameIDFormat>urn:oasis:names:tc:SAML:2.0:nameid-format:transient</NameIDFormat>

    </AttributeAuthorityDescriptor>
<Organization>
        <OrganizationName xml:lang="en">Brigham Young University</OrganizationName>
        <OrganizationDisplayName xml:lang="en">Brigham Young University</OrganizationDisplayName>
        <OrganizationURL xml:lang="en">http://www.byu.edu</OrganizationURL>
</Organization>
<ContactPerson contactType="technical">
    <GivenName>Shibboleth</GivenName>
    <SurName>Tech</SurName>
    <EmailAddress>idpadmins@byu.edu</EmailAddress>
</ContactPerson>
<ContactPerson contactType="support">
    <GivenName>Shibboleth</GivenName>
    <SurName>Support</SurName>
    <EmailAddress>idpadmins@byu.edu</EmailAddress>
</ContactPerson>
<ContactPerson contactType="administrative">
    <GivenName>Shibboleth</GivenName>
    <SurName>Admin</SurName>
    <EmailAddress>idpadmins@byu.edu</EmailAddress>
</ContactPerson>

</EntityDescriptor>
|
Step 2: Download Lead Liaison's SP Metadata
A download URL will be provided to you once your IdP metadata has been provided to Lead Liaison and the service has been initially provisioned.
- Example direct download: https://app.leadliaison.com/simplesaml/module.php/saml/sp/metadata.php/default-sp
- Example access from web page: https://app.leadliaison.com/simplesaml/module.php/saml/sp/metadata.php/default-sp?output=xhtml
Step 3: Find IdP Initiated URL in your IdP Metadata, Provide to Lead Liaison for use in our Database
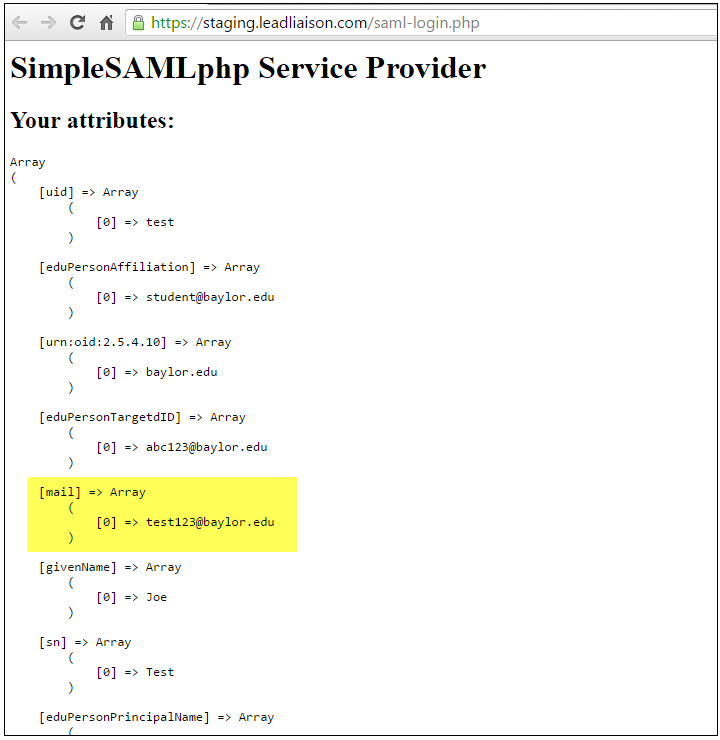
- Find the Identity Provider Authentication (idp) initiated URL. In the below code, the URL we're using is highlighted.
- This will be the URL to send the customer to after logging in through single sign on.
Step 4: Lead Liaison will add your IdP Metadata to Lead Liaison's Config File
Lead Liaison will copy the contents of your IdP metadata and paste it into the config script in SimpleSAMP php.
Step 5: Validate
Here's what the experience will look like:
https://byuidp.byu.edu/idp/profile/SAML2/POST/SSO?spentityid=https://staging.leadliaison.com/simplesaml/module.php/saml/sp/metadata.php/default-sp&RelayState=https://staging.leadliaison.com/saml-login.php
| Widget Connector | ||
|---|---|---|
|
Step 5: Receive Array Values and Login
After a successful authentication the identity provider returns an array of values, which we use in our application to validate the user and sign them in.
Available Attributes to Send to Lead Liaison
There should be an array with the following attributes that Lead Liaison will use for each user. Each attribute is explained below:
first_name (optional): The Lead Liaison user's first name
last_name (optional): The Lead Liaison user's last name
email (required): The Lead Liaison user's email
login_name (optional): The Lead Liaison user's login name. If empty the system will use email as the login name
is_active (optional):
If empty then the user will be created and activated. An activation email will be sent to the user.
If not empty and has a value equals 0, then the user will be created but not actived and no activation email will be sent. A default error message will be shown.
If not empty and has a value not equal to 0, then the user will be created and activated. An activation email will be sent to the user.
sp_id (optional): The Lead Liaison Security Profile ID. If empty the system will use the default Security Profile ID per your company settings page, which is set to admin by default but can be changed. To assign a specific Security Profile use the ID of any of your Security Profiles. Get the ID from the edit Security Profile page (see screenshot below)
title (optional): The title of the user.
Notes:
When a successful authentication occurs and is forwarded to Lead Liaison our system will try to match the authentication to a Lead Liaison user (using the login name or email). If found, it will log the user into Lead Liaison.
If no user was found, then the system will check the setting to enable the customer to create new Lead Liaison users. The system checks the customer setting as well. If both settings are enabled, then the system will try to parse the attributes and create a Lead Liaison user; otherwise, an error message will occur.
Please integrate our metadata file to your backend system and provide us with the username/password that we can use to authenticate to your backend system. Make sure to provide the attributes above with the authentication process for our system to use.
- We will test the implementation first on our staging environment before releasing to production so it is ready for your users.
Logging into Lead Liaison with Single Sign On
- Go to the login page and click the link at the bottom to login with SSO.
- Enter any email with your company's domain (yourdomain.com).
- The user will be redirected to your company's servers for authentication. After being authenticated, the user will be redirected back to Lead Liaison.
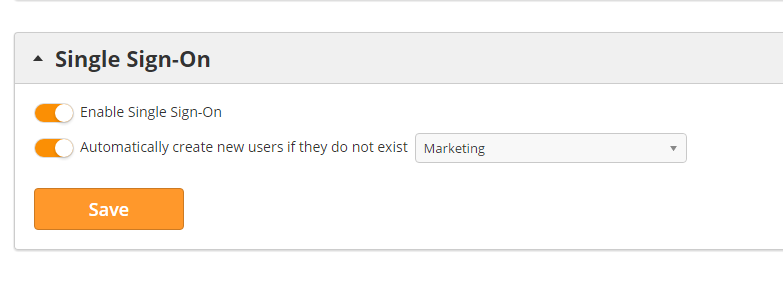
- If the authentication information matches a user in your Lead Liaison account, then the system will automatically log them in. However, if the authentication information does not match an existing Lead Liaison user, then this will automatically create a new Lead Liaison user with a Security Profile of "Marketing" (see screenshot below).
- To change the Security Profile for new users navigate to Admin > Account > Settings > Single Sign-On and change the dropdown as shown below.
- To enable creation of new users if they do not exist yet in Lead Liaison, navigate to Admin > Account > Settings > Single Sign-On and turn the switch off. The default setting is off.
Direct Login URL
After setting up SSO, you will be able to use your direct login URL, which is your normal login URL followed by "/login-sso.php", for example, microsoft.leadliaison.com/login-sso.php.
Known Process Improvements
- Cookie browser to automatically log authenticated user in each time.
- Use subdomain for customers, such as byu.leadliaison.com, to know who the client is and automatically identify IdP based on client instead of reading domain value in email when customer is trying to login (like box.com example).
Testing on Staging
Tests can be run using Lead Liaison's staging environment: http://repository.leadliaison.com/leadliaison/Step2-Promote-from-Release-Server-to-Staging-Server.php, you'll need to coordinate with our support team.
| Tip |
|---|
SSO also applies to the Captello mobile app |
Process Summary
Below is a summary of the process:
Add a Dummy Entry: Create a placeholder (dummy) entry for Lead Liaison in your SSO platform (e.g., Okta, Entra, OneLogin, etc.). Once done, provide our support team with the Identity Provider (IdP) metadata associated with this entry.
Metadata Parsing: Our team will extract the EntityID and signing certificates from the IdP metadata you provided.
SP Metadata Creation: We will generate our Service Provider (SP) metadata and send it back to you. You will then need to extract the Assertion Consumer Service (ACS) URL and login URLs from this metadata and input them into your SSO platform.
SSO Account Options
Once you have SSO setup and validated, you have a handful of options in your account settings. You can get there by clicking the gear in the top right (Setup), Followed by Settings from under the Account section of the Setup Menu.
...
Once the Account Settings is open, you should see a grouping for Account which contains many settings for password enforcement, login page setup and general account defaults.
For SSO the options here that are useful are:
Allow login with Google - If you are using SAML based SSO, you can turn this option off as you do not need the Sign In with Google button on your login page.
Allow reset password - You can turn this off if you want your system to be SSO logins only. As authentication is using your system they do not need passwords on our side making the reset password redundant. If you wish to allow resetting password as a break glass, you can add a security group who is still allowed to use passwords. If someone is part of that group they must visit https://app.captello.com to sign in and/or reset password instead of your usual sign-in portal link.
Allow login form - Like reset password, if you are SSO only you can turn this off so people can not sign in using username/password. It will provide the option for setting up a break glass security group, and like reset password members who need to sign in using login/password and who are part of that security group must sign in from https://app.captello.com
Allow SSO - This should already be turned on if you have finished SSO setup with us, however, if you ever need to turn off the SSO capabilities, you can toggle the link for signing in with SSO off here.
There is a second group for SSO specific options
Enable Single Sign-On - This turns on or off the ability to sign into our system using the configured SSO
Automatically create new users if they do not exist - If this is toggled on, we will automatically create new users in our system if they have passed SSO authentication, but do not have a user existing in our system.
User Type - Lets you specify what type of user the automatic accounts are, the options are standard (website), Exhibitor (an exhibitor portal user), or Capture Portal (a user who can view only transcriptions for translations)
Security Profile - Lets you setup which security profile the automatically created users will have by default.
Authentication Settings for Mobile
From 'Setup > Events > Capture':
...
The following settings are available for the mobile app SSO:
Enable sign-in with an Auth Code: Disable this option to prevent users from signing in without SSO.
Enable using the "Forgot Auth Code" option in the mobile app
Enable SSO login to the mobile app.
...


