...
Each component is explained in detail below.
Lead Distribution Action
The lead distribution action is part of the automation process. It's located in Step 2 of the configuration wizard. To locate the Distribute Lead action do the following
- Go to the Design tab
- Create a new Automation (left-hand menu)
- On Step 2 (Define Actions) drag/drop the Distribute Lead action to the canvas
Based on any number of explicit or implicit criteria leads may be distributed using the Distribute Lead action in one of three ways. Leads may be sent to:
- a specific User
- Sends a lead directly to the selected User
- This use case is helpful if you know who you want to send the lead to based on the defined criteria in Step 1 of your Automation program.
- Lead Liaison's Assignment Rules
- Sends a lead through the Assignment Rules engine
- Assignment Rules are setup by your company. See the list of rule criteria that may be used in Assignment Rules.
- This use case is helpful when you need to distribute leads based on company size, location or name (for Major Account Managers supporting assigned accounts)
- Lead Liaison's Distribution Rules
- Sends leads through a specific Distribution Rule
- This use case is helpful when you do not need to distribution leads based on company size, location or name (Assignment Rule criteria). Instead, you'd like to distribute leads only to a specific User, round robin, based on performance or take a User's/sales person's load (# of opportunities and/or # of leads they're managing) into consideration.
| Info | ||
|---|---|---|
| ||
Assignment Rules and Distribution Rules can work together to provide advanced lead distribution methods. For example, distributing leads based on location as well as performance. To do this, select the Distribution Rule in the drop down box in the Assignment Rule tab. |
User/Team Filters
User/Team Filters are used to not distribute leads to (or "skip") individual Users, or Users on a Team, who have a high number of leads and/or opportunities they are working. Using User/Team Filters is an intelligent way to distribute the load of leads across your organization.
| Info | ||
|---|---|---|
| ||
User/Team Filters are global across your organization. Once defined, they can be activated per Distribution Rule. They are not applied by default. To apply User/Team Filters to a Distribution Rule check the "Apply User/Team Filters" check box when building a Distribution Rule. |
Two Filters are available:
- Opportunity Filter
- Lead Filter
When enabled, an Opportunity Filter will not distribute a lead to a User/Team who meets the specified criteria. Criteria may be defined for each Filter as follows:
Lead Filter
Lead Filters will not distribute leads to users that meet the defined lead criteria. For example, to not distribute leads to users that have 20 or more open leads select "greater than or equals" from the drop down and enter 20 in the field. Lead Liaison can also apply Lead Status to the lead criteria. To use Lead Status criteria click the gear and enter the Lead Status. In the use case above, select "equals" from the drop down and enter "Open" in the text field.
Use the following operators to apply to the number of leads used in this Filter:
- equals
- does not equals
- less than
- less than or equals
- greater than
- greater than or equals
- empty
- not empty
Use the following operators to apply to the Lead Status (text value) used in the Filter:
- equals
- does not equals
- empty
- not empty
- contains
- does not contain
- starts with
- does not start with
- ends with
- does not end with
Opportunity Filter
Opportunity Filters will not distribute leads to users that meet the defined opportunity criteria. For example, to not distribute leads to users that have 10 or more open opportunities select "greater than or equals" from the drop down and enter 10 in the field. Lead Liaison can also apply Opportunity Stage to the opportunity criteria. To use Opportunity Stage criteria click the gear and select the Opportunity Stage from the drop down. In the use case above, select "is" from the drop down and "Open" in the drop down field at the end.
Use the following operators to apply to the number of opportunities used in this Filter:
- equals
- does not equals
- less than
- less than or equals
- greater than
- greater than or equals
- empty
- not empty
Use the following operators to apply to the Opportunity Stage used in the Filter:
- is
- is not
- is any
| Info | ||
|---|---|---|
| ||
There are three available Opportunity Stages to choose from: Open, Closed/Won and Closed/Lost. Many CRMs such as Salesforce.com use these Opportunity Stages. To support Lead Liaison's integration with CRMs we've used these three stages. |
Building a User/Team Filter
To build a User/Team Filter do the following:
- Go to Administration > Lead Distribution > User/Team Filters tab
- Click the Create New User Filter or Create New Team Filter button
- Give the User/Team Filter a name and select and/or logic. The "Use OR operator between Filters" will not distribute leads to Users who meet any of the enabled criteria. The "Use AND operator between Filters will not distribute leads to Users who meet all of the enabled criteria.

- Check the box next to the respective Filter to enable the Filter. Leave it unchecked to disable the Filter. Disabled Filters will not be applied.

- Enter the appropriate criteria per the Lead/Opportunity Filter section defined above.
- Select the User/Team you'd like to associate with the Filter. To apply the Filter(s) to more than one User/Team click the green plus sign. Similarly, when one or more Users/Teams are applied they may be removed by clicking the minus sign.
- Click the Save button.
Managing Filters
User/Team Filters can be individually turned on/off. When a User/Team Filter is turned off it will not be included/ignored when distributing leads. This option allows organizations to build various User/Team Filters and selectively enable/disable them based on business needs. To turn a User/Team Filter on/off do the following:
- Go to Administration > Lead Distribution
- Click the User/Team Filters tab
- Turn each User/Team Filter on/off as needed

Performance Metrics
Performance Metrics provide a way for organizations to distribute leads based on the best performing sales reps (Users). For example, send a lead to the sales person with the most opportunities closed greater than $10,000 in the past 30 days. Lead Liaison offers the Performance Metrics below. More Performance Metrics may be added in the future as the software has been designed to scale to accommodate additional metrics.
- Opportunity Conversion = Highest opportunity to won conversion rate. The formula is calculated as follows: Total # of opportunities with opportunity filters applied and "Type = Closed/Won" / Total # of opportunities with opportunity filters applied
- Lead Conversion = Highest lead to opportunity conversion rate. The formula is calculated as follows: Total # of opportunities with opportunity filters applied / Total # of leads with lead filters applied
| Note | ||
|---|---|---|
| ||
Calculations on Performance Metrics are done initially when the Performance Metric is saved. After the initial save, Performance Metrics are calculated once per day. |
Let's look at the following scenario to better understand how Performance Metrics work. Suppose a Performance Metric has 4 Users and 2 conversions (Opportunity Conversion and/or Lead Conversion). Assume the following calculations:
Conversion #1:
User 1 -> 90%
User 2 -> 90%
User 3 -> 30%
User 4 -> 90%
Since the conversion rate between user 1, 2 and 4 are the same we calculate Conversion #2 for User 1, 2 and 4.
User 1 -> 20%
User 2 -> 60%
User 4 -> 60%
Therefore, the priority for distributing leads is as follows:
User 2 -> order = 1
User 4 -> order = 1
User 1 -> order = 2
User 3 -> order = 3
| Info | ||
|---|---|---|
| ||
If there is a tie in priority then a lead is distributed in Round Robin fashion only to users who are tied in priority until the priority changes. Priorities may change once the Performance Metric is re-calculated; however, as long as there is a tie Round Robin distribution will occur. |
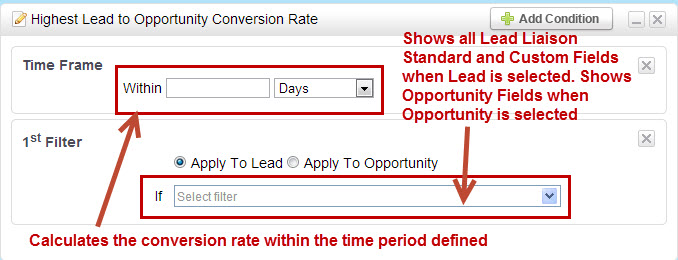
Opportunity Conversion
The Opportunity Conversion metric measures how successful a user (sales person) is at converting opportunities into closed/won status.
| Info | ||
|---|---|---|
| ||
Click "Add Condition" to add sub-criteria to the conversion. Only one "Time Frame" sub-criteria may be added (marked grey once added); however, multiple "Filter" sub-criteria may be added. |
When adding a sub-filter for an Opportunity Conversion metric Lead Liaison allows several opportunity fields to be selected to further refine the criteria. The following opportunity fields may be selected:
- Amount
- Close Date
- Closed
- Deleted
- Lead Source
- Name
- Next Step
- Opportunity Type
- Probability (%)
- Stage
- Won
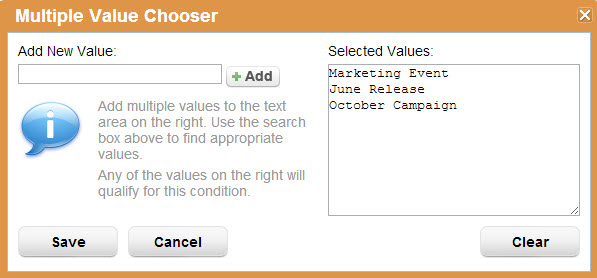
To add more than one value to a filter click the green plus which will open the multi-value chooser as shown below:

Lead Conversion
The Lead Conversion metric measures how successful a user (sales person) is at converted leads into opportunities.
| Info | ||
|---|---|---|
| ||
Click "Add Condition" to add sub-criteria to the conversion. Only one "Time Frame" sub-criteria may be added (marked grey once added); however, multiple "Filter" sub-criteria may be added. |
Building Performance Metrics
To build a Performance Metric do the following:
- Go to Administration > Lead Distribution
- Click the Performance Metrics tab
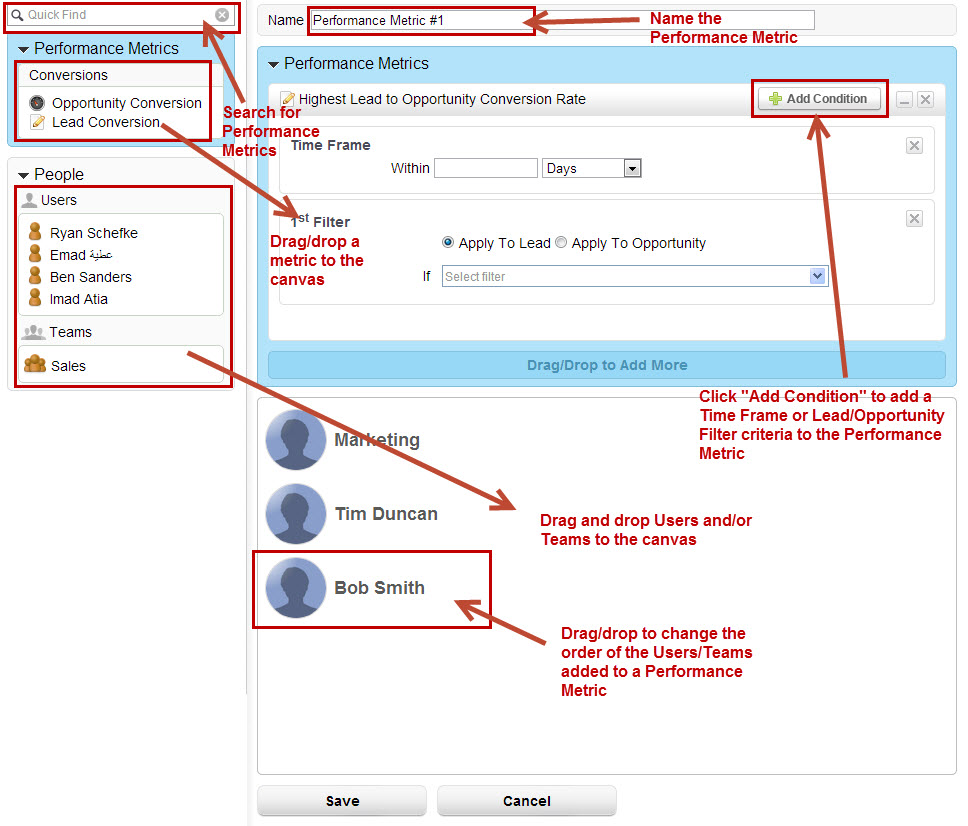
- Click the Create New Performance Metric button
- Enter a name for the Performance Metric
There are two components of a Performance Metric. The Performance Metric itself and the Users and/or Teams who the Performance Metric applies to. On the Performance Metric builder, drag/drop the desired Performance Metric and Users/Teams to the canvas on the right. Performance Metrics are added to the blue section while Users/Teams are added to the grey section.
| Info |
|---|
More than one conversion metric may be added to the Performance Metric. Lead Liaison calculates Performance Metrics from top to bottom. The order of Users/Teams may also be changed (drag/drop); however, the order has no bearing on the results of the Performance Metric. |
Managing Performance Metrics
Performance Metrics can be individually turned on/off. When a Performance Metric is turned off it will not be included/ignored when distributing leads. This option allows organizations to build various Performance Metrics and selectively enable/disable them based on business needs. To turn a Performance Metric on/off do the following:
- Go to Administration > Lead Distribution
- Click the Performance Metrics tab
- Turn each Performance Metric on/off as needed
...
Distribution Rules
Distribution Rules allows organizations to select from one off three distribution methods
- directly to a User
- Round Robin to a team
- using Performance Metrics
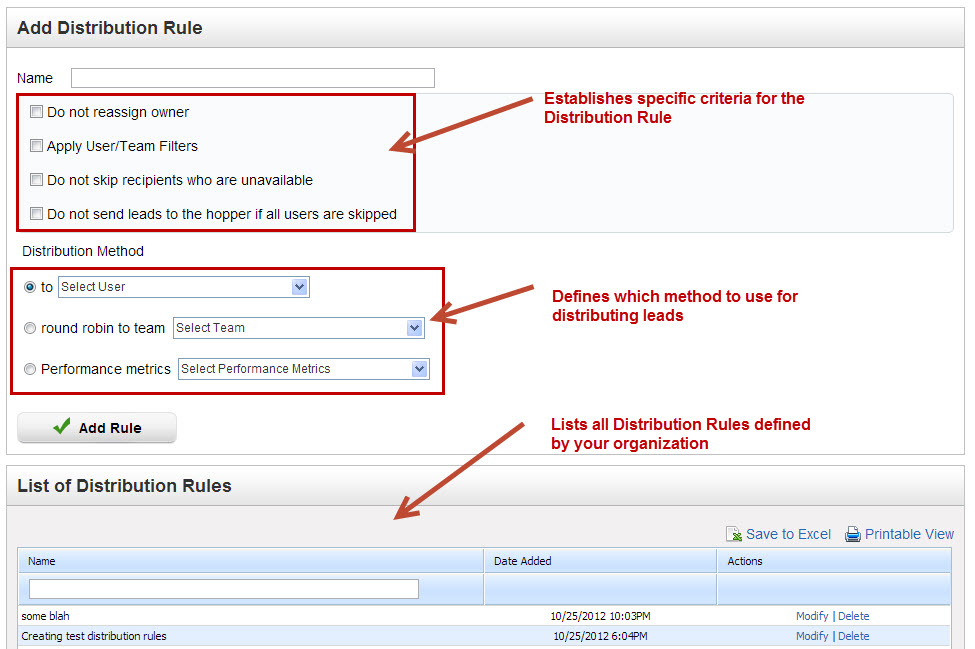
When building an Assignment Rule associate it with a Distribution Rule or define a Distribution Rule and use the Distribute Lead action to distribute the lead directly to the Distribution Rule criteria. To create a new Distribution Rule do the following:
- Go to Administration > Lead Distribution
- Click the Distribution Rules tab
- Select criteria and Distribution Method then click the Add Rule buttonThe following criteria may be applied to each Distribution Rule
- Do not reassign owner = If a Lead Owner already exists then the lead will not be reassigned.
- Apply User/Team Filters = Applies User/Team Filters that are enabled to the Distribution Rule. See the User/Team Filters section for more information.
- Do not skip recipients who are unavailable = If checked then the system will not skip over Users who have the Unavailable option set to "yes" in their profile settings. If this setting is left unchecked then Users who have the Unavailable option set to "yes" in their User Profile will not receive distributed leads if this Distribution Rule is executed.
- Do not send leads to the hopper if all users are skipped = If this option is checked then the system will not send leads to the hopper if all users are skipped (from User/Team Filters).
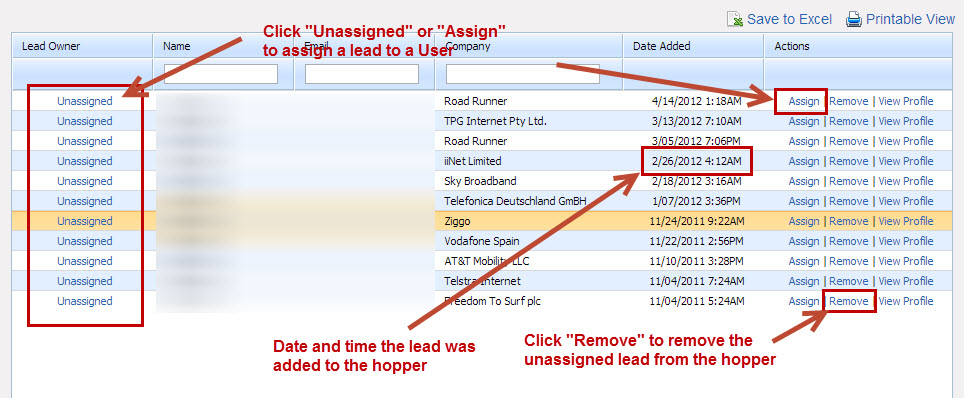
Hopper
The Hopper is equivalent to a "shark tank". It's a repository for leads that could not be distributed. The Hopper is an excellent source of new leads for "hungry" sales people. The Hopper queues up leads for anyone to claim. Marketers or sales people can access the Hopper to assign a lead to themselves or to their colleagues. The Hopper will only show Unassigned leads. Once a lead is assigned the recipient (unless assigned to yourself) will receive a Lead Distribution notification via email and the lead will disappear from the Hopper. To access the Hopper do the following:
- Go to the Sales tab
- Click Hopper in the left-hand menu
Alternatively, access the Hopper through the Alert Center by:
- Clicking on the number to the left of your name
- Then click Hopper from the drop down menu

Once inside the Hopper you can search for leads, remove them from the Hopper, assign them to sales, export them, view their profile and more. See the screen shot below:
Implementing SLAs
Service Level Agreements (SLAs) allow organizations to ensure leads are followed up with in reasonable time. To define a SLA setup a new Automation action by doing the following:
- Go to the Design tab
- Click the green plus next to Automation on the left-hand menu
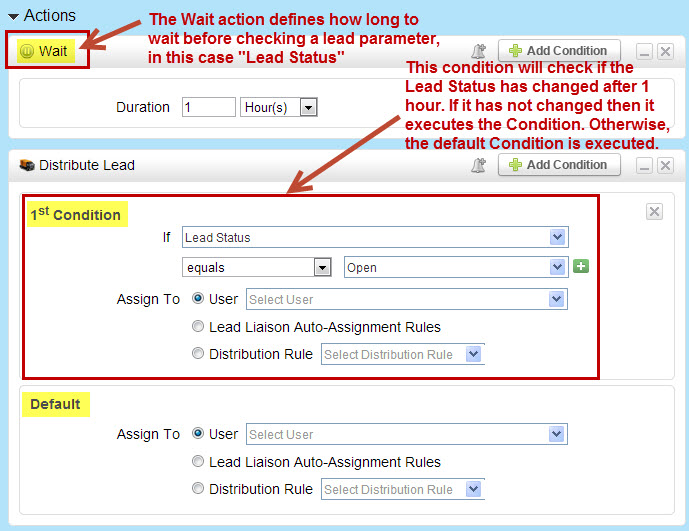
- In Step 2 (Define Actions) search for "Wait" to add a wait-state
- Then add a "Distribute Lead" action along with a Condition
See the screen shot below for an example of an SLA that monitors Lead Status after one hour.
| Info |
|---|
Each action will only execute one time on a prospect. |