| Info |
|---|
This document explains the steps required to connect Lead Liaison with your Salesforce.com Group Edition account. |
| Table of Contents |
|---|
Installation Overview
Lead Liaison is installed into Salesforce.com in five easy steps. Here's an overview of the installation process.
- Setup a CRM sync user by adding your CRM credentials into Lead Liaison
- Install the Lead Liaison for Salesforce.com package
- Add fields to your Lead/Contact layout in SFDC
- Create custom fields in Lead Liaison
- Configure Lead Liaison and sync your Salesforce.com data to Lead Liaison
Lead Liaison's Salesforce.com package will make the following changes to your Salesforce.com account:
...
Connecting Salesforce.com to Lead Liaison
Follow these step by step instructions to connect your Salesforce.com account to Lead Liaison.
Step 1: Add CRM Sync User
Lead Liaison requires one Salesforce.com user account be used as a sync account. The sync account is the account used to send data bidirectional, from Salesforce.com to Lead Liaison and from Lead Liaison to Salesforce.com. The sync account is required for operation and has no material impact on leads, contacts, opportunities or any other event.
| Note |
|---|
Salesforce.com suggests updating passwords every 90 days. If credentials for the sync account expire then syncing between Lead Liaison and Salesforce.com will fail. We suggest using a Salesforce.com Admin user as the sync account to use with Lead Liaison. See the section below called "Salesforce.com Password Profiles" for tips on how to set the password to never expire on your Salesforce.com user account. |
Follow these steps below to enter your CRM sync user:
- Login to Lead Liaison at https://app.leadliaison.com/login.php (use the account you'd like to use as your sync user (usually Lead Liaison Admin)
- Go to Settings > Connectors
- Under the CRM section enter your Salesforce.com credentials. Your password is your CRM password followed by your security token. See this post on Salesforce.com for help finding your security token.
If you try to connect Salesforce.com to Lead Liaison without entering in a sync user by going to Settings > Administration > CRM you'll see a prompt like the one below. Click the 'here' link to enter in a sync user.

Once you've connected your Lead Liaison account to your Salesforce.com account successfully you'll see a success prompt like this:
...
Step 2: Install and Configure Salesforce.com Plugin
Install URL
Lead Liaison's Salesforce.com plugin is live on Salesforce's AppExchange portal. Access the plugin here: http://appexchange.salesforce.com/listingDetail?listingId=a0N30000009vFlTEAU
| Info | ||
|---|---|---|
| ||
Obtain the package password from your Lead Liaison Revenue Performance Specialist. |
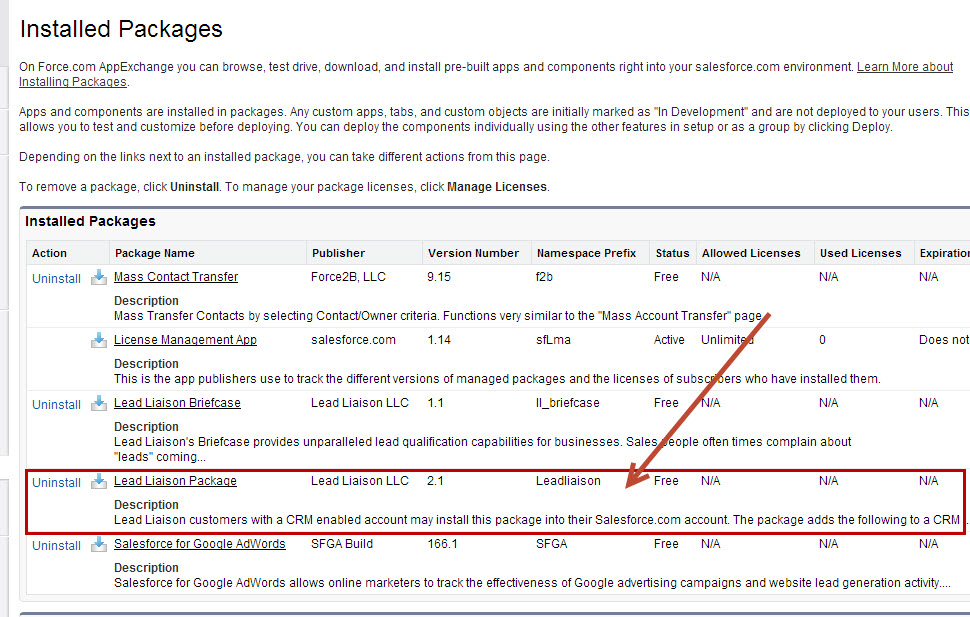
- To view the package contents at a later point show all installed package contents under Setup > Develop > Installed Packages
Step 3: Add Lead Liaison's custom fields/sections to your SFDC layout
...
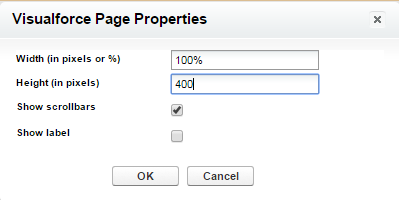
- Set the Page Properties as follows:
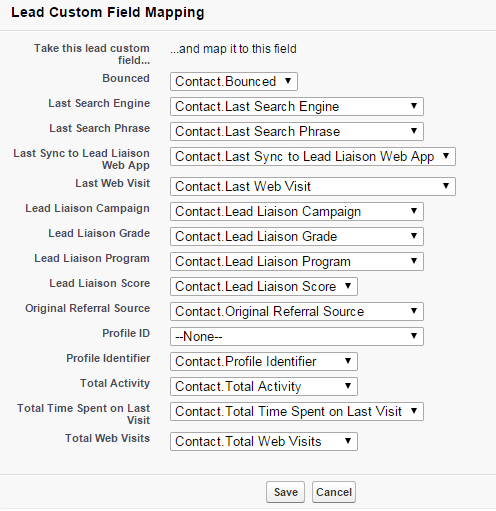
Step 4: Map Lead Custom Fields to Contact Custom Fields
Next, map the custom fields added by the Lead Liaison plug-in. Mapping custom fields ensures information added to a Lead is transferred to a Contact when the lead is converted in Salesforce.com. To map fields do the following:
- Go to 'Setup' > 'Customize' > 'Leads' > 'Fields'.
- Scroll to the bottom and click the "Map Lead Fields" button in the "Lead Custom Fields & Relationships" section.
- Map each custom Lead field to the related Contact field. Your results should look similar to the image below:
| Note | ||
|---|---|---|
| ||
Make sure to map all the custom fields added by Lead Liaison package (Lead Liaison Score, Total Activity, Total Web Visits, Total time spent on last visit, Last Sync to Lead Liaison Web App, Last Web Visit, Last Search Engine, Last Search Phrase, Original Referral Source, Bounced and Profile Identifier) |
| Info | ||
|---|---|---|
| ||
Map only the "Profile Identifier" field. Do not map the "Profile ID" field. Lead Liaison adds the Profile Identifier field automatically. This field is a formula that builds the hyperlink for the Profile ID. By mapping the Profile Identifier Salesforce.com will automatically map the Profile ID value for you. |
...
Step 5: Create Custom Fields in Lead Liaison
...
Complete Lead Liaison's CRM Configuration Wizard:
Lead Liaison synchronizes data between Lead Liaison's local database and Salesforce.com in real-time. To configure your CRM settings for Lead Liaison:
- Login to Lead Liaison at https://app.leadliaison.com/login.php
- Click Settings > Administration tab in Lead Liaison.
- Click the CRM button on the left hand menu.
- Follow the wizard step by step to get your CRM account configurations complete
| Info |
|---|
Step 1: Select Edition and Default Sync Options |
...
Enable automatic lead creation (optional)
Lead Liaison offers the ability to automatically create a lead in Salesforce.com from visitors to your website that come from Connector (E-mail Marketing solution) or Send & Track (Microsoft Outlook Plug-in).
- Login to Lead Liaison at https://app.leadliaison.com/login.php
- Click Settings > Setup on the top of the page.
- Under "Admin Settings" section, click 'Account settings'.
- Check the check boxes next to "Auto-create CRM lead from email campaigns" and "Auto-create CRM lead from Send & Track emails" to enable automatic lead creation.
Setting up additional users
Have each user add their CRM credentials inside Lead Liaison. Provide instructions to your users to add their CRM credentials. Adding their CRM credentials allows the Lead Liaison user to:
- Automatically sync leads to their Salesforce.com account
- Export professional contacts to their Salesforce.com account
- View Salesforce.com contacts and leads within Lead Liaison
- ...and view many additional sync features
| Tip |
|---|
Congratulations, you're done! |
Removing Fields
Removing SFDC Custom Fields
...
Removing the Lead Liaison Package
- First, remove all dependencies. Dependencies must be removed first before uninstalling. For example, assigning the Lead Liaison Lead Layout to a profile is a dependency. Change the layout profile to another profile or the standard profile first.
- Inside Salesforce.com go to 'Setup' > 'View Installed Packages'. If there are any dependencies removal will fail.